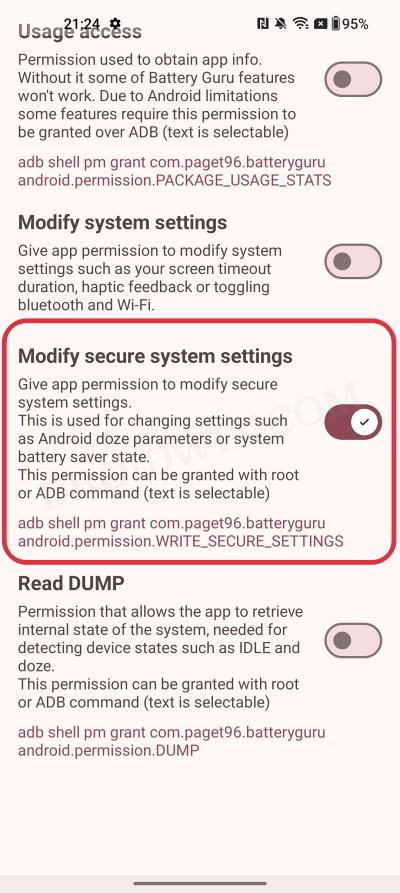
In this guide, we will show you the steps to give an app the WRITE_SECURE_SETTINGS permission without using your PC or root. Executing a few lines of ADB shell commands or gaining administrative access by rooting your device via Magisk are usually the two approaches that many users opt for. While they get the job done, they might not be in sync with everyone’s requirements.
Whereas the first method requires the use of a PC, the second method needs a rooted smartphone. So is there any alternate way out? Well, turns out there is one, granted your device is running Android 11 or higher versions. Using the Wireless ADB Debugging feature, this guide will show you the steps to give an app the WRITE_SECURE_SETTINGS permission on your Android device. So without further ado, let’s get started.
Table of Contents
Give any app WRITE_SECURE_SETTINGS without PC or Root
METHOD 1 [New]
- First off, download and install a Terminal app. We are using Termux.
- Give the terminal app the file permission access as well.
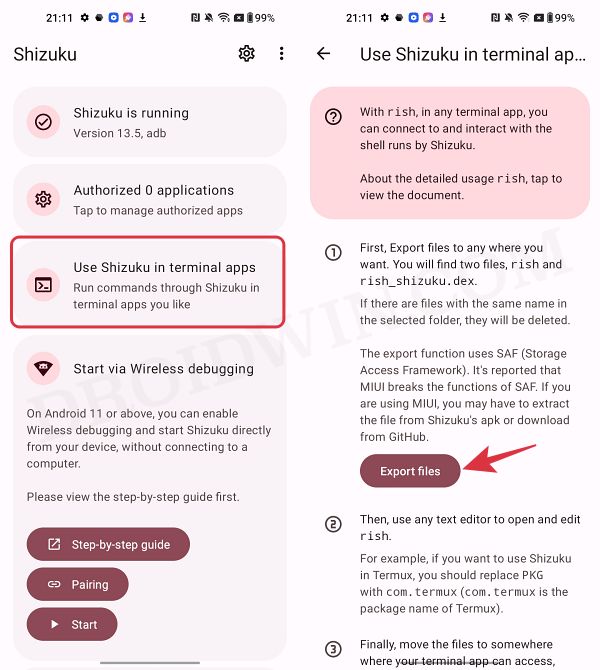
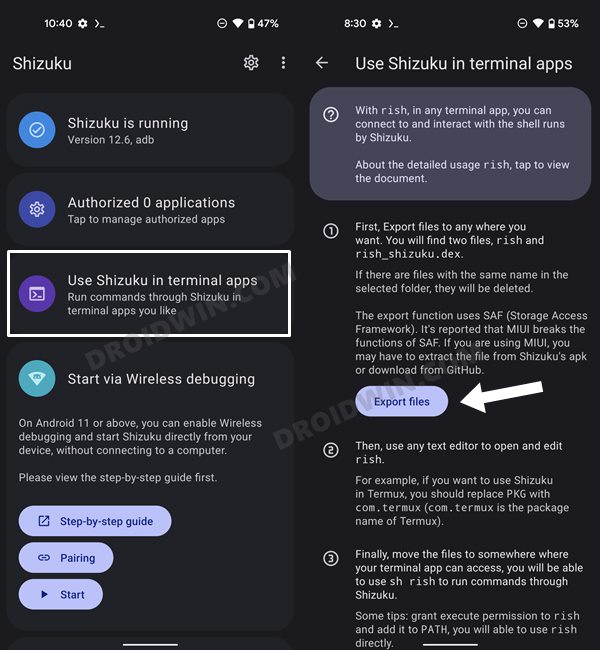
- After that, set up and enable Shizuku on your device.
- Once enabled, tap on Use Shizuku in Terminal Apps > Export Files.

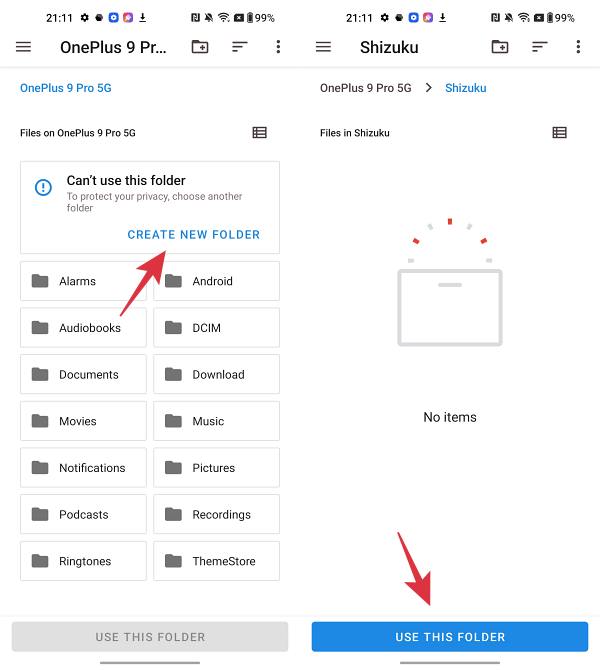
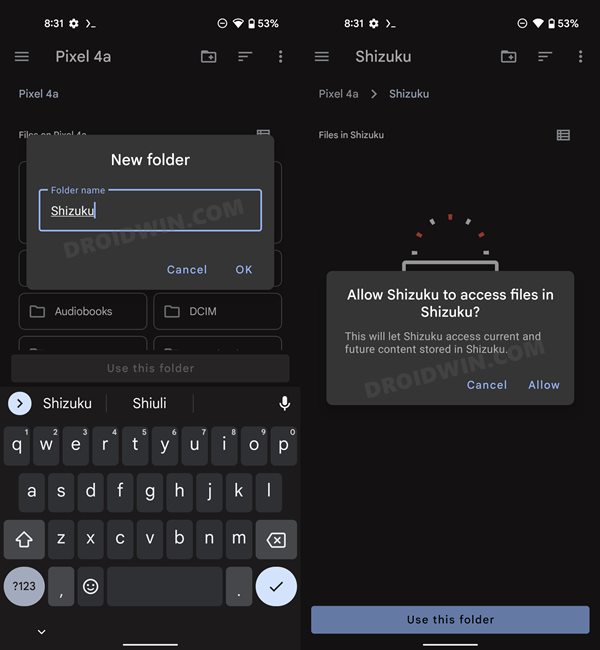
- Now select the desired folder [or create a new one] and select Use this Folder.
- We have created a new folder named Shizuku inside Internal Storage and using it.
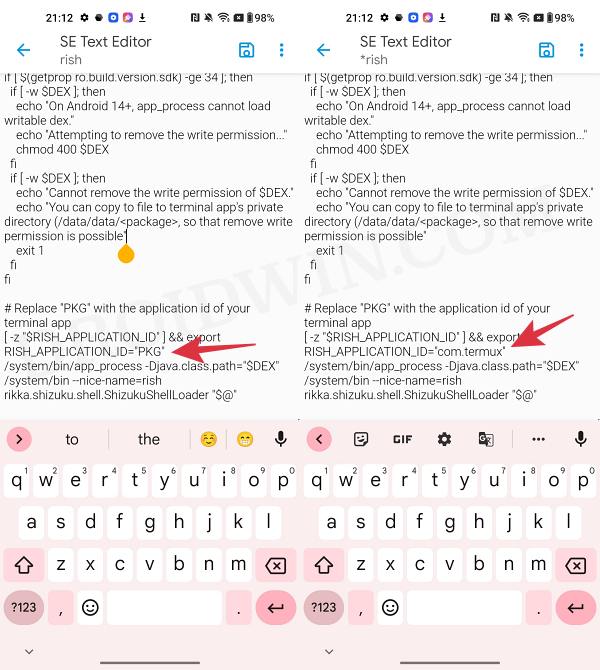
- Now go to this folder via a File Manager app and open the ‘rish’ file via a text editor.
- We are using Solid Explorer as it comes built-in with a text editor.
- Then replace the PKG keyword with the app package of your terminal app and hit Save. In our case, it is com.termux.
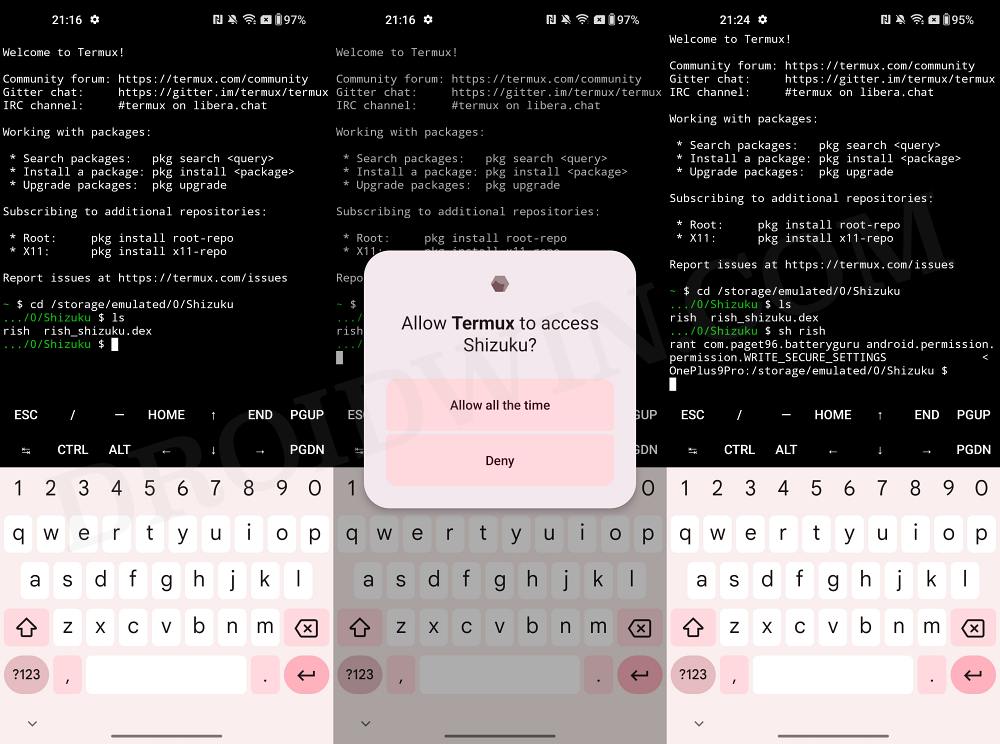
- Now open Termux and change the directory [via cd command] to the folder where the ‘rish’ file is present.
- In our case, the file is present in Internal Storage > Shizuku folder, so the entire command will be:
cd /storage/emulated/0/Shizuku - You could use the ‘ls’ command and verify that it is showing the ‘rish’ file.
- if that’s well and good, then type in the below command:
sh rish
- You’ll now get a Shizuku prompt, tap on Allow.
- Finally, type in the desired adb command in the Termux window [without adb or shell keywords] and hit Enter.
- Now go to the desired app and you’ll now be able to enable the desired feature right away.
That’s it. These were the steps to give an app the WRITE_SECURE_SETTINGS permission without using your PC or root. Do note that you just need to carry out these steps once for an app, until you uninstall and reinstall that app. on that note, we round off this guide. all your queries are welcomed in the comments section below.
METHOD 2
- To begin with, download and install the Shizuku app from Play Store. This app will be used to grant the WRITE permissions.
- Next up, download and install the Termux app. It is a terminal emulator app that will be used to execute a couple of commands.
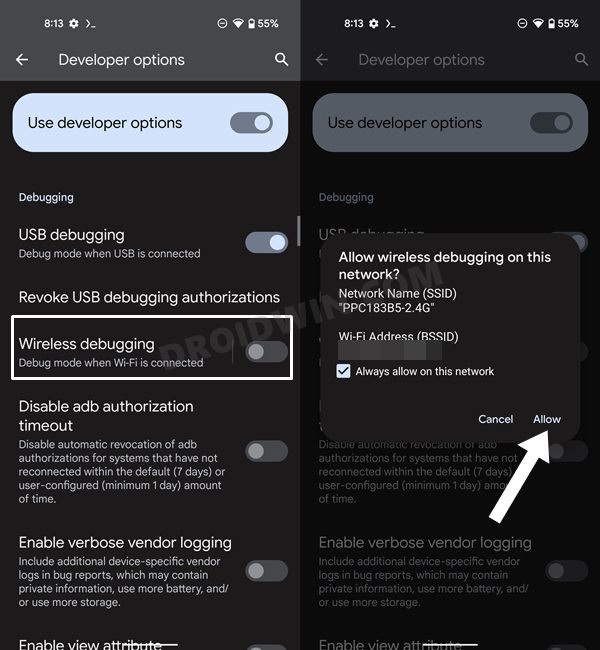
- Now enable Developer Options on your device and then enable the toggle next to Wireless Debugging.
- Lauch the Shizuku app and tap on the Pairing button > Developer Options.
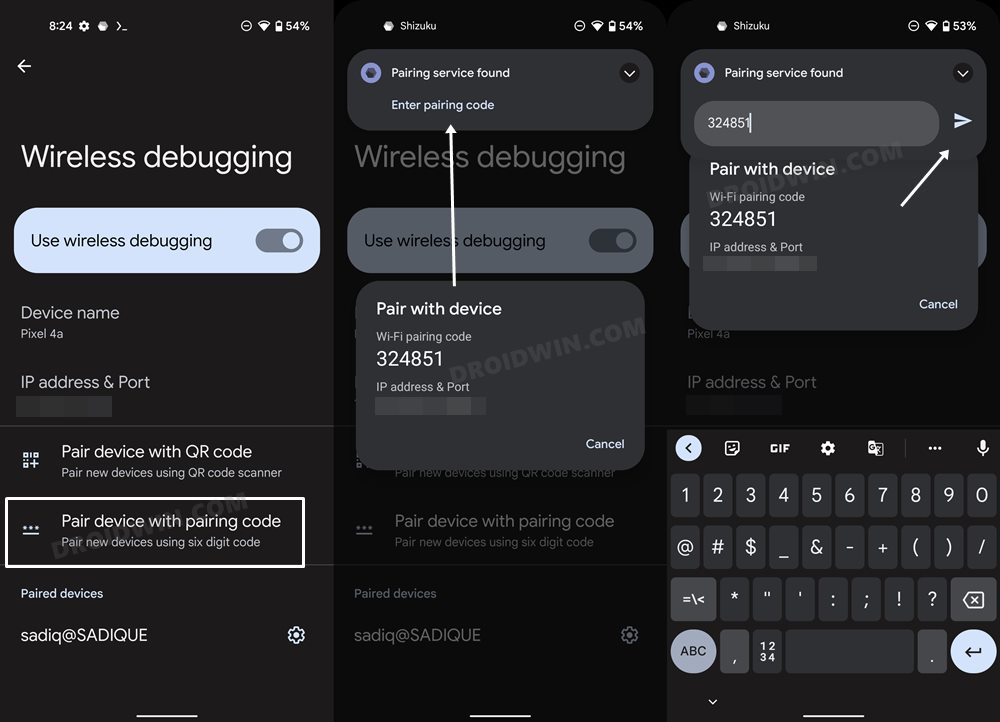
- Go to the Wireless Debugging section and then tap on Pair device with pairing code.
- You will now get a pairing code. Type it in the Shizuka dialog box that appears at the top of your screen.
- Now go back to the Shizuku app and tap Start. Go to Use Shizuku in terminal apps and tap on Export.
- Then create a new folder, name it Shizuku, and tap on Allow > Use this folder.
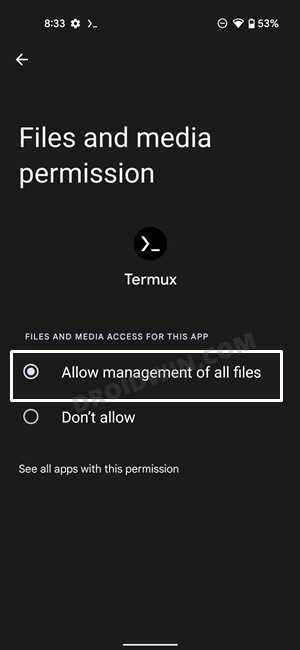
- After that, go to Settings > Apps > Termux > File and Media Permission and select Allow.
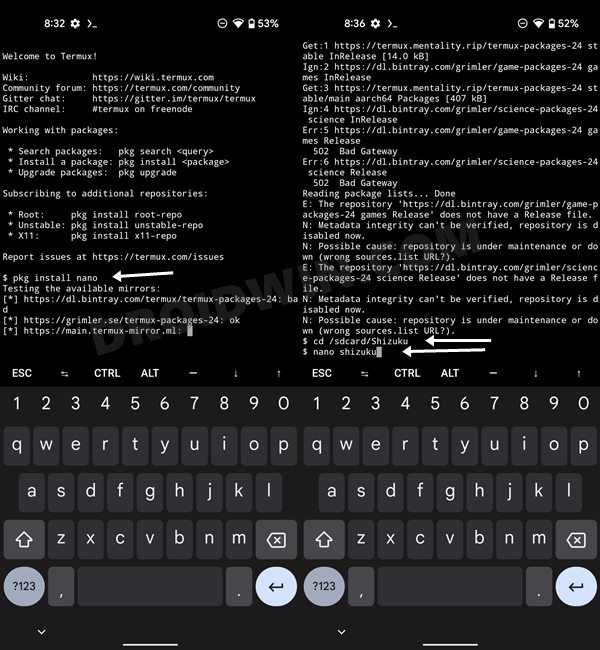
- Now launch Termux and execute the below command to install a text editor
pkg install nano
- Once installed, change the Termuz director to the Shizuku folder using the below two commands
cd /sdcard/Shizuku
nano shizuku
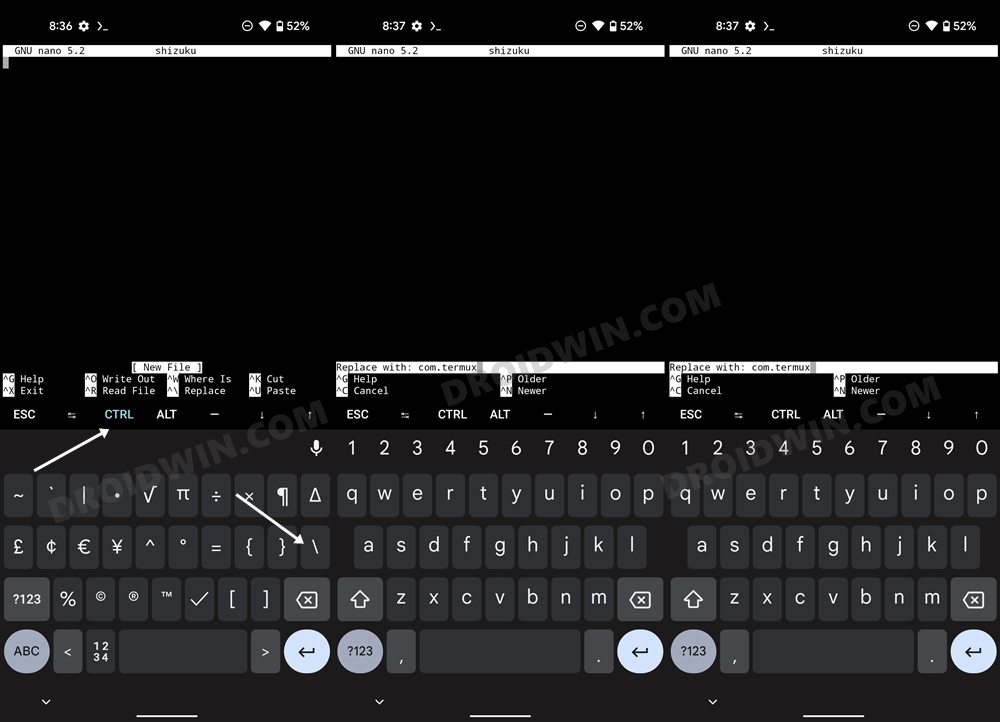
- Now tap on the Ctrl button situated at the top menu bar and then hit the keyboard’s \ key.
- After that, type in PKG and hit Enter. Then type in the below command
com.termux
- Then tap A, tap Ctrl+X, and then tap Y.
- Finally, execute the below command, replacing the app’s package name with the one whose WRITE permission you want
sh shizuku pm grant app-package-name android.permission.WRITE_SECURE_SETTINGS


Andrew Burgess
its telling me my app package name is not found when i type: sh shizuku pm grant android.permission.WRITE_SECURE_SETTINGS
What do i do i am using termux app. i have already paired the shizuku app with my phone and started the service. i exported the files to a folder i created in termux. i nano the rish file and replaced “PKG” with ‘com.termux’ and renamed the file ‘shizuku’ i entered the shizuku directory and ran: sh shizuku pm grant android.permissions.WRITE_SECURE_SETTINGS and it tells me that my package name is not found! im trying to give an app thats on my phone write secure settings permission. please help!!!
Angelo
Permission manager x with abd access you can give all the adb permissions.
Anuj
Hey! Great blog! I use a Pixel 6 and get an error “PKG” not found” after typing com.termux. Am I doing something wrong?
Note that pixel 6 has no sdcard, just internal storage. Would that effect the cd line? Thanks!