In this guide, we will show you various methods to fix the Windows Powershell not working issue on your Windows 11 PC. This command-line shell from the Redmond giants received a major overhaul in the latest iteration of the OS. Likewise, it has also been blessed with a few noteworthy features. Apart from the ability to execute commands, it could also be used as a scripting language and an automation platform for Microsoft as well as third-party services like Google Cloud and AWS.
However, in spite of all the goodies attached, it isn’t free from its fair share of issues either. Various users have voiced their concern that the Powershell is not working issue on their Windows 11 PC. As far as the reason for the same is concerned, it could be quite a few ones. including the likes of corrupt system files and interference with third-party services. With that said, this guide will make you aware of a few workarounds that would help you resolve this issue. Follow along.
Table of Contents
Fix Windows Powershell not working in Windows 11
It is recommended that you try out each of the below-mentioned workarounds and then see which one spells out success for you. So with that in mind, let’s get started.
FIX 1: Re-Enable Windows PowerShell
First and foremost, you should consider disabling and then re-enabling Powershell. This will refresh its underlying settings and could well resolve the underlying issue. So refer to the below instruction steps to try it out
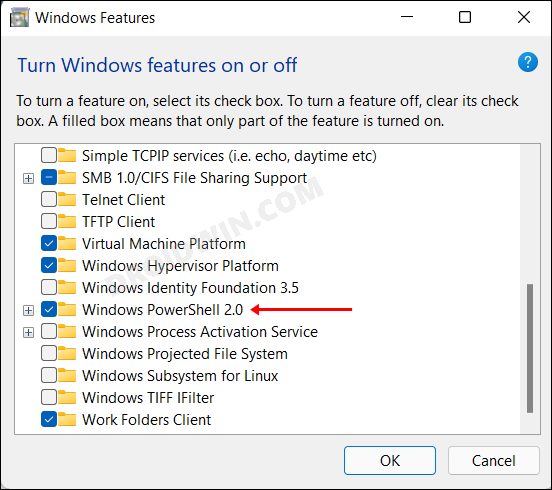
- Launch Turn Windows Feature On or Off from the Start menu.
- Then uncheck Windows Powershell 2.0 and hit OK.

- Again bring up this menu and this time checkmark Windows Powershell 2.0
- Now check if it fixes the issue of Powershell not working in Windows 11.
FIX 2: Run PowerShell as Admin
In some instances, the Powershell might not function in a restrictive environment, bereft of the necessary permissions. Therefore, you should consider launching in with administrative privileges, using the instructions given below
- Bring up Task Manager via Ctrl Shift Esc shortcut keys.
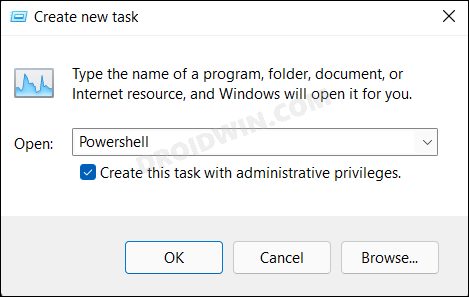
- Then go to File Run New Task and type in Powershell.

- Now checkmark Create this task with administrative privileges and hit OK.
- Check if it fixes Powershell not working issue in Windows 11.
FIX 3: Use Windows Troubleshooters
Windows comes built-in with quite a few troubleshooter apps that scan for issues and bring out the related fixes. As for the current issue, we will be using the System Maintenance and the Hardware and Devices troubleshooters, as they are the best fit to resolve this bug.
- Bring up the Run dialog box via Windows R shortcut keys.
- Then type in the below command and hit Enter
msdt.exe -id MaintenanceDiagnostic
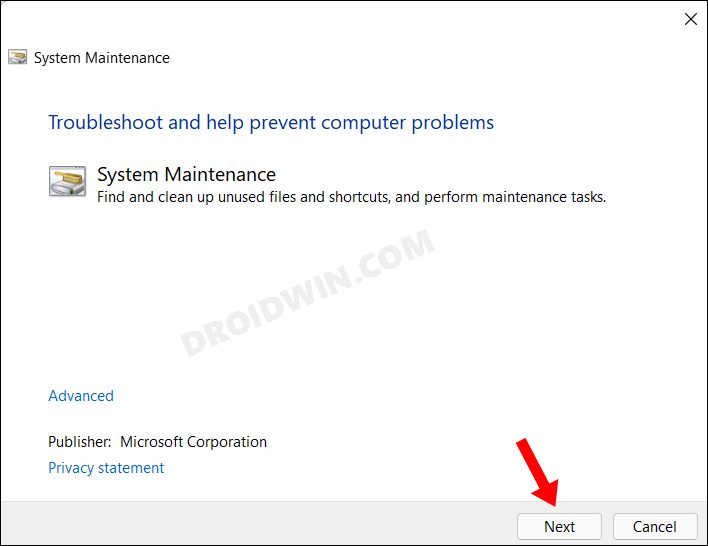
- This will launch the System Maintenance troubleshooter, click Next to continue.

- It will now scan for underlying issues and bring up the related fix as well.
- Just select the fix to implement and then check if the issue has been fixed or not.
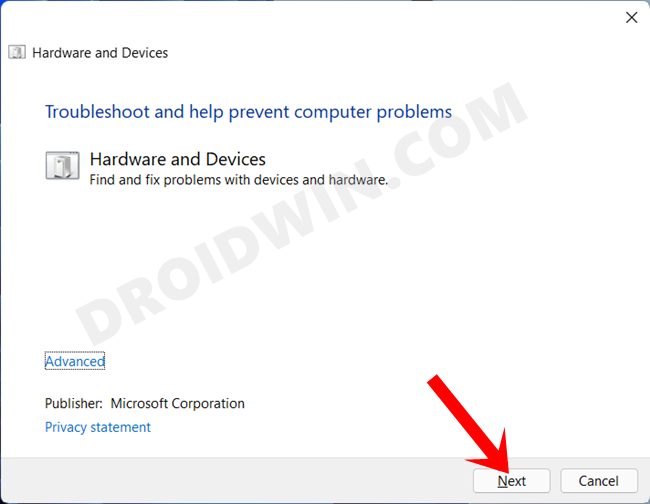
- If it is still there, then enable the Hardware and Devices troubleshooter on your PC.

- Then launch it, click Next and let it scan for issues. Then apply the fixes that it brings up.
- Check if it fixes the Windows Powershell not working issue in Windows 11.
FIX 4: Boot to Safe Mode
In some instances, a third-party app might conflict with the OS functionality as well. The best way to verify and hence rectify this issue is to boot your PC to the Safe Mode. Doing so will disable all the third-party apps and give you the stock environment with just the system apps. If you are able to select multiple files in this mode, then the culprit is an app or software. Therefore, you should consider uninstalling the recently installed apps after which the issue first came to light. Here’s how:
- Bring up the Run dialog box via Windows+R shortcut keys.
- Then type in the below command and hit Enter to open the System Configuration menu
msconfig

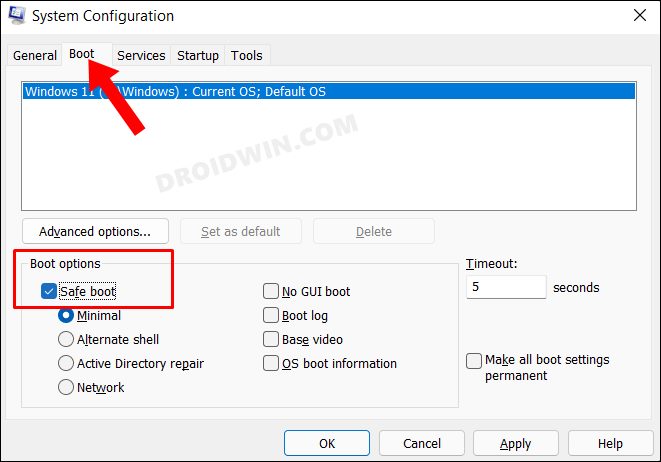
- Now go to its Boot tab and checkmark Safe Mode under Boot Options.
- Finally, click OK followed by Restart in the confirmation dialog box.
- Your PC will now boot to Windows Recovery Environment.
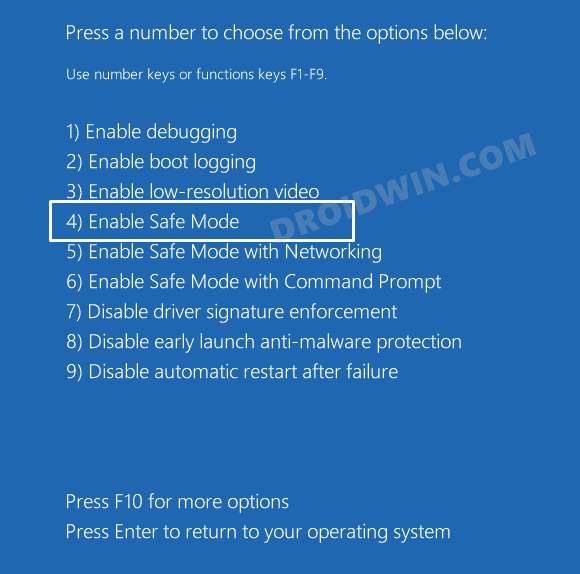
- Go to Troubleshoot > Advanced options > Startup Settings > Click Restart > Press 4 to boot to Safe Mode.

- Now check if it fixes the Windows Powershell not working issue in Windows 11.
FIX 5: Disable Third-Party Service
A third-party service could also create a few roadblocks in the functioning of this feature. Therefore, you should consider disabling all the non-Microsoft-related services and then test out the results. Here’s how it could be done
- Head over to the Start Menu, search System Configuration, and open it.
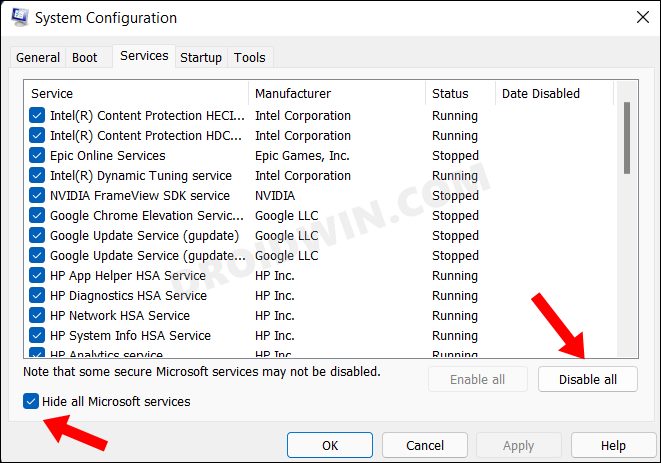
- Then go to the Services tab, checkmark Hide All Microsoft Services, and click on the Disable All button.

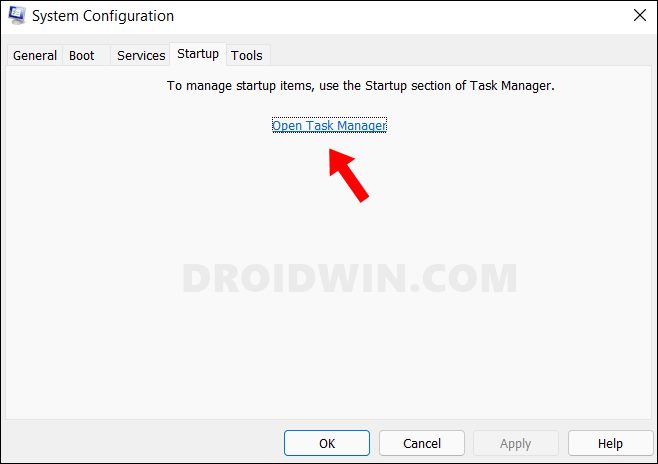
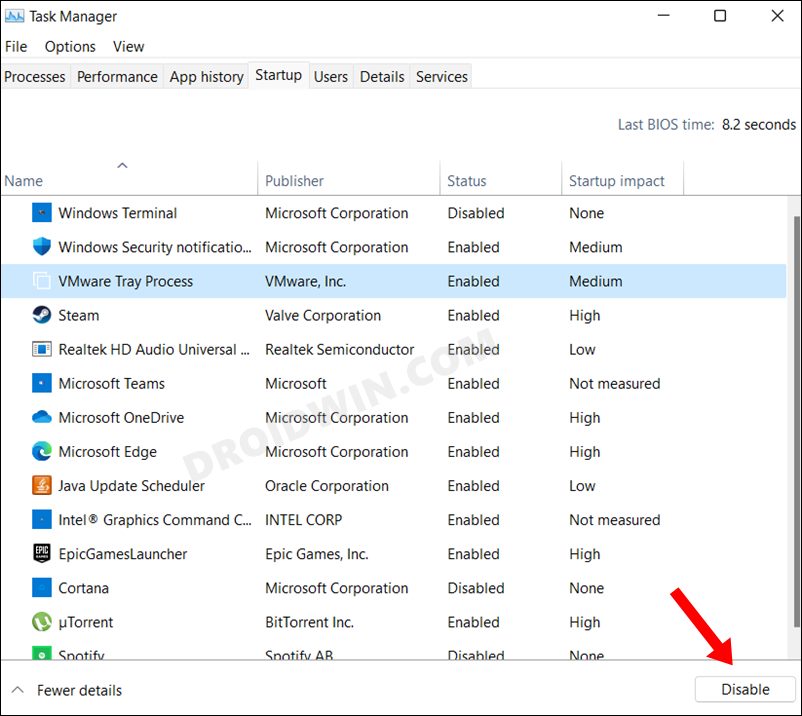
- Then go to the Startup tab and click on Open Task Manager.

- Now select a process from the list and click Disable. Do so for all the running services.

- Once done, restart your PC and then check if it fixes the Windows Powershell not working issue in Windows 11.
FIX 6: Use SFC and DISM Commands
System File Checker and Deployment Image Servicing and Management are two command-line utility tools that scan for corrupt Windows files and then replace them with their working counterpart. The major difference between the two is whereas the SFC replaces the corrupt files with the working ones from the cached directory on your PC, DISM does so by downloading the working files from the online Microsoft servers. And as of now, we would be making use of both these tools to fix the underlying issue.
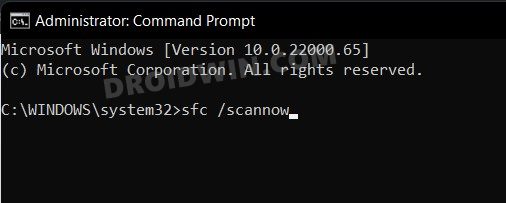
- Head over to the Start Menu, search Command Prompt, and launch it as an administrator.
- Then copy-paste the below command to open the SFC Tool:
sfc /scannow

- Once the SFC Scanning is complete, it’s time to use the DISM Tool. So copy-paste the below command:
DISM /Online /Cleanup-Image /RestoreHealth

- Once DISM finishes the scanning, it is recommended to reboot your PC.
- Now check if it fixes the Windows Powershell not working issue in Windows 11.
FIX 7: Use a Restore Point
If none of the aforementioned methods spelled out success, then you should consider restoring your system to an earlier point during which it was free from this issue. Here’s how it could be done
- To begin with, open the Settings page via the Windows+I shortcut keys.
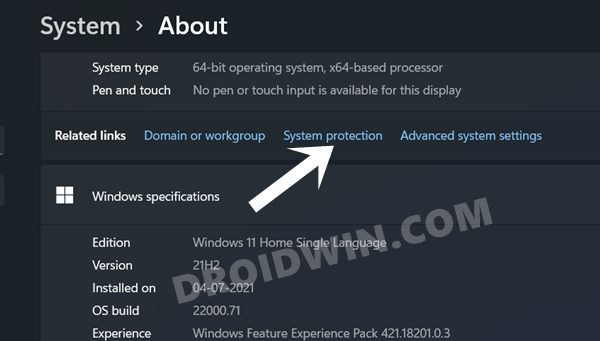
- Then go to the System tab from the left menu bar, scroll all the way to the bottom and click on About.

- After that, click on the System Protection option present on the Related Links tab.

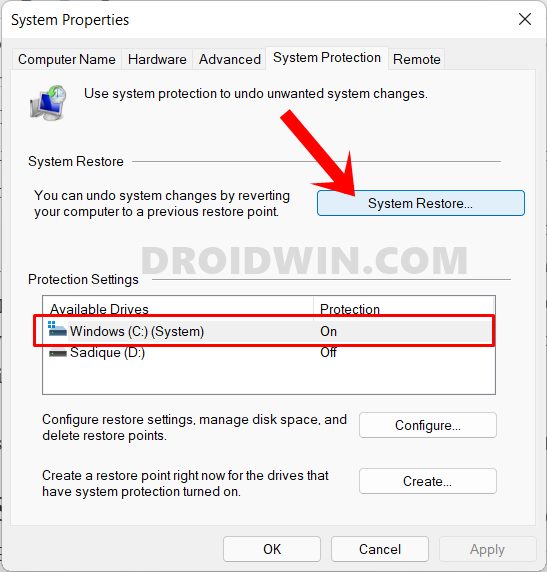
- This shall launch the System Properties dialog box. Go to the System Protection tab and click on System Restore.

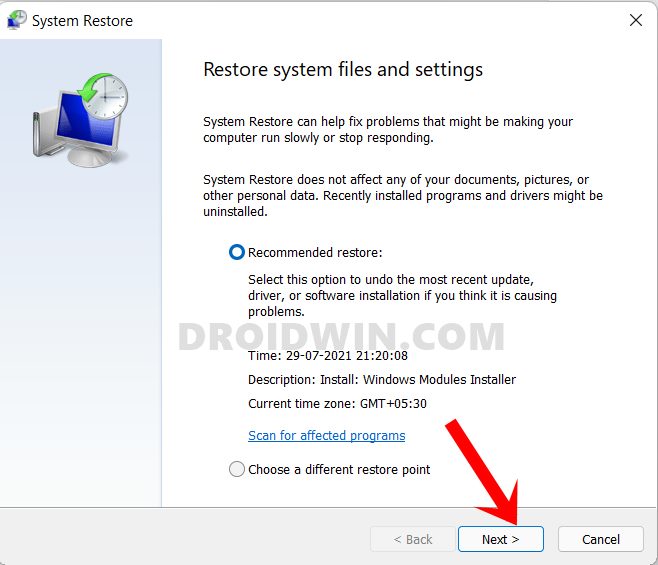
- Windows will now bring up the backup under the Recommended Restore section. This is the backup that it finds most suitable according to your PC’s current condition.

- If you are satisfied with it, enable the Recommended Restore option and hit Next.
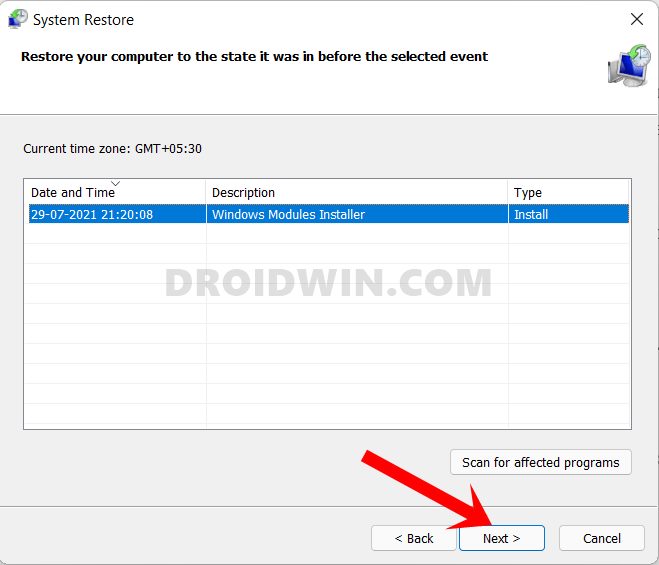
- However, if you wish to select any other custom backup, then select Chose a Different Restore point and click Next.
- Now select the desired custom restore point and hit Next.

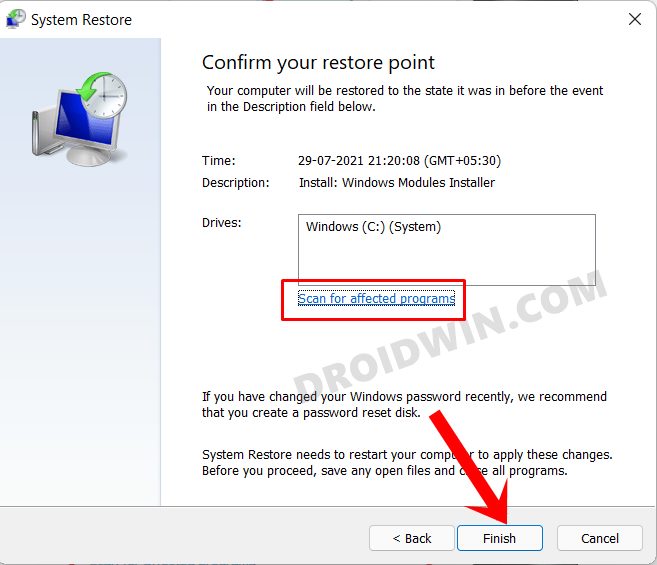
- Windows will now bring up the finalized screen showing all your selections. You may click on the Scan for Affected program option and get a list of all the programs that would be uninstalled/re-installed after this restore.

- If everything is as per your requirement, hit the Finish button and wait for the restore to complete.
- Once done, your PC will automatically boot to that system restore point and the underlying issue would be resolved.
So with this, we round off the guide on how you could fix the Windows Powershell not working issue in Windows 11.
. We have listed six different methods for the same. Do let us know in the comments section which one spelled out success for you. Likewise, all your queries are welcomed in the comments below.
