In this guide, we will show you the steps to fix the root issues after December 2021 OTA update on Pixel 6 and 6 Pro devices. This time around, the anticipation surrounding the December goodies to arrive on Pixel flagships was unlike anything seen in recent times. While the Silicon Valley giants were a tad late in releasing this update, but when they did, they made sure that they address most of these issues. And that was indeed the case. A plethora of bugs relating to camera, fingerprint sensor, display, audio, and Bluetooth seems to have been rectified.
However, this update also resulted in a few gloomy faces in the custom development. This is because this update seems to have broken the root functionality on these flagships. And both the set of users are affected by this issue- the ones who are installing the December OTA on their rooted Pixel running the November update as well as the ones who are rooting their device for the first time. So what is the reason for this issue, and more importantly how to fix the root issues after the December 2021 OTA update on Pixel 6/Pro? Let’s check it out.
Table of Contents
Why is Root Not Working After December 2021 Update on Pixel 6/Pro?
After the latest update, Pixel 6/Pro seems to have moved its stab to the /system/etc directory. As a result of this, MagiskInit was no longer able to patch the mount tables at runtime, thereby leading to issues with the root.
![]()
However, the required changes have since been implemented and introduced in the latest Magisk Canary build. All you need to do is flash this Magisk app version and this should fix the root issues after the December 2021 OTA update on Pixel 6/Pro.
Fix Root Issues After December OTA Update on Pixel 6/Pro
![]()
The entire procedure of rooting the Pixel 6/Pro or installing OTA on rooted Pixel 6/Pro stays the same. The only change is that you need to use the latest version of Magisk Canary while carrying out this process. What about data loss? Well, if you are installing the OTA on rooted devices, then you would have already disabled verity checks by flashing vbmeta. Hence you would no longer need to perform this step again and hence your data would be preserved.
However, if you are rooting your device for the first time, then you will have to disable verity checks and hence the data would be wiped off as well. But still, no matter to which category you belong, we would highly recommend you to take a complete device backup beforehand. Droidwin and its members wouldn’t be held responsible in case of a thermonuclear war, your alarm doesn’t wake you up, or if anything happens to your device and data by performing the below steps.
STEP 1: Download Latest Magisk Canary
- First off, grab hold of the latest Magisk Canary build from below:
Download: Latest Magisk Artifacts [Source: Magisk GitHub Page].
- Once downloaded, extract the ZIP and you will get three APKs:
app-debug.apk, app-release.apk, and stub.release.apk

- Out of these three, transfer the app-release.apk file to your device.
STEP 2: Install Android SDK

First and foremost, you will have to install the Android SDK Platform Tools on your PC. This is the official ADB and Fastboot binary provided by Google and is the only recommended one. So download it and then extract it to any convenient location on your PC. Doing so will give you the platform-tools folder, which will be used throughout this guide.
STEP 3: Download Pixel 6/Pro December Factory Image
- Download the December Factory update for your Pixel 6/Pro from below:
Factory Images for: Pixel 6 | Pixel 6 Pro
- Then extract the Images folder, get the boot.img file from there and transfer it to your device.
- Moreover, if you are rooting your device for the first time, then transfer the vbmeta.img file to the platform-tools folder on your PC. Users who are coming from rooted November (or any other month) need not do this.
STEP 4: Install Latest Magisk Canary
- First off, uninstall the currently installed Magisk App. For that, head over to Settings > Apps > All Apps.
- Then select Magisk from the list and hit Uninstall.
- After that, install the latest Magisk Canary app that you have downloaded from STEP 1.
- Then launch it and tap on the Install button next to Magisk.
- After that, choose ‘Select and Patch a File’, navigate to the stock boot.img file, and select it.
- Then tap on the Let’s Go button situated at the top right.
- The boot.img file will now be patched and placed under the Downloads folder on your device. You should transfer this file to the platform-tools folder on your PC.
STEP 5: Boot Pixel 6/Pro to Fastboot Mode
- Now connect your device to the PC via USB cable. Make sure USB Debugging is enabled.
- Then head over to the platform-tools folder, type in CMD in the address bar, and hit Enter. This will launch the Command Prompt.

- Type in the following command in the CMD window to boot your device to Fastboot Mode
adb reboot bootloader
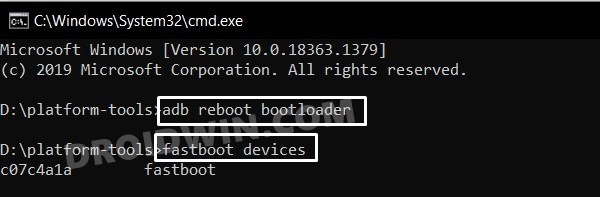
- To verify the Fastboot connection, type in the below command and you should get back the device ID.
fastboot devices
STEP 6: Disable AVB and Verity Check [For First-Time Root Users]
This step is only needed for users who are rooting their devices for the first time. If you are installing the December OTA over a rooted November OTA, then you don’t have to perform this step
- Then copy the vbmeta.img file from there and transfer it to the platform-tools folder.
- Now open the CMD window inside this platform-tools folder and execute the below command to flash the vbmeta file:
fastboot flash --disable-verity --disable-verification vbmeta vbmeta.img
STEP 7: Boot Pixel 6 to Magisk Patched December OTA
While we could have directly flashed the Magisk patched the boot.img, but that is generally a risky approach and more so in the current scenario. Therefore, we will first boot your device via the patched boot.img, and if everything’s well and good, will permanently install it.
- So transfer the magisk patched boot.img to the platform-tools folder.
- Then open the CMD window inside platform-tools and execute the below command
fastboot boot magisk_patched.img
- If your device is booted to OS and Magisk shows the device status to be rooted, then it’s time to permanently flash it.
STEP 8: Permanently Flash Magisk Patched December Boot on Pixel 6
- To begin with, launch the Magisk Manager App.
- Then tap on Install > Direct Install and tap Let’s Go situated at the top-right.
- Once done, hit the Reboot button situated at the bottom right.
- That’s it, your device will now boot to the rooted OS.
So with this, we round off the guide on how you could fix the root issues after December 2021 OTA update on Pixel 6 and 6 Pro devices. It might take some time before these changes are merged into the Magisk stable APK. So till then, you should stick with this Canary App Release build itself. On that note, we conclude this tutorial. All your queries are welcomed in the comments section below.


