In this guide, we will show you various methods to fix the issue of the Power Troubleshooter missing from your Windows 11 PC. The OS from the Redmond giant comes built-in with quite a few troubleshooter apps. Upon just a single click, they will diagnose the underlying issue, let you know the root cause of the same, and subsequently rectify it. Well, we as a user couldn’t have asked for anything better.
However, recently, we stumbled upon some power-related issues with our laptop, as it wasn’t behaving the way it should under different circumstances [such as when charging, on battery, sleep, etc.]. So our first course of action was to head over to the Power Troubleshooter on our Windows 11 PC, only to find out that it was missing. if that’s the case with you as well, then this guide will help you out. Follow along for the fixes.
Table of Contents
Fix Power Troubleshooter Missing in Windows 11

It is recommended that you try out each of the below-mentioned workarounds and then see which one spells out success. So with that in mind, let’s get started.
FIX 1: Use Power Troubleshooter via CMD
Well, the Power Troubleshooter is not actually missing from Windows 11, it’s just that for some reason Microsoft decided not to provide us with its UI/UX in the Settings menu. But thankfully, the feature is still present in the OS and we could invoke it via the CMD window. Here’s how:
- Launch Command Prompt as an administrator.
- Then type in the below command and hit Enter.
msdt.exe /id PowerDiagnostic
- Now restart your PC and check out the results.
FIX 2: Restore Power Troubleshooter to Default
One probable reason for this issue is the power plan getting corrupted. So let’s restore them to their default state using the instructions listed below:
- Launch Command Prompt as an administrator.
- Then type in the below command and hit Enter.
powercfg -restoredefaultschemes
- Now restart your PC and check out the results.
FIX 3: Use SFC and DISM Scans
System File Checker and Deployment Image Servicing and Management are two command-line utility tools that scan for corrupt Windows files and then replace them with their working counterpart.
The major difference between the two is whereas the SFC replaces the corrupt files with the working ones from the cached directory on your PC, DISM does so by downloading the working files from the online Microsoft servers. And as of now, we will be making use of both these tools to fix the issue of Power Troubleshooter missing in Windows 11.
- Right-click on the Start Menu and select Windows Terminal (Admin).
- Then click on the down arrow present next to the new tab icon and select Command Prompt from the list.
- Once the CMD window is opened, copy-paste the below command to open the SFC Tool:
sfc /scannow
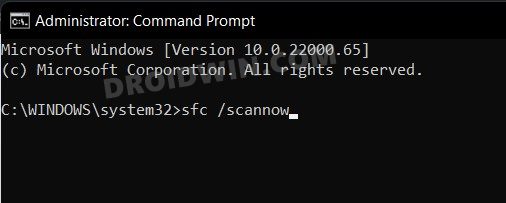
- Once the SFC Scanning is complete, it’s time to use the DISM Tool. So copy-paste the below command:
DISM /Online /Cleanup-Image /RestoreHealth

- Once DISM finishes the scanning, restart your PC and check the results.
FIX 4: Using Control Panel
Control Panel also beholds quite a few nifty features with regards to the Power Settings. So do go through them once from Control Panel > Hardware and Sound > Power Options and check if they are able to meet your requirements. Moreover, once you are in Power Options, click on Change what the Power Options Do and then click on Change settings that are currently unavailable and you may get hold of a few additional power-related tweaks from there.
FIX 5: Using Registry Editor Tweak
- Bring up Run via Windows+R, type in regedit, and hit Enter.
- This will launch Registry Editor. So paste the below location:
HKEY_CURRENT_USER\Software\Microsoft\Windows\CurrentVersion\Policies\Explorer
- Now open the NoClose file, change its Value to 0, and save it.
- Finally, restart your PC and check if it fixes the issue.
FIX 6: Using Group Policy Editor
- Launch Group Policy Editor [Windows Home users should enable it first].
- Then go to Computer Configuration> ‘Administrative Templates’.
- Now open the “Start Menu and Taskbar” from the right.
- Then open ‘Remove and prevent access to the Shut Down, Restart, Sleep, and Hibernate commands’ policy.
- Choose Disabled > Apply > OK. Finally, restart your PC and check out the result.
FIX 7: Try a Clean Boot
In some instances, a third-party app ot service might conflict wit the proper functioning of the OS. In those cases, your best bet is to disable those services at boot up and only boot your system with the required system files. Here’s how:
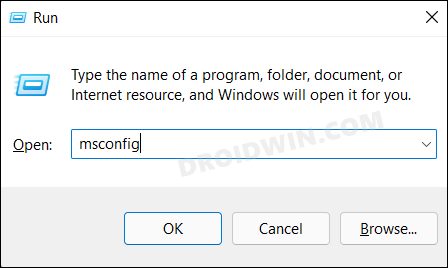
- Open Run via Windows+R, type in msconfig, and hit Enter.
- This will open the System Configuration menu
- Under the General tab, choose Selective Startup and untick Load Startup Items.
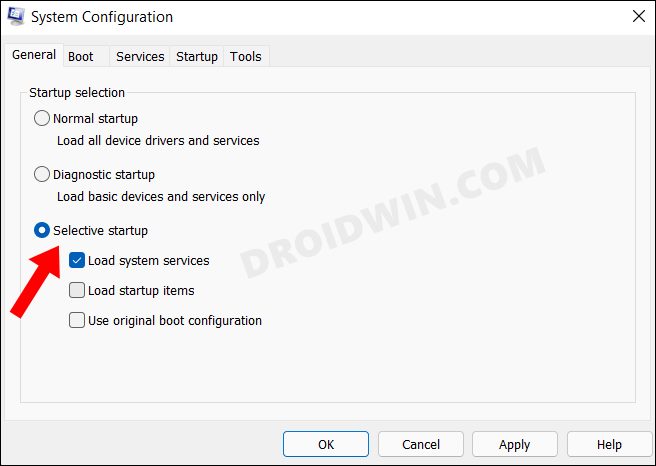
- Now go to the Services tab, click on Hide all Microsoft Services, and click Disable All button.

- Finally, hit Apply > OK to save the changes and restart your PC.
- Now check if it fixes the Power Troubleshooter missing issue on Windows 11.
FIX 8: Perform a System Restore
If you were able to access this setting earlier but have recently started facing this issue, then you should consider rolling back your PC to that earlier stage. Here’s how it could be done: [take a backup beforehand]
- Head over to Settings > System > About > System Protection.
- Then click on the System Restore button.

- Windows will now bring up the backup under the Recommended Restore section. This is the backup that it finds most suitable according to your PC’s current condition.

- If you are satisfied with it, enable the Recommended Restore option and hit Next.
- However, if you wish to select any other custom backup, then select Choose a Different Restore point and click Next.
- Now select the desired custom restore point and hit Next.
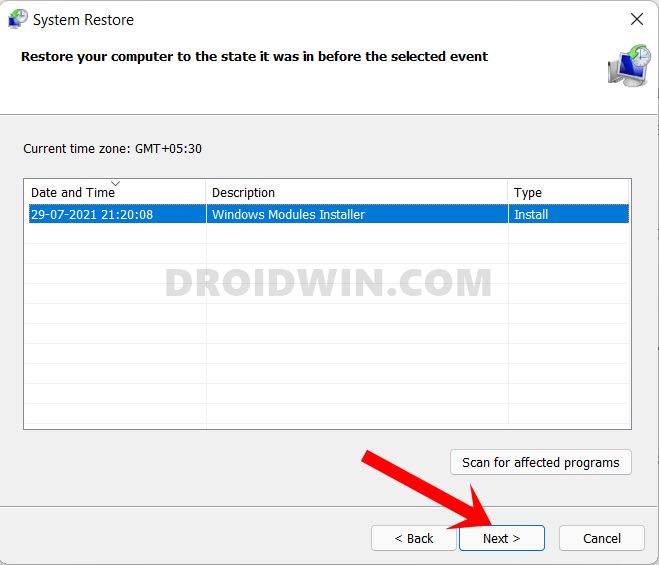
- Windows will now bring up the finalized screen showing all your selections.
- You may click on the Scan for Affected program option and get a list of all the programs that would be uninstalled/re-installed after this restore.
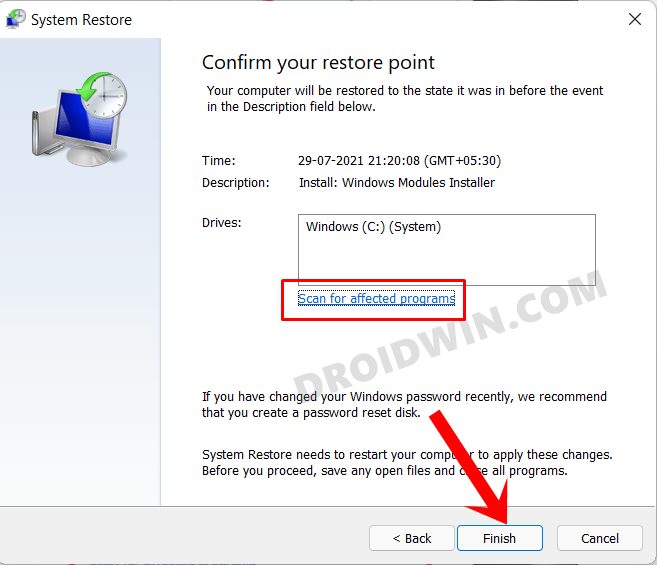
- If everything is as per your requirement, hit the Finish button and wait for the restore to complete.
- Once done, your PC will automatically boot to that system restore. Check if it fixes the issue.
That’s it. These were the various methods that should help you fix the issue of the Power Troubleshooter missing from your Windows 11 PC. If you have any queries concerning the aforementioned steps, do let us know in the comments. We will get back to you with a solution at the earliest.