In this guide, we will show you the steps to install a custom ROM and root your OnePlus device on a locked bootloader! In the past couple of months, Google has started to tighten up the screws in the custom development, by placing one roadblock after another. As a result, many users are now thinking twice before flashing a ROM or obtaining root.
For the unaware, earlier if you were running a rooted device, then you might not be able to pass SafetyNet and hence banking apps won’t run on your device. Well, we managed to find a nifty method to pass this test and things were back to normal. This is when Google decided to replace SafetyNet with Play Integrity and things took a turn for the worse.
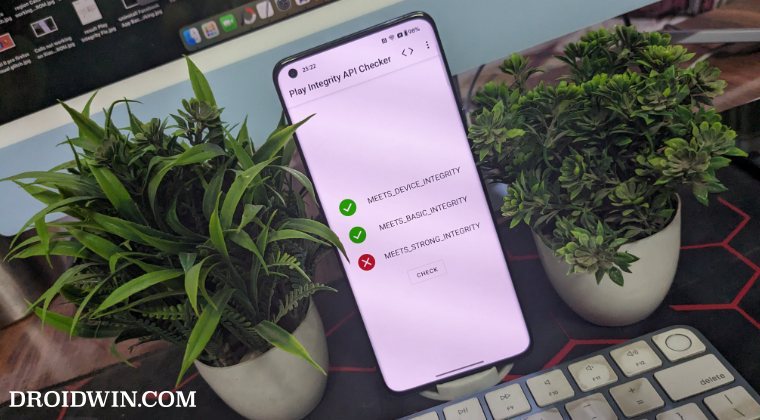
While passing Play Integrity is still a possibility, but you’ll have to find a unique fingerprint from the build.prop that hasn’t yet been patched by Google [while the module to get this job done still exists, but it’s open source and is there for all to see, including Google! So it patches it as soon as it goes live over GitHub].
Apart from this major drawback, we also have a few minor inconveniences such as Widevine certification being downgraded to L3 among others. Combining all these factors, we are witnessing a few seeds of doubt being planted even in the minds of tech enthusiasts. Well, it’s time to stop those seeds from nurturing any further as this guide will show you the steps to install a custom ROM and root your OnePlus device on a locked bootloader.
Table of Contents
Install Custom ROM & Root OnePlus 9 Pro on Locked Bootloader!
Before starting, please take a backup of all the data on your device. Droidwin and its members wouldn’t be held responsible in case of a thermonuclear war, your alarm doesn’t wake you up, or if anything happens to your device and data by performing the below steps.
Some Important Points to Keep in Mind
- First and foremost, this feature is made possible via the Jaguar ROM. It beholds tons of customizations and features and all of them are free to use [as is the case with any other custom ROM]. However, the ability to use this custom ROM and have Magisk installed on a locked bootloader is a paid feature [more on that later].
- Moreover, the following OnePlus devices are supported: OnePlus 9 Pro | OnePlus 8 | OnePlus 8T | OnePlus 8 Pro | OnePlus 6 | OnePlus 6T.
- Since the device’s bootloader will be locked, you won’t be able to use fastboot flashing commands [which is quite obvious].
- The ROM is based on Android 11 OxygenOS 11.
- If you are using it on a locked bootloader, we would recommend keeping the OEM Unlock toggle enabled. Because if something goes wrong, then you could easily unlock the bootloader and rectify the issue. However, if the OEM Unlock toggle is disabled and you cannot access the OS, then your only way out will be to boot your device to EDL Mode and use the MSM Tool to flash the OPS firmware to bring your device back to life.
STEP 1: Install Android SDK
First and foremost, you will have to install the Android SDK Platform Tools on your PC. This is the official ADB and Fastboot binary provided by Google and is the only recommended one. So download it and then extract it to any convenient location on your PC. Doing so will give you the platform-tools folder, which will be used throughout this guide.

STEP 2: Enable USB Debugging and OEM Unlocking
Next up, you will have to enable USB Debugging and OEM Unlocking on your device. The former will make your device recognizable by the PC in ADB mode. This will then allow you to boot your device to Fastboot Mode. On the other hand, OEM Unlocking is required to carry out the bootloader unlocking process.
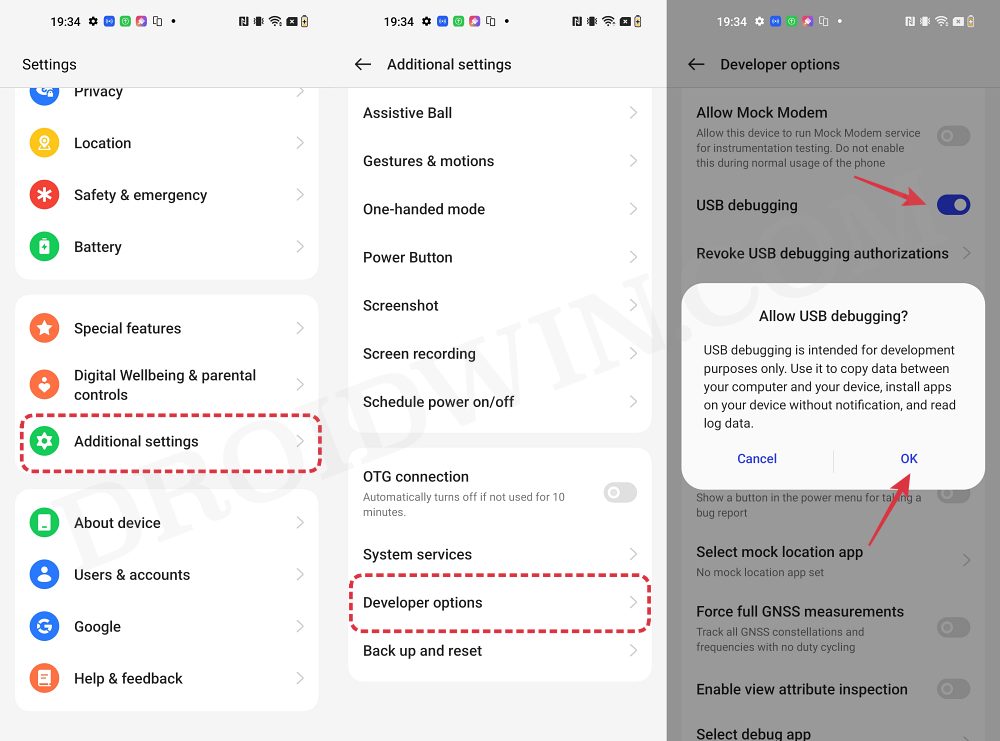
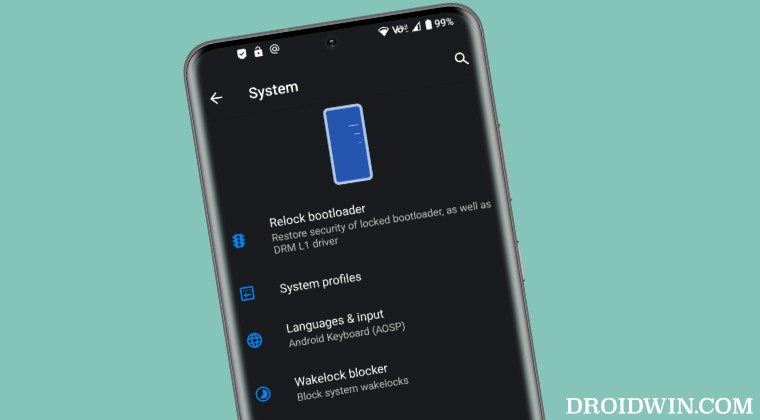
So head over to Settings > About Phone > Tap on Build Number 7 times > Go back to Settings > System > Advanced > Developer Options > Enable USB Debugging and OEM Unlocking.
STEP 3: Download Jaguar ROM for OnePlus
- Now, get hold of the Jaguar ROM and its associated files from below [Credits: XDA Senior Member optimumpro]
DOWNLOAD LATEST JAGUAR ROM:
ONEPLUS 9 PRO | 8 | 8T | 8 PRO | 6 | 6T
NOTE: The instructions listed below are for OnePlus 9 Pro. If you want it for any other device, then do let us know in the comments section. We will create a separate guide for the same at the earliest.
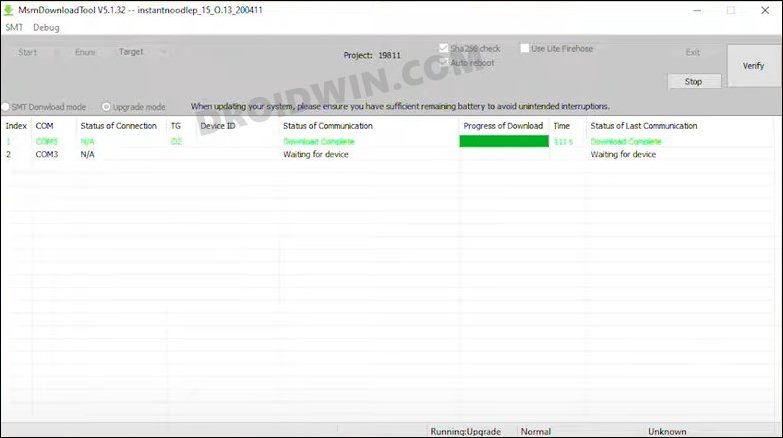
STEP 4: Flash OxygenOS 11 in Slot A
You’ll now have to flash OxygenOS 11 via the MSM Download Tool [it will be flashed in Slot A]. For that, you could use the MSM Download Tool to get this job done. Do note that this is only for users who are running OxygenOS 12/13/14. If you are already on OxygenOS 11, then you may skip this step.
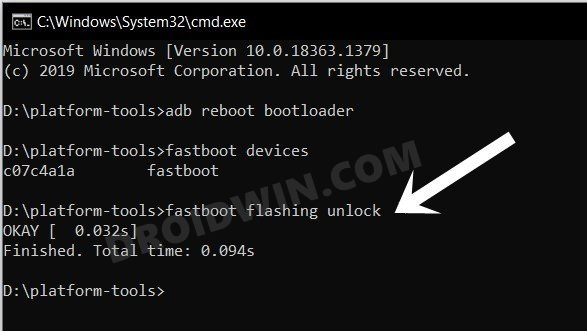
STEP 5: Unlock Bootloader [For Now]
Flashing via MSM relocks the bootloader, so let’s proceed ahead and unlock it [It’s just required for the initial setup process. We will relock it at the end]. Do keep in mind that doing so will wipe off all the data from your device and could nullify its warranty as well. So if that’s all well and good, then please refer to our detailed guide on How to Unlock Bootloader on OnePlus 9, 9 Pro and 9R
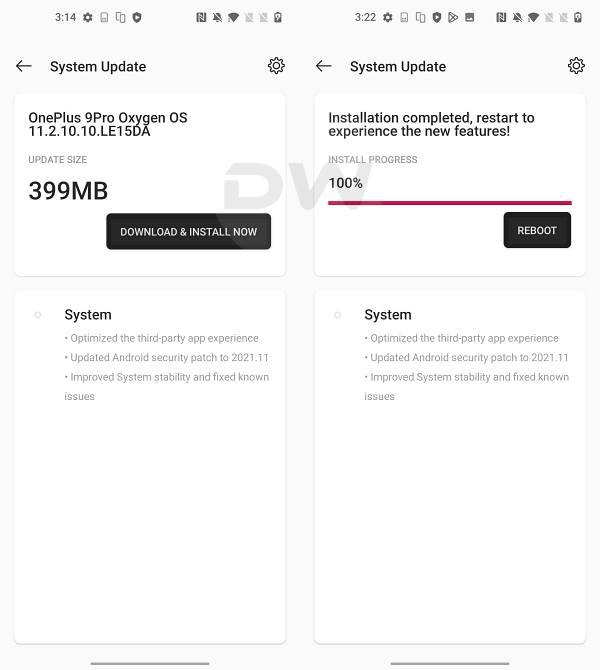
STEP 6: Install an OTA Update
You’ll now have to install ‘one’ update so that the latest OxygenOS 11 is populated in Slot B. So go to Settings > System and download and install an update.
STEP 7: Boot to Fastboot Mode
- Connect your device to the PC via a USB cable. Make sure USB Debugging is enabled.
- Now head over to the platform-tools folder, type in CMD in the address bar, and hit Enter. This will launch the Command Prompt.
- After that, type in the following command in the CMD window to boot your device to Fastboot Mode
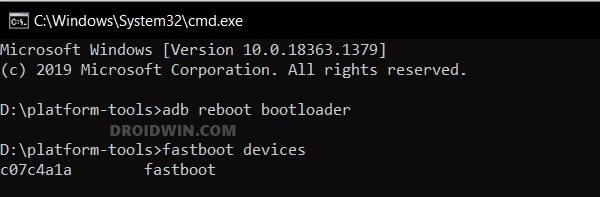
adb reboot bootloader

- To verify the Fastboot connection, type in the below command and you should get back the device ID.
fastboot devices
- If you’re not getting any ID, then install Fastboot Drivers on your PC.
STEP 8: Flash TWRP Recovery
- To begin with, download the TWRP IMG and ZIP file from here [download v3.6.0].
- Then send the TWRP IMG file to the platform-tools folder and the ZIP file to your device.
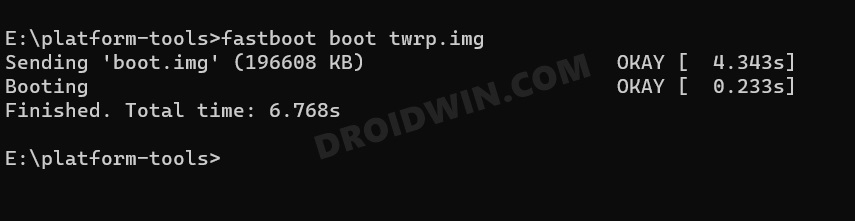
- Now type in the below command to temporarily boot your device to the TWRP Recovery:
fastboot boot twrp.img
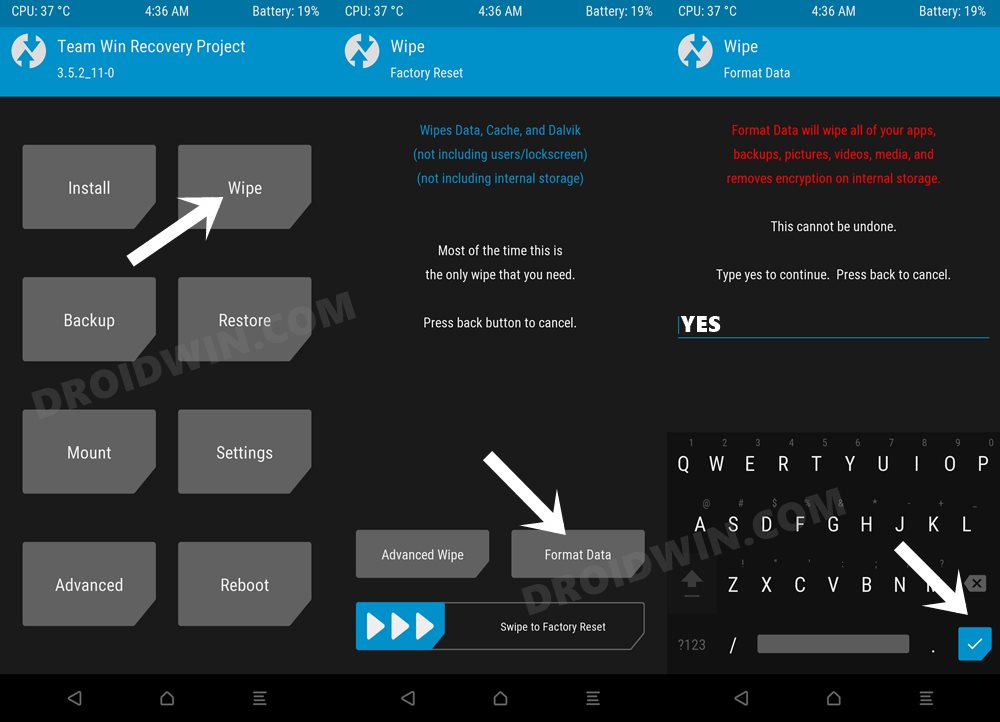
- Then go to Install, select the TWRP ZIP, and perform a right swipe to flash it.
- Now go to Wipe > Format Data > type in YES > hit the blue checkmark.
- Once done, go to Reboot and select System. Your device will reboot to the OS. You are now in slot B.
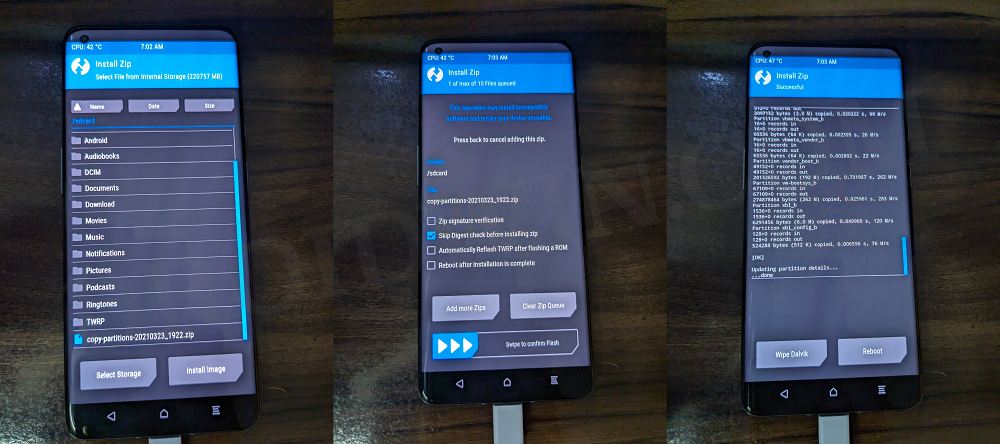
STEP 9: Copy Partition Data to Slot B
We will now have to update the Slot A. For that, we will be using the LineageOS Copy Partition ZIP file. So transfer the file to your device > boot your device to TWRP > flash the ZIP file. Once done, reboot to System.
STEP 10: Flash Jaguar ROM
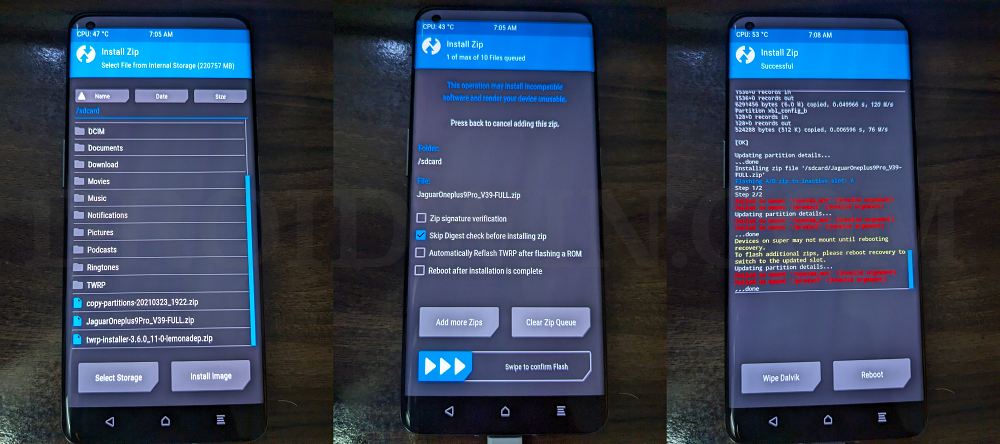
- First off, transfer the Jaguar ROM and TWRP ZIP to your device.
- Then go to Install, select the Jaguar ROM, and perform a right swipe to flash it.
- Again go to Install, select the TWRP ZIP, and perform a right swipe to flash it.
- Now go to Wipe > Format Data > type in YES > hit the blue checkmark.
- Finally, go to Reboot and select System. Your device will boot to the OS.
NOTE: If your device boots to TWRP, then do a Format Data and then select Reboot > System. Your device should now boot to the OS.
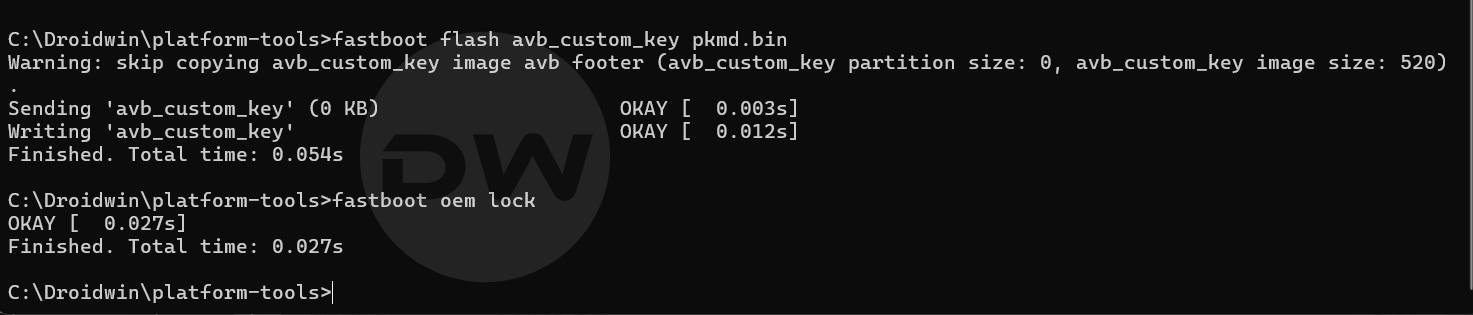
STEP 11: Flash Custom AVB and Relock Bootloader
- First off, place the downloaded custom AVB key in the platform tools folder.
- Then boot your device to the Fastboot Mode and type in the below command:
fastboot flash avb_custom_key pkmd.bin
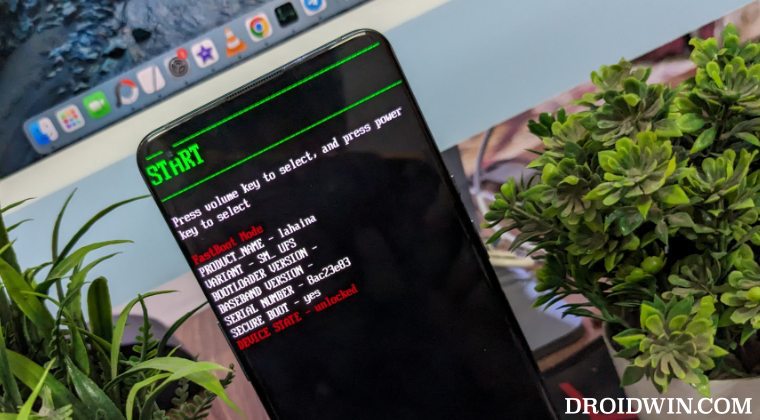
- Finally, use the below command to relock the bootloader on your device:
fastboot oem lock
- You’ll get a prompt on your device, use the Volume Keys to highlight Lock the Bootloader and press the Power key to confirm.
- Your device will undergo a reset and boot to the OS, with the locked bootloader.
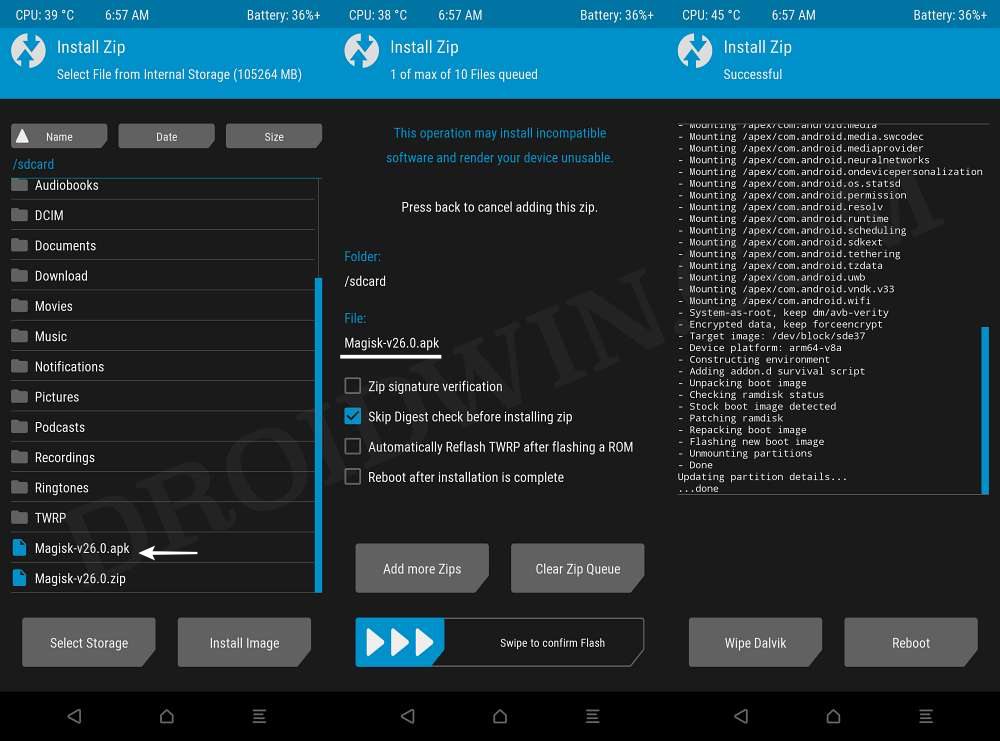
STEP 10: Root Jaguar ROM
- To begin with, download the Magisk APK and transfer it to your device.
- Now boot your device to the TWRP Recovery and flash the Magisk APK.
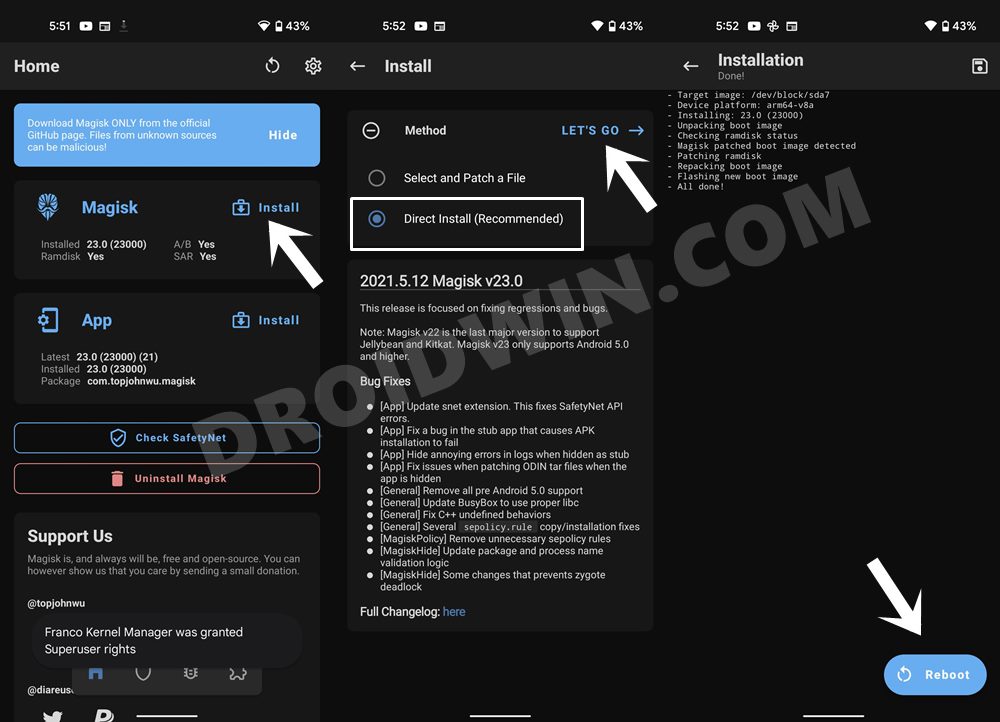
- Then go to Reboot > System. Once it boots to the OS, install Magisk APK.
- Then launch it, tap on Install next to Magisk, and select Direct Install.
- It will now be installed. Once done, hit Reboot. Your device stands rooted.
That’s it. These were the steps to install a custom ROM and root your OnePlus device on a locked bootloader. If you have any queries concerning the aforementioned steps, do let us know in the comments. We will get back to you with a solution at the earliest.
How to Install Updates to this ROM
Updating the Jaguar ROM is quite straightforward, without any need to do a factory reset! Here are the required instructions steps:
- Download the latest Jaguar ROM and transfer it to your device.
- Likewise, also transfer the TWRP ZIP file to your device.
- Now boot your device to TWRP and flash the ROM ZIP file
- After that, flash the TWRP ZIP file as well [to preserve TWRP].
- Then reboot to Recovery and flash Magisk to preserve the root.
- Finally, select Reboot > System. Your device will boot to the OS.


