In this guide, we will show you the steps to change the default startup folder in the File Explorer on your Windows 11 PC. It goes without saying that File Explorer is one one the most important apps with which you probably interact the most. In the latest iteration of the OS, it has gone through a few changes. However, one thing that is inquiries most of the users is its default behavior.
Whenever you launch File Explorer, it will automatically open the Quick Access folder. For many users, this is the least interacted directory on their PC and hence they don’t wish to be greeted with it every time they invoke the explorer. Some users mostly deal with a specific system directory on the C drive, while others frequently visit their preferred games or movies folder in D Drive.
And in all these scenarios, they wish to be directly taken to that specific folder rather than to Quick Access whenever they open File Explorer. If you also echo this thought, then this guide shall help you out. In this tutorial, we will show you the steps to change the default startup folder in Windows 11 File Explorer. So without any further ado, let’s get started.
Change Default File Explorer Startup Folder to This PC in Windows 11

We decided to include a separate section for “This PC” because Windows 11 has provided a direct approach to switch from Quick Access to This PC in File Explorer. Whereas if you wish to switch to any other folder or directory, then you would have to carry out a few additional steps (as mentioned in the next section). So if you are planning to make This PC the default startup folder in File Explorer, then here’s what you need to do:
- To begin with, launch File Explorer via Windows+E shortcut keys.
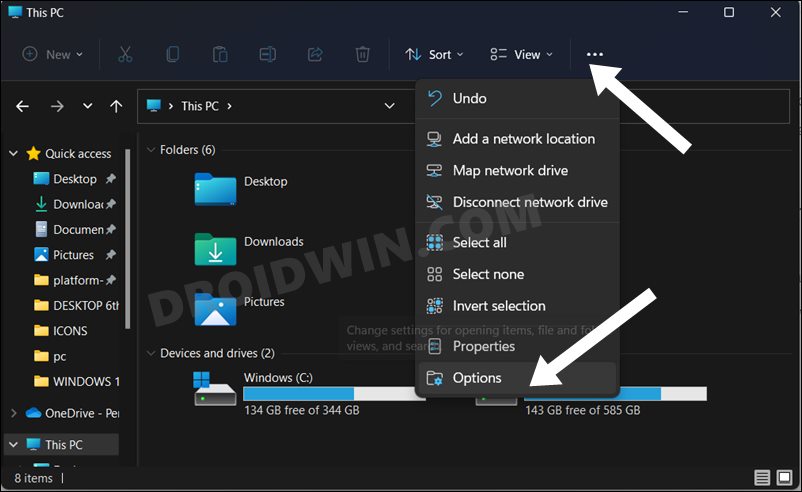
- Then click on the three horizontal dots situated at the top menu bar and select Options.

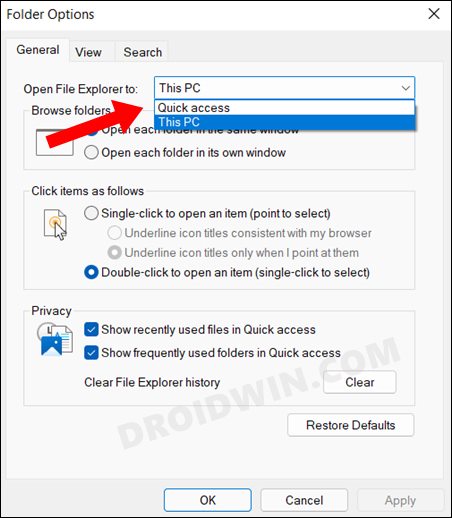
- Now click on the drop-down menu next to “Open File Explorer to”.
- Finally, select this PC from the list and click Apply > OK to save the changes.
- That’s it. From now on, File Explorer will automatically open This PC by default on your Windows 11 PC.
Change Default File Explorer Startup Folder to Any Other Folder in Windows 11
Rather than making the stop at This PC, it would be a much better approach to instruct File Explorer to directly take you to a specific file or folder. It goes without saying that this tweak will be most helpful if there’s only a particular folder that you interact with most of the time. So with that in mind, let’s get started.
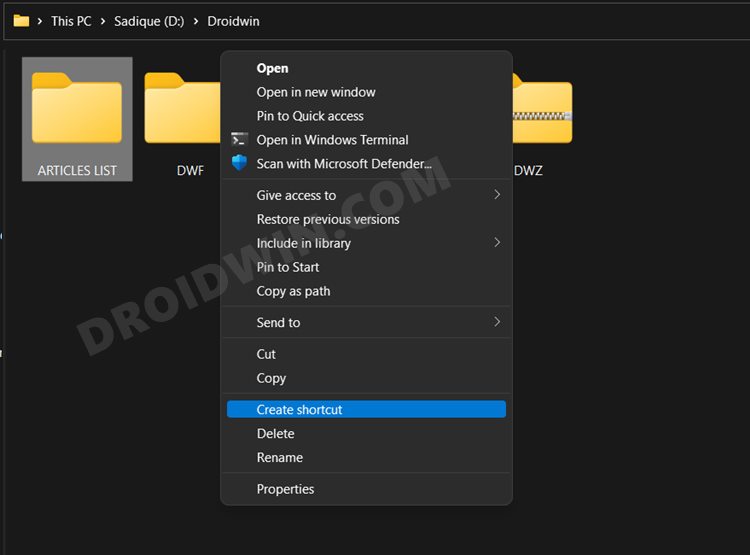
- Open File Explorer and head over to the folder that would act as your default location.
- Don’t open that folder, rather right-click on it, select Show More Options > Create Shortcut.
- Once the shortcut is created, right-click on it, select Rename, and name it File Explorer.
- Let’s now assign it the File Explorer icon as well. So right-click on that shortcut and select Properties.
- Then go to the Customize tab and click on the Change Icon button.
- Then copy-paste the below location in the field provided and hit Enter:
%windir%\explorer.exe
- Select the File Explorer icon from the list and click OK to apply it.
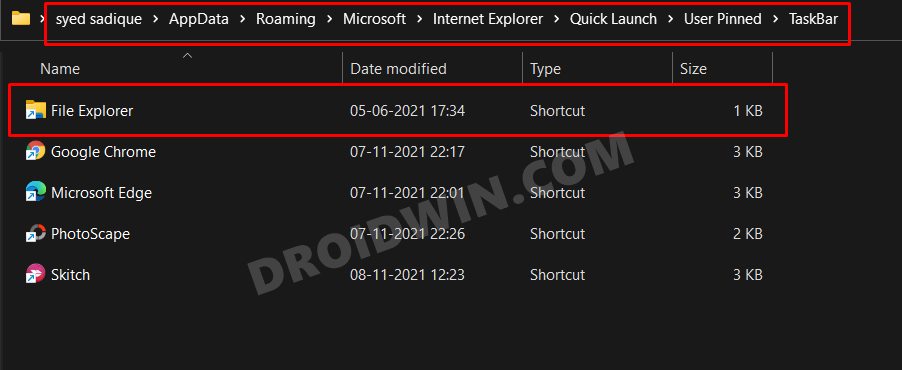
- Once that is done, head over to the below location (change UserName accordingly):
C:\Users\UserName\AppData\Roaming\Microsoft\Internet Explorer\Quick Launch\User Pinned\TaskBar
- Now copy this original File Explorer shortcut and paste it somewhere else. This will act as the backup that you could use to revert the changes to the default.
- Once that is done, copy the shortcut file that you have for your desired folder and paste it in this User Pinned > Taskbar directory.
- If you get a confirmation prompt, click Replace the file in the destination. And that’s it. The process stands complete.
So with this, we round off the guide on how you could change the default startup folder in the File Explorer on your Windows 11 PC. If you have any queries concerning the aforementioned steps, do let us know in the comments. We will get back to you with a solution at the earliest.


Dinesh
Awesome post, Really helpful. Thanks for sharing
Paul
Thanks, this was helpful. The issue that the Windows+E shortcut still opens Explorer to the Quick Access folder. Is there a way to make this shortcut open Explorer in a folder of my choosing?