In this guide, we will show you various methods to install OTA updates on your rooted Google Pixel Fold. There are quite a few new players entering the foldable segment. However, we wouldn’t be exaggerating by saying that many were eagerly awaiting the offering from the Silicon Valley giant. For the generic users, they would be getting a clean stock OS experience, the fastest OS updates, and an impressive camera.
And for the tech enthusiast- there’s an additional benefit involved- the devices from Google have always been among the most active player in custom development. While Fold is an entirely new form factor, but still it will be blessed with tons of goodies sooner than later. And while you wait for the developers to release their ROMs and mods, there’s no stopping you from gaining administrative privileges over your device.
But as soon as you do so, it will straightaway conflict with your ability to install updates on your device, whether it’s security patches, OTA, or Feature Drops. Fortunately, there do exist quite a few nifty methods through which easily install OTA updates on your rooted Google Pixel Fold. And in this guide, we will make you aware of all those methods. So without further ado, let’s get started.
Table of Contents
How to Install OTA Updates on Rooted Google Pixel Fold
![]()
We have listed three different methods to get this job done, you may try out the one that is in sync with your requirements. Moreover, take a complete device backup beforehand as well. Likewise, disable all the modules beforehand via the Magisk App > Modules section and turn off the toggle next to every module.
![]()
Moreover, while the images used here are from Pixel 7 series, they should still give you a perfect idea as to what needs to be done on your Fold. Droidwin and its members wouldn’t be held responsible in case of a thermonuclear war, your alarm doesn’t wake you up, or if anything happens to your device and data by performing the below steps.
Method 1: Manually Flash Patched Init_boot [Recommended]
This is the lengthiest of the four methods but is also the most safest one, so let’s start off with this method.
- To begin with, download a text editor like Notepad++ on your PC.
- Then download and extract the Android SDK Platform Tools on your PC.

- Now download the factory image for your device from below and extract it inside the platform-tools folder.
Pixel Fold [felix]: Download Factory Image
- Then go to the images-codename-filename.zip folder and extract the init_boot.img file.
- Now transfer this init_boot.img file to your device and launch the Magisk App.
- Then tap on Install next to Magisk and tap on Select and Patch a File.
- Now select init_boot.img file and hit the Let’s Go button situated at the top right.
- The file will now be patched and placed in the Downloads folder on your phone.
- Transfer it to the platform-tools folder on your PC and rename it to magisk_patched_boot.
- Now enable USB Debugging on your device and connect it to your PC via a USB cable.
- Then launch CMD inside the platform-tools folder and type in the below command to boot your device to Fastboot Mode:
adb reboot bootloader
- Now go to the extracted firmware folder, right-click on the flash-all.bat file, and select More Options > Edit with Notepad++.
- Move your cursor over to the fastboot -w update image-filename.zip and delete the -w keyword. Now hit the Ctrl+S to save the changes. The line should now look something like this:
fastboot update image-filename.zip
- So run this flash-all.bat file. The flashing will now start and during the process, your device will automatically reboot to Fastboot and FastbootD Modes, that’s completely normal.
- Once done, your device will boot to the OS. So enable USB Debugging and execute the below command to boot your device to Fastboot Mode:
adb reboot bootloader
- Now execute the below command to flash the patched init_boot:
fastboot flash init_boot magisk_patched_boot.img
- Finally, execute the below command to boot your device to the OS:
fastboot reboot
- Once your device boots to the OS, you could now verify root via Magisk and then re-enable all the disabled modules [do so one module at a time].

Method 2: Using Fastboot Commands
- To begin with, download and extract the Android SDK Platform Tools on your PC.
- Now download the factory image for your device from below and extract it inside the platform-tools folder.
Pixel Fold [felix]: Download Factory Image
- Then, rename the bootloader, image, and radio files as instructed below so that it becomes easier to type in the CMD window:
bootloader-codename-codename-x.x-xxxxxxx.img to bootloader.img
image-codename-xxxx.xxxxxx.xxx.xx.zip to image.zip
radio-codename-xxxxxx-xxxxx-xxxxxx-x-xxxxxxx to radio.img
- Then go to the images-codename-filename.zip folder and extract the init_boot.img file.
- Now transfer this init_boot.img file to your device and launch the Magisk App.
- Then tap on Install next to Magisk and tap on Select and Patch a File.
- Now select init_boot.img file and hit the Let’s Go button situated at the top right.
- The file will now be patched and placed in the Downloads folder on your phone.
- Transfer it to the platform-tools folder on your PC and rename it to magisk_patched_boot.
- Now enable USB Debugging on your device and connect it to your PC via a USB cable.
- Then launch CMD inside the platform-tools folder and type in the below command to boot your device to Fastboot Mode:
adb reboot bootloader
- Now just execute the following commands one at a time [your device will reboot to Fastboot Mode during the process, this is completely normal]:
fastboot flash bootloader bootloader.img
fastboot reboot-bootloader
fastboot flash radio radio.img
fastboot reboot-bootloader
fastboot update --skip -reboot image.zip
fastboot flash init_boot magisk_patched_boot.img
fastboot reboot
- As soon as you execute the last command, your device will now boot to the rooted OS. You may now re-enable the modules as well.
So this was the second method to install OTA updates on your rooted Pixel Fold. Let’s now make you aware of the other two.
Method 3: Flashing Patched Init_boot via Script
- To begin with, download a text editor like Notepad++ on your PC.
- Then download and extract the Android SDK Platform Tools on your PC.
- Now download the factory image for your device from below and extract it inside the platform-tools folder.
Pixel Fold [felix]: Download Factory Image
- Then go to the images-codename-filename.zip folder and extract the init_boot.img file.
- Now transfer this init_boot.img file to your device and launch the Magisk App.
- Then tap on Install next to Magisk and tap on Select and Patch a File.
- Now select init_boot.img file and hit the Let’s Go button situated at the top right.
- The file will now be patched and placed in the Downloads folder on your phone.
- Transfer it to the platform-tools folder on your PC and rename it to magisk_patched_boot.
- Now go to the extracted firmware folder, right-click on the flash-all.bat file and select More Options > Edit with Notepad++.
- Move your cursor over to the fastboot -w update image-filename.zip, delete that line and instead add the following lines [replace filename accordingly]:
fastboot update --skip -reboot image-filename.zip
fastboot flash init_boot magisk_patched_boot.img
fastboot reboot
- Then hit Ctrl+S to save the changes. Once done, enable USB Debugging on your device and connect it to your PC via a USB cable.
- Then launch Command Prompt inside the platform-tools folder and type in the below command to boot your device to Fastboot Mode:
adb reboot bootloader
- Finally, launch the modified flash-all.bat file and it will flash the latest firmware along with the patched init_boot.
- Once done, your device will automatically boot to the rooted OS. You may now re-enable the modules as well.
That’s it. This was the third method through which you could install OTA updates on your rooted Pixel Fold. Let’s now check out the fourth and final method that will help us get this job done.
Method 4: Using Magisk Install to Inactive Slot
While Install to Inactive Slot is the easiest and shortest of the four methods, but as of now, if you use the method, then it will restore the stock boot.img, instead of the stock init_boot.img. So the OTA will try and install in a rooted environment, which will ultimately fail and you will be greeted with the “Your device is corrupt” error message. So as of now, you should skip this method and use one of the three listed above.
Fix Pixel 7 Pro: Your Device is corrupt Install to inactive slot Magisk
Once the Magisk app makes the necessary changes, we will update this post accordingly and only then you should use the Install to Inactive Slot method.
- Launch the Magisk app and tap on Uninstall Magisk > Restore Images.
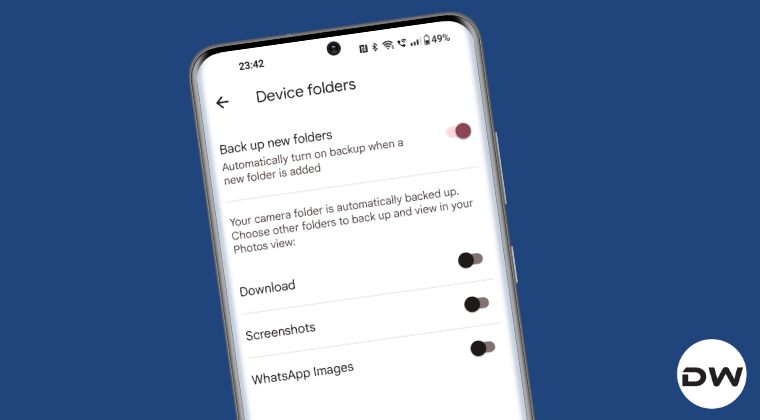
- Then go to Settings > System > System Update and download the available update.
- Once downloaded, do not reboot your device. Rather, launch the Magisk App.
- Then tap on Install next to Magisk. After that, select Install to Inactive Slot.
- You will now get a prompt, tap OK. Magisk will now be installed in the inactive slot.
- Once done, your device will restart to the updated and rooted OS! You may now re-enable all the modules.
These were the four different methods to install OTA updates on your rooted Pixel Fold. If you have any queries concerning the aforementioned steps, do let us know in the comments. We will get back to you with a solution at the earliest.