In this guide, we will show you the steps to install a GSI ROM on any Samsung Galaxy device. The latest flagships from Samsung don’t usually boast of support for numerous Custom ROMs. One major reason for the same is the tripping of Knox which is an irreversible process and would straightaway nullify your ability to use numerous banking and payment apps even if you go back to stock.
With that said, there are still a few tech enthusiasts who are willing to take this risk but are unable to do so simply because of the fact that there aren’t many ROMs to choose from! Well, we have got you covered. Even if your device doesn’t have support for custom ROMs, there’s always a plethora of Generic System Images that gives you a perfect opportunity to break free from the shackles of the One Ui and welcome abode an AOSP ecosystem. So without further ado, let’s get started.
Table of Contents
How to Install GSI ROM on Samsung Galaxy Devices

The below process will wipe off all the data from your device, so please take a complete device backup beforehand. Droidwin and its members wouldn’t be held responsible in case of a thermonuclear war, your alarm doesn’t wake you up, or if anything happens to your device and data by performing the below steps.
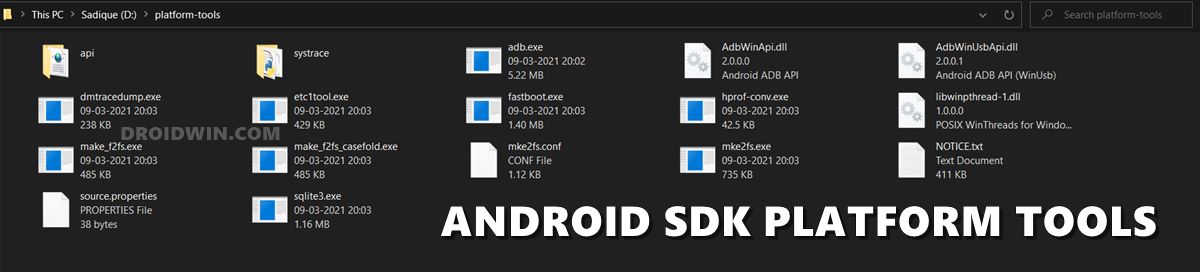
STEP 1: Install Android SDK
First and foremost, you will have to install the Android SDK Platform Tools on your PC. This is the official ADB and Fastboot binary provided by Google and is the only recommended one. So download it and then extract it to any convenient location on your PC. Doing so will give you the platform-tools folder, which will be used throughout this guide to install the GSI ROM onto your Samsung device.
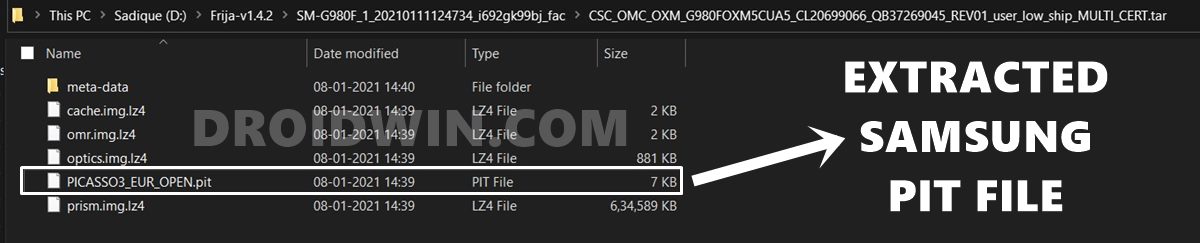
STEP 2: Extract PIT from Firmware
Next up, you now have to extract the PIT file from your firmware. For that, download the firmware from Frija Tool or a trusted website and then extract it. You will get a few files, out of which, you need to extract the CSC in order to get the PIT file. You may refer to our detailed guide to get this job done: How to Extract PIT File from Samsung Firmware.
STEP 3: Download Android 14 GSI
You may now get hold of the desired GSI for your Samsung device from any of the below-listed sources. Make sure to download the arm64 builds.
STEP 4: Enable USB Debugging and OEM Unlocking
You will also have to enable USB Debugging and OEM Unlocking on your device. The former will make your device recognizable by the PC in ADB mode. This will then allow you to boot your device to Fastboot Mode. On the other hand, OEM Unlocking is required to carry out the bootloader unlocking process.
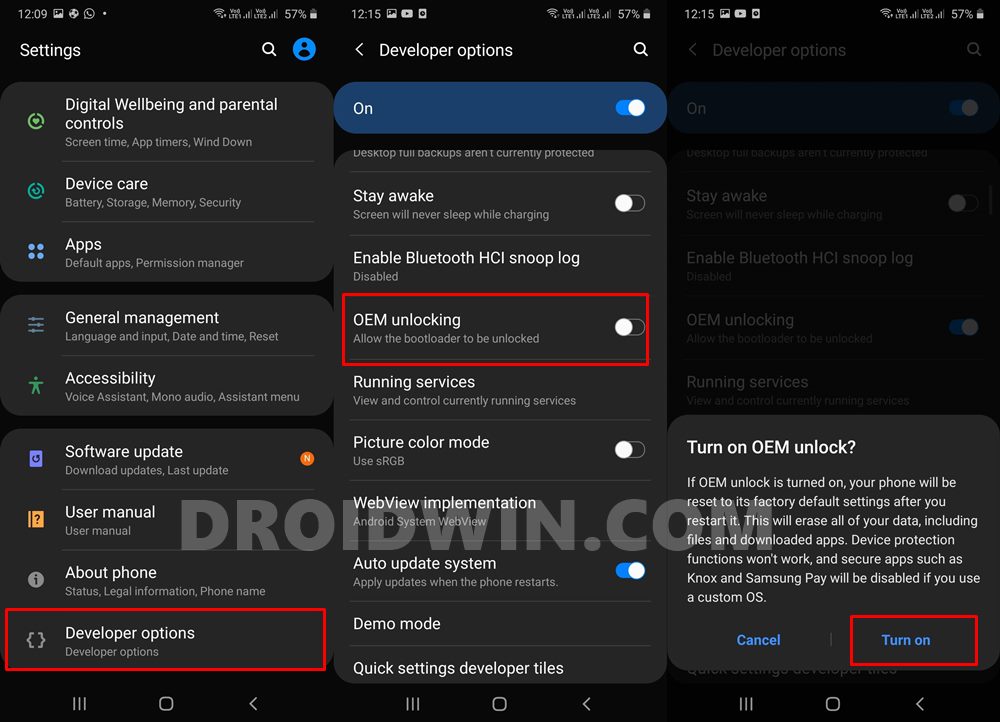
So head over to Settings > About Phone > Tap on Build Number 7 times > Go back to Settings > System > Advanced > Developer Options > Enable USB Debugging and OEM Unlocking.
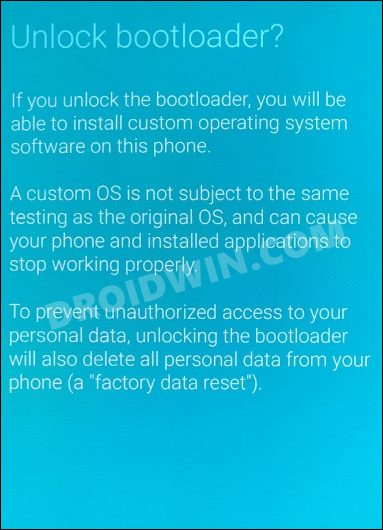
STEP 5: Unlock Bootloader on Samsung
You will also have to unlock the device’s bootloader to install the LineageOS GSI ROM onto the Samsung device. Do note that doing so will wipe off all the data from your device and could nullify its warranty as well. So if that’s all and good, then please refer to our guide on How to Unlock Bootloader on any Samsung Device [New VaultKeeper Method]
STEP 6: Boot Samsung Device to Download Mode
You will have to boot your device to Download Mode so that you are able to flash the required mods. So either refer to our detailed guide on How to Boot any Samsung Device to Download Mode or refer to the below shorter instructions:
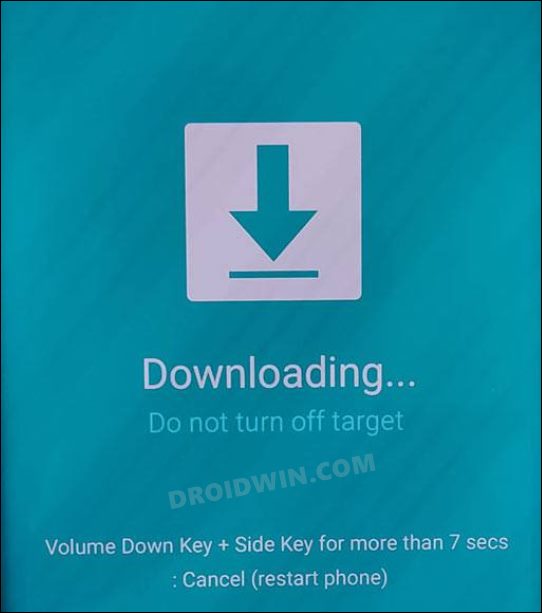
- To begin with, power off your device.
- Then press and hold the Power and Volume Up keys and your device will be booted to Stock Recovery.
- Now highlight the Reboot to Bootloader option using the Volume keys and then press the Power key to confirm it.
- Your device should now boot to the Download Mode.
STEP 7: Install Odin
Next up, you will have to download and install the Odin Tool onto your PC. This is needed to flash the TWRP and disable AVB on your device. So get hold of the latest Odin from here: Download: Odin3-v3.14.4.zip. Once downloaded, extract it to any convenient location on your PC.
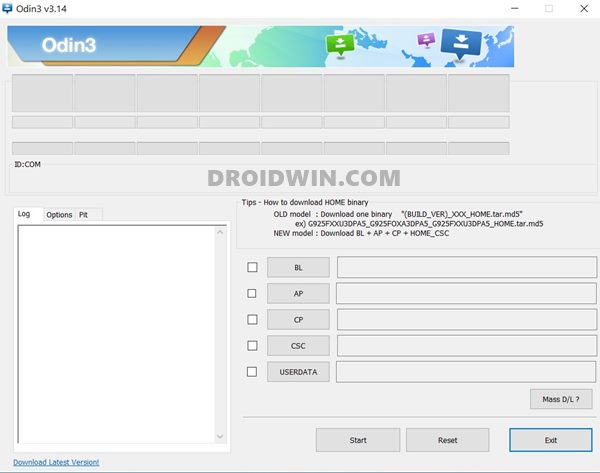
STEP 8: Flash PIT
You’ll now have to flash the PIT file onto your Samsung device via Odin. However, do not simply flash the PIT file, instead flash the rest of the firmware files as well. Here’s how:
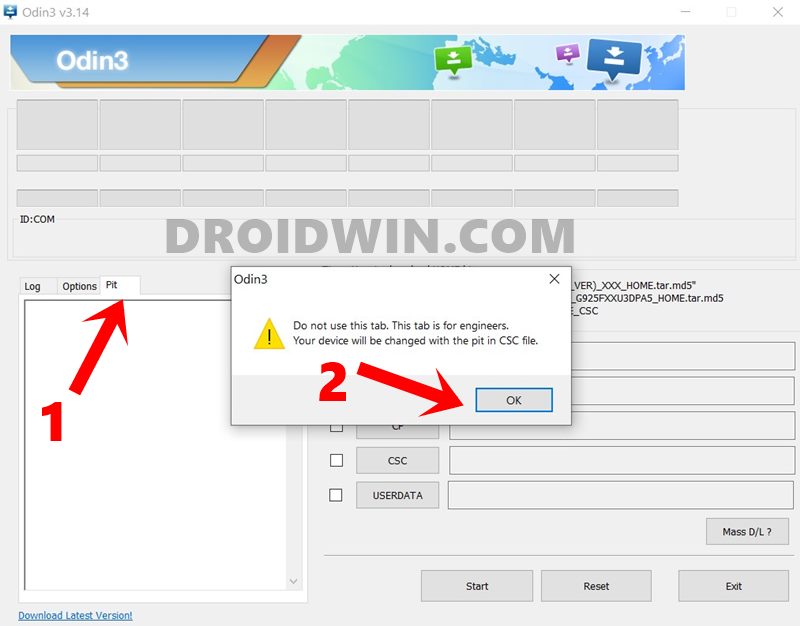
- Launch the Odin Tool on your PC and go to the PIT section. You will get a warning, click OK.

- Click on the PIT button, navigate to the extracted PIT file, select it, and hit the Open button to load the file.
- Once that is done, you will have to load the other firmware files as well. This is because the PIT file is never flashed alone, but with its associated files. So load the BL, AP, CP, and CSC (the normal CSC file, not the HOME CSC) files to the tool.
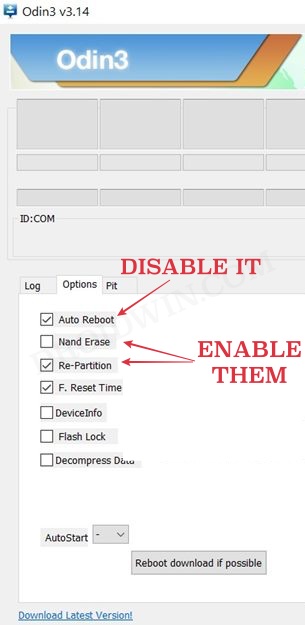
- Then go to the Options section of Odin and checkmark Re-Partition and Nand Erase. On the other hand, uncheck Auto Reboot.
- Finally, hit the Start button and wait for the process to complete. Once the flashing of the PIT file is finished, you should get the Pass message.


STEP 9: Disable Android Verified Boot
Next up, you will have to disable AVB on your device which would then allow you to flash the desired custom binary (in this case, TWRP).
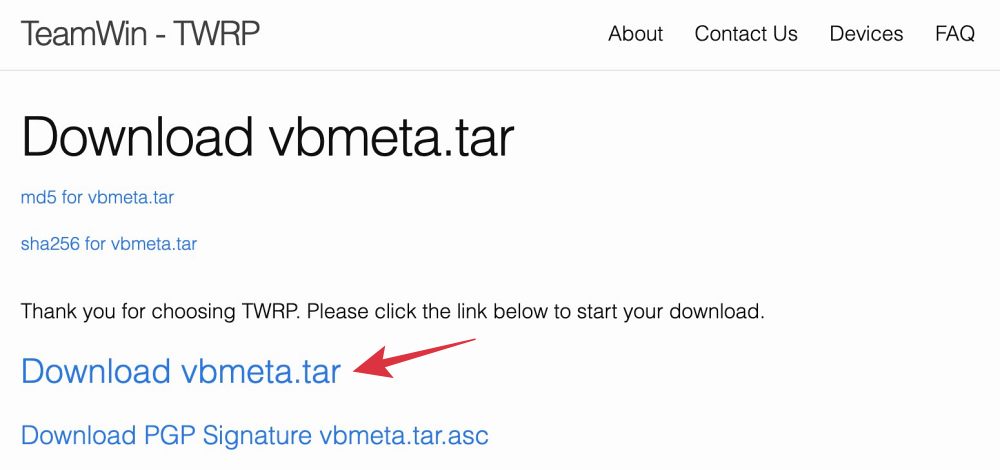
- Head over to the TWRP website and download the vbmeta_disabled.tar for your device.
- However, if your device doesn’t have one, then you may try this one: vbmeta_disabled.tar file.
- Now connect your device to the PC via USB cable (make sure that it is booted to Download Mode)
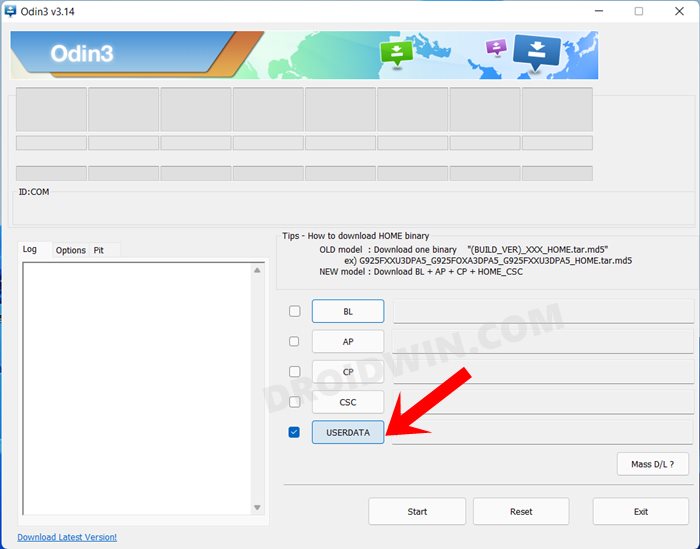
- Then launch the Odin Tool and click on the Userdata button.
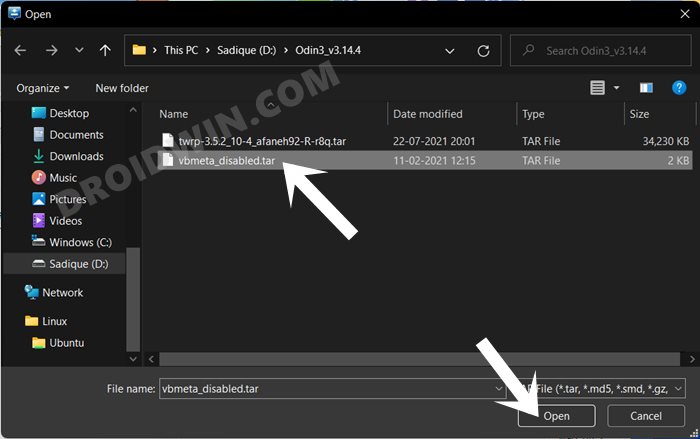
- Navigate to the vbmeta_disabled.tar file, select it, and click Open.
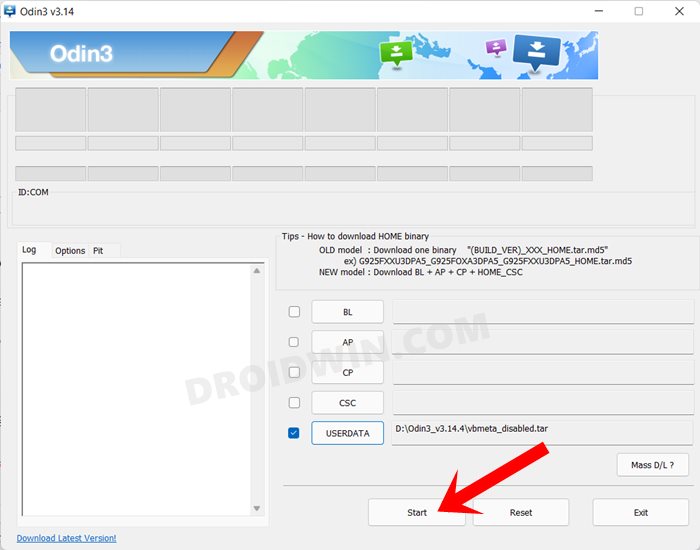
- Finally, click on the Start button. You shall now get a prompt on your device, stating that “You have to reset your device to factory settings”.
- So use the Volume Keys to select the reset option and hit the Power key to confirm it.
Your device will now undergo a reset and then, the AVB stands disabled. You may now proceed ahead to install the TWRP Recovery and the Android 14 GSI ROM on your Samsung device.
STEP 10: Install TWRP Recovery
You may refer to our detailed guide on How to Install TWRP Recovery or check out the below generic instructions for the same:
- Download the TWRP Recovery for your device from the official site or an unofficial trusted site like XDA.
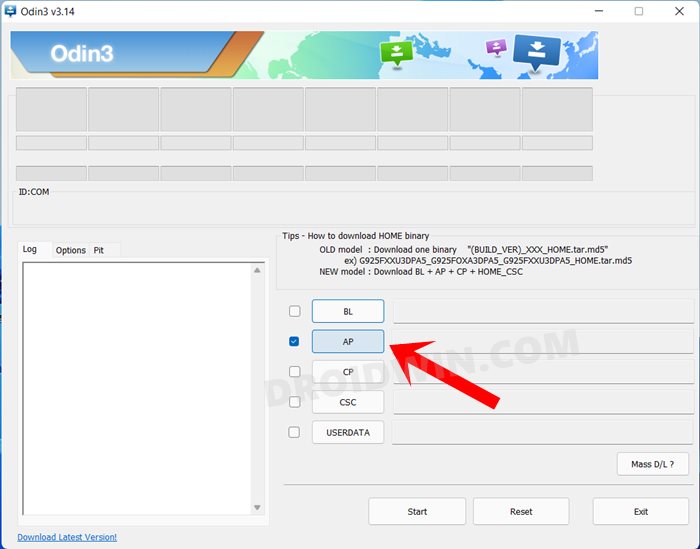
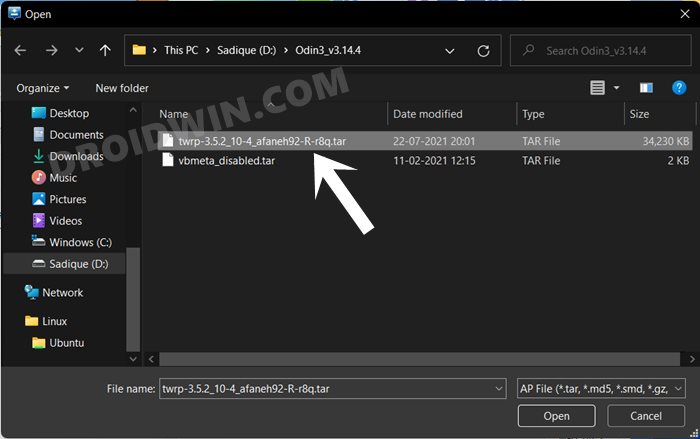
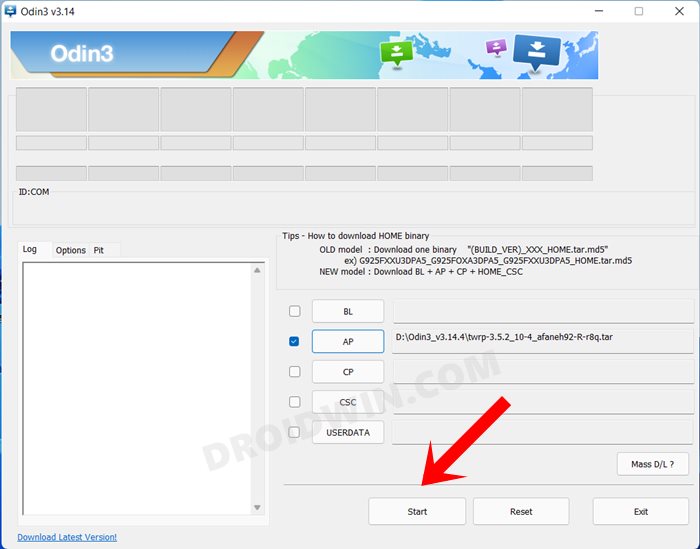
- Then launch the Odin Tool on your PC and click on the AP button.
- Navigate to the downloaded TWRP.tar file, select it, and click Open.
- Finally, hit the Start button and TWRP will be flashed onto your device.
- Now use the hardware key combinations to boot your device directly to TWRP.
STEP 11: Disable Encryption via TWRP
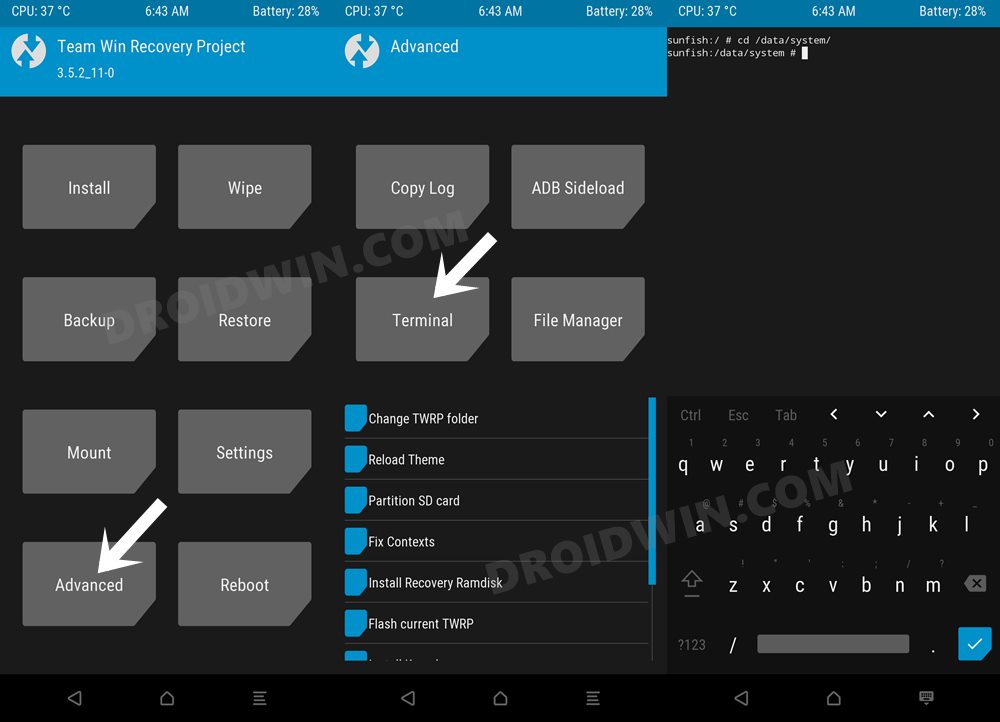
- Once your device boots to TWRP, go to Advanced > Terminal.
- Then type in the below command and hit Enter
multidisabler
- Your device will now resize the vendor and will ask you to run multidisabler again.
- So again execute the below command and hit Enter
multidisabler
STEP 12: Install GSI ROM via TWRP
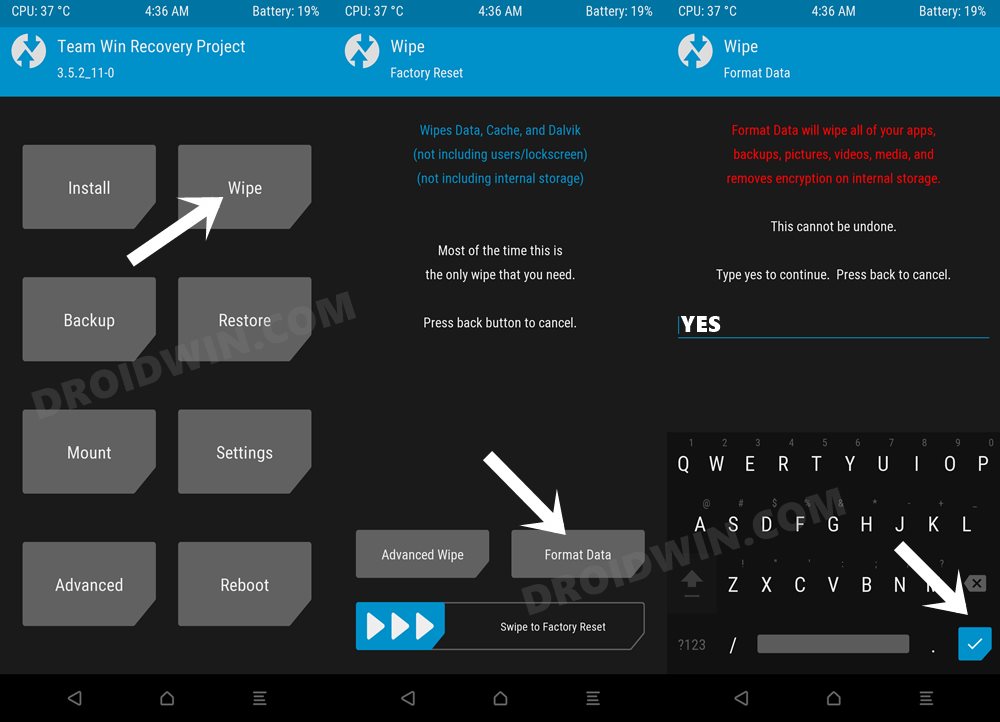
- From TWRP, go to Wipe > Format Data and type in YES in the space provided.
- Then hit the checkmark situated at the bottom right and wait for the wipe to complete.
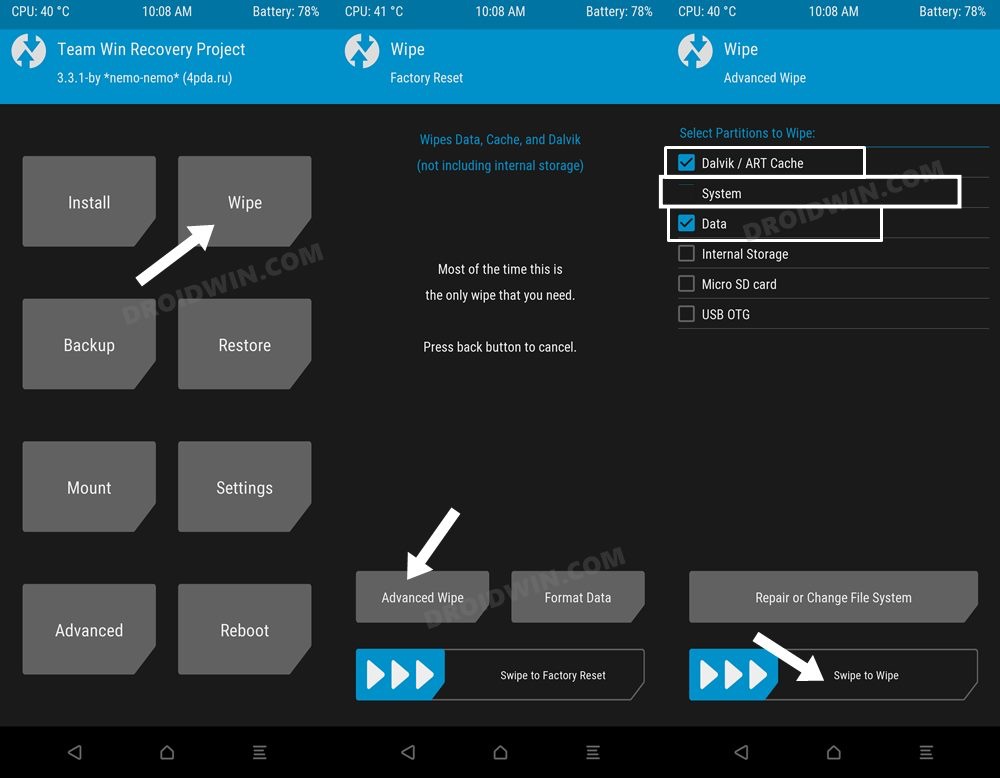
- Once done, go to Advanced Wipe and select Dalvik, Cache, Data, and System partitions.
- Then perform a right swipe to wipe these partitions.
- After that, transfer the GSI ZIP file to your device using ADB Sideload, Mount, or OTG.
- Then from TWRP, go to Install and tap on Install Image. Navigate to the GSI ROM IMG file and select it.
- Now choose the System Image partition and perform a right swipe to flash it. The flashing could take around 5-10 minutes.
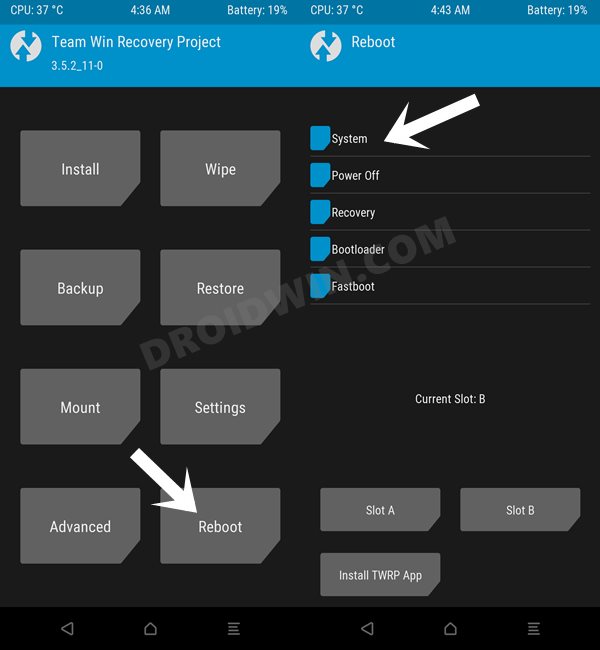
- Once done, go to Reboot and select System. Your device will now boot to the newly installed OS.

That’s it. These were the steps to install the GSI ROM on your Samsung Galaxy device. If you have any queries concerning the aforementioned steps, do let us know in the comments. We will get back to you with a solution at the earliest.
FAQ: GSI ROM Bugs and Bootloop Fixes
GSI ROMs are known to go through a few bugs and issues related to network, 5G, or VoWIFI/VoLTE. In case, you also come across such bugs, then you could refer to our below-listed guides to fix them.
- 5G, Bluetooth, 90Hz Display, DT2W, Headphone Jack, Brightness Slider not working in GSI ROM: How to Fix
- No Audio in Bluetooth/Wired Headphones in GSI ROM [Fixed]
- Fix WiFi/Internet/Network not working in GSI ROM [MediaTek]
- Fast Charging not working in GSI ROM: How to Fix
Likewise, if your device gets stuck in a continuous bootloop, then it’s most probably in need of disabling the verity checks, which requires flashing the vbmeta. All these have been explained in the below-linked guides, do check them out, if needed: