In this guide, we will show you the various methods to boot your Windows 11 PC to Safe Mode when it is unable to boot to the OS. Safe Mode is a special boot state that disables all the third-party apps and services and only runs the most essential OS components. So in case an app or software is causing a few issues with the proper functioning of the system, then you could boot to this mode, diagnose the issue and rectify it accordingly.
Regarding the methods to boot to this mode, there exists quite a ones, including the likes of System Configuration Menu, Startup Menu, Command Prompt, Sign-in screen, and others. However, all these methods will only work if you are able to boot to the OS in the first place. But if you are currently looking to boot your PC to Safe Mode, then there is every chance that your PC is currently bugged with an issue that might prevent it from booting to the OS.
So how could you then boot to this mode and debug and fix the underlying issues? Well, there exists a couple of nifty methods to boot your Windows 11 PC to Safe Mode when it is unable to boot to the OS. Apart from that, we will also make you aware of the methods to boot to Safe Mode when you could access the OS for a few seconds, which is usually the case in bootloops. Moreover, booting to Safe Mode in case of dual boot OS will also be discussed. So without further ado, let’s check them out.
Table of Contents
How to Boot Windows 11 to Safe Mode when it cannot boot to OS

There exist three different methods to boot to the Safe Mode in case the operating system is inaccessible- using the Automatic Repair Mode, a Bootable USB, and CMD from the Windows Recovery screen. We have listed all these methods below. Go through them and then decide which one is in sync with your requirement.
Method 1: Via Automatic Repair Mode
In this case, you will have to fake crash your PC a couple of times so as to trick Windows into believing that it is currently stuck in a bootloop. After a few attempts, Windows will bring up the Automatic Repair Mode from where we could boot your PC to Safe Mode. So refer to the below instructions to try it out:
- To begin with turn on your PC. As soon as Windows is booting up, turn it off via the Power button.
- Do so three continuous times. The fourth time you do so, Windows will take you to the Automatic Repair.
- From the Automatic Repair Mode screen, click on the Advanced Options present at the bottom right.

- You will now be taken to Windows Recovery Environment from where you could now easily boot to the Safe Mode.
- For that, select Troubleshoot from the Choose an Option screen.

- After that, select Advanced options.

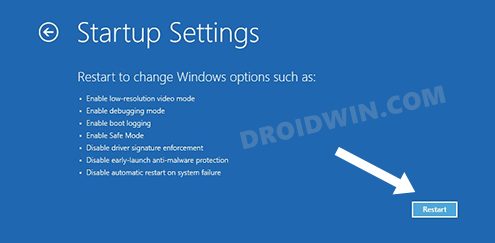
- Then select Startup Settings and click Restart at the bottom right.

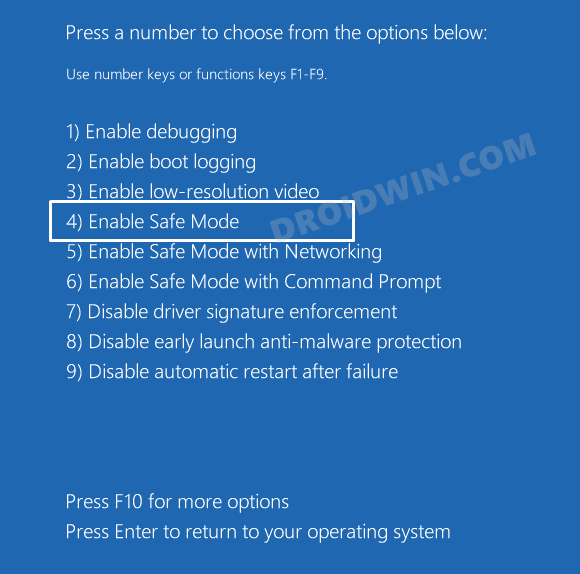
- Finally, press 4 and your PC will boot to Safe Mode.

So these were the steps to boot your Windows 11 PC to Safe Mode when it cannot boot to the OS. Let’s now make you aware of the second method to do to this job.
Method 2: Via Bootable USB
For this process, you will need another PC and a Pendrive with at least 8GB of free space (it will be wiped off during the process). So if that’s well and good, then proceed with the below steps:
- To begin with, head over to the Microsoft download center page
- Then click on Download Now under Create Windows 11 Installation Media.

- It will now download the Media Creation Tool. Plugin your USB device into the PC now.
- Launch it and proceed with the on-screen instructions to create a bootable Windows 11 USB.

- Once done, let’s turn our attention back to the affected PC. So plug in the Pendrive to this PC and power it on.
- As soon as it is booting up, continuously press the Esc key. It will bring up the Startup Options screen.

- Then press F9 for Boot Device Options and select your Pendrive from the list.
- Your PC will now boot via this Pendrive and it shall load the Windows Setup screen.
- Click on Next and then on Repair your computer button situated at the bottom left.

- You will now be taken to Windows Recovery Environment from where you could now boot to the Safe Mode as before.
- Just to recall, the path that you need to take is Troubleshoot > Advanced options > Startup Settings > Click Restart > Press 4 to boot to Safe Mode.
This was the second method to boot your Windows 11 PC to Safe Mode when it cannot boot to the OS. Let’s now check out the third and final method to carry out this task.
Method 3: Via Command Prompt from Windows Recovery
In this method, you will first have to boot your PC to the Windows Recovery Environment. For that, you may take the help of any of the two methods mentioned before [Method 1- Point 1 to 4, Method 2- Point 1 to 10]. Once you reach that mode, you may then refer to the below steps:
- From the Choose an Option screen, select Troubleshoot.
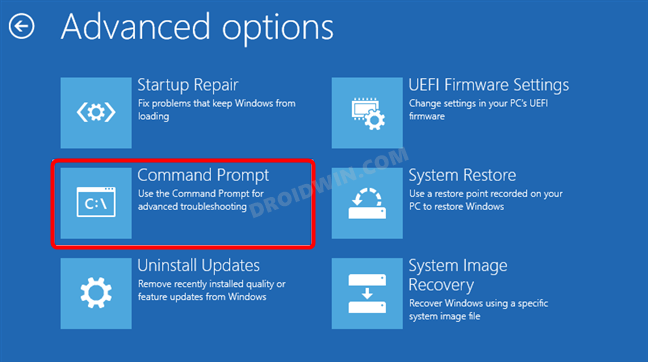
- After that select Advanced Options > Command Prompt.

- Now type in the below command in the CMD window and hit Enter:
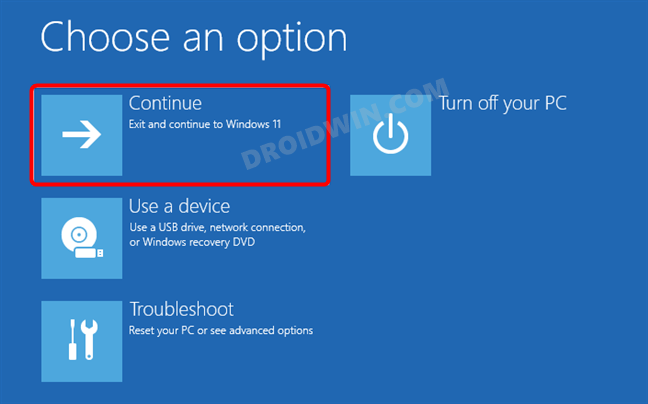
bcdedit /set {default} safeboot minimal - Now close the CMD window and click Continue. Your PC will now boot to the Safe Mode.

However, the thing is that we have set the safe boot as default boot mode (check the command above). So from now on, your PC will now boot to Safe Mode every time. To stop that from happening, here’s what you need to do:
- Since you could now access the OS (via Safe Mode), bring up the Run dialog box via Windows+R shortcut keys.
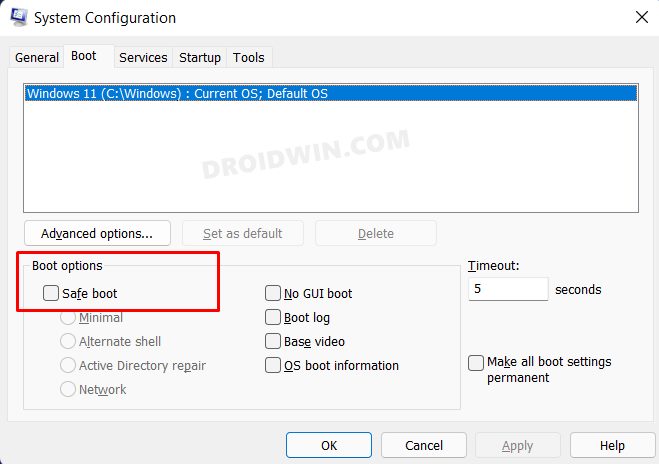
- Then type in msconfig and hit Enter. It will open the System Configuration menu.

- Now go to its Boot tab and uncheck Safe Mode. Then click Apply > OK to save the changes.
- That’s it. Your PC will now boot to the ‘normal mode’ the next time you start it.
So these were the three different methods to boot your Windows 11 PC to Safe Mode when it cannot boot to the OS.
How to Boot Windows 11 to Safe Mode when it is in a Bootloop
If your PC is currently stuck in a bootloop, we would still suggest you try out the three methods mentioned above. However, if during the bootloop you could access the OS for close to 20-30 seconds, then you could also try out the below methods (you need to be a little bit quicker though):
Method 1: Via Start Menu
- Bring up the Start menu. Then while pressing the Shift key, click on Restart.

- Your PC will now boot to Windows Recovery. Now follow the same process as above to boot to Safe Mode.
- To recall, it was Troubleshoot > Advanced options > Startup Settings > Click Restart > Press 4 to boot to Safe Mode.
Method 2: Via Command Prompt
- Head over to the Start menu and open CMD as an administrator.
- Then execute the below command and hit Enter. You will be taken to Windows Recovery.
shutdown.exe /r /o

- Go to Troubleshoot > Advanced options > Startup Settings > Click Restart > Press 4 to boot to Safe Mode.
Boot Windows 11 to Safe Mode when it cannot boot to OS: For Dual Boot PCs
If your PC has two operating systems installed and it is unable to boot to the OS, then it will automatically take you to the OS selection screen. On that screen, you will see ‘Change defaults or choose other options’, so click on it.

You will be taken to the Windows Recovery Environment from where you could boot to the Safe Mode via the same route as before: Troubleshoot > Advanced options > Startup Settings > Click Restart > Press 4 to boot to Safe Mode.
Additional: Boot Windows 11 to Safe Mode when you can access the OS
So by now, you are aware of the various methods to boot your Windows 11 PC to Safe Mode when it is unable to boot to the OS or stuck in a bootloop. As a rounding-off remark, I thought of sharing the steps to boot your Windows 11 PC to Safe Mode when you are in a position to access the OS. So apart from all the methods mentioned above, you could also use the below two methods- via Settings menu and from System configuration menu.
Method 1: Via Settings Menu
- Bring up the Settings menu via Windows+I shortcut keys and select Recovery.

- Then click on Restart Now under Advanced Startup.

- Again click on Restart Now in the confirmation dialog and your PC will boot to Windows Recovery Environment.
- You could now boot to Safe Mode via Troubleshoot > Advanced options > Startup Settings > Click Restart > Press 4 to boot to Safe Mode.
Method 2: Via System Configuration Menu
- Bring up the Run dialog box via Windows+R shortcut keys.
- Then type in the below command and hit Enter to open System Configuration Menu
msconfig

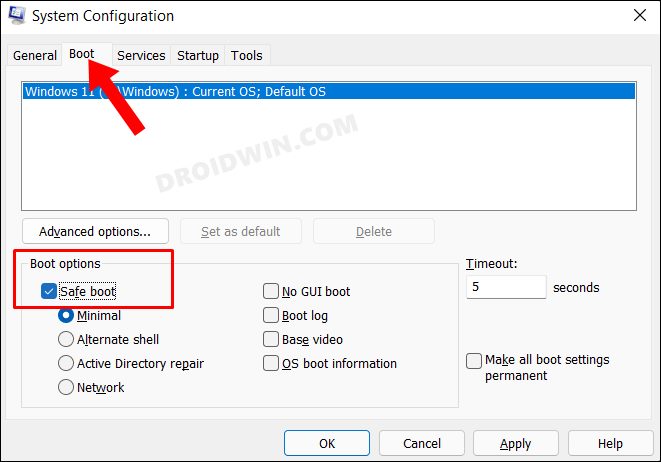
- Now go to its Boot tab and checkmark Safe Mode under Boot Options.
- Finally, click OK followed by Restart in the confirmation dialog box.
Your PC will now boot to Windows Recovery Environment. You may now boot it to Safe Mode via Troubleshoot > Advanced options > Startup Settings > Click Restart > Press 4 to boot to Safe Mode.
So with this, we round off the guide on how you could boot your Windows 11 PC to Safe Mode. We have shared all the plausible scenarios: when it cannot access the OS, when it is stuck in a bootloop, for Dual boot PCs, and also for the PCs that are working well and good. If you have any queries concerning the aforementioned methods, do let us know in the comments section below.


