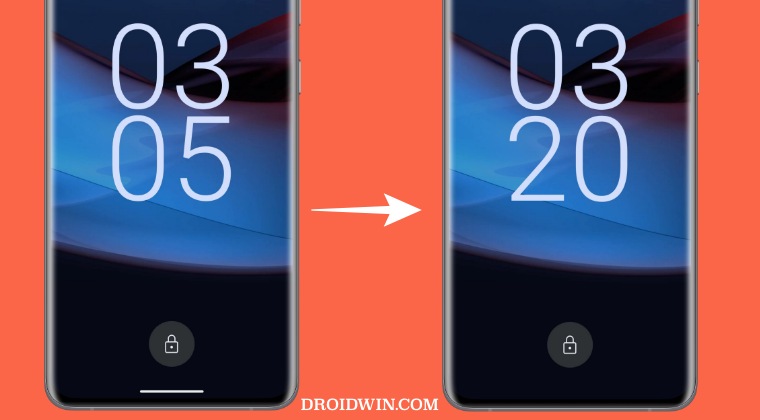
In this guide, we will show you two methods to hide/remove the gesture pill in the navigation bar on Android. When the tenth iteration of the OS was released, one of the major talking points that stood out was the addition of the gesture-style system navigation. Along with that, there was a small pill at the bottom of the screen which literally served no useful purpose as such.
On the flip side though, it resulted in minor UI obstruction while using the device. And to make matter worse, Google didn’t provide any option to hide/remove the gesture pill in the navigation bar on Android. With that said, we did manage to grab hold of two nifty workarounds through which you could easily get this job done. So without further ado, let’s check it out.
Table of Contents
Hide/Remove the Gesture Pill in Navigation Bar on Android 13 via HiveNavBar [Root]
- First off, make sure to root your device via Magisk.
- Then download the HiveNavBar module from GitHub.
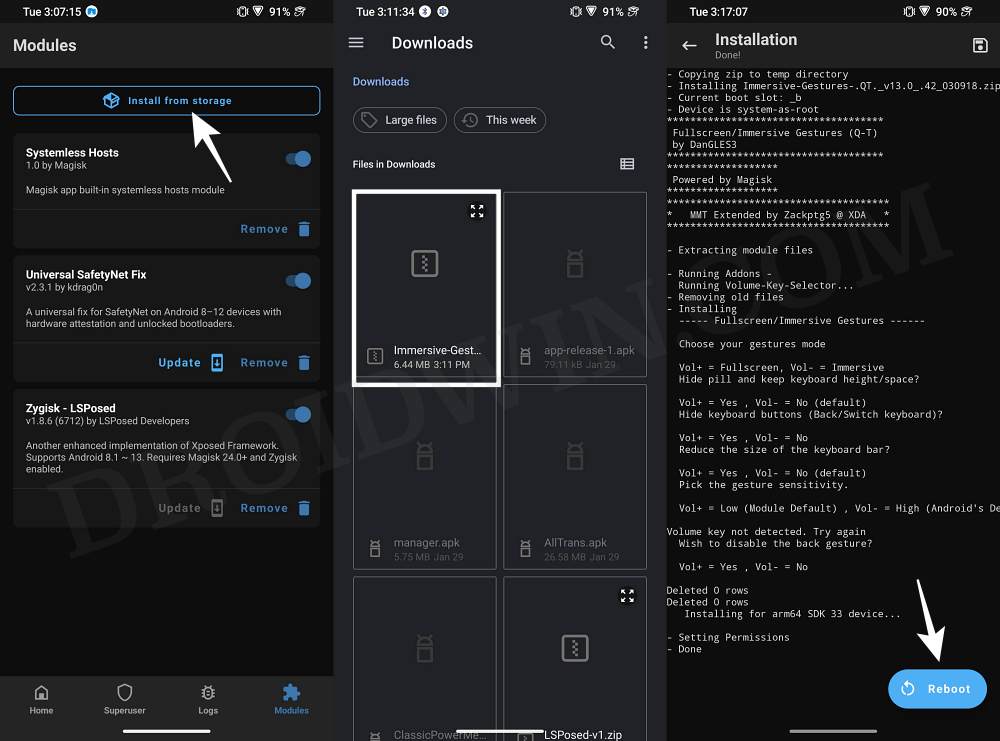
- Now launch Magisk and go to the Modules section.
- Then tap on Install from Storage and select HiveNavBar.
- Now under “Choose your gestures mode,” press Volume Down to select “Immersive.”

- Then under “Hide pill and keep keyboard height/space?” press Volume Down for No.
- Next up, under “Reduce the size of the keyboard bar.”, press Volume Up for Yes.
- Finally, under Gesture Sensitivity, press Volume Down to select High.
- Once done, hit Reboot. Your device will now restart with the gesture pill removed.
That’s it. These were the steps to hide the gesture pill in the navigation bar on Android via root. Let’s now make you aware of the second root method that will help you get this job done.
Hide/Remove the Gesture Pill in Navigation Bar on Android 13 via AOSP Mod [Root]
This mod supports all Pixel devices and firmware that is AOSP based without heavy modifications. You could also use it across AOSP-based custom ROMs as well.
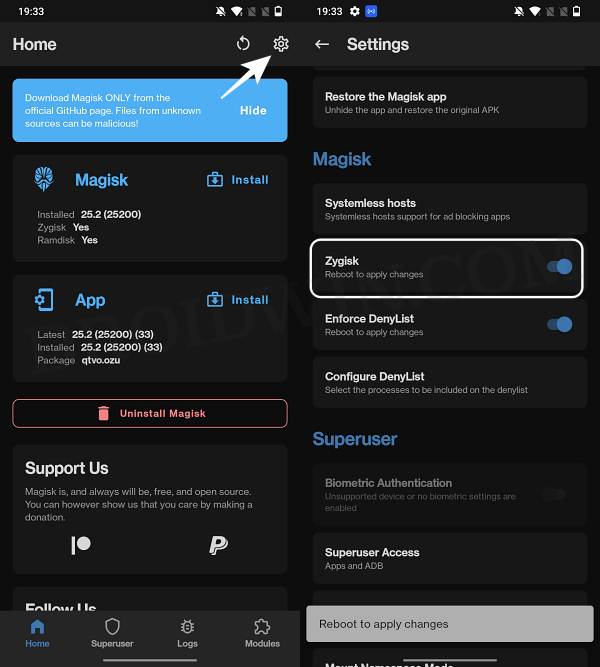
- Launch the Magisk app and tap on the settings icon at the top right.
- Then enable the toggle next to Zygisk and restart your device.
- Now download the LSposed Module (Zygisk Version) and transfer it to your device.
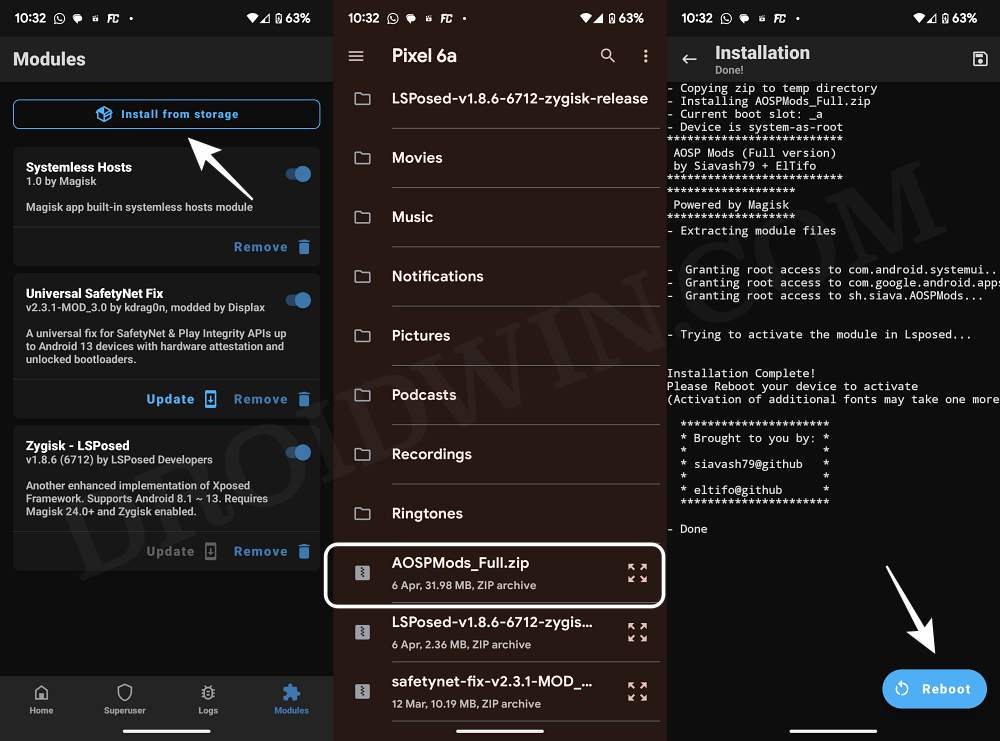
- Then launch Magisk, go to the Modules section, and tap on Install from Storage.
- Now navigate to the LSposed Module and select it. It will now be flashed. Once done, hit Reboot.
- Then download the AOSP Mod and flash it onto your device via Magisk. Once done, hit Reboot.
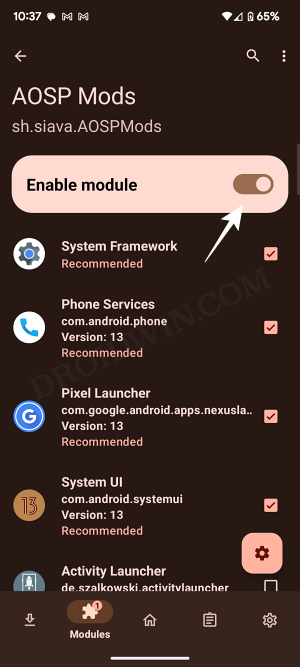
- Now launch LSPosed, go to Modules, select the AOSP Mods, and turn on the toggle next to Enable.
- Once done, launch AOSP Mods and grant it the Magisk request.
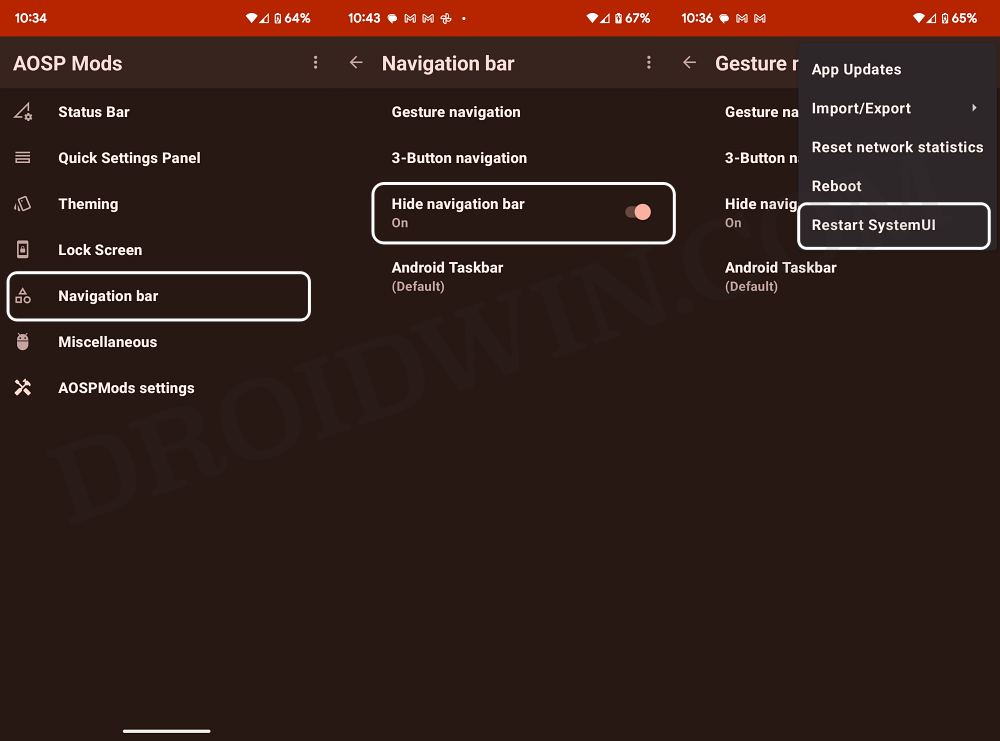
- Then go to Navigation Bar and enable the toggle next to “Hide Navigation Bar”.
- Now tap on the overflow icon at the top right and select Restart System UI for the change to be implemented.

Hide/Remove the Gesture Pill in Navigation Bar on Android 13 [Non-Root]
UPDATE: This method has been patched by Google and might no longer work.
- To begin with, download Android SDK Platform Tools and extract it to any convenient location on your PC. This will give you the platform tools folder, which we will be using throughout this guide.
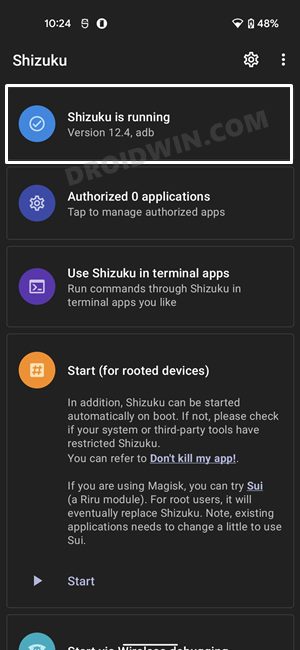
- Next up, download and install the Shizuku App from Play Store. Then launch it and as of now, you should see the Shizuku is not running message, not an issue, we will make it run via ADB command.
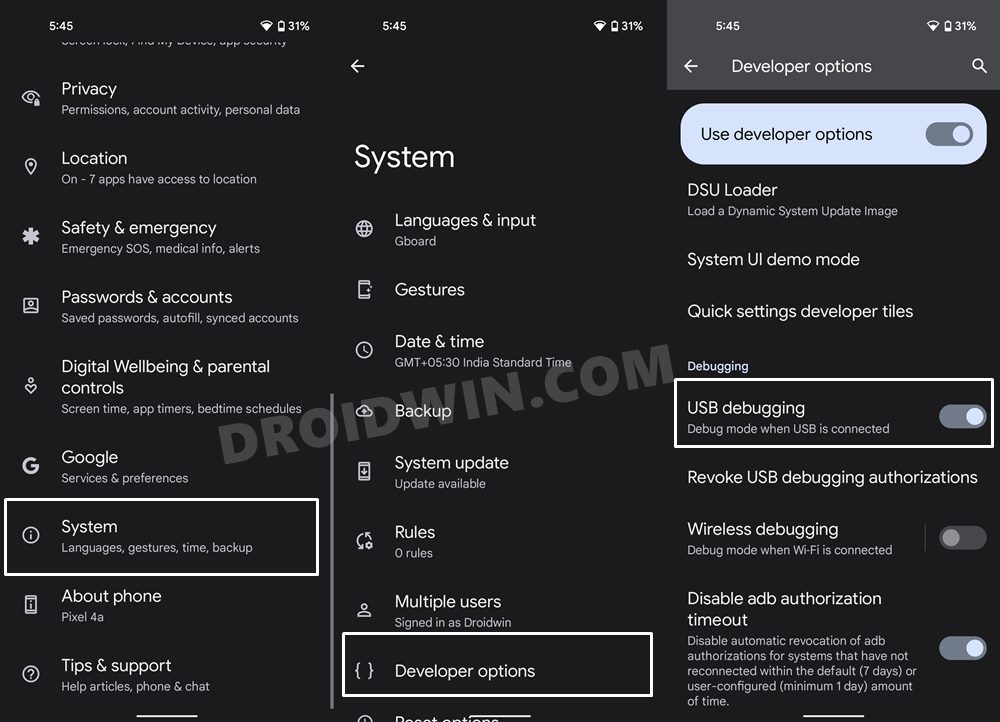
- So head over to Settings > System > Tap on Build Number 7 Times > Go back to Settings > System > Developer Options > Enable USB Debugging.
- Now connect your device to the PC via USB cable. Then head over to the platform-tools folder, type in CMD in the address bar, and hit Enter. This shall launch the Command Prompt.
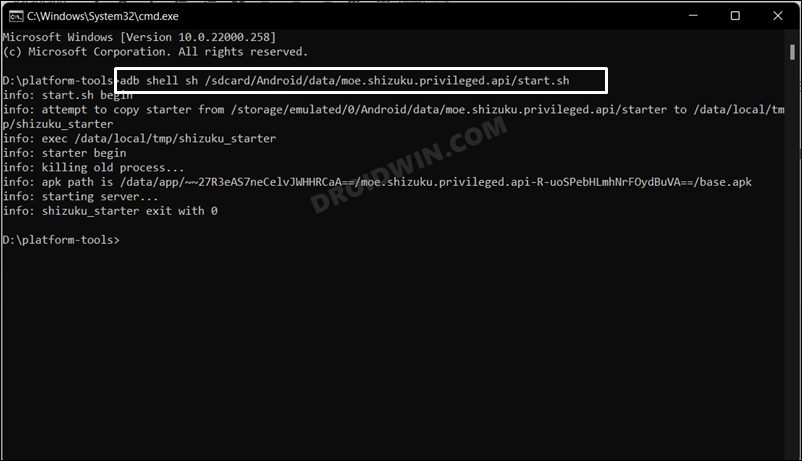
- Now type in the below command in the CMD window to launch the Shizuku App:
adb shell sh /sdcard/Android/data/moe.shizuku.privileged.api/start.sh
- You should now see the Shizuku is running message and we are now good to go ahead.
- Now download and install the Fabricate Overlay app on your device from GitHub. Here’s the direct link for the same: Fabricate Overlay v1.0.2 APK
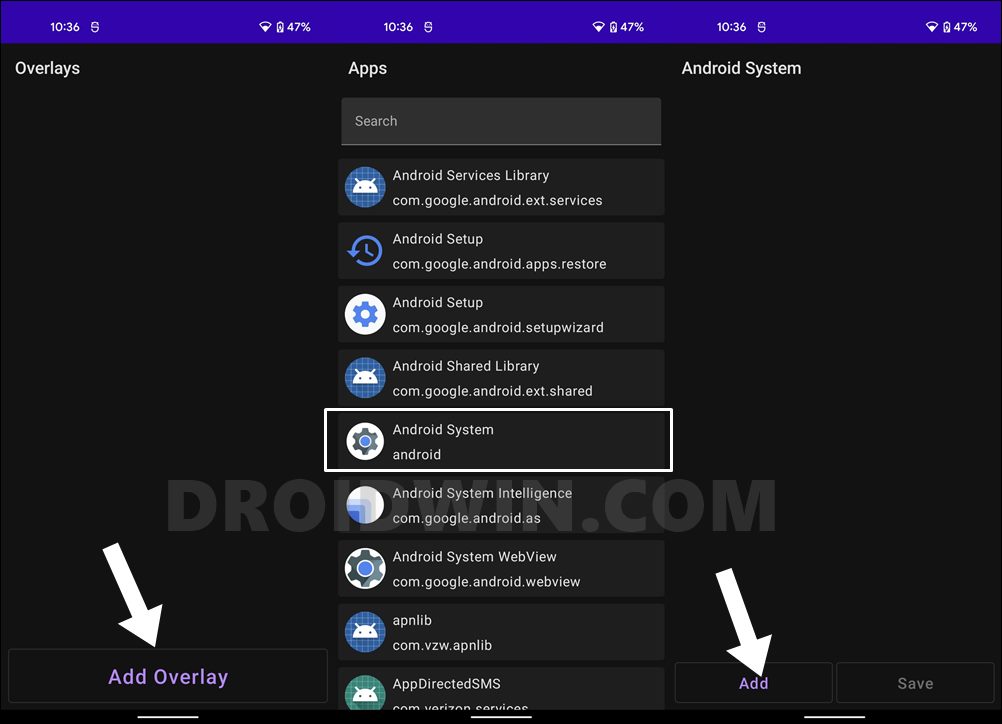
- Launch the app and tap on the Add overlay button situated at the bottom.
- After that, select Android System from the list and tap on Add.
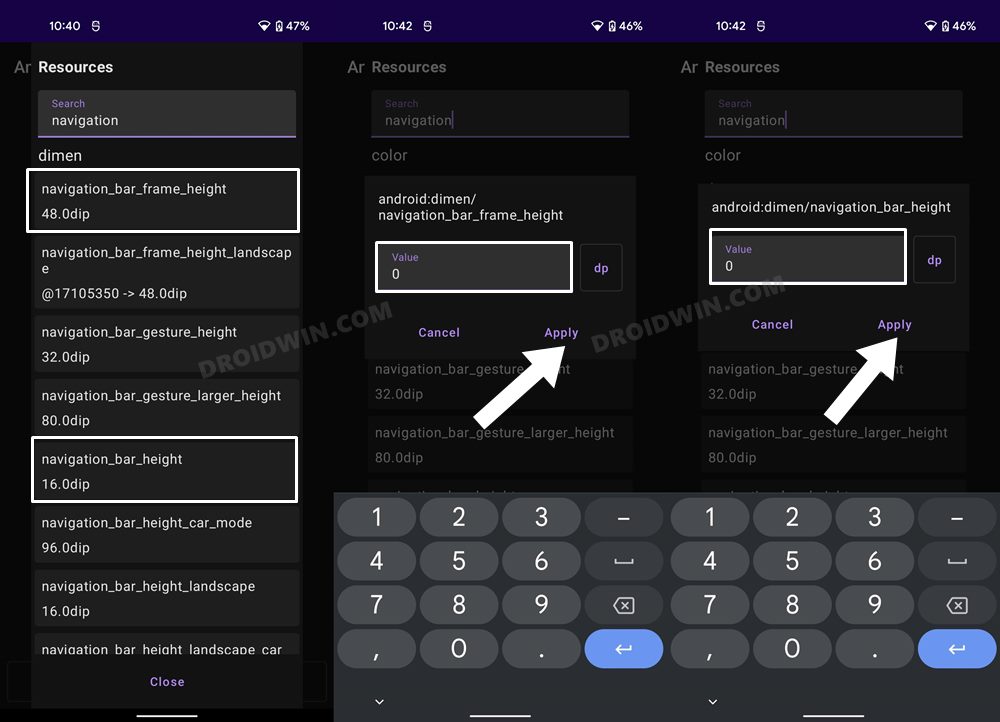
- Then type in navigation in the search bar and scroll to the Dimen.
- Now select the navigation_bar_frame_height, input 0 in the Value field and tap Apply.
- Then select the navigation_bar_height, type in 0 in the Value field and tap Apply.
- Now hit the Save button, give this overlay a name, and hit Save.
- Finally, checkmark this overlay to activate it.
- That’s it, the overlay will now be activated and subsequently, the pill will be hidden.


That’s it. These were the two different methods to hide the gesture pill in the navigation bar on Android. If you have any queries concerning the aforementioned steps, do let us know in the comments. We will get back to you with a solution at the earliest.


Alex Kenowall
Second method is working, but it ruin original ( very cool ) font in my Nothing phone 1 ( nothing os 2.0 ) does anyone know how to fix this problem?
FlorinM
Just did the shizuku method in my non rooted pixel 3 with stock android 12 and it worked. But how do we hide the gestures pill bar also in landscape mode? I still see the bar, but without the pill.
Kaja
HideNavBar doesn’t work for me but the Content #2 works for me Thank you so much
IDA447
is this post really from January 31, 2023? because the rootless methods were patched out in android 12/13
Buzi
I would love if it would work on non rooted devices but it doesn’t
The app overlay crashes every time on my pixel 7
rabugi
as soon as you type in add overlay ist crashes. completely useless
Nicki
I’ve encounter the same issue with my Pixel 6 (Android 14 Beta), Now my only option is sending feedback to Google so that they can add option to hide navigation bar themself