In this guide, we will show you various methods to fix the issue of Windows 11 unable to assign a drive letter on your PC. As you might be aware, all the drives on your PC are assigned a letter. In this regard, the drive where your system files and OS is present by default is tagged C, and the other drivers that you end up creating afterward would be given subsequent letters. Likewise, all the USB devices that you connect to your PC are assigned a temporary letter, depending on the drive.
As you might have noticed, all this is taken care of by the OS itself, you don’t have to manually assign these letters. But what is the need to assign letters to these drives? Well, it tends to give a unique indication to each of these drives, which helps the Storage partition of your PC in identifying them. However, in some instances, your PC might not be able to assign a letter to the connected device. This in turn would lead to the Storage partition’s inability to identify the connected device.
As a result, the said device would not appear in the File Explorer, or anywhere for that matter. This would then translate to your inability to use that device, which would be the last thing that you would wish for. Fortunately, there do exist a couple of workarounds that have been known to fix the issue of Windows 11 being unable to assign a drive letter. And in this guide, we will make you aware of just that. So without further ado, let’s get started.
Table of Contents
How to Fix: Windows 11 Unable to Assign Drive Letter?
There exists three different methods through which you could rectify the aforementioned issue. Apart from that, we will also show you the steps to manually assign the drive letters on your Windows 11 PC. Follow along.
FIX 1: Restart Virtual Disk Service
The Virtual Disk Service is responsible for automatically assigning drive letters. So if there’s an issue with this service, then your drive will remain unsigned and hence the Storage Sense wouldn’t be able to identify or read it. So the best way out is to restart this service, which could be done as follows:
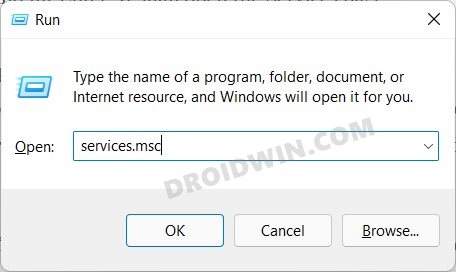
- Use the Windows+R shortcut keys to bring up the Run dialog box.
- Then type in the below command and hit Enter:
services.msc

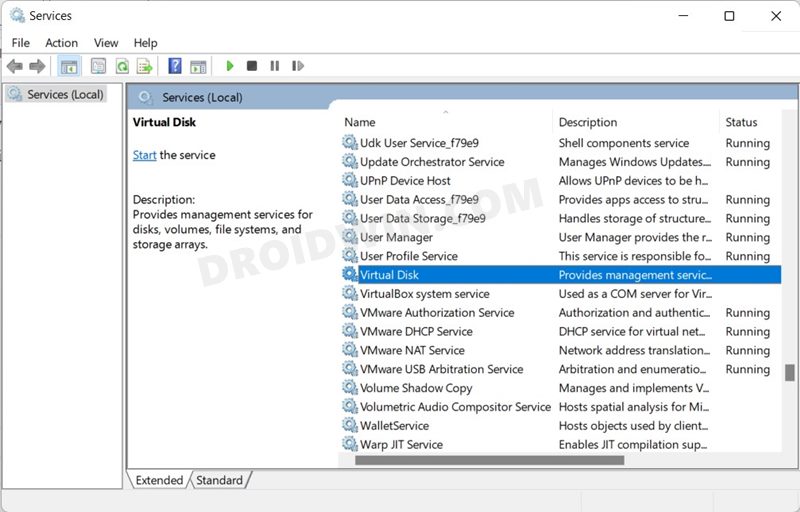
- This shall launch the Services menu. Scroll to Virtual Disk and double-click on it to open its Properties window.
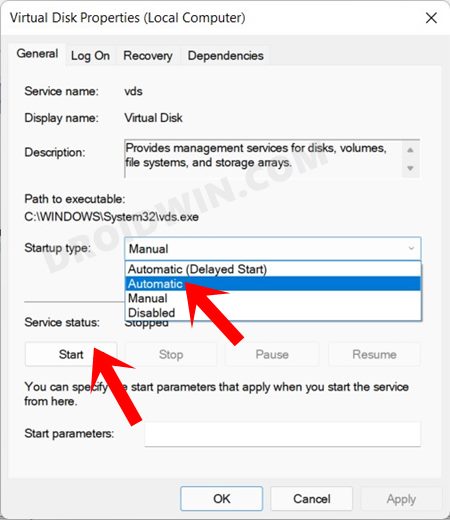
- Now change its Startup Type to Automatic and then click on Start. If it is already running, then click Stop and then Start.
- Finally hit Apply > OK to save the changes.
- Now connect the desired device to the PC (if required) and verify if it is able to fix the Windows 11 unable to assign a drive letter issue.
Troubleshooting Tips: If for some reason you are unable to Start/Stop the Virtual Disk Service, then there’s an alternate way out. You could carry out this task via the CMD window as well, here’s how:
- Head over to the Start Menu and launch Command Prompt as an administrator.
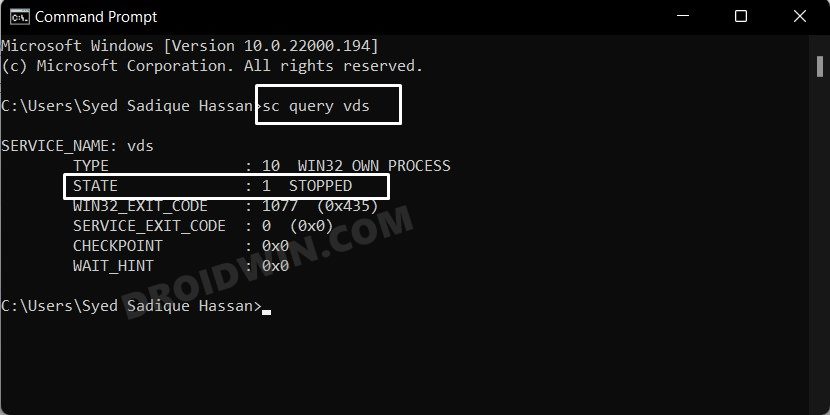
- Then type in the below command to verify the current status of the service:
sc query vds
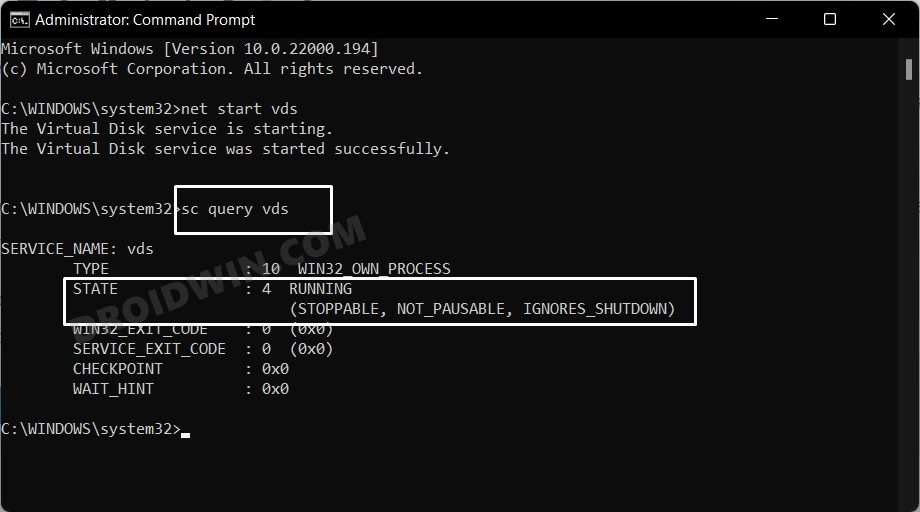
- If it spells out as STOPPED, then use the following command to start that service:
net start vds
- Now restart your PC and then verify if the Windows 11 unable to assign a drive letter issue has been fixed or not.
FIX 2: Enable Auto-Mount
In its default nature, storage partitions automatically mount the connected device and subsequently assigns the drive letter as well. However, if for some reason the partition fails to mount them, then the letter assignment of the drives would fail as well. So you should consider manually carrying out this task via Diskpart and CMD. Follow along.
- Head over to the Start Menu, search CMD, and launch it as an administrator.
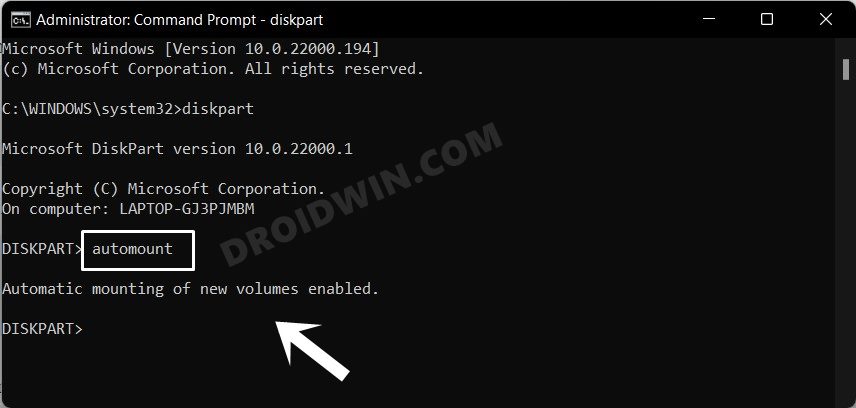
- Now type in the below command to open the Disk Partition Tool:
diskpart
- Then type in the below command to check the mount status:
automount
- If it is disabled, then execute the following command to enable Auto-Mount
automount enable
- Finally, type in the below command to close the Disk Partition:
exit
- Now check if the Windows 11 unable to assign a drive letter issue stands fixed or not.
FIX 3: Disable Drive Hidden Attributes
In some instances, the Hidden and/or No default drive letter attributes get activated on your system. When that happens, the File Explorer wouldn’t be able to display any drive letter, even if everything is working well and good with Storage Sense. To rectify it, the procedure is fairly simple- you just need to disable this Hidden attribute. Here’s how:
- To begin with, connect the device to the PC that is currently facing the issue.
- Then head over to the Start menu and launch Command Prompt as an administrator.
- Now launch the Disk Partition Tool via the following command:
diskpart
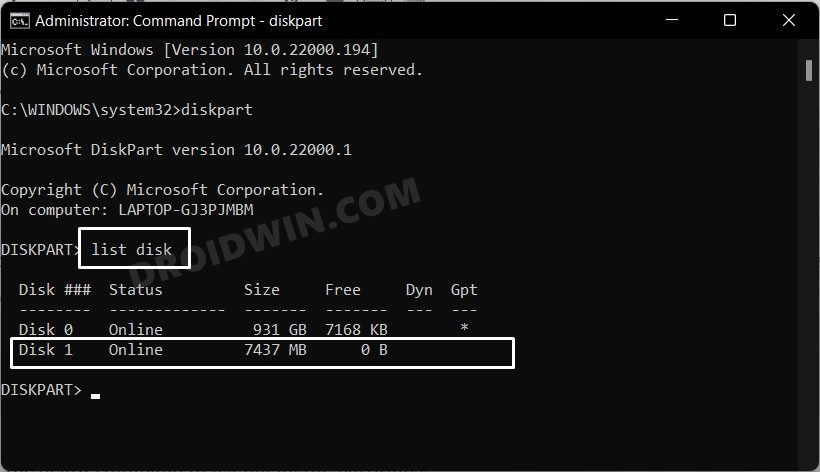
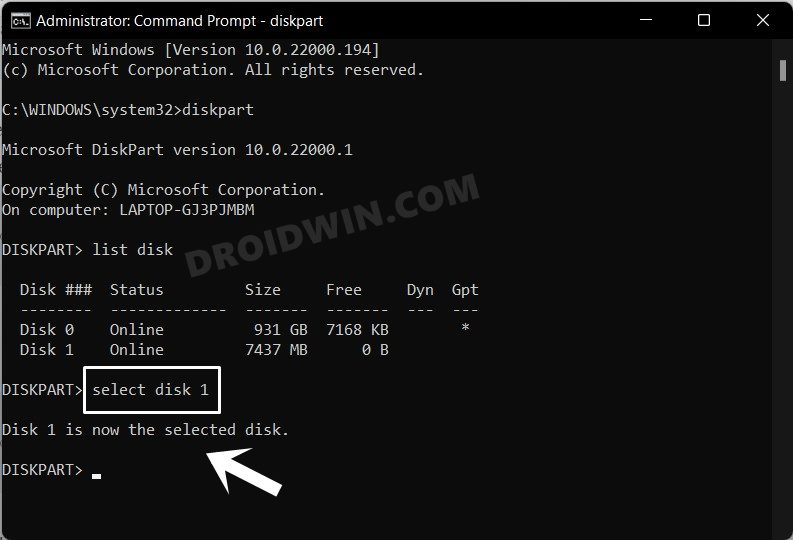
- After that, use the below command to list out all the disks on your PC:
list disk
- Now copy the disk number next to that connected device (refer to the Disk ### column).
- After that, execute the below command to select that disk
select disk <DiskNumber>
- Make sure to replace the <DiskNumber> with the value that you got from the list disk column. In our case, this command will transform to:
select disk 1
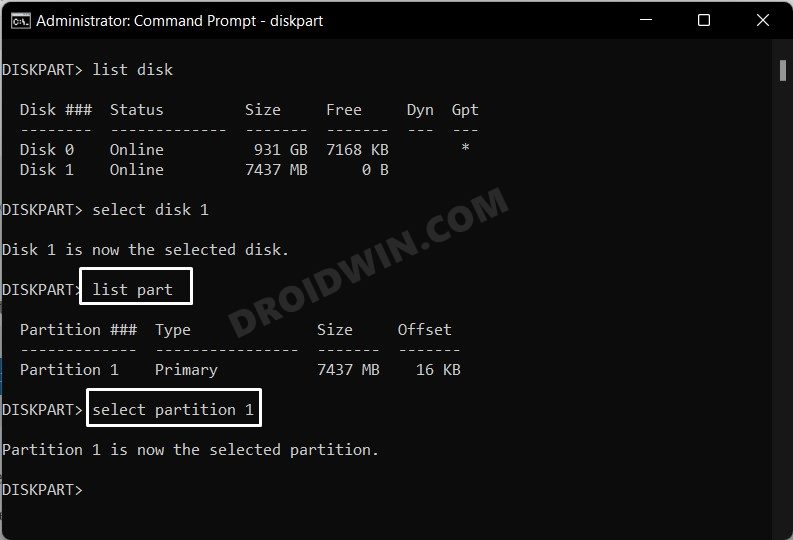
- Then type in the below command to list out all the partitions:
list part
- Now copy the value of the biggest partition (refer to the Partition ### for the value)
- After that, use the below command to select that partition
select partition <PartitionNumber>
- As before, make sure to replace <PartitionNumber> with the value that you got from the list part command. So in our case, this command will transform to:
select partition 1
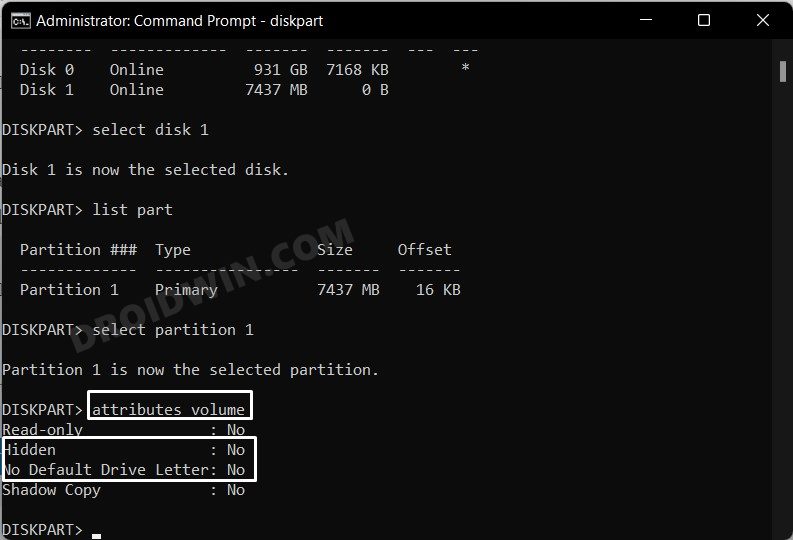
- Now execute the below command to check all the attributes of the selected partition:
attributes volume
- If the “Hidden” and “No default drive letter” spells out YES, then you will have to disable them using the below two commands:
attributes volume clear hidden
attributes volume clear nodefaultdriveletter
- Finally, type in the below keyword to close the Diskpart
exit
- Check if it is able to fix the Windows 11 unable to assign a drive letter issue.
FIX 4: Manually Assign Disk Letters in Windows 11
If none of the aforementioned methods managed to spell out success, then lets’ manually carry out this task. And as opposed to other manual tweaks, this hardly takes a minute to complete. So on that positive note, let’s get started.
- To begin with, connect your device to the PC.
- Then use the Windows+R shortcut keys to launch the Run dialog box.
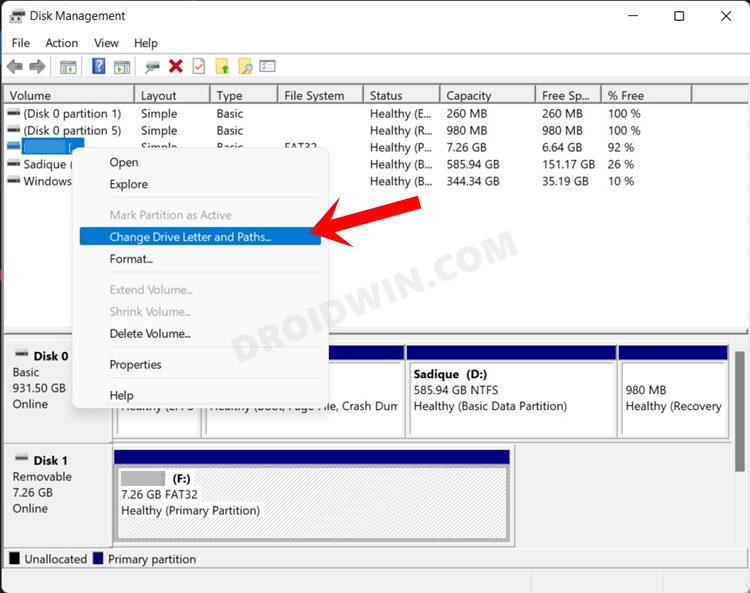
- Now, type in the below command to open the Disk Management Tool:
diskmgmt.msc
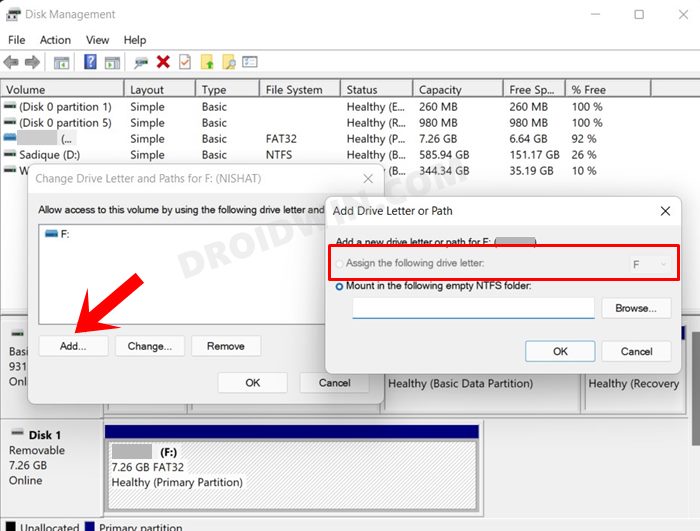
- Now select your device from the Volume column, right-click on it and choose “Change drive letter and paths”.
- After that, click Add > “Assign the following drive letter”. Select the desired letter from the drop-down menu and click OK.
- You have successfully assigned a letter to the drive and the File Explorer and Storage Sense should have no trouble in identifying it now.

With this, we round off the guide on how you could fix the Windows 11 unable to assign a drive letter issue. We have shared four different methods for the same. Do let us know in the comments section which one spelled out success for you.


