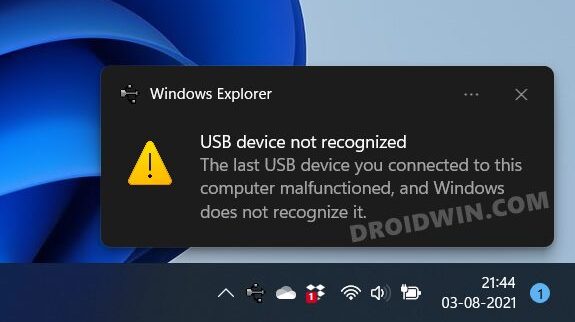
In this guide, we will show you various methods to fix the USB Device Not Recognized Error in Windows 11. If you create a list of issues that are most frequent in nature and at the same time the most infuriating as well, then the inability of the OS to read the connected device would definitely occupy among the top spots. Now, there could be quite a few plausible reasons as to why the issue happened in the first place.
Right from using old drivers to issues with the USB device itself, from using corrupt drivers to issues with the USB Port on your PC, or even the FAT-32 File System, any of them could result in this error. Fortunately, in a majority of the cases, this error is linked with a software side issue and could easily be rectified via a few handy tweaks. And this is where this guide shall help you out. Given here are the various methods that shall help you fix the USB Device Not Recognized Error on your Windows 11 PC.
- How to Fix Internet or WiFi Not Working in Windows 11
- How to Create and Restore a System Restore Point in Windows 11
- 5 Methods to Fix Windows 11 Search Not Working Issue
- How to Enable or Disable Network Adapters in Windows 11
Table of Contents
How to Fix USB Device Not Recognized Error in Windows 11
Do keep in mind that there’s no universal fix as such. You will have to try out each of the below-mentioned workarounds until one of them spells our success for you. So keeping that in mind, let’s get started.
Fix 1: Use USB 2.0 Port | Official USB Cable
To begin with, you should try connecting your device to the USB 2.0 Port. There are still some compatibility issues with the faster USB 3.0 Ports. So it’s better to stick with the traditional 2.0 ports. Along the same lines, it is highly recommended that you use the official USB cables that came shipped with your device.
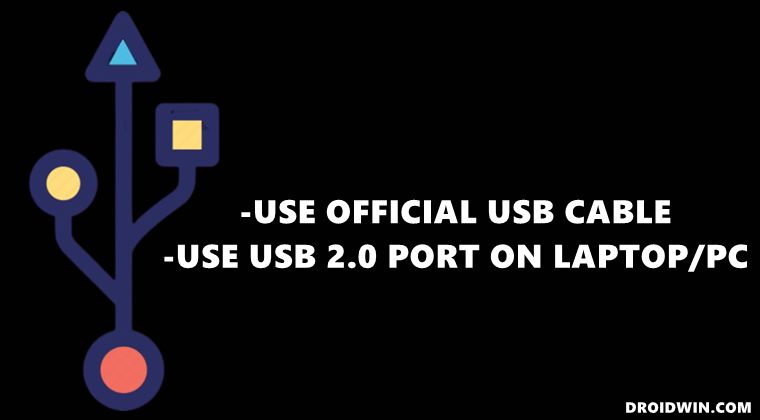
This is written keeping in mind the smartphones, as the local USBs are only capable enough to charge your device, they wouldn’t be able to support File Transfer, let alone the ADB or Fastboot Modes. So try out these tweaks and see if they are able to fix the USB Device Not Recognized Error on your Windows 11 PC.
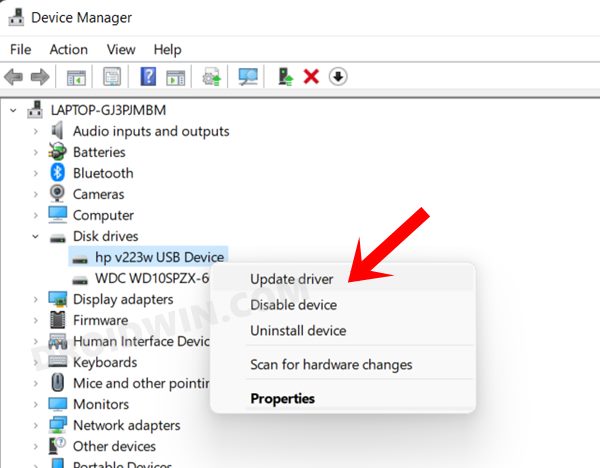
Fix 2: Update Device Drivers
If you are using old or outdated drivers, then they are bound to cause a few issues. Therefore, it is recommended to update these drivers right away. Here’s how it could be done:
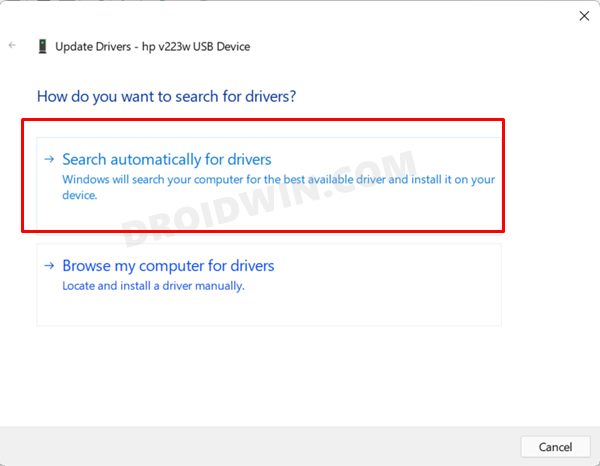
- Head over to the Start menu and search Device Manager.
- Then open it and expand the Disk Drives section.
- Right-click on your device and select Update Driver.

- Then click on Search automatically for drivers.
- Windows will now search for the latest drivers online, and if found will download and install them right away.
- Once done, remove your device and then re-insert it. Check if it fixes the USB Device Not Recognized Error on Windows 11.
Fix 3: Re-Enable Device
In some instances, restarting the device by giving it a fresh instance to work upon is enough to rectify the underlying issues. So let’s try out this workaround in this scenario as well and see if it spells out success or not:
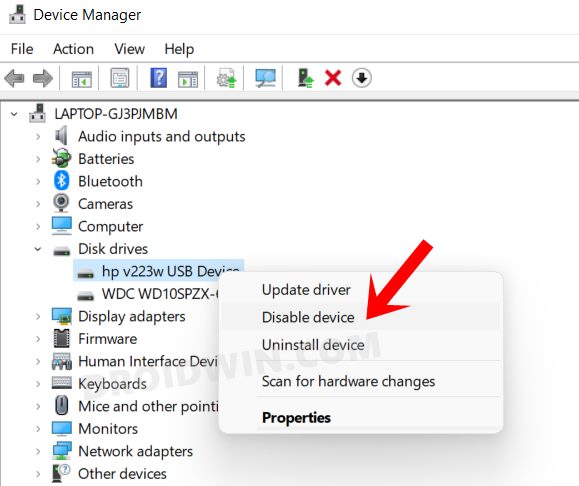
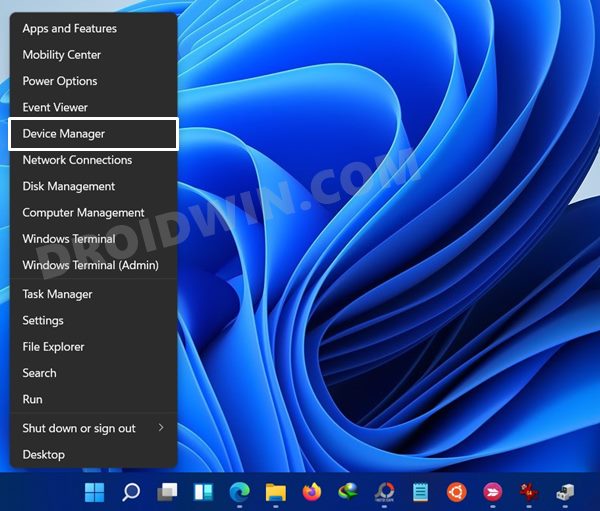
- Right-click on the Windows icon present on the Taskbar and select Device Manager.
- Go to the Disk Drives section and click on it to further expand it.
- Then right-click on your device and select Disable Device.
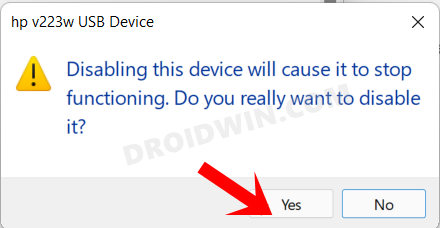
- Click Yes in the confirmation dialog box that appears.
- Wait for a minute or two and then again right-click on your device and this time select the Enable Device option.
- See if it fixes the USB Device Not Recognized Error on your Windows 11 PC.
Fix 4: Re-Install Device Drivers
If any of the data associated with your device gets corrupted, then simply updating it will do no good. Rather, you should then have to make the device start afresh from scratch. Here’s how:
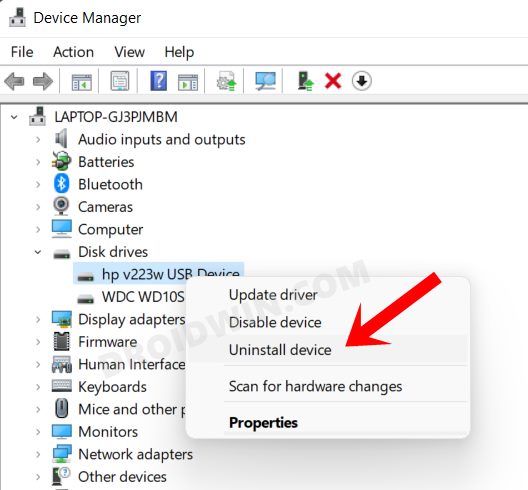
- Use the Windows+X shortcut keys and select Device Manager from the menu that appears.
- Go to the Disk Drives section and click on it to further expand it.
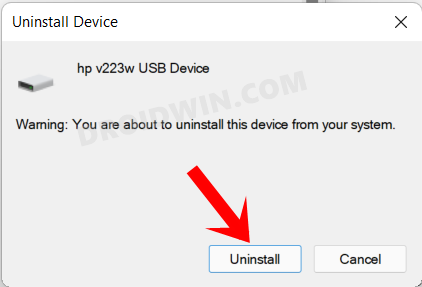
- Then right-click on your device and select Uninstall Device.
- Again, click on Uninstall in the confirmation dialog box that appears.
- Now unplug your device from the PC and replug it back in. Windows shall now re-install the drivers.
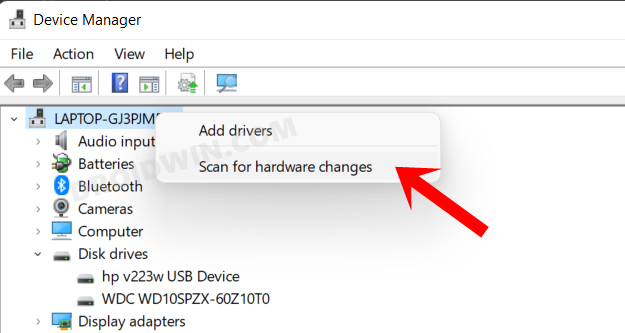
- However, if that doesn’t happen, then right-click on your PC name situated at the top and select Scan for hardware changes.
- Windows will now find the missing drivers and would then install them as well.
- Once that is done, verify if it fixes the USB Device Not Recognized Error on your Windows 11 PC.
Fix 5: Disable USB Selective Suspend Setting
In order to conserve your laptop’s battery juice, there’s a power setting that suspends the functionality of the USB ports. As of now, it is advised that you turn off this feature for both scenarios: when charging and while on battery. Here’s how it could be done:
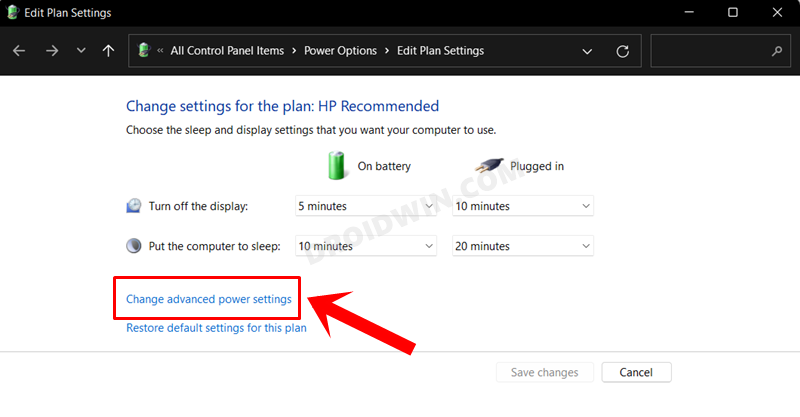
- Head over to the Start Menu and search Edit power plan.
- Open it and click on the Change advanced power settings option.
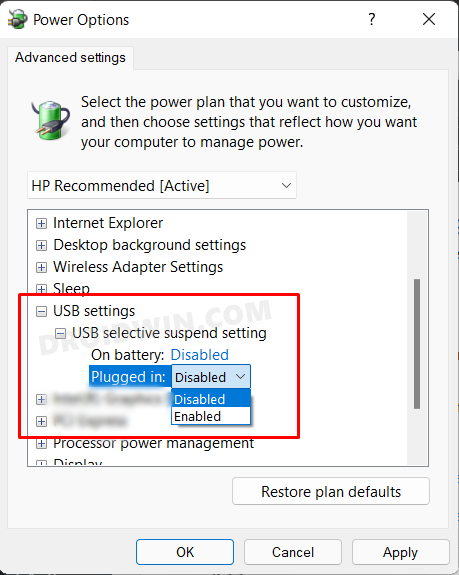
- Now expand the USB Setting option followed by the USB selective suspend setting.
- Click on the Enabled keyword next to both ‘On battery’ and ‘Plugged in’ and select Disabled.
- Finally, click OK to save the changes and then check if it fixes the USB Device Not Recognized Error on your Windows 11 PC.
Fix 6: Use Hardware Device Troubleshooter
Windows comes built-in with quite a few troubleshooting apps, and one of them focuses specifically on hardware devices. And in this guide, we will be putting it to the test. But to do so, you will have to take an alternate route. This is because while all the other troubleshooter apps are located under Settings > System > Troubleshooter > Other Troubleshooter. However, that isn’t the case with Hardware Device Troubleshooter. But why is that so?
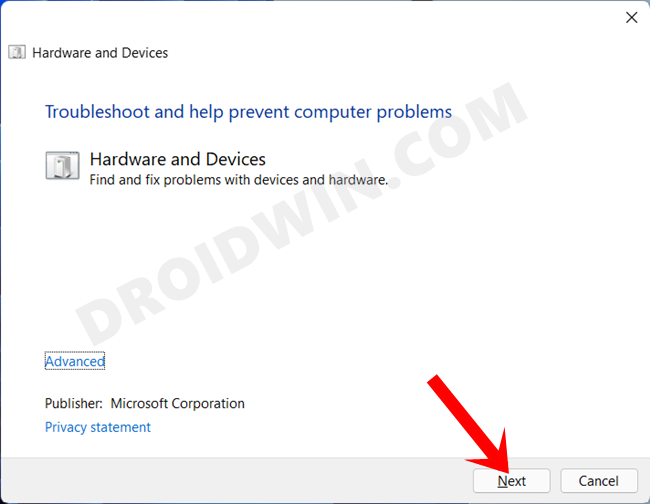
Well, for some reason best known to them, Microsoft decided to hide this feature from the general users. However, you could still get hold of it by carrying out a few additional steps on your PC. To try it out, please refer to our guide Enable and Use Hardware and Devices Troubleshooter in Windows 11. Just keep in mind that before starting the Hardware Troubleshooter, you should connect the USB device to your computer that is currently throwing the USB Device Not Recognized Error on your Windows 11 PC.
Fix 7: Change Power Management of USB Root Hub
In some instances, when your laptop is low on battery, then your PC might turn off the USB Root Hub corresponding to the port to which your device is connected. As a result, your PC wouldn’t be able to identify the connected device. To prevent this from happening, you should change this behavior and disallow it to have full control over the USB’s Power Management. Here’s how it could be done:
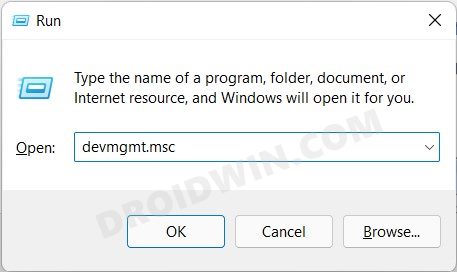
- To begin with, use the Windows+R shortcut keys to launch the Run dialog box.
- Then type in the below command and hit Enter. It shall open the Device Manager.
devmgmt.msc
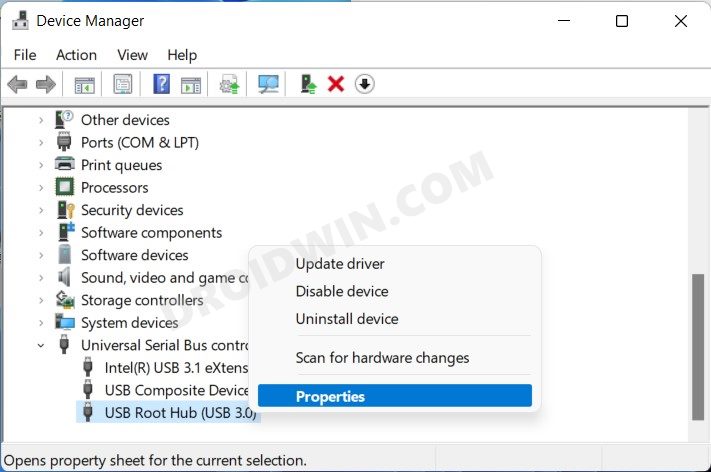
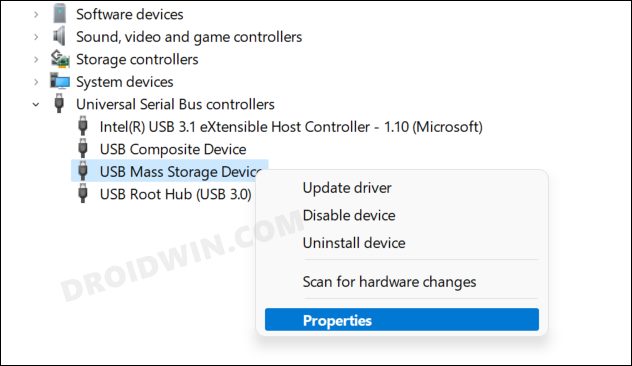
- Now click on the Universal Serial Bus controllers section to expand it.
- Then right-click on USB Root Hub and select Properties.
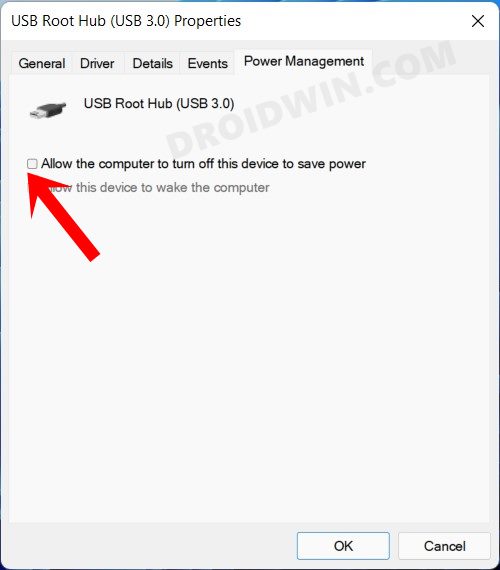
- Go to the Power Management tab and uncheck “Allow the computer to turn off this device to save power”.
- Finally, click OK to save the changes. Now verify if the USB Device Not Recognized Error on your Windows 11 PC has been fixed or not.
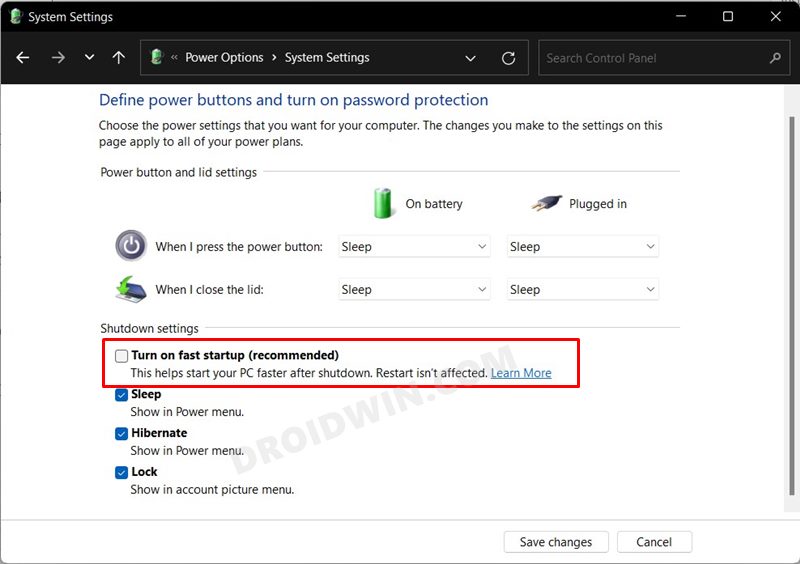
Fix 8: Disable Fast Startup
Windows comes with a Fast Startup feature that speeds up the boot-up time of your PC after a shutdown. However, in some instances, this feature has been known to conflict with USB Drive as well. Therefore, it is recommended to disable this feature as of now.
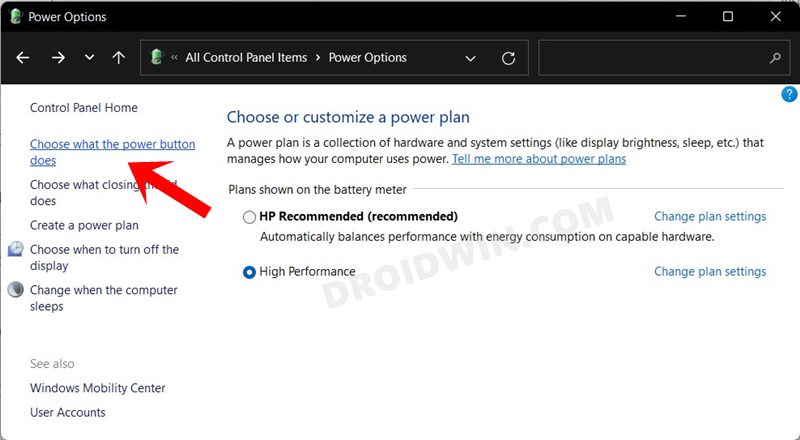
- To do so, open Control Panel from the Start Menu and go to the “Power Options” section.
- Then click on “Choose what the power button does from the left menu bar.”
- After that, click on “Change settings that are currently unavailable”.
- Now uncheck “Turn on fast startup” and hit the “Save changes” button.
- Finally, restart your PC and then check if it fixes the USB Device Not Recognized Error on your Windows 11 PC.

FIX 9: Disable Enhanced Power Management
When a USB device is treated as a Human Interface Device (HID) and there is no third-party app or service currently accessing this device, then Windows will suspend this USB device. Then as soon as any program initiates an interaction with this device, the OS will re-enable this USB device.
However, in some instances, Windows isn’t able to re-enable the device and hence you might get the “Device not recognized” error message. To rectify this issue, you will have to disable the Enhanced Power Management using Device Manager and Registry Editor. So proceed ahead with the below instruction steps.
- To begin with, connect your USB device to the PC. Then right-click on the Windows icon and select Device Manager.
- After that, expand the Universal Serial Bus controllers section, right-click on your USB device, and select Properties.
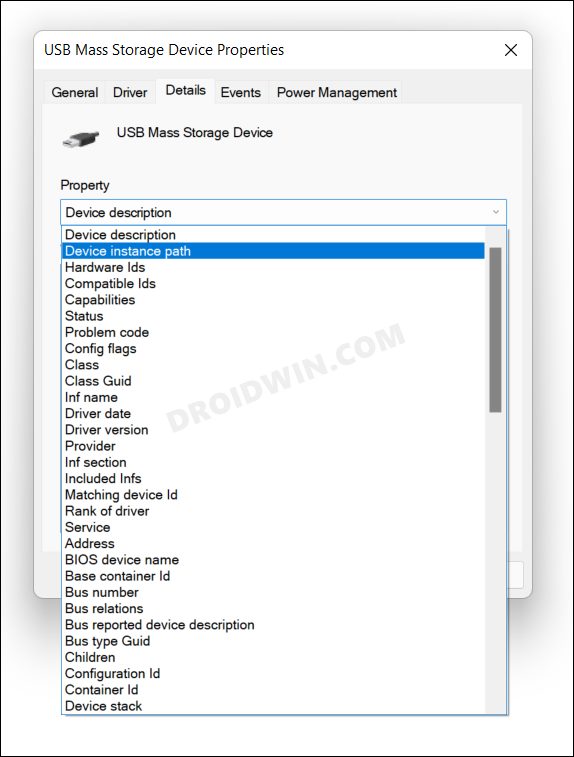
- Then switch to the Details tab and change the Property to Device Instance Path.
- Now right-click on the data under the Value field and select Copy. It is generally a combination of three values: Vendor ID (VID)\Product ID (PID)\Instance ID.
- After that, head over to the Start menu, search Registry Editor and open it.
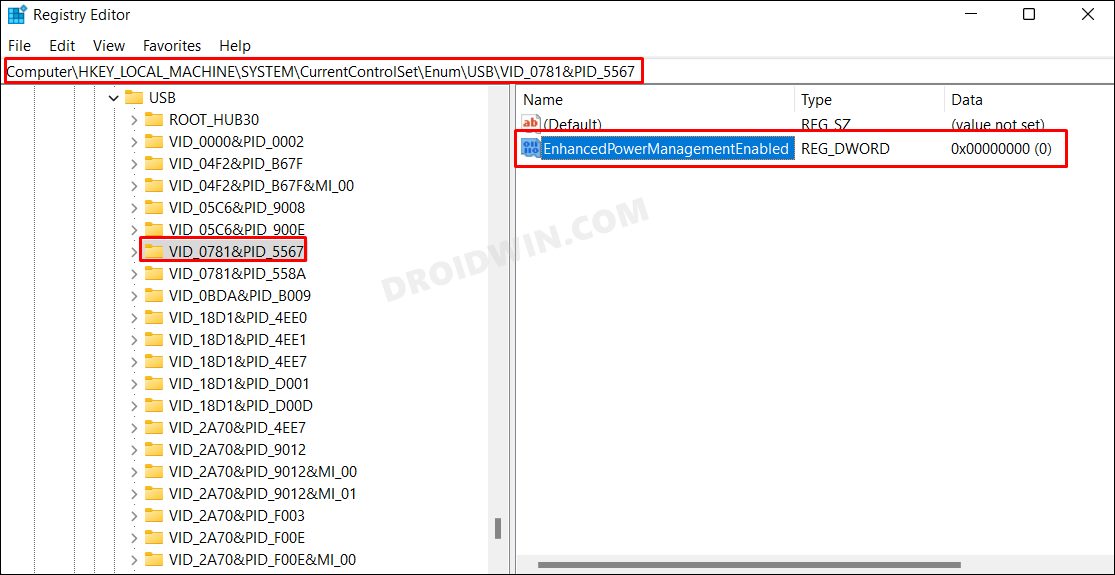
- Then head over to the below location via the Registry Editor. Make sure to replace the DeviceInstancePath with the value that you had copied from the above step.
HKEY_LOCAL_MACHINE\SYSTEM\CurrentControlSet\Enum\USB\DeviceInstancePath\Device Parameters
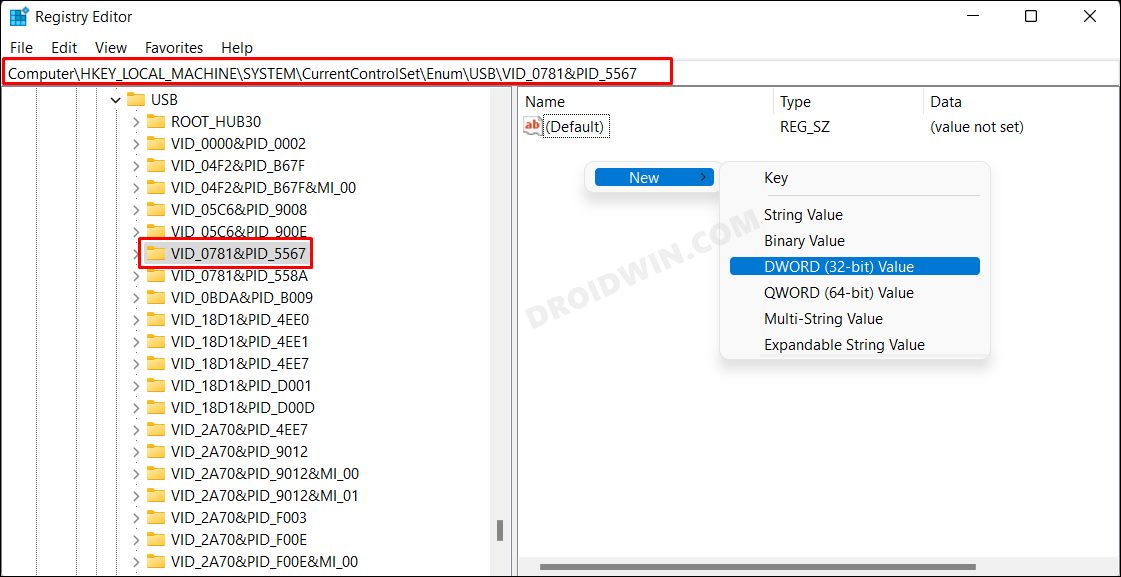
- On the right-hand side, you should see the EnhancedPowerManagementEnabled file. Double click to open it.
If it is not there, then right-click in an empty location, select New > DWord (32-bit) Value and name it EnhancedPowerManagementEnabled
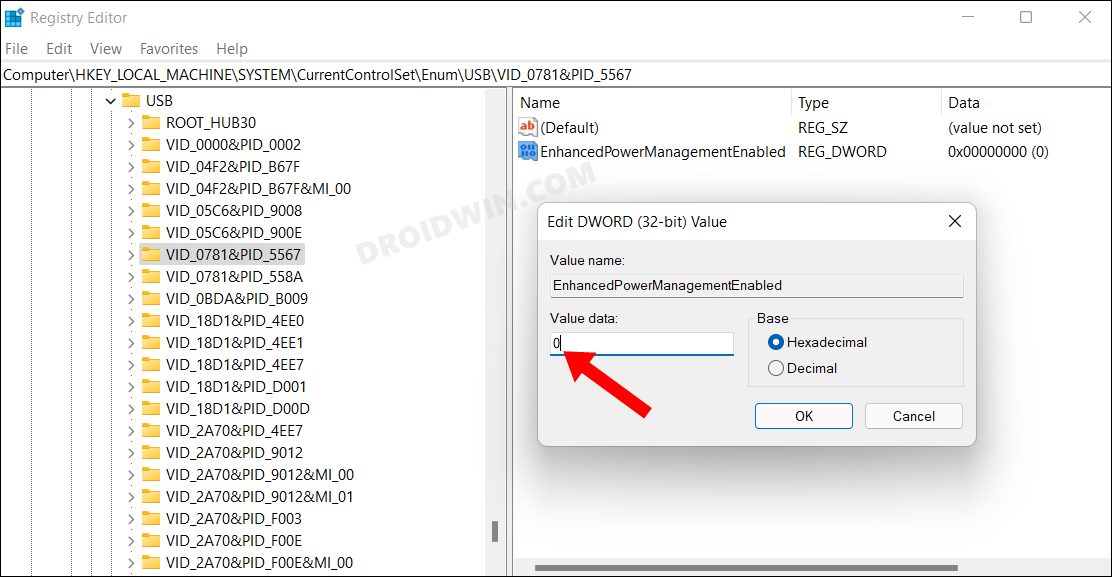
- Then change its Value Data to 0 and hit OK to save the changes. Once done, restart your PC for the changes to take place.
- Check if it fixes the USB Device Not Recognized Error on your Windows 11 PC.

Fix 10: Assign Drive Letter to your Device
As minuscule as it may sound, but if your device hasn’t been assigned a drive letter, then the PC might not be able to identify it. So let’s assign a drive letter to your device right away. [DO READ: Windows 11 Unable to Assign Drive Letter: How to Fix?]
- Head over to the Start menu and search Disk Management.
- Open Create and Format hard disk partitions from the search results.
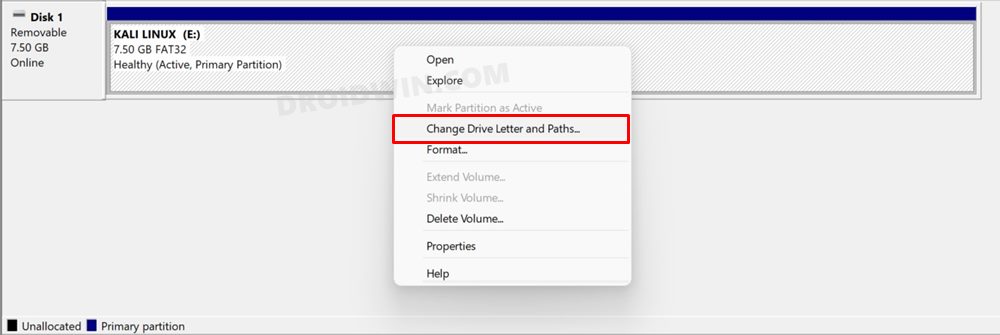
- Now right-click on your device from the bottom menu bar and select Change Drive Letter and Paths.
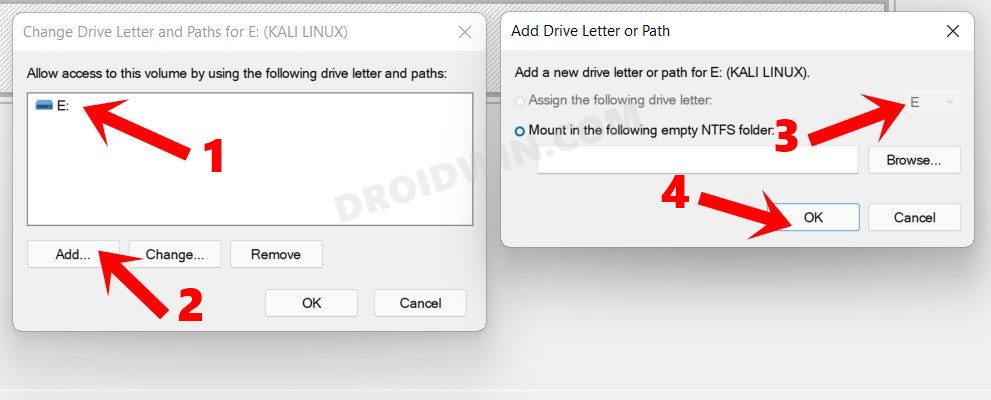
- After that, click on the Add button in the Change Drive Letter and Paths dialog box that appears.
- Windows will now automatically assign the next available drive letter. If that’s well and good, click OK.
- However, if you wish to change it, then select Assign the following drive letter option, choose the desired letter from the drop-down, and hit OK.
- Once done, verify if the USB Device Not Recognized Windows 11 error has been fixed or not.
Fix 11: Switch to NTFS File System
If your device is using the older File Allocation Table and storing data in 32-bits (FAT-32), then it is recommended that you switch over to the powerful and efficient New Technology File System (NTFS). Do keep in mind that the below process will format your device.
There do exist a few FAT-32 to NTFS tools that claim to carry out this process without the data format, but I haven’t used them so cannot vouch for their claim. Below is the tried and tested traditional method that works to this date without any issues. So let’s stuck with this approach itself.
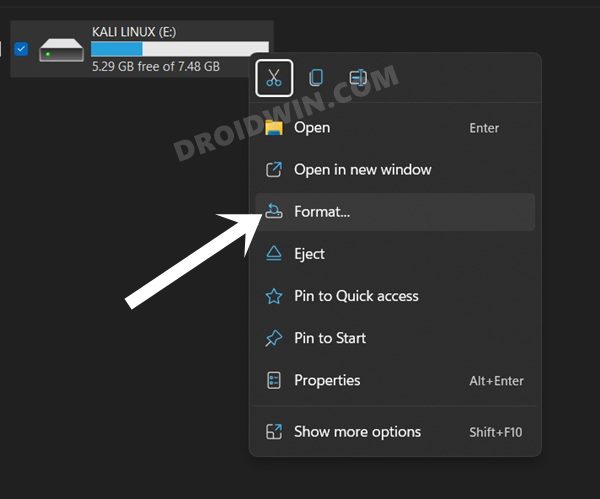
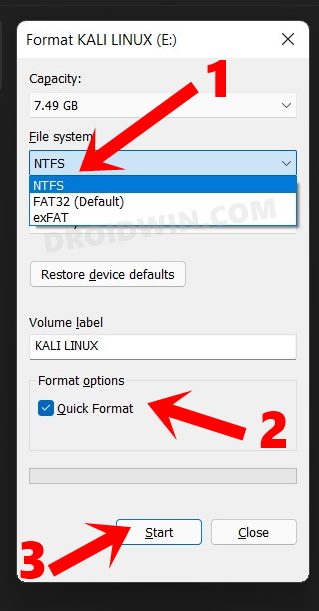
- Open File Explorer, right-click on your device, and select Format.
- Then choose NTFS under the File System drop-down menu.
- Finally, enable the Quick Format option and hit Start.
- Wait for the process to complete which might take up to a minute.
- Once done, check if it was able to fix the USB Device Not Recognized error on your Windows 11 PC.
Fix 12: Format Device via CMD
If none of the aforementioned methods managed to work out in your favor, then you should consider formatting your device via Command Prompt. As you might have guessed, this process will wipe off all the data from your device. So if that’s well and good, then let’s get started:
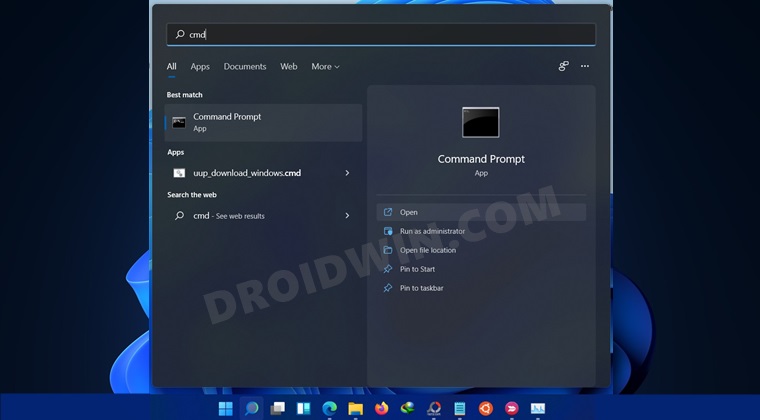
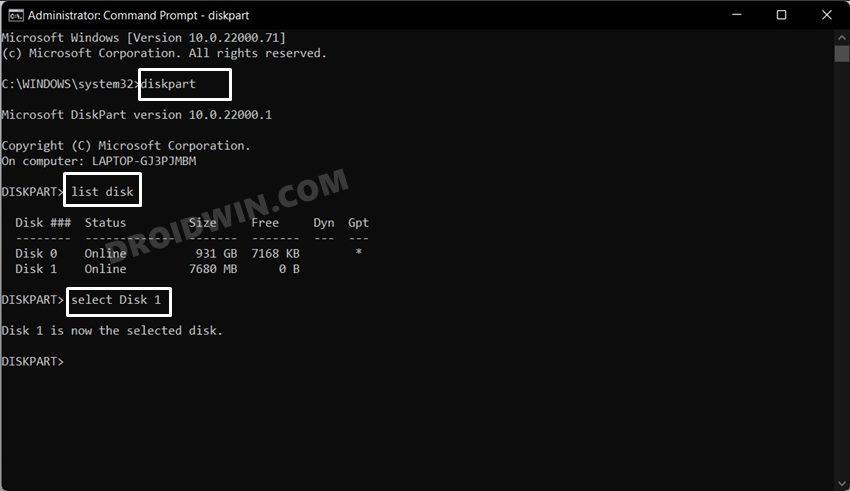
- Head over to the Start menu, search CMD, and launch Command Prompt as an administrator.
- Type in the below command to open the Diskpart Tool:
diskpart
- Now type in the following command to bring up the list of all the available drives on your PC:
list disk
- Next up, use the following command to select your device that is currently facing issue (replace * with the disk number that you got from the above command):
select Disk *
- Now type the following command to format your device:
clean
- After that, use the below command to re-create the partition
create part pri
- Then make it the active partition via the following command:
active
- Finally, convert your device to the NTFS format via the below command:
format fs=NTFS
- Wait for the process to complete. Once done the underlying issue would have been fixed.
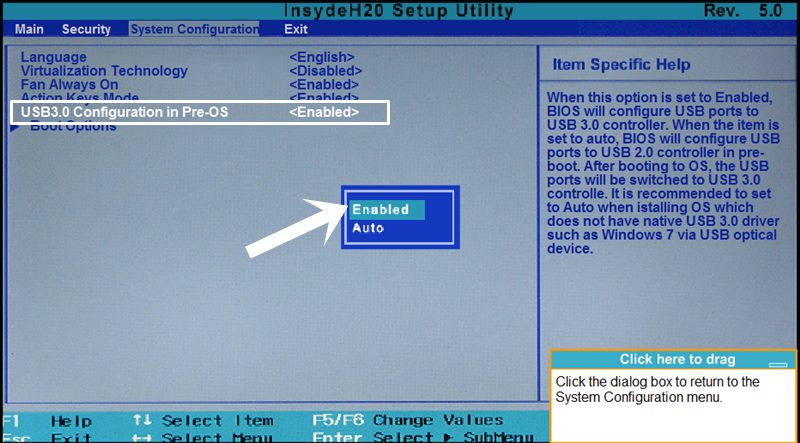
Fix 13: Disable USB 3.0 support from BIOS
If none of the aforementioned methods worked out in your favor, then you could consider temporarily disabling the USB 3.0 Port on your PC. This could be carried out from the BIOS screen, as explained below (we are taking the example of an HP laptop, other OEMs instructions would be along similar lines as well):
- To begin with, power off your PC.
- Then turn it back on. As soon as it is booting up, keep tapping the F10 key, your PC will boot into BIOS.
- Now go to the System Configuration tab, select USB 3.0 configuration in Pre-OS, and choose Auto.
- Finally, press F10 to save the changes and exit.
- Now boot your PC to the OS and then try connecting the USB device to one of the USB 2.0 Ports, the issue would have been rectified.
So this was all from this guide on how you could fix the USB Device Not Recognized error on your Windows 11 PC. We have shared eight different fixes for the same. Do let us know in the comments section which one spelled out success for you.


booboo
Fix 7 worked, thank you! It was driving me nuts and wouldnt stop beeping even when I turned notifications off. Are you muslim?
Bob Found
Very comprehensive list of things to try. I’m trying to interface Bluetooth from a Win11 computer with USB3 ports to a microcontroller with a Bluetooth module on it. All configuration works, Computer BT binds with the module but I cannot download via the serial port the Bluetooth is attached to. Error is that “port is busy”. I suspect one of the things in this list is responsible. Stay tuned.
Excellent work buddy.