In this guide, we will show you the steps to fix TWRP Error 1 on any Android device. When it comes to stepping into custom development, there are a plethora of tweaks and customizations that tech enthusiasts prefer. And replacing the device’s stock recovery with a custom one is right there at the top. But why do users install a custom recovery when there’s already an in-built recovery present? Well, the reason is that the stock recovery isn’t built to support any custom tweaks whatsoever.
At the very most, you could wipe off the data, reboot your device to Fastboot, or in some instances, perform the ADB sideload functionality. But that’s it. You cannot flash ZIP or IMG files, erase data partition, create and restore a backup of various device partitions, etc. Hence the need for a custom recovery becomes all the more important. And as of now, TWRP is the sole recovery ruling the charts. While there are others as well, but they are build using the TWRP’s source code.
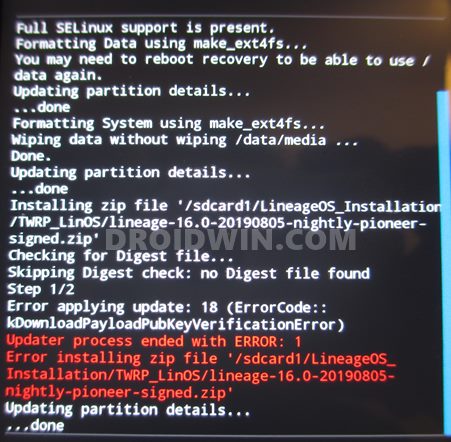
However, this recovery isn’t free from its fair share of issues. For example, you might get TWRP Error 7 while flashing custom ROMs or TWRP Error 20 after flashing GApps. Then there are instances of users facing TWRP Error 70 due to insufficient storage in the System partition. And now, there have been numerous complaints from users getting bugged with the TWRP Error 1. If you are also facing this issue, then fret not. This guide will list out two different methods to fix this TWRP Error 1 once and for all. Follow along.
Table of Contents
The Reason for TWRP Error 1
The reason for this issue is due to the corrupt boot.img file. Well, we aren’t talking about the stock boot image file, rather it’s the patched boot img file that we use for rooting purposes. For the unawares, there exist two different methods to root any device. In the first one, you could directly flash the Magisk ZIP Installer file via TWRP and your device stands rooted. The next method requires getting the stock boot.img file, patching it via Magisk and then flashing it via Fastboot commands.
However, there is an important point worth keeping in mind. You will have to use the same boot.img file from the firmware that corresponds to the current firmware installed on your device. Any mismatch in the version would lead to a conflicting situation and could lead to a few issues, one of which is TWRP Error 1. So how could this be rectified? Well, you would have to patch and flash the correct boot.img file and it will fix the TWRP Error 1. Here are all the required instructions for the same.
How to Fix TWRP Error 1
So here’s how the entire process will be carried out. First off, we will be flashing the stock boot.img file onto your device. This will remove the root from your device (if you are already rooted). Once that is done, we will take this stock boot.img file, patch it via Magisk, and flash it via Fastboot Commands. Droidwin and its members wouldn’t be held responsible in case of a thermonuclear war, your alarm doesn’t wake you up, or if anything happens to your device and data by performing the below steps.
STEP 1: Download Stock Boot IMG
First and foremost, you will need the stock boot.img file corresponding to the firmware version installed on your device. You could check the current firmware build number from the About Phone section. Once you have verified the same, download the corresponding firmware file (stock or custom ROM whichever is currently installed).
![]()
Now if you are having a Pixel device, then you could easily extract the firmware via WinZIP or WinRAR. But that isn’t the case with other devices. In the case of OnePlus, the partition image files are placed inside payload.bin. Whereas Oppo and Realme have their files inside the OZIP package, so you would need standalone tools for this purpose. In this scenario, you may refer to our detailed guide linked below:
- How to Extract payload.bin and get the stock boot image file
- How to Extract OZIP Realme Stock ROM (Firmware)
Once you have got hold of the stock boot.img file, proceed to the next step to fix the TWRP Error 1.
STEP 2: Flash Stock Boot.img file via TWRP
The next step in the guide to fix the TWRP Error 1 requires you to install the stock boot.img file onto your device. While we could do so via Fastboot Commands, but since TWRP is already installed, let’s take this approach only. Do keep in mind that if your device is rooted, then it will be unrooted on flashing the stock boot.img (don’t worry we will re-root it later on as well).
- To begin with, transfer the stock boot.img file to your device.
- Then boot your device to TWRP, either via hardware key combinations or by using the adb reboot recovery command.
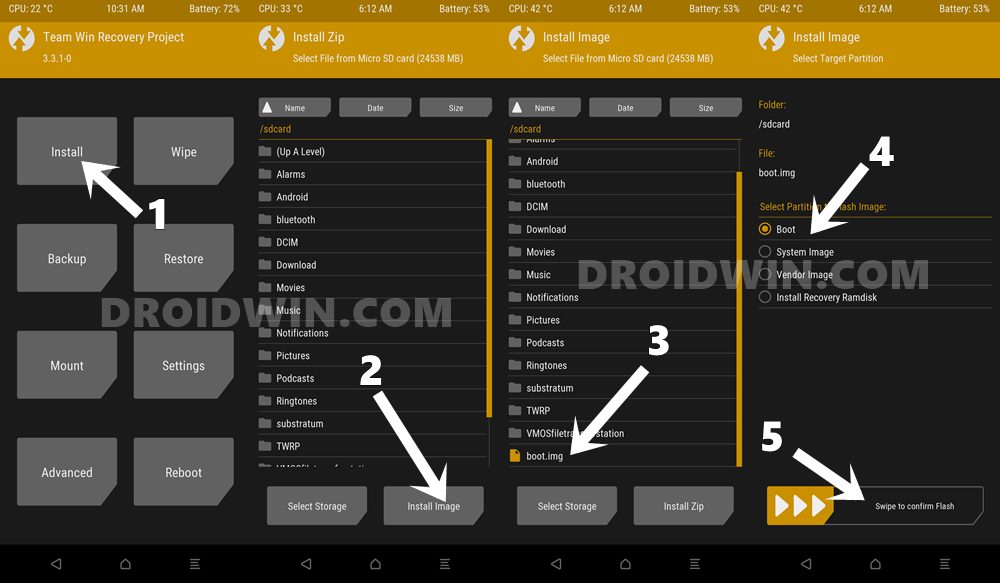
- Now go to the Install section and tap on the Install Image button situated at the bottom right.
- Navigate to the stock boot.img file and select it.
- Then select Boot from the partition selection screen and perform a right swipe to flash it.
- Once done, go to Reboot and select System. Your device will be booted to the OS. Now move over to the next step to fix the TWRP Error 1.
STEP 3: Patch Stock Boot.img via Magisk
In this section, we will be patching the stock boot.img file via Magisk. This will give us the magisk_patched.img file which will then be flashed onto your device. So follow the below steps to carry out this task. Make sure that the stock boot.img file is transferred to your device. [Having trouble on your Android 11 device? Check out this guide: Fix Magisk patched boot.img issue while Rooting Android 11]
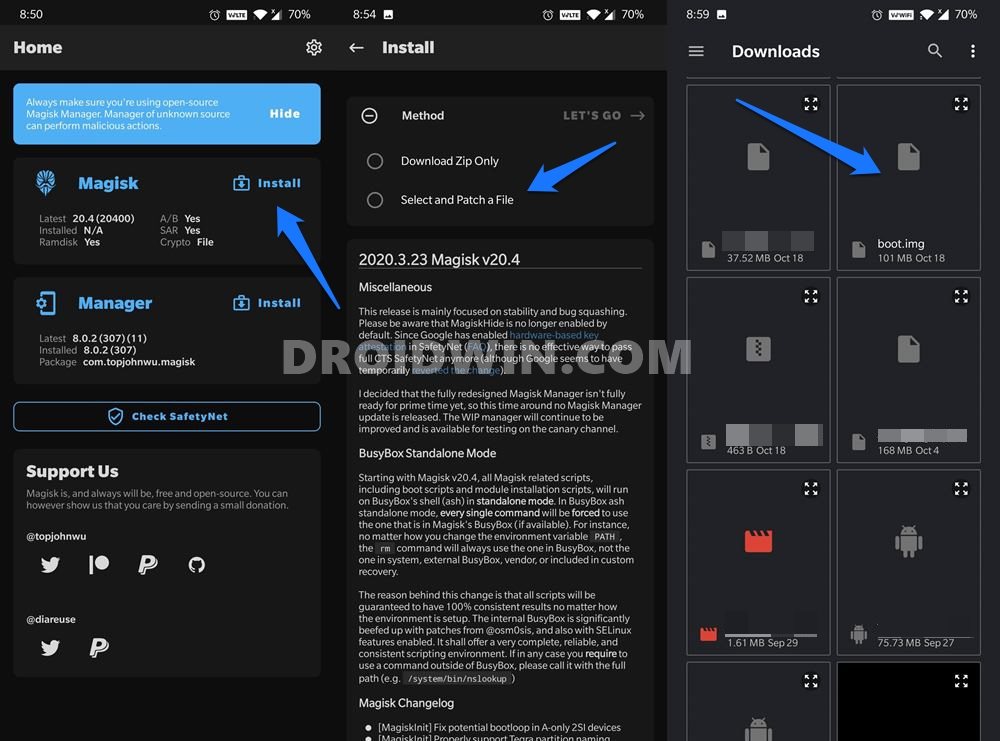
- First and foremost, install the Magisk Manager app on your device.
- Then launch it and tap on the Install button situated next to Magisk.
- From the Method section, choose Select and Patch a file.

- Browse to the extracted boot.img file and select it.
- Then tap on the Let’s Go option situated at the top right.
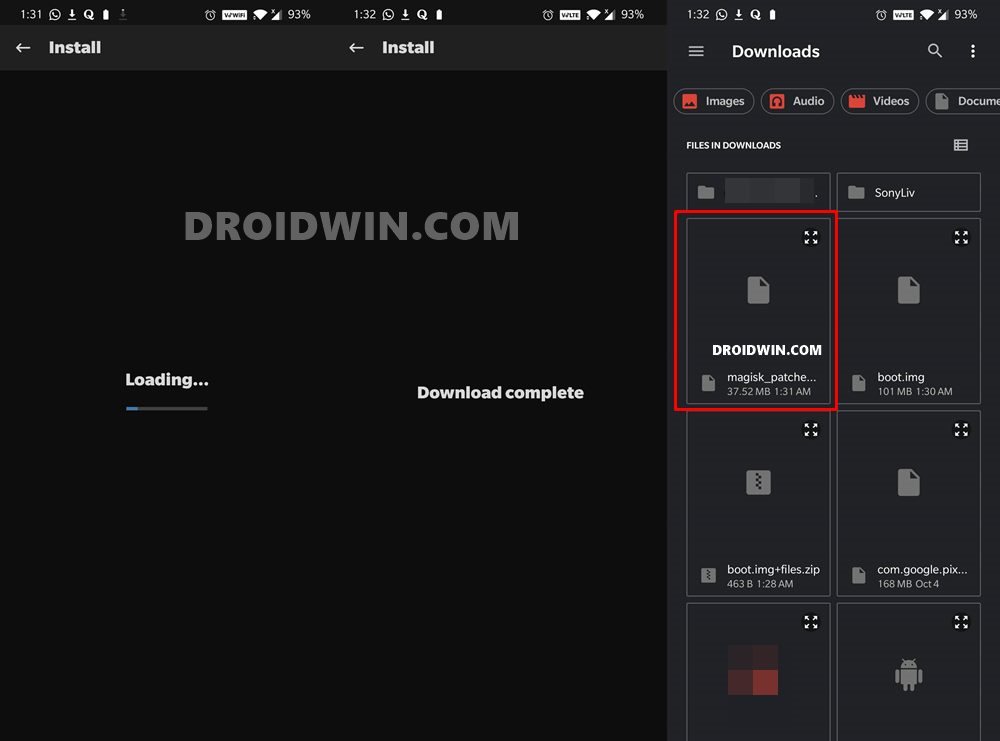
- Magisk will now load the boot.img file and will patch it accordingly. Once that is done, you would get the Download Complete message.
- The patched boot image file will be saved in Internal Storage > Downloads. The name of the file will be magisk_patched.img. We will now use this file to fix the TWRP Error 1. Follow along.
STEP 4: Flash Patched Boot.img via TWRP
Finally, you just need to flash this patched boot.img file to your device. Again, there are two different approaches for the same, but since TWRP is the easier method than compared with Fastboot Commands, we will be using this method only. Make sure that you have the magisk_patched.img on your device:
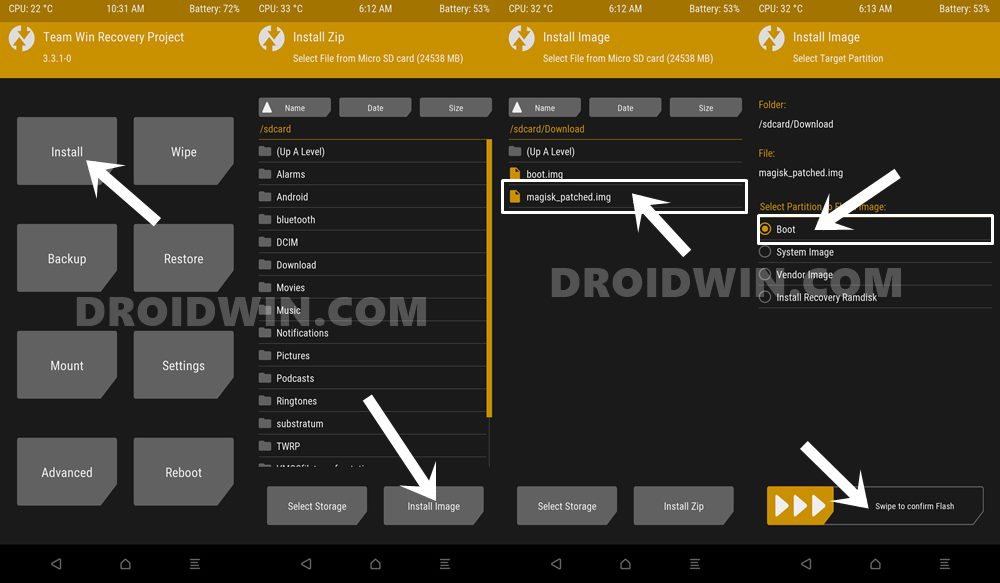
- First off, boot your device to TWRP Recovery.
- Then go to the Install section and tap on the Install Image button situated at the bottom right.
- Browse to the magisk_patched.img file and select it.
- Then select the Boot partition from the menu and perform a right swipe to flash it.
- Once done, you may now reboot your device to the ‘rooted OS’ by going to Reboot > System.
That’s it. The process stands complete. With this, we conclude the guide on how to fix TWRP Error 1. If you still have any queries concerning the aforementioned steps, do let us know in the comments. We will get back to you with a solution at the earliest.


Dileep
I have an old Xiaomi Redmi 1s. The last official update is MIUI 9.2.3.0 (Android 4.4.4). I want to install Lineage 19.1 on it. I have downloaded it from XDA Developers Forum (unofficial but developed for Redmi 1s). When I tried it with TWRP and I was getting TWRP Error 1 failure.
After reading your article I tried again after following all the steps given by you. I got the same error again. I then installed the original OS (MIUI-JHCMIBF36.0) with which the phone was delivered and tried again but got the same error. I also tried “Install” option in TWRP but got the same error.
On the TWRP failure screen it mentions MIUI 9.2.4.0 KHCCNEK as the system to unmount but this was never installed on my phone. When I Googled I found that this is a China version which I do not want to install as I will not be able to do any settings due to unfamiliarity with the language.
My doubt is:
1. Whether MIUI version is causing the error?
2. While trying “Install” in TWRP I did not check the boxes for “wipe Dalvik catche” and “wipe catche”. Whether this can cause the error?
Please help.
Johannes der kann Es
Thank you so much !
I tried to fix this problem since 9 days and got really frustrated.
And your guide help me to fix it without flashing the original ROM
THANKS !
Tushar
Man.. you Rock! I spent 12 hours figuring out Error 1 and reading many forums online. Hats off to your article!
Ashutosh Patil
Your artical was very useful.
Thank You So Much
ASHUTOSH
Hello sir, I am getting this following error – assert failed: update_dynamic_partitions(package_extract_file(“dynamic_partitions_op_list”)) while flashing colt os on my poco m2 pro (gram). Please help me out.