In this guide, we will show you the steps to install the TWRP Recovery on your Samsung Galaxy device via multidisabler and fbedisabler. Once you have unlocked the device’s bootloader, there are a plethora of tweaks and mods that you could welcome abode on your device. However, it goes without saying that a custom recovery is probably the biggest asset that a tech enthusiast could have in its arsenal.
And the reason for the same is hardly a secret either. From flashing ZIPs and IMGs to taking a backup of all the data on your device, there is a slew of functionalities that the recovery beholds. However, as you might be aware installing mods on a Samsung device is no easy task in itself as it tends to deviate from the normal generic flashing process that every other Android device tends to follow.
And the same is the case with the custom recovery as well. From flashing the recovery to the AP slow instead of a dedicated recovery or boot/vendor_boot, from using Download Mode instead of Fastboot, and taking the help of Odin instead of Fastboot Commands or flashing, it’s quite a bumpy journey ahead.
Making matters worse are the multidisabler and fbedisabler that are used to disable encryption. So if you are also confused about all these technicalities, then fret not, this guide will help you install the TWRP Recovery on your Samsung Galaxy device in the easiest of ways possible. So without further ado, let’s get started.
Table of Contents
Benefits and Risks of Installing TWRP Recovery on Samsung
If you install custom recovery like TWRP, then it will help you carry out a slew of intriguing and useful tasks for your device. Some of the most noteworthy ones include the likes of being able to take a backup of all the partitions on your device via the Nandroid Backup feature, deleting data from various partitions, using the in-built terminal to execute commands, and navigating the storage via the built-in File Manager app.
But the most important among them all is the ability to flash ZIPs and IMGs. This in turn will let you flash Custom ROMs, install Magisk to obtain root, and make the recovery permanent by flashing its IMG file, among others. However, before you get your hands dirty on this recovery, there are some important points worth keeping in mind, especially with regard to the drawbacks that this process brings with itself.
First and foremost, flashing a recovery requires an unlocked bootloader. This will factory reset your device and make the warranty null and void. Likewise, Knox will be tripped and many banking and payment apps might not work, including the likes of Samsung Pay. And on Samsung phones, things get even worse- you cannot restore the Knox status even on removing the root and relocking the bootloader
This is because Knox is an eFuse embedded into the motherboard, so it’s more of a hardware-level change than software. So as opposed to other Android devices where things go back to normal, here it’s just one-way traffic. If that’s all well and good, then let’s get started with the steps to install TWRP Recovery on your Samsung device.
How to Install TWRP Recovery on Samsung Galaxy Devices
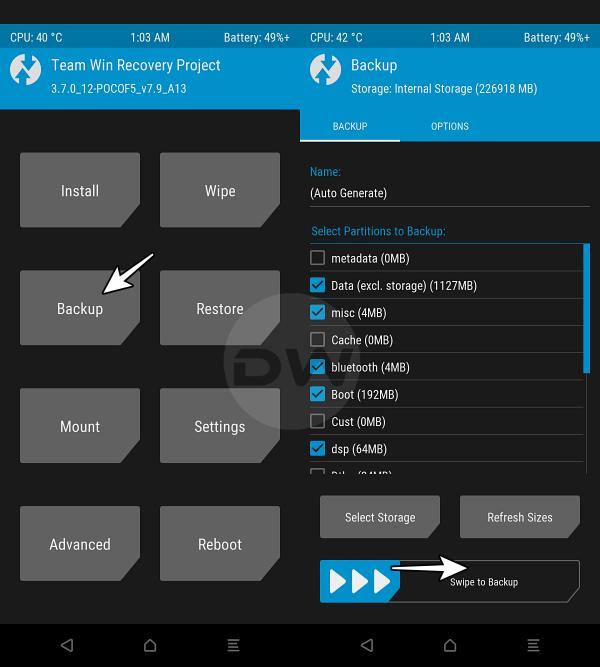
The below process will wipe off all the data from your device, so please take a complete device backup beforehand. Droidwin and its members wouldn’t be held responsible in case of a thermonuclear war, your alarm doesn’t wake you up, or if anything happens to your device and data by performing the below steps. NOTE: On most devices, TWRP Decryption will only work if you remove the password/PIN/pattern from your device.
Install TWRP on Samsung via fbedisabler
STEP 1: Unlock Bootloader
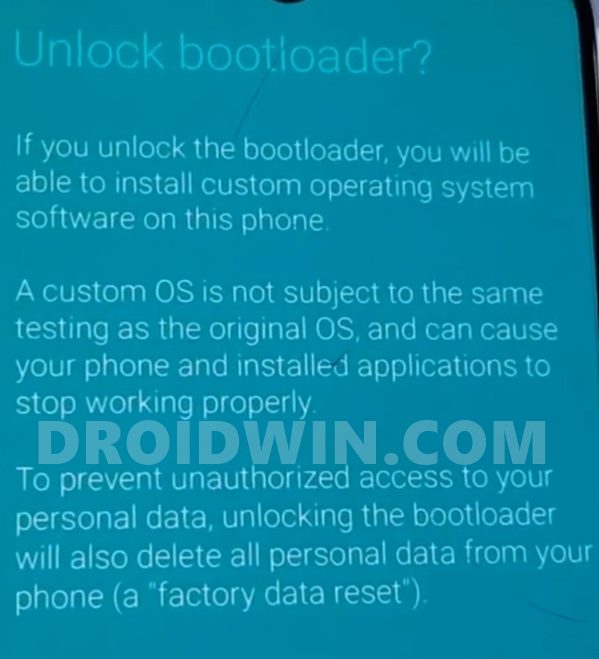
First and foremost, you’ll have to unlock the bootloader on your device. For that, please refer to our detailed guide on How to Unlock the Bootloader on any Samsung Device [New VaultKeeper Method]. The shorter instructions follows below:
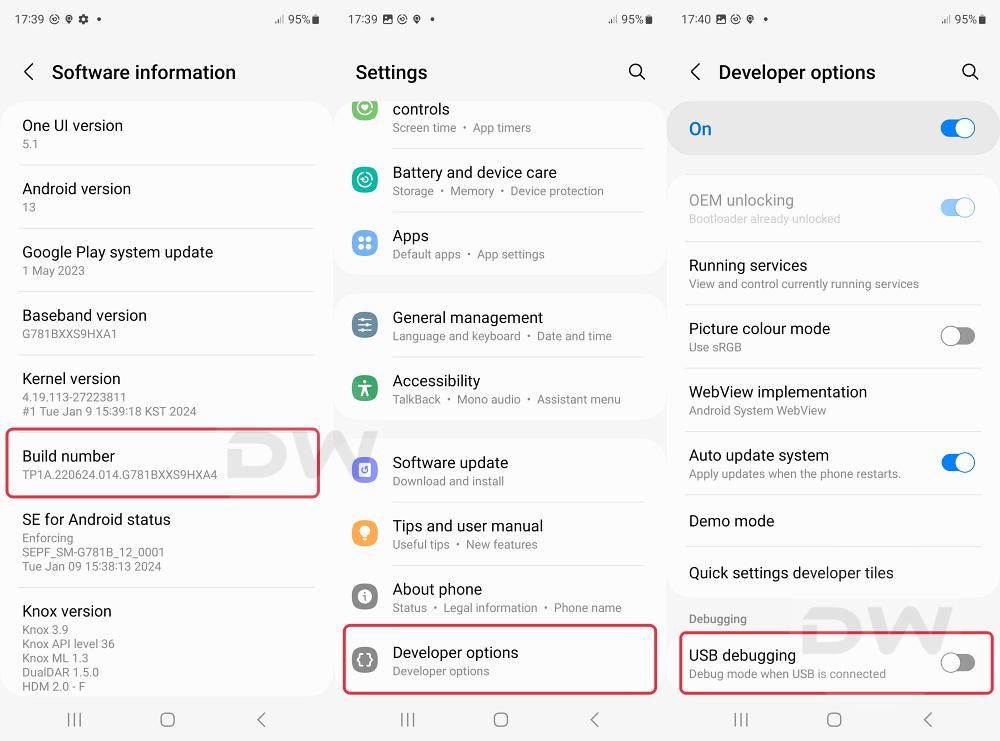
- First off, enable OEM Unlocking from the Developer Options.
- Then connect your device to PC and boot it to Download Mode.
- Finally, press the Volume Up key once to Unlock the Bootloader.

STEP 2: Download TWRP Recovery and Vbmeta_Patched
Next up, get hold of the TWRP Recovery for your device. You may either do so from the official TWRP website or a third-party trusted site like XDA. Moreover, along with the recovery, there will also be a disabled_vbmeta.img, make sure to download it as well. DOWNLOAD: vbmeta_patched_G780G.tar | vbmeta_patched_G781B.tar
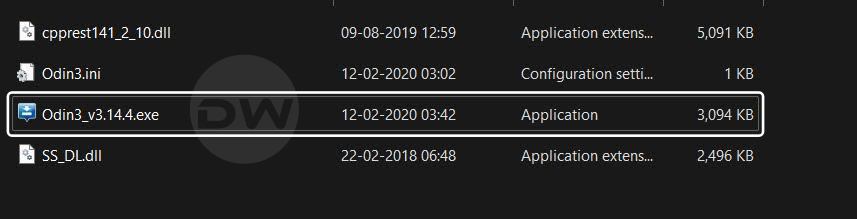
STEP 3: Download Odin
Now download Odin from here and extract it onto your PC. It will be used to flash the TWRP Recovery as well as the disabled_vbmeta.tar file.
STEP 4: Boot to Download Mode
You’ll now have to boot your device to Download Mode so that Odin can identify your device and hence flash the required files. So refer to our detailed guide on How to Boot any Samsung Device to Download Mode or check out the below shorter instructions [we are listing the ADB method, if you want the hardware key combinations, then do check out the linked guide above]:
- To begin with, download and extract the Android SDK Platform Tools.
- Then enable USB Debugging and connect your device to a PC via a USB.
- Now type in CMD in the platform-tools folder address bar and hit Enter.
- This will launch the Command Prompt. Now type in the below command:
adb reboot download
- The device will now reboot to Download Mode in a matter of a few seconds.
STEP 5: Install TWRP Recovery on Samsung
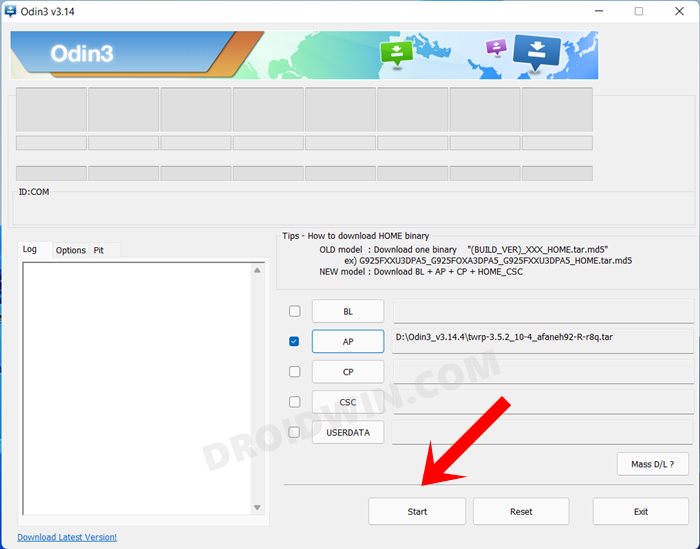
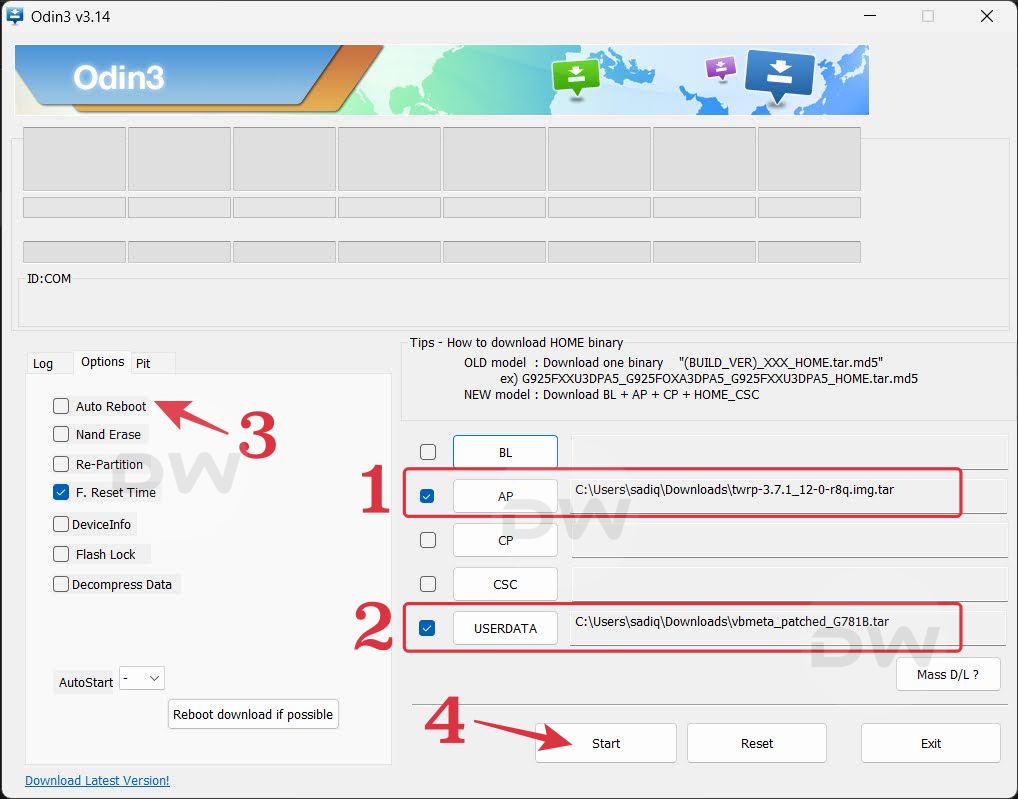
- Open Odin via its EXE file, click on AP, and load the TWRP file.
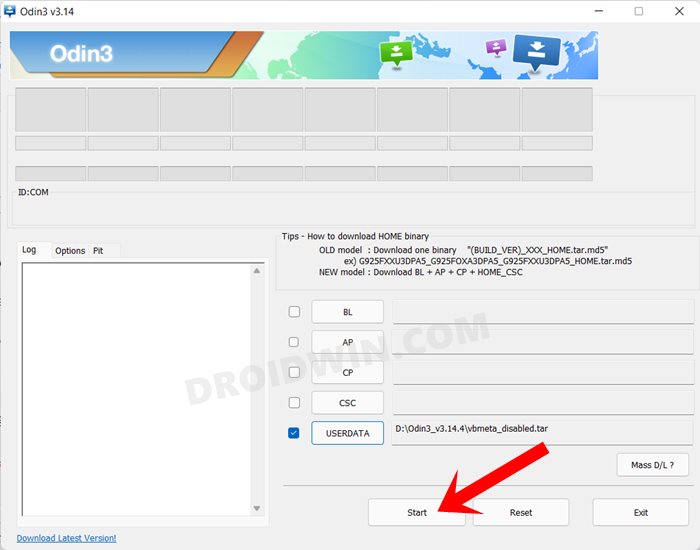
- After that, click on Userdata and load the disabled_vbmeta file.
- Now go to Options and uncheck Auto Reboot. Then click Start.
- The flashing will now begin. Once done, reboot to the recovery.
- For that, press and hold both the Power and Volume up buttons.
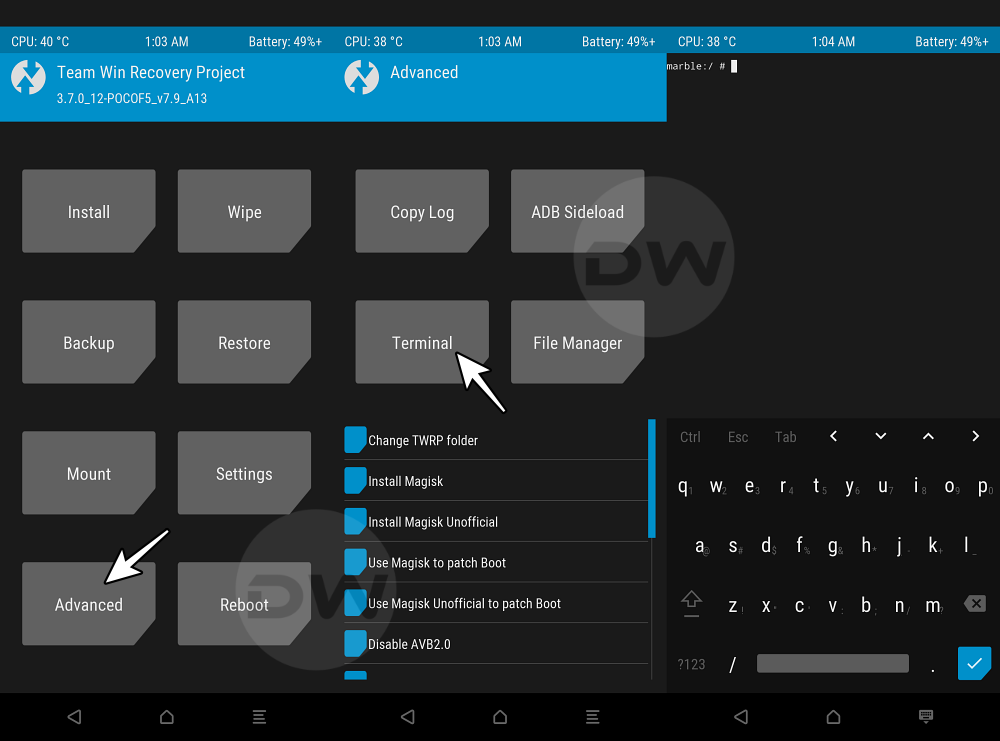
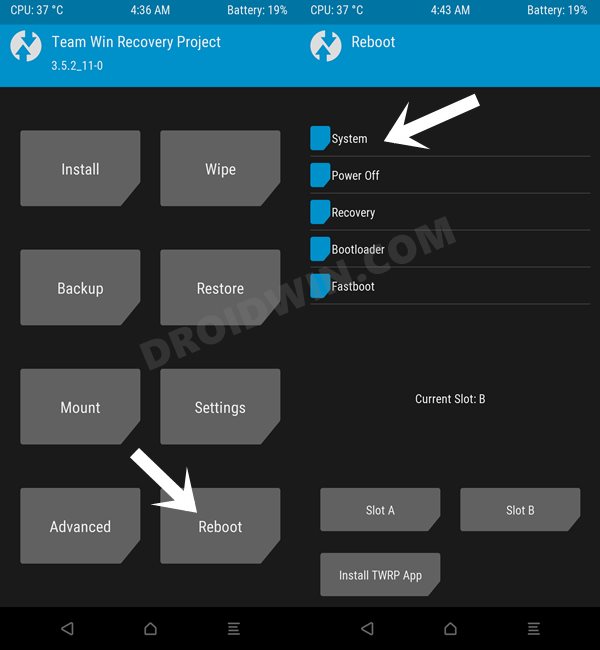
- Now from recovery, go to Wipe > Advanced Wipe > checkmark:
DATA, METADATA, KEYDATA, and KEYREFUGE
- Once done, you may now reboot to the OS via the Reboot > System.
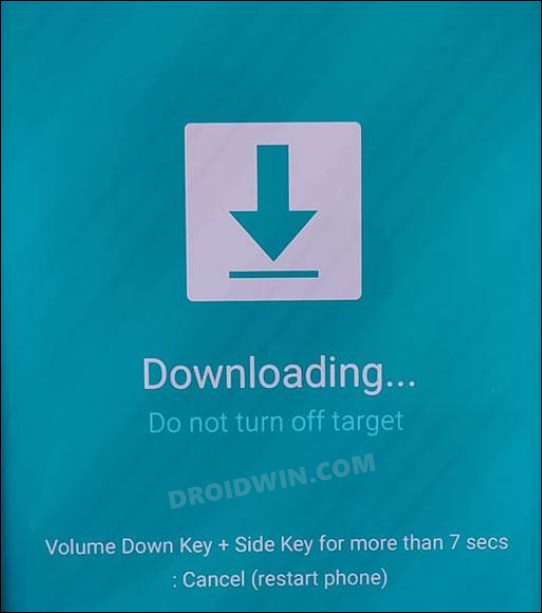
Do note that if you let the device boot to the OS even for a second after flashing the recovery, then the custom recovery will be replaced by the stock recovery and you’ll have to repeat the entire process from scratch. Therefore, make sure to boot to recovery as soon as the flashing gets completed. Moroever, this is the reason why we unchecked Auto Reboot so that we have some time on our hands to get this job done.
Why We Did Not Use MultiDisabler?
As you might have noticed, we didn’t use the multidisabler, this is because we now have the fbedisabler. This script checks the fstab and disables the encryption if FBE V1 is found. It will also format the data, so you don’t need to do that again. It won’t work with FBE V2, since TWRP can already decrypt it.
Install TWRP Recovery on Samsung via multidisabler
- To begin with, carry out STEPS 1 to 4 from above.
- Open Odin via its EXE file, click on AP, and load the TWRP file.
- After that, click on Userdata and load the disabled_vbmeta file.
- Now go to Options and uncheck Auto Reboot. Then click Start.
- The flashing will now begin. Once done, reboot to the recovery.
- For that, press and hold both the Power and Volume up buttons.
- You’ll now have to disable the decryption via MultiDisabler.
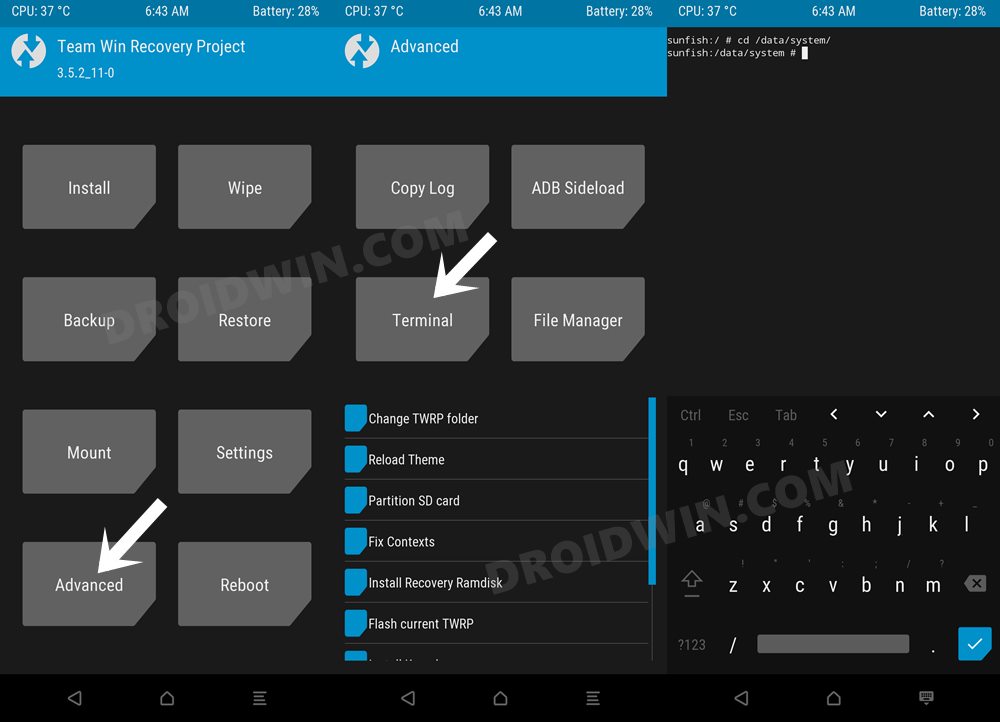
- So from TWRP Recovery, go to Advanced > Terminal.
- Then type in the below command and hit Enter
multidisabler
- Your device will now resize the vendor and will ask you to run multidisabler again.
- So again execute the below command and hit Enter
multidisabler
- Once the decryption is disabled, you’ll now have to do a format data.
- For that, go to Wipe > Format > Type in YES > hit the blue checkmark.
- Once done, you may reboot the device to the OS via Reboot > System.
That’s it. These were the steps to install the TWRP Recovery on your Samsung Galaxy device via multidisabler and fbedisabler.
An Alternate Method to Flash TWRP on Samsung
In the aforementioned method, we flashed both the TWRP and vbmeta files together. You could further simplify this process and flash the files individually as well by slightly modifying the flashing instructions. Here’s how:
- To begin with, carry out STEPS 1 to 4 from the above section.
- Then launch Odin, click on Userdata, and load the vbmeta.tar.
- Now, hit Start. You shall now get a prompt on your device, stating that:
“You have to reset your device to factory settings”.
- Use the Volume Keys to select the reset option and hit the Power key to confirm it.
- Your device will now undergo a reset and then the AVB will be disabled.
- Once that is done, again reboot your device to the Download Mode.
- Then launch Odin, click on AP, and load the twrp.tar.
- Now go to the Options tab and make sure to uncheck Auto Reboot.
- Then click Start and wait for the recovery to be flashed.
- Once that happens, immediately boot your device to TWRP recovery.
- For that, press and hold both the Power and Volume up buttons.
- Now, fbedisabler users should carry on from the 6th point of STEP 5.
- Whereas multidisabler users carry on from the 7th point of their section.