In this guide, we will show you the steps to root your Android device via APatch. When it comes to gaining administrative privileges by rooting your device, then Magisk has been the de facto choice for the masses for ages. Being able to easily patch the boot/init_boot file, and grant SuperUser requests to apps or even flash modules in just a few clicks, it manages to checkmark each of these requirements with ease.
With that said, we are now witnessing the advent of numerous different types of rooting solutions popping up in the past couple of months, including the likes of Magisk Kitunse, which is an unofficial fork of Magisk offering a few additional benefits, especially with regards to the SafetyNet API.
Apart from that, we also have the KernelSU, which has just become the most popular player in the town, since it works directly in the kernel space. Following the same kernel route, APatch has just made its way which allows you to root your Android device using a slightly different approach. So in this guide, we will show you how to get this job done, but first, let’s explain to you what exactly is APatch and how it functions.
Table of Contents
What is APatch?
APatch is a kernel-based root solution for Android devices that works in kernel mode and grants root privileges to user space apps directly in kernel space. Does it ring a bell or two? Well, you have guessed it right- it has taken a page or two, or rather borrowed the entire book from KernelSU. In a more technical term- The APatch UI and the APModule source code have been derived and modified from KernelSU itself. With that said, here are some of the noteworthy features of this tool:
Features of APatch
- It is compatible with most Android devices. As opposed to KernelSU, it is not just limited to devices with GKI kernel, which is a big plus point for tech enthusiasts. For instance, I have a Pixel 6A, Poco F5, OnePlus 9 Pro, Redmi Note 9, and Galaxy S20 FE 5G, out of which Pixel is the only one with the GKI Kernel and hence it was the only device that could be rooted via KernelSU. However, APatch will be able to root all these Android devices with ease.
- Supports APModule (APM) similar to Magisk modules.
- Supports KPModule (KPM), which will allow you to inject any code into the kernel
- APatch depends on KernelPatch.
Drawback of APatch
One of the or probably the biggest drawbacks of APatch is the fact that it only patches the boot;.img and not the init_boot. Since most of the Android devices that came with Android 13 or higher versions out of the box use init_boot for root, they are currently left out of the app’s support list. According to the developers:
APatch always patch the
boot.imgof any device. Do not attempt to patch or flash theinit_bootor other partition image files. The APatch developers are not responsible for the failure of resulting patch and boot.
Now that you are aware of the features and the working mechanism of APatch, let’s show you the steps to root your device via it. Follow along.
How to Root Android via APatch
Before starting, please take a backup of all the data on your device, just to be on the safer side. Droidwin and its members wouldn’t be held responsible in case of a thermonuclear war, your alarm doesn’t wake you up, or if anything happens to your device and data by performing the below steps.
The Prerequisites
Before you get started, make sure your device checkmark the following requirements:
- Your device has an ARM64 architecture. You can verify the same via a third-party app Treble Info > launch it > Go to Details > Refer to the CPI Architecture section > Make sure it’s ARM64.
- Your device’s Kernel version should be between 3.18 and 6.1. You can verify the same from Settings > About Phone or System section. Or simply search kernel in the Settings menu.
NOTE: There exists a handy ADB command that will help you verify if your kernel supports Apatch or not [though it isn’t necessarily required if your device checks the aforementioned requirements, still you may carry it out if you wish to be double sure]. However, there’s a major catch. with this method- your device needs to be rooted.
While it might sound like a surprising requirement as we are here to root the device but the command already requires root beforehand, you may do one thing- obtain temporary root via Magisk, execute the below given, and then restart your device- the root will be gone after a restart and you can then proceed to root the device via APatch.
zcat /proc/config.gz | grep -w CONFIG_KALLSYMS
- Download and extract the Android SDK Platform Tools on your PC.
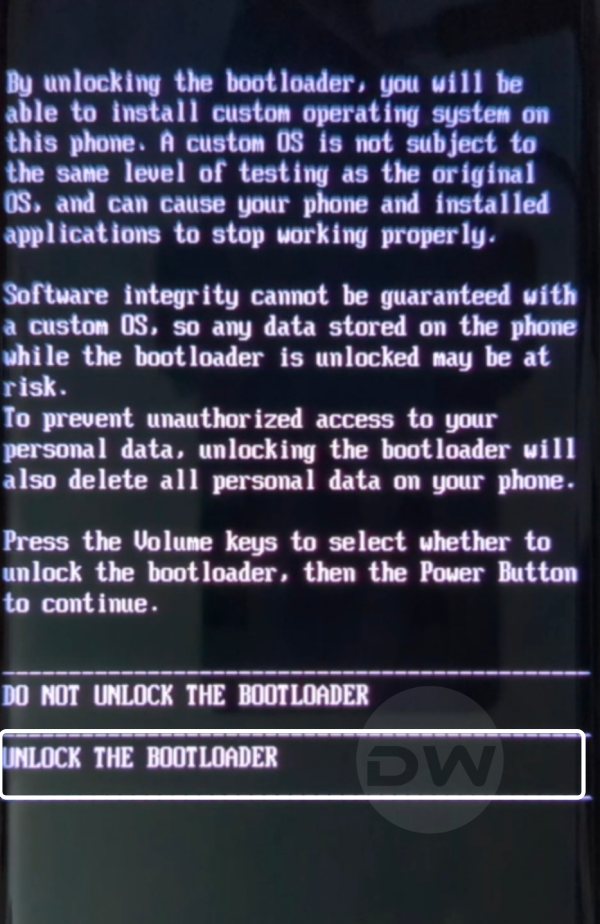
- Then unlock the bootloader on your device [it will reset your device].

- Now download the same firmware that is currently installed on your device.
- You may verify the same from Settings > About Phone > Build Number.
- Then extract the boot.img file from that firmware. Here’s how it can be done:
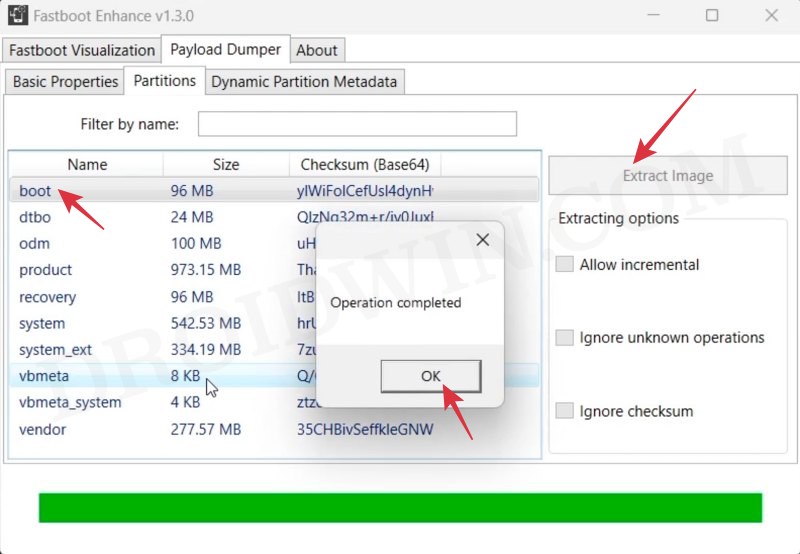
Pixel: Download Factory Image and extract the ZIP.
OnePlus: Download Full Firmware > Extract payload.bin via Fastboot Enhance.
Xiaomi: Download Fastboot ROM > Extract TGZ and TAR via 7ZIP > Go to Images.
- Once you have got the boot.img file, transfer it to the platform tools folder.
- Now download and install the latest version of APatch on your device.
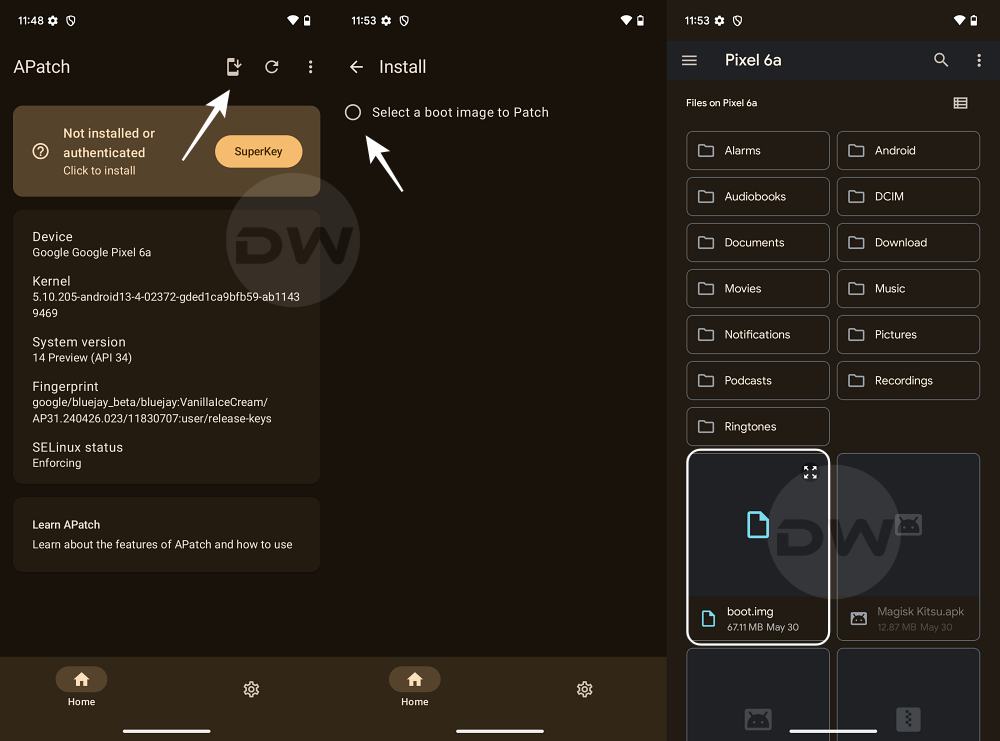
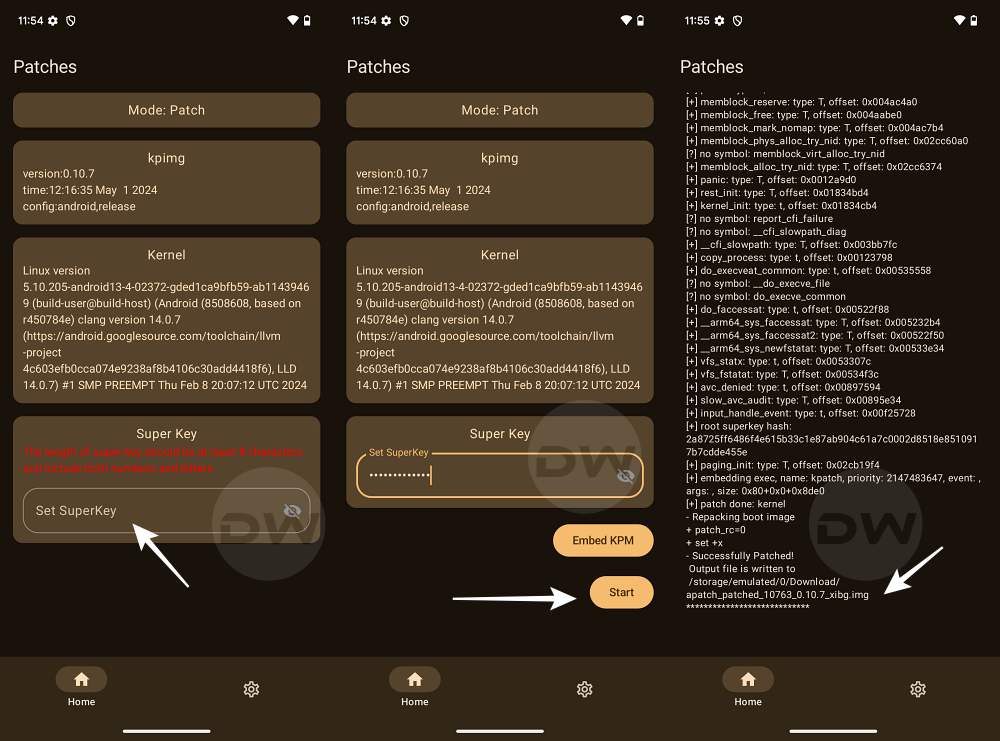
- Then launch it and tap on the install icon at the top right [NOTE: We are using the Automatic Flashing Method s it is the easier and shorter one. if you want to try out the Manual Method, then do check out the section wit hthe same name at the end of this guide].
- Now choose Select a Boot Image to Patch and select the stock boot.img file.
- Then tap on Set SuperKey, set your key, and hit OK. The length of Superkey should be at least 8 characters, in alphanumeric format.
- Do not use weak keys like 1234abcd. The latest version of the app might not even let you set weak keys, which is definitely a welcome move from the security point of view [ah, an unlocked device with root talking about security, the irony!].
- APatch will patch the boot.img and place it inside the Downloads folder.
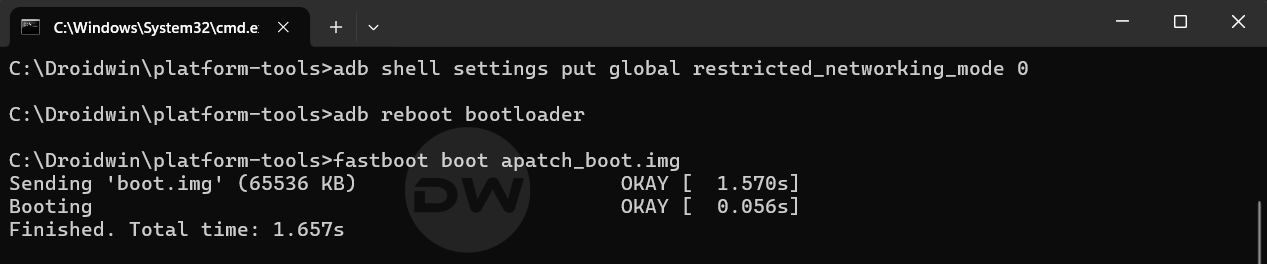
- Transfer it to the platform tools folder and open Command Prompt there.
- Now enable USB Debugging on your device and connect it to PC via USB.
- Then use the below command to boot your device to Fastboot Mode:
adb reboot bootloader
Now there are quite a few ways through which you can flash this patched boot and obtain root. Let’s have a look at each of these methods:
Temporary Boot
If your device supports temporary boot, then you may use the below command to boot your device via the patched boot.img for one-time usage. This will give you the opportunity to test whether everything is working well and good or not. If it is, then you may proceed ahead and obtain permanent root [refer to the next sextion]. On the other hand, if there’s any issue, then simply restart your device and the patched boot will be replaced with the stock one and your device will boot to the OS.
fastboot boot apatched_boot.img
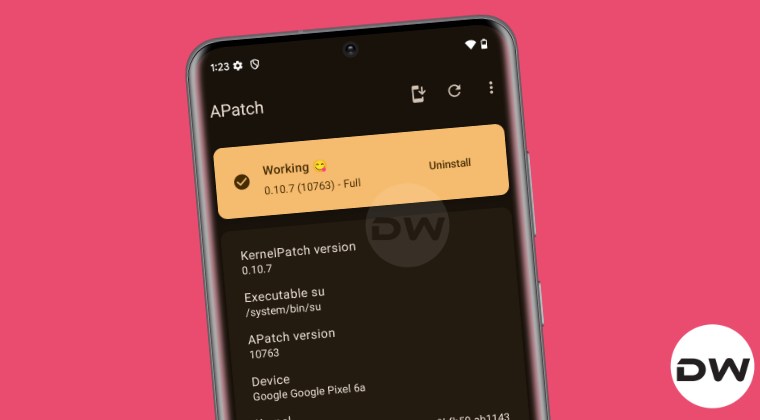
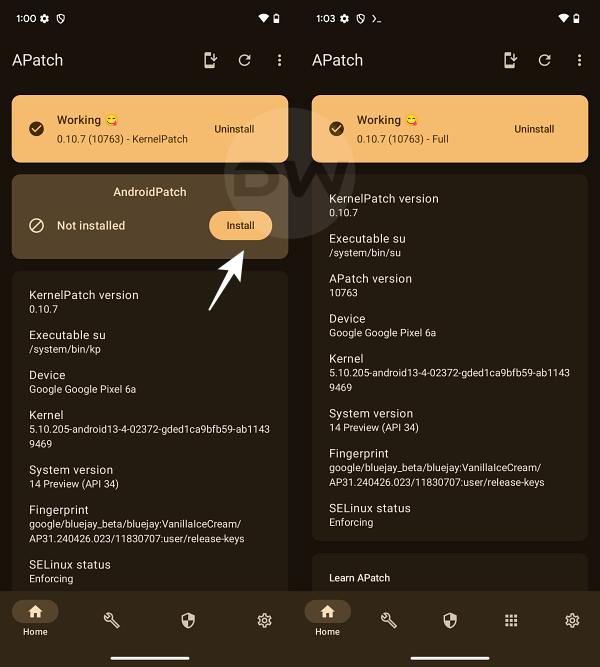
Now launch APatch and tap on SuperKey. Enter the Superkey that you have set earlier and you should now get the Working status under Kernel Patch. Finally, hit Install next to AndroidPatch and restart your device.
Direct Permanent Root
If your device doesn’t support temporary boot or you have done that and are now looking to obtain permanent root, then here’s what you need to do:
- Type in the below command to permanently flash the patched boot:
fastboot flash boot apatched_boot.img
- Now reboot your device to the rooted OS via the below command:
fastboot reboot
- Then launch APatch and tap on SuperKey.
- Now enter the Superkey that you had set earlier.
- You should now get the Working status under Kernel Patch.
- Finally, hit Install next to AndroidPatch and restart your device.

Using Custom Recovery
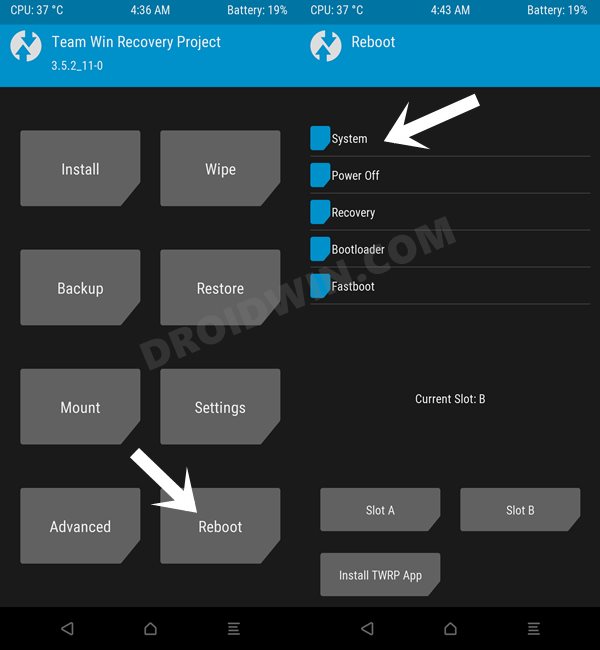
You can also flash the patched boot.img to the boot partition on your device via a custom recovery like TWRP. Here’s how it could be done:
- To begin with, install the TWRP Recovery on your device.
- Then boot your device to TWRP via the below command:
adb reboot recovery
- Now go to Install > tap on Install Image > select the patched boot.img
- Then choose the Boot partition and perform a right swipe to flash it.
- Now go to Reboot > System. Your device will reboot to the rooted OS.
- Then launch APatch and tap on SuperKey.
- Now enter the Superkey that you had set earlier.
- You should now get the Working status under Kernel Patch.
- Finally, hit Install next to AndroidPatch and restart your device.
That’s it. These were the various methods through which you can root your Android device via APatch. Let’s now have a look at some of the other tweaks related to this app.
How to Manually Patch the Kernel
Manually patching the kernel is somewhat complicated and an effort-taking task when compared with the Automatic approach and that is the reason why we discussed the latter one above. But if you wish to challenge your inner geek, then here’s how you can get the job done via this method:
- Download
kptools-win.zip,kpimg-androidandmagiskboot: LINK - Then extract all these three files to the same folder.
- Now open Command Prompt inside that folder and type in the below command:
magiskboot.exe unpack boot.img
- This will unpack the
boot.imgand give you the kernel file. Rename it to kernel-b. - Now type in the below command in the CMD window to patch the kernel:
kptools-x86_64-win.exe -p --image kernel-b --skey "YourKey" --kpimg kpimg-android --out kernel
- Finally, type in the below command to repack the boot.img:
magiskboot.exe repack boot.img
- You’ll get a new patched image with the name new-boot.img.
- Flash it via the instructions given above in Temporary Boot, Permanent Root, ‘or’ Custom Recovery.
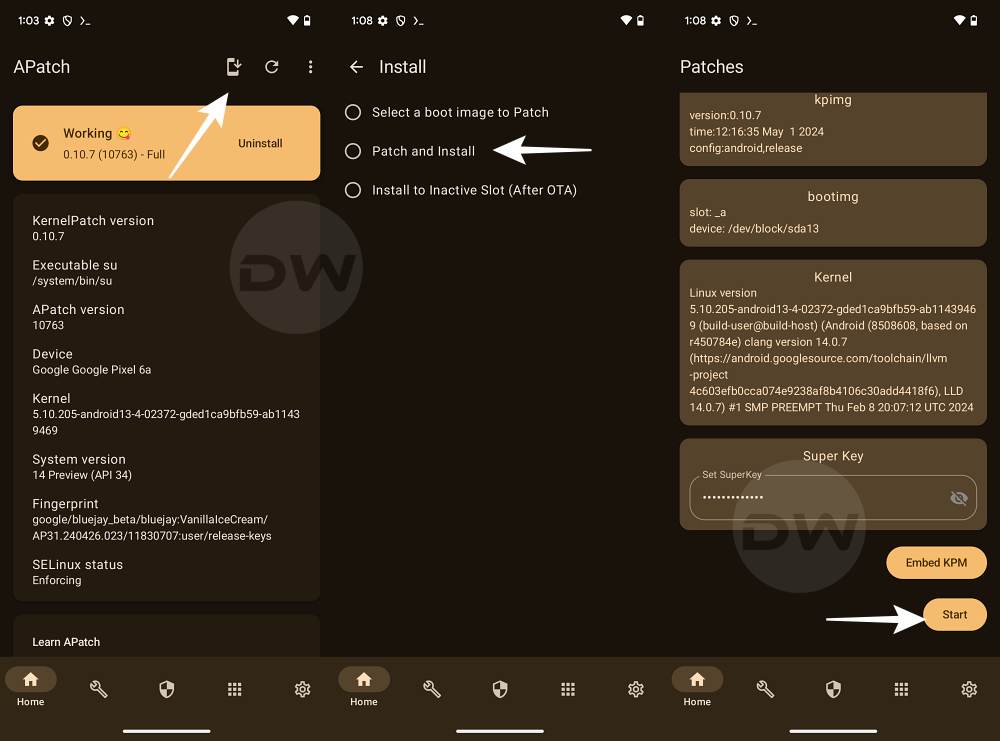
How to Update APatch
- To begin with, download the latest version of APatch from here.
- Then launch APatch and tap on the Install icon at the top right.
- Choose Patch and Install. Type in the SuperKey and tap on Start.
- It will now patch and flash the latest APatch build on your device.
- Once done, restart your device for the changes to come into effect.
How to Install OTA and Retain Root via APatch
You can also install OTA updates and at the same time retain the root via APatch, similar to how you do so via Magisk. Here’s how it could be done:
- First off, download and install the OTA update on your device.
- Once the download is complete, DO NOT RESTART your device.
- Instead, launch APatch and tap on the Install section at the top right.
- Now select Install to Inactive Slot [After OTA] and get the job done.

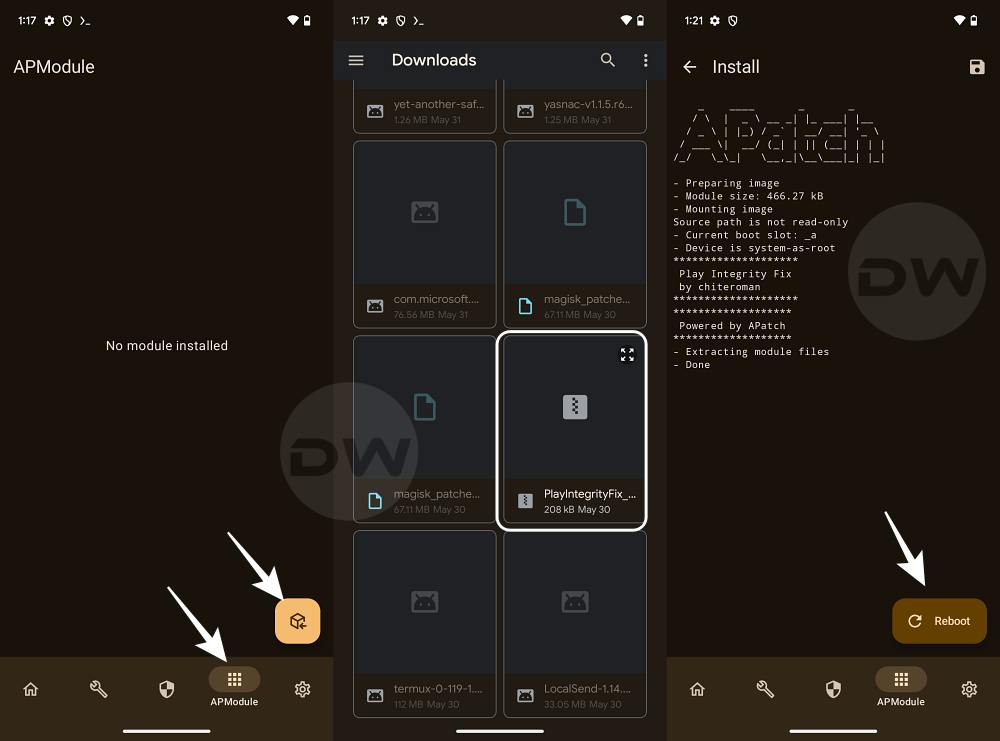
How to Flash Modules via APatch
Flashing modules via APatch is exactly the same as you do so with Magisk. Here’s what you need to do in this regard.
- First off, download the desired module ZIP file on your device.
- Then launch Apatch, go to APModule, and tap on the load icon.
- Now select the module ZIP file and it will be flashed. Once done, hit Reboot.
- Your device will reboot to the OS and the module will be activated.
How to Give SuperUser Access to Apps via APatch
When you root your device via Magisk and launch a root app, you get a SuperUser request right away. You could then tap on Grant and the app will be able to function with administrative privileges in the rooted environment without any issues. However, that isn’t the case with APatch as it follows the KernelSU approach wherein you’ll have to manually grant the apps SU request. Here’s how it could be done.
- Launch APatch and go to the SuperUser section.
- Then enable the toggle next to the desired app.
- Now launch that app and it will automatically get the root permission via APatch.
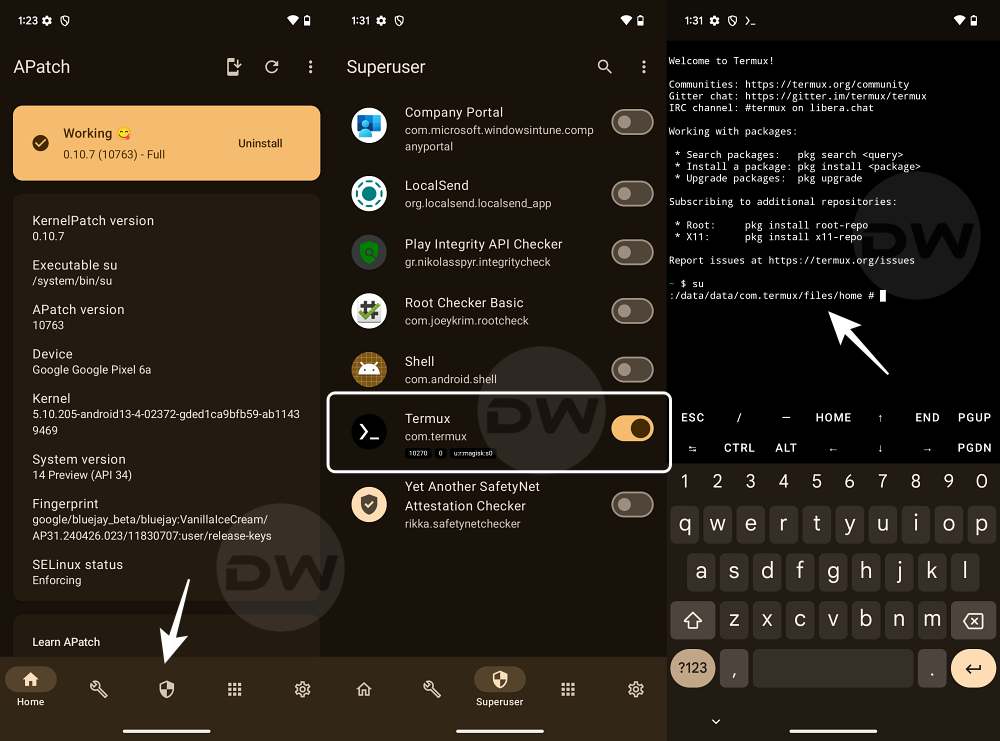
Do note that you will not see any SuperUser prompt as you get while the device is rooted via Magisk, but that isn’t a cause of concern as the app has gotten root privilege in the backend via APatch and you can now start using it with root privilege.
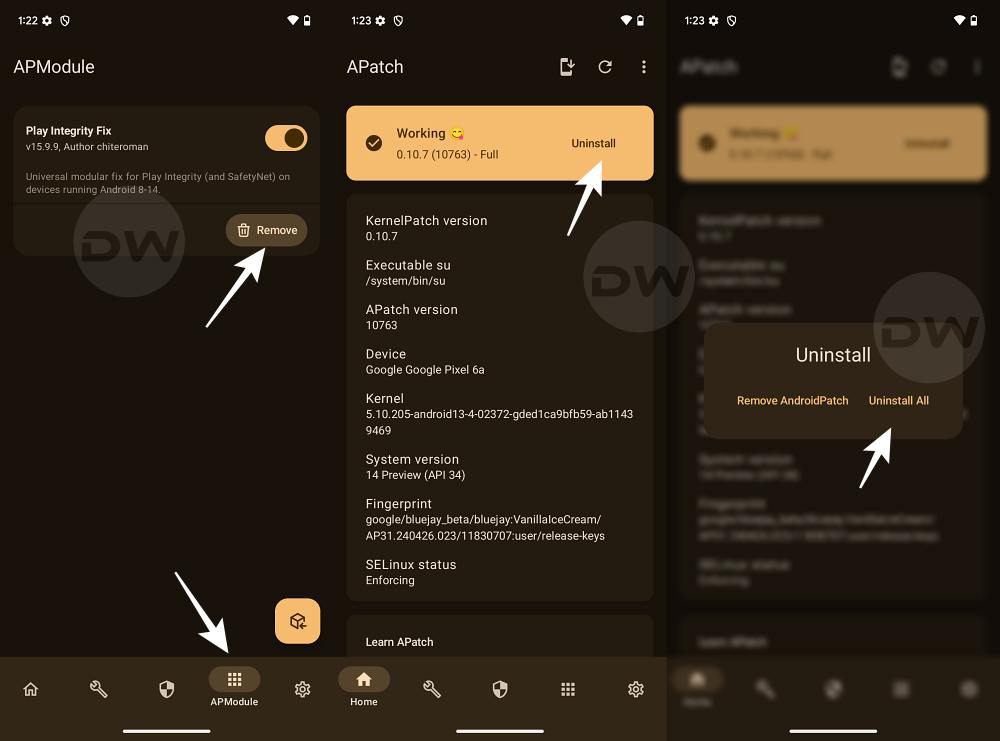
How to Uninstall APatch: Unroot Android
If you no longer wish to have a rooted device and want to remove APatch from your device, then here’s what you need to do:
- Launch APatch, go to Modules, and disable/Uninstall all the modules.
- Go back to the app’s home screen and tap on Uninstall > Uninstall All.
- APatch will be removed and device will auto reboot to a non-rooted OS.
That’s it. These were the steps to root your device via APatch. Likewise, we have also listed a couple of methods to patch the boot.img and numerous ways to flash that patched file. Likewise, the steps to flash modules via APatch, retain root after installing OTA, and update APatch are also discussed. Finally, the steps to unroot your device via Apatch are also given. If you have any queries concerning the aforementioned steps, do let us know in the comments. We will get back to you with a solution as soon as possible.