In this guide, we will show you the steps to install custom ROM on your Android device using ADB Sideload. One of the major perks of having an open-source ecosystem is the plethora of tweaks that it brings in with itself. Among them, it’s the ability to flash customized firmware that is right there at the top of the pecking order.
However, there’s always an element of doubt as to which is the correct way of flashing a ROM. Well, truth be told, there’s no universal rule regarding this. You could install them via TWRP, Fastboot Commands, ADB Sideload, or some specific tools. As far as this guide goes, our focus will be on the sideload method. For the unaware, ADB Sideload is the method through which you could directly flash the ZIP file.
It is different from ADB Push as the latter will only send that ZIP file to your device, whereas Sideload would send then subsequently flash that file as well. So due to the involvement of fewer steps, it has quickly become the go-to choice for many tech enthusiasts. On that note, this guide will show you the detailed steps to install and flash custom ROM on Android using this ADB Sideload method. Follow along.
Table of Contents
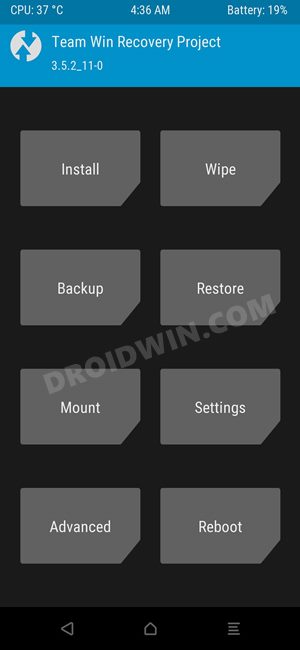
How to Install Custom ROM on Android via ADB Sideload
Before starting off, do keep in mind that not every ROM could be flashed via ADB Sideload. So even if you find your ROM package in ZIP format, it doesn’t necessarily mean that it supports sideload. So I would recommend you go through the developer’s installation instructions once (you know where, hint: it has the letters X, D, A!) and double-check that their ROM supports this mode of flashing.
If it does, then you may proceed ahead with the below instructions steps. Droidwin and its members wouldn’t be held responsible in case of a thermonuclear war, your alarm doesn’t wake you up, or if anything happens to your device and data by performing the below steps.
Video Guide
STEP 1: Take a Backup
If you are doing a clean flash (switching between two custom ROMs or coming from stock to custom), then a factory reset is compulsory. This will wipe all the data from your device, so please take a complete device backup beforehand.
On the other hand, doing a dirty flash (updating your ROM) doesn’t always call for a reset, but it is still highly recommended to take a backup. This is because you never know when things might go south in custom development!
STEP 2: Install Android SDK

First and foremost, you will have to install the Android SDK Platform Tools on your PC. This is the official ADB and Fastboot binary provided by Google and is the only recommended one. So download it and then extract it to any convenient location on your PC. Doing so will give you the platform-tools folder, which will be used throughout this guide to install Custom ROM via ADB Sideload.
STEP 3: Download Custom ROM
- Download the custom ROM of your choice (double-check that it is in a ZIP format).
- Once downloaded, rename it to rom, so that the complete name becomes rom.zip (it becomes easier to type in Command Prompt).
- Now transfer this rom.zip file to the platform-tools folder on your PC.
STEP 4: Enable USB Debugging and OEM Unlocking
Next up, you will have to enable USB Debugging and OEM Unlocking on your device. The former will make your device recognizable by the PC in ADB mode. This will then allow you to boot your device to Fastboot Mode. On the other hand, OEM Unlocking is required to carry out the bootloader unlocking process.
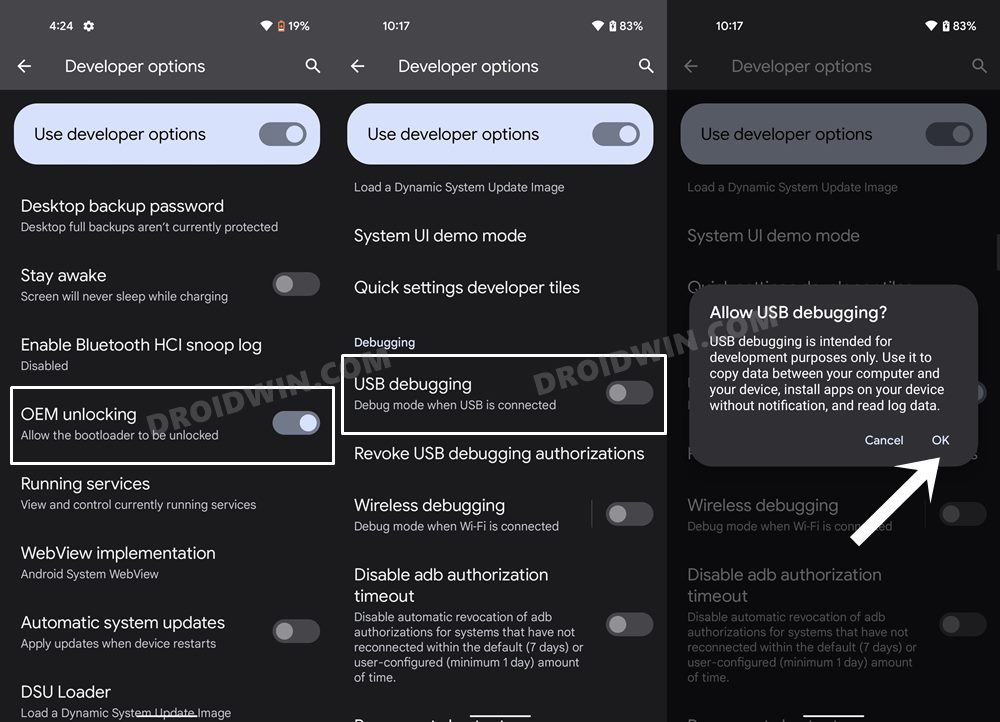
So head over to Settings > About Phone > Tap on Build Number 7 times > Go back to Settings > System > Advanced > Developer Options > Enable USB Debugging and OEM Unlocking.
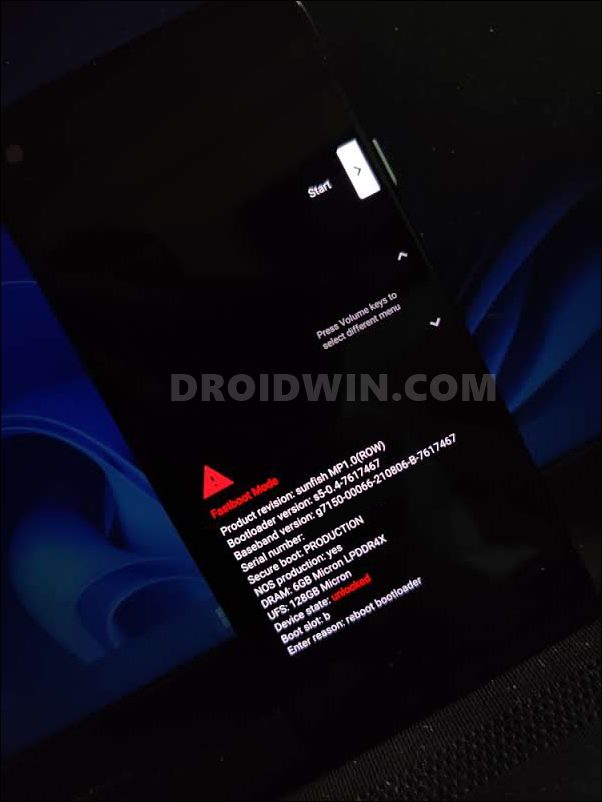
STEP 5: Unlock Bootloader
Next up, you will also have to unlock the device’s bootloader. Do keep in mind that doing so will wipe off all the data from your device and could nullify its warranty as well. So if that’s all well and good, then please refer to our detailed guide on How to Unlock the Bootloader of any Android Device. In short, it is usually either of the two below commands that should do the job:
fastboot oem unlock
fastboot flashing unlock

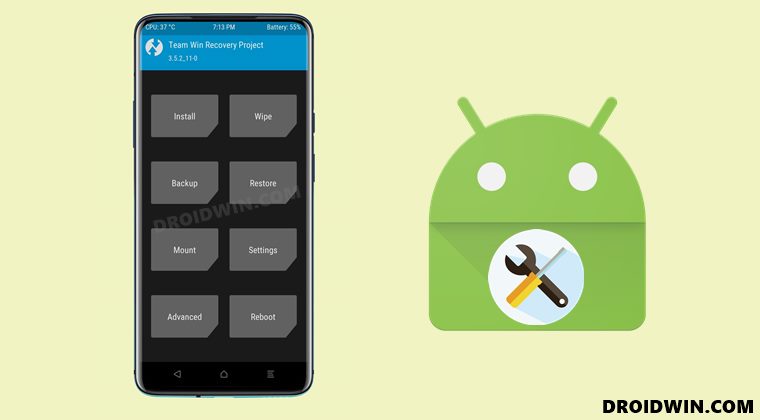
STEP 6: Install/Boot to TWRP Recovery
While most of you might already be aware of this fact, I still want to re-iterate it: using the ADB Sideload feature requires you to have a custom recovery installed. While stock recovery also has the sideload option, that could only be used to install official OTA and firmware. For installing custom ROMs, you will always need to use a custom recovery’s ADB Sideload feature. So on that note, do check out our guide on How to Install TWRP Recovery on Android. Or refer to the below shorter instructions:
- To begin with, boot your device to the Fastboot Mode, using the below command:
adb reboot bootloader

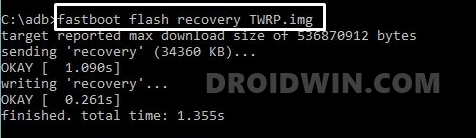
- Now if your device has a recovery partition, then use the below command to flash TWRP:
fastboot flash recovery twrp.img
- However, if it doesn’t have a recovery partition, then you will have to use the boot partition to temporary boot it via the below command:
fastboot boot twrp.img
- After that, flash the TWRP ZIP via the Install option. Or if there’s no ZIP, then flash the IMG file in the Ramdisk slot.
- On the other hand, if you have already installed the TWRP Recovery, and you want to boot your device to it, then use the following command:
adb reboot recovery
STEP 7: Format Data/Wipe
Factory Reset is a must if you are coming from another custom ROM or stock firmware. However, different ROMs have diverse approaches regarding this. While some of them would ask for a factory reset of the device, others would tell you to wipe the Data partition (and also the System partition in some instances). So please double-check the ROM instruction page and then you may refer to the below instructions:
TWRP Format Data
- From TWRP, go to Wipe and tap on Format Data.
- After that, type in YES in the space provided.
- Then tap on the checkmark situated at the bottom right.
- Wait for the Factory Reset to complete.
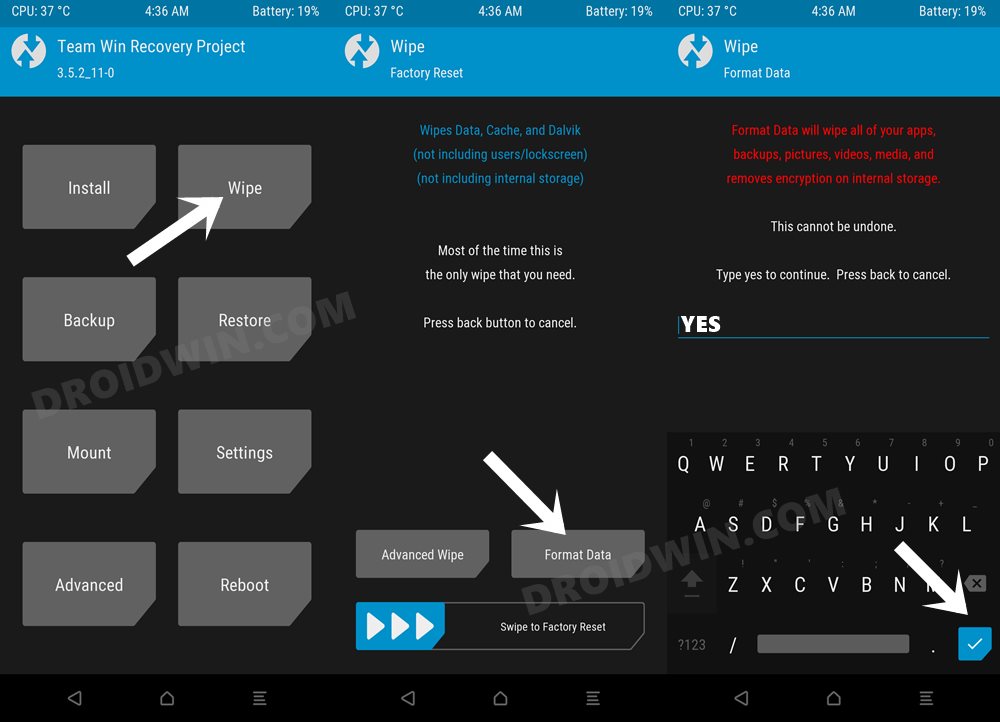
TWRP Factory Reset
- From TWRP, go to the Wipe section.
- Then performs a right swipe on the Factory Reset button situated at the bottom.
- Now, wait for the process to complete.

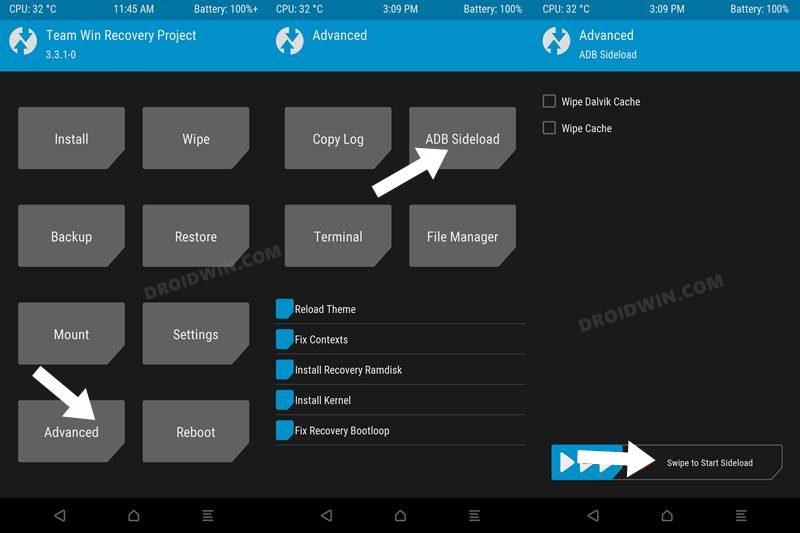
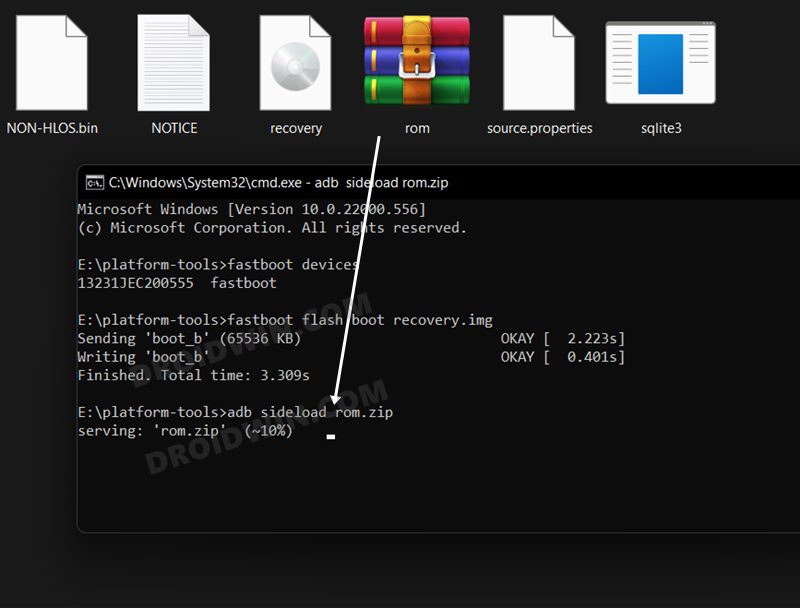
STEP 8: Flash Custom ROM via ADB Sideload
- From the TWRP, go to Advanced and select ADB Sideload.
- Then perform a right swipe to start the Sideload process.
- Now connect your device to the PC via USB cable.
- Then head over to the platform-tools folder, type in CMD in the address bar, and hit Enter. This will launch the Command Prompt.
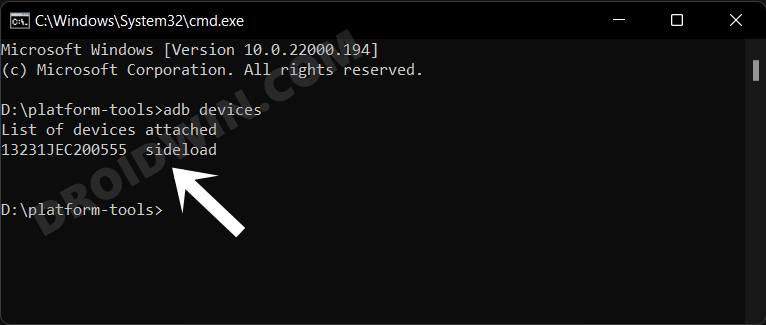
- Type in the following command in the CMD window to verify the ADB Sideload connection:
adb devices
- If you get the device ID followed by the sideload keyword, then the connection stands successful and you may proceed ahead.
- So execute the below command in the CMD window to install the custom ROM via ADB Sideload (here rom.zip is the name of the custom ROM):
adb sideload rom.zip
- Now, wait for the process to complete. Once done, you will be notified of the same via Total xfer: 1.00x
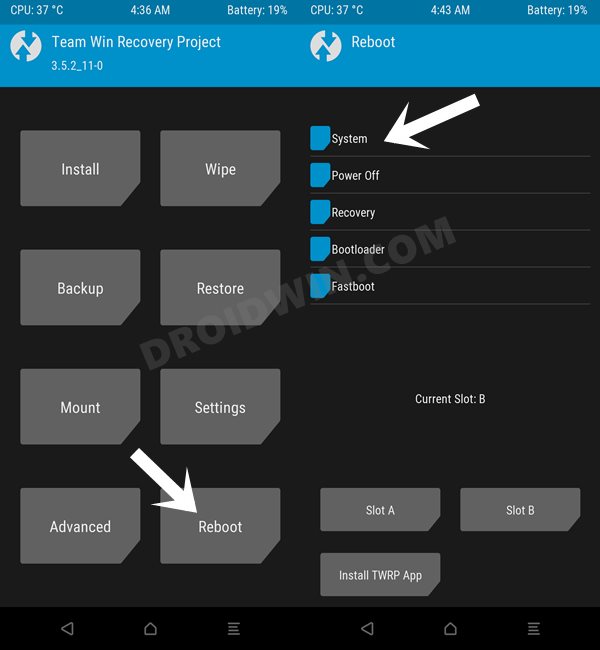
- Finally, you may boot the device to the newly installed OS by going to Reboot > System.

So with this, we conclude the guide on how you could install or flash a custom ROM on your Android device via ADB Sideload. If you have any queries concerning the aforementioned steps, do let us know in the comments. We will get back to you with a solution at the earliest.


Muneeb
hi, i have amazon echo 4 and i am looking for its firmware software, to install via sideload, but cannot find, can you help me?
Darren
Sadique, you are a god, this “how to” was well written and easy to follow, i managed to update my dads old samsung tab pro t320 from KitKat to a more modern OS… thank you
GFCM
I do not know if you guys will read this.. But Sadique, hats off to you, my brother. I spent the whole day trying to get this done thru a lot of sources, but your explanation saved my phone, my butt, and made my day. I thank you deeply, brother.
Sadique Hassan
Thanks for the appreciation mate.