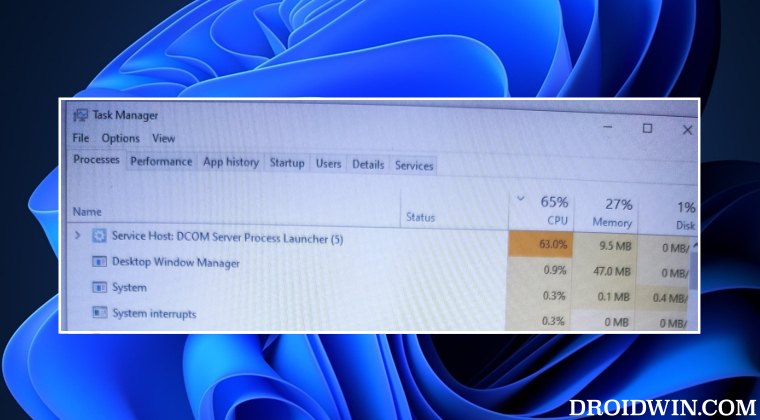
In this guide, we will show you various methods to fix the high CPU usage issue of the Service Host DCOM server process launcher. Many users have voiced their concern that the aforementioned service is consuming an astronomical amount of CPU resources. In some instances, it ends up taking around 70-80% RAM, thereby leaving only a tiny bit for the OS and other system processes to function along the expected lines.
The end result? Well, as you might have expected, the PC tends to constantly crash and freeze at regular intervals. So is there a method to address this issue? Well, there does exist a plethora of nifty workarounds that should help you fix the high CPU usage issue of the Service Host DCOM server process launcher. So without any further ado, let’s check them out.
Table of Contents
Fix Service Host DCOM Server Process Launcher High CPU usage
It is recommended that you try out each of the below-mentioned workarounds and then see which one spells out success for you. So with that in mind, let’s get started.
Fix 1: Change Time Zone to Central Africa!
As strange as it may sound, many users were able to rectify this issue after changing the system time zone to Central Africa! So let’s give it a try using the below-listed steps and then check out the results:

- Launch CMD as an administrator from the Start menu.
- Then type in the below command and hit Enter:
tzutil /s "W. Central Africa Standard Time"
- Now check if it fixes the high CPU usage issue.
Fix 2: Restart the PC
In most cases, giving the OS a fresh environment to work in is all that is needed to lower the CPU burden. Combining it with the fact that most users only tend to send your PC to sleep or hibernate, and a complete restart becomes all the more important.

So bring up the Start Menu, click on the Power icon, and select Restart. Wait for your PC to power on and give it a minute or two. Then check if the Windows 11 high CPU and disk usage issue has been fixed or not.
Fix 3: Disable Background Apps in Windows 11
The number of apps running in the background has a direct impact on the performance of your PC. Therefore, it is always recommended to keep these apps at the very minimum. In other words, you should only allow the most important apps to function in the background, and consider disabling the others. Here’s how it could be done:
- Bring up the Settings page via Windows+I shortcut key combinations.
- Then select Apps from the left menu bar and go to the Apps and Features section.

- Now scroll to the app whose background functionality you wish to disable.
- Click on the overflow icon next to that app and select Advanced Options.
- Go to the ‘Let this app run in the background’ section and select Never from the drop-down menu.


Do so for all the apps on an individual basis (yes, this setting has undergone a change from Windows 10 and you cannot disable all the apps at once). Moreover, you would only see the Advanced Options for those set of apps that runs in the background.
If the app doesn’t support this functionality, then it wouldn’t have this option in the first place. Anyways, try out this tweak and then verify if it fixes the Service Host DCOM Server Process Launcher high CPU usage.
Fix 4: Change Power Options in Windows 11
By default, your laptop is set to the Balanced power plan. This gives equal weightage to performance and battery consumption. However, you could trade opt for high battery consumption and get a better performance in return. if you are willing to try ut out, then here’s what you need to do:
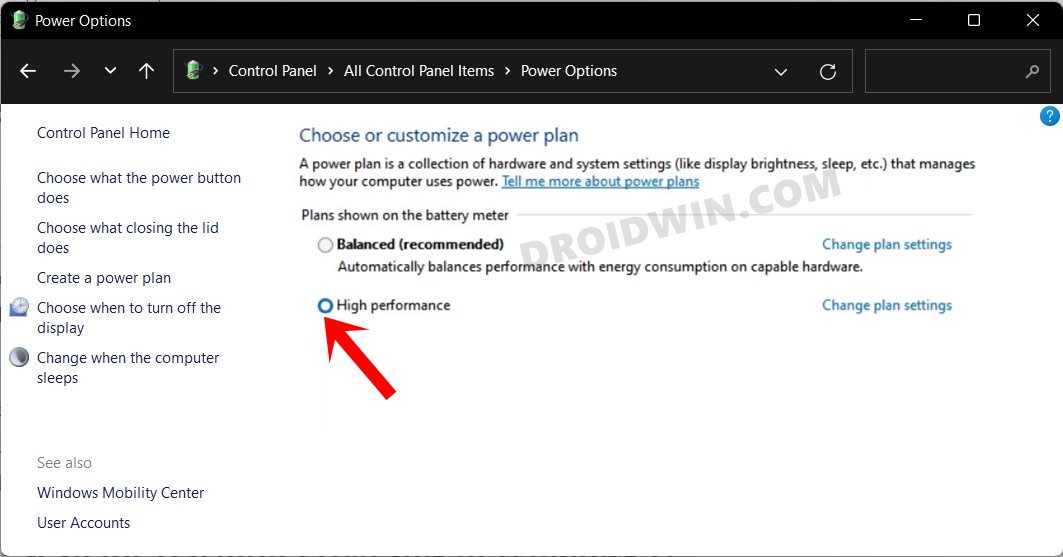
- Head over to the Start menu, search Edit power plan, and open it.
- Then click on Power Options from the top menu bar.
- Finally, select the High-Performance plan.
- Check if it fixes the Service Host DCOM Server Process Launcher high CPU usage.
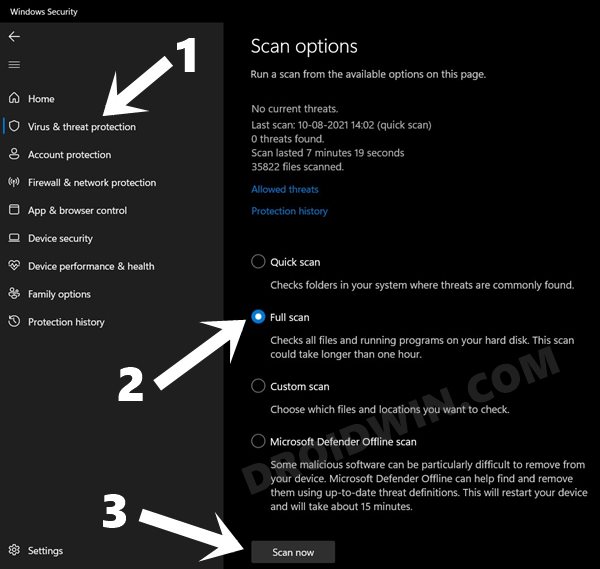
Fix 5: Scan for Harmful Programs in Windows 11
If a virus or malware has crept into your PC, then it could result in the slow down of the entire system, along with a plethora of other issues. Therefore, it is recommended that you perform a full scan of your PC and eliminate all the harmful apps from your PC, if found.
- So go to the Start menu, search Windows Security and open it.
- Then go to Virus and Threat Protection and click on Scan Options.
- Select Full Scan and hit click on the Scan Now button present at the bottom.
- The scanning will now begin and could take a few minutes.
- If it asks for your approval, then don’t think twice before letting it delete the harmful files from your PC.
- Once done, restart your PC and check if it fixes the Service Host DCOM Server Process Launcher high CPU usage.
Fix 6: Update Graphics Drivers in Windows 11
if you are using an old graphics driver, then your PC might have to exert that extra effort in properly rendering the graphics on your screen. This is completely avoidable though-all you need to do is just update the graphics drivers, which could be done as follows:
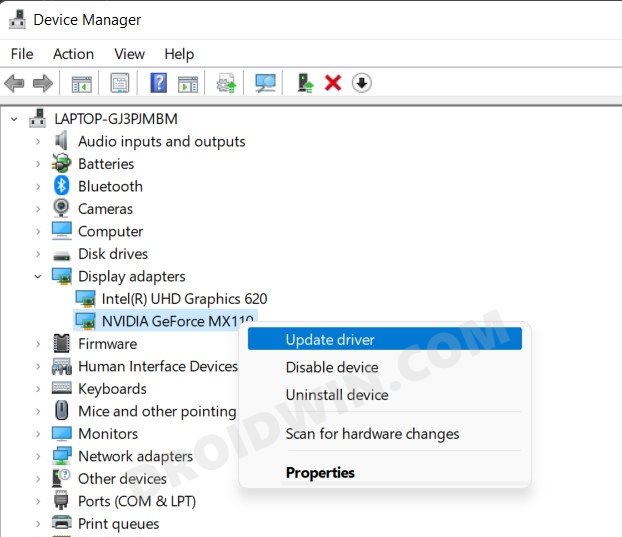
- Use the Windows+X shortcut to bring up the menu and select Device Manager.
- Then expand the Display Adapter section, right-click on your drivers, and select Update drivers.
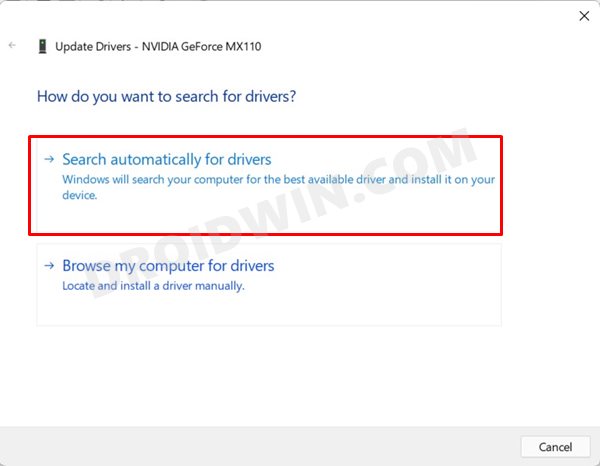
- Now select Search automatically for drivers.
- Windows will then search online for the latest display drivers, and would subsequently download and install them.
- Once that is done, restart your PC and then check if it fixes the Service Host DCOM Server Process Launcher high CPU usage.
Fix 7: Update Hard Drive Drivers in Windows 11
Using old hard drive firmware would call for more processing power from the hard disk in reading and writing files. This in turn will spike up the Disk Usage graph. The fix for the same is fairly simple- update your hard disk drivers to the latest build. Here’s how:
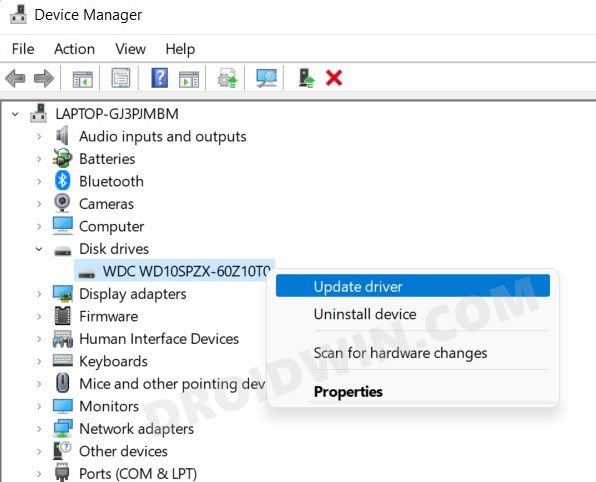
- Right-click on the Start menu present at the taskbar and select Device Manager from the menu.
- Then expand the Disk Drive section, right-click on your drivers, and select Update drivers.
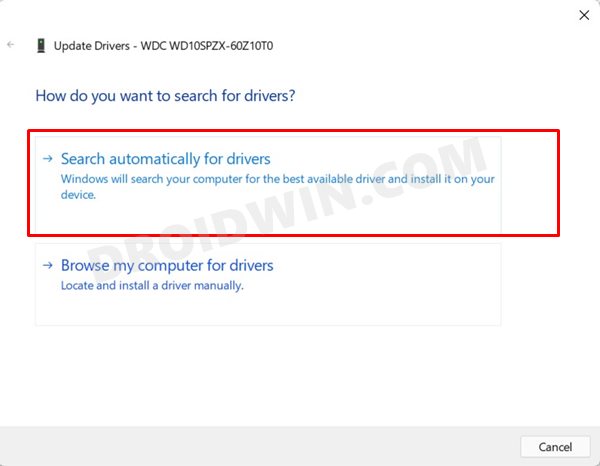
- Now select Search automatically for drivers.
- Windows will search online for the latest disk drivers, and if found, will download and install them.
- Once done, restart your PC and check if it fixes the Service Host DCOM Server Process Launcher high CPU usage.
Fix 8: Disable Background Services in Windows 11
Background Services are among the biggest culprit when it comes to putting an extra burden on the CPU. However, most of these services might actually prove to be a useful bet for some other component on your PC. So it’s mostly a trade-off.
With that said, we have listed out three services below that we are about to suspend. But at the same time, we have listed their usage as well. So go through them first and then decide accordingly whether you need to continue using them or not.
SysMain (Superfetch)
Its function is to load the frequently used apps to the volatile memory aka RAM so that easily you may access that app much quicker the next time you launch it. However this service is continuously running in the background, so you may consider turning it off. In my case, the apps then took 2-3 seconds ‘more’ to load, which was with the expected limit for me. So if you echo this thought as well, then consider stopping it.
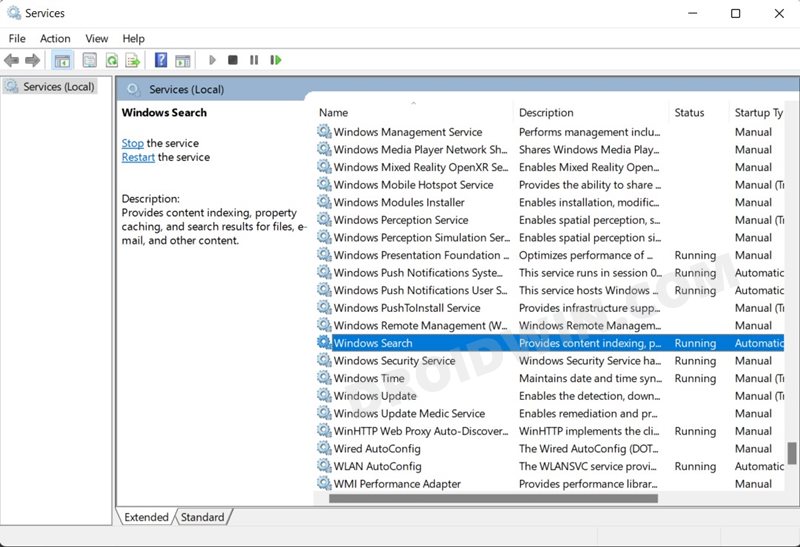
Windows Search
This service also continuously runs in the background so that whenever you input a query, it is able to index it and bring the result in no time whatsoever. It ultimately boils down to individual performance whether you want to disable it or not.
Connected User Experiences and Telemetry
The Telemetry service collects your system’s diagnostic and debugging data and then sends it to Microsoft. And for this purpose, it has to remain active all the time. Well, out of all three services mentioned here, this was literally a no-brainer for me- turning it off not only improves the CPU performance but is also a boon from the privacy aspect.
How to Disable Services in Windows 11
Now that you are aware of the three services and their usage, let’s check out the steps to disable them:
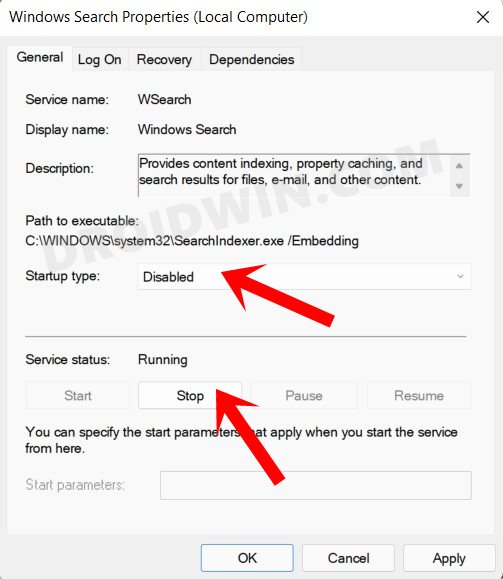
- Head over to the Start menu, search Services, and open it.
- Scroll to the service that you need to disable and double-click to open its properties.
- Change its Startup Type to Disabled and finally hit the Stop button.
- That’s it. The service will no longer run now. Check if it fixes the Service Host DCOM Server Process Launcher high CPU usage.
Fix 9: Use SFC and DISM Commands
System File Checker and Deployment Image Servicing and Management are two command-line utility tools that scan for corrupt Windows files and then replace them with their working counterpart. The major difference between the two is whereas the SFC replaces the corrupt files with the working ones from the cached directory on your PC, DISM does so by downloading the working files from the online Microsoft servers. And as of now, we would be making use of both these tools to fix the underlying high CPU usage issue. Follow along.
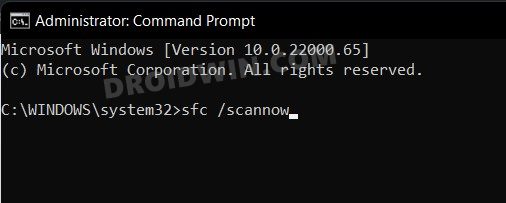
- To begin with, right-click on the Start Menu and select Windows Terminal (Admin).
- Then click on the down arrow present next to the new tab icon and select Command Prompt from the list.
- Once the CMD window is opened, copy-paste the below command to open the SFC Tool:
sfc /scannow
- Once the SFC Scanning is complete, it’s time to use the DISM Tool. So copy-paste the below command:
DISM /Online /Cleanup-Image /RestoreHealth
- Once DISM finishes the scanning, it is recommended to reboot your PC.
- Check if it fixes the Service Host DCOM Server Process Launcher high CPU usage.

Fix 10: Boot to Safe Mode
In some instances, a third-party app might conflict with the mouse. The best way to verify and hence rectify this issue is to boot your PC to Safe Mode. Doing so will disable all the third-party apps and give you the stock environment with just the system apps. If the CPU usage comes down to normal usage in this mode, then the culprit is indeed a third-party app. Therefore, you should consider uninstalling the recently installed apps after which the issue first came to light. Here’s how:
- Bring up the Run dialog box via Windows+R shortcut keys.
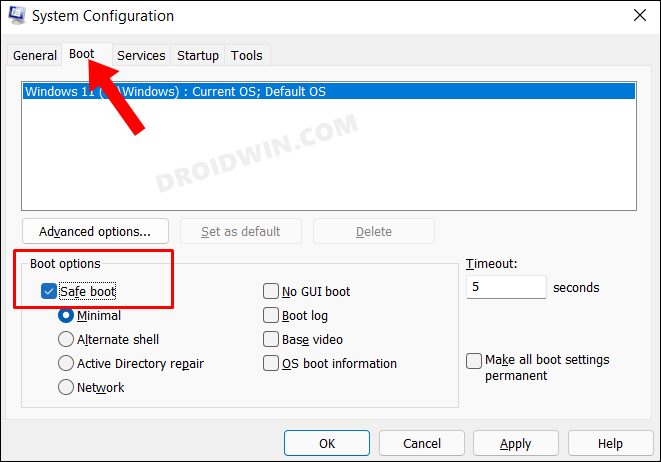
- Then type in the below command and hit Enter to open the System Configuration menu
msconfig
- Now go to its Boot tab and checkmark Safe Mode under Boot Options.
- Finally, click OK followed by Restart in the confirmation dialog box.
- Your PC will now boot to Windows Recovery Environment.
- Go to Troubleshoot > Advanced options > Startup Settings > Click Restart > Press 4 to boot to Safe Mode.
- Now check if it fixes the Service Host DCOM Server Process Launcher high CPU usage.

Fix 11: Install Updates
If there is any pending update waiting for a permanent bode on your PC, then now is probably the best time to download and install it. These updates do tend to fix underlying issues and might also bring in some performance boost. All in all, it could help you to fix the Windows 11 high CPU and disk usage issue as well.
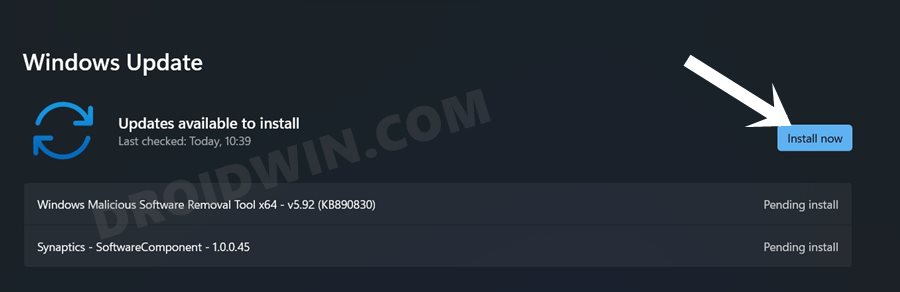
- Right-click on the Taskbar icon and select Settings from the menu that appears.
- Then go to the Windows Update section from the left menu bar.
- Now if you see any pending updates, then download and install them right away.
- Once the installation is complete, restart your PC.
- Check if it fixes the Service Host DCOM Server Process Launcher high CPU usage.
Fix 12: Try a Clean Boot
If none of the above methods managed to work out in your favor, then the last method calls for desperate measure. Here we will be disabling all the services and most of the apps that have a high-performance impact and then restart your PC in this environment.
You will then have to re-enable each of the services and apps one at a time until you are able to identify the culprit. Once that happens, it is recommended that you keep that service or app disabled in the long run as well (if possible).
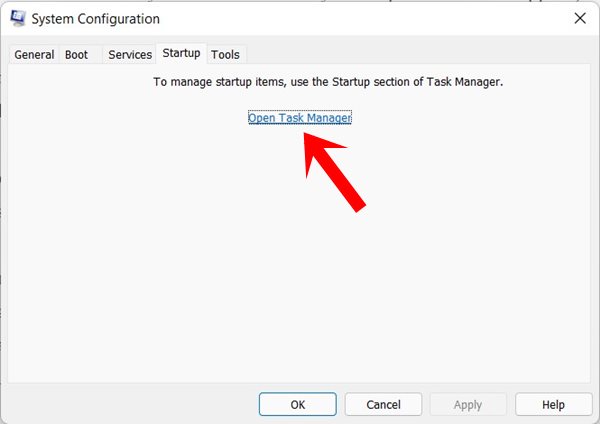
- So head over to the Start Menu, search System Configuration, and open it.
- Then go to the Services tab and checkmark enable ‘Hide all Microsoft service’.
- After that, click on the Disable All button.
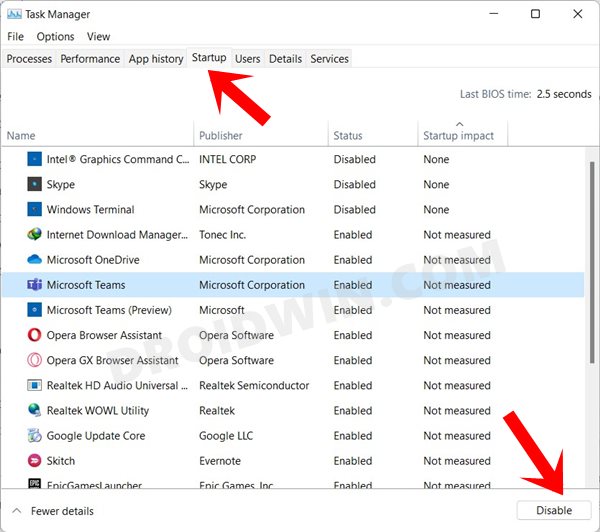
- Once that is done go to the Startup tab and click on Open Task Manager.
- Then select all the apps that are consuming too much system resources and are having a high-performance impact and click the Disable button.
- Now click OK to save all the changes. Then click Restart in the confirmation dialog box that appears.
- Once your PC boots up, it will be without any services and most of the apps will be disabled as well.
- So bring up the System Configuration menu and then re-enable a few apps at a time. Likewise, enable a few apps via the Task Manager’s Startup tab.
- Keep on doing so until you are able to recreate the issue. Once that happens, take note of the last enabled apps and services and then disable them right away.

That’s it. These were the various methods that should help you fix the high CPU usage issue of the Service Host DCOM server process launcher. If you have any queries concerning the aforementioned steps, do let us know in the comments. We will get back to you with a solution at the earliest.


