In this guide, we will show you various methods to enable/disable Local Security Authority Protection on your Windows 11 PC. The Local Security Authority is a Window sshyem process, that is responsible for authenticating users and verifying Windows logins. It manages system credentials like passwords and tokens linked to Microsoft accounts and Azure.
So to create a layer of protection around your credentials, it is important to have this feature enabled. With that said, in some testing and debugging environments, users usually prefer to have this feature temporarily disabled. So keeping all these points in mind, this guide will make you aware of numerous methods to enable and disable Local Security Authority Protection on your Windows 11 PC. Follow along.
Table of Contents
Enable/Disable Local Security Authority Protection via Settings Menu
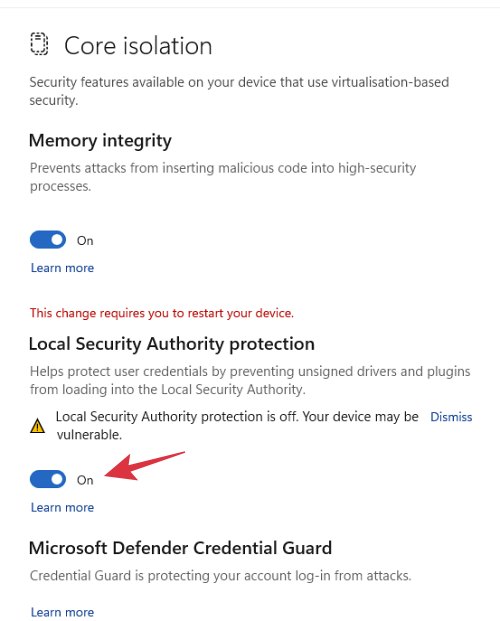
- Head over to Settings > Privacy & Security> Windows Security.
- Then go to Device Security and click on Core isolation details.

- Then enable or disable Local Security Authority Protection from there.
- Finally, restart your PC for the changes to take place.
Enable/Disable Local Security Authority Protection via Registry File [Without UEFI Lock]

- Download the Registry file corresponding to your requirement from below:
Enable LSAP [No UEFI Lock] Reg File
Disable LSAP [No UEFI Lock] Reg File
- Now open the registry file and click YES in the prompt that appears.
- Finally, restart your PC for the changes to take place.
Enable/Disable Local Security Authority Protection via Registry File [Via UEFI Lock]
- Download the Registry file corresponding to your requirement from below:
Enable LSAP [UEFI Lock] Reg File
Disable LSAP [UEFI Lock] Reg File
- Now open the registry file and click YES in the prompt that appears.
- Finally, restart your PC for the changes to take place.
Enable/Disable Local Security Authority Protection via Group Policy Editor
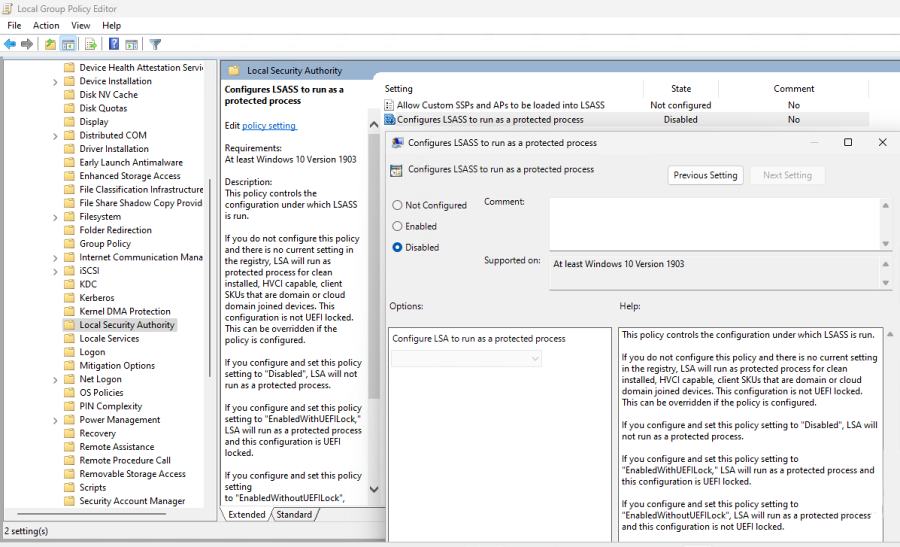
- Open Run via Windows+R, type in gpedit.msc, and hit Enter. This will launch Group Policy Editor.
- Now go to Computer Configuration > Administrative Templates > System > Local Security Authority.
- Then under Local Security Authority, open Configure LSASS to run as a protected process.
- Now select the option corresponding to your requirement:
Disable LSA: Select Enabled and under Configure LSA to run as a protected process, choose Disabled.
Enable LSA with UEFI Lock: Select Enabled and under Configure LSA to run as a protected process, choose Enabled with UEFI Lock.
Enable LSA without UEFI Lock: Select Enabled and under Configure LSA to run as a protected process, choose Enabled without UEFI Lock.
- Finally, hit OK to save the changes and restart your PC for the changes to be active.
That’s it. These were the various methods that should help you enable/disable Local Security Authority Protection on your Windows 11 PC. If you have any queries concerning the aforementioned steps, do let us know in the comments. We will get back to you with a solution at the earliest.


