In this guide, we will show you the steps to go back to stock ROM from any custom ROM on your Samsung device. While the devices from the South Korean giant are not the most active players when it comes to custom development, still, it isn’t the least favorite among tech enthusiasts either. It has managed to maintain a middle ground and usually gets blessed with numerous One UI-based and a few AOSP-based ROMs.
However, custom ROMs are known to have a few underlying bugs and issues, which even though get ironed out in the next build, but the new ones tend to make their way in the subsequent build. So is a vicious cycle with no way out. Apart from that, there have been a few instances wherein a developer decides to end support for their ROM.
While we completely respect their decision [as most of them aren’t earning anything from these ROMs but instead have to put in their valuable time and efforts], however, it creates quite a few problems for the end users. The biggest among these is the fact that since the ROM is no longer being developed, it will no longer be on the latest security patch, which will spell out a major security and privacy risk.

Apart from that, if you are currently facing any issues, then it will no longer be fixed as it’s not being maintained. So in such cases, your best bet is to revert to the stock ROM or flash a different custom ROM. If we talk about the latter, then it’s quite a risky approach to directly jump from one ROM to another.
Instead, a much safer approach is to first go back to stock from your current custom ROM and then make a switch to a different ROM on your Samsung device. So in all these cases, going back to the stock ecosystem is a must. And in this guide, we will show you how to do just that. So without further ado, let’s get started.
Table of Contents
How to Go Back to Stock from Custom ROM on Samsung
The below process will wipe off all the data from your device, so take a complete device backup. Droidwin and its members wouldn’t be held responsible in case of a thermonuclear war, your alarm doesn’t wake you up, or if anything happens to your device and data by performing the below steps
STEP 1: Install Samsung USB Drivers
Your first course of action should be to install the Samsung USB Drivers on your PC. This will help your PC identify the connected device. So download the drivers from below, launch its EXE, and proceed with the on-screen instructions to install it.
Download: Samsung_USB_Drivers.exe
STEP 2: Download Firmware
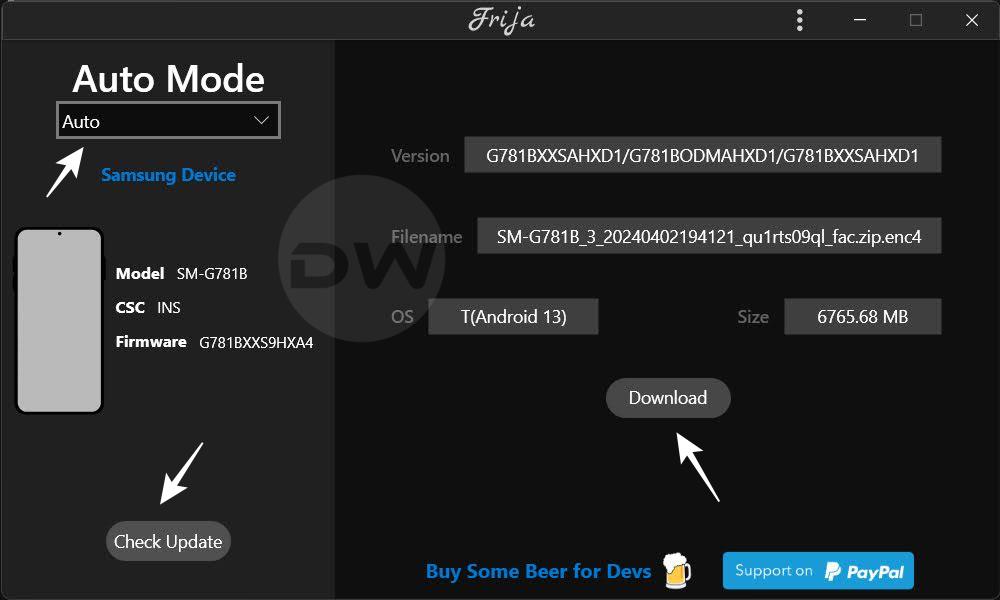
Next up, download the stock firmware for your device, corresponding to your device’s CSC code. You may get hold of the same from a third-party tool like Frija or a website like SamFW. For that, you may refer to our guide on How to Download Samsung Stock Firmware/ROM via Frija Tool & SamFW.
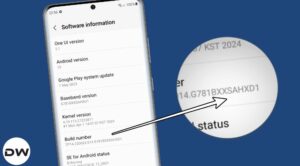
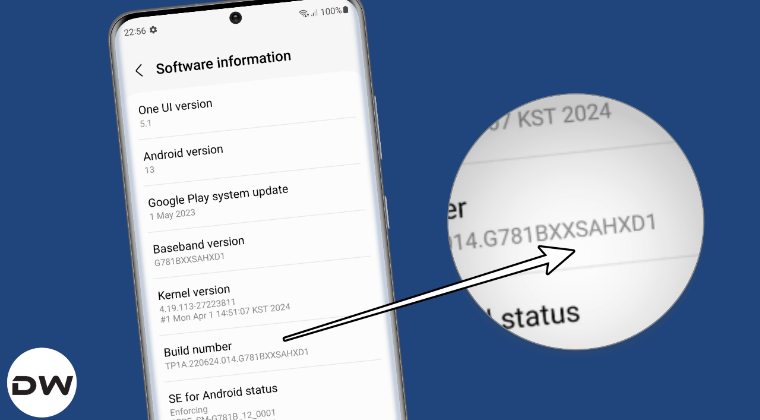
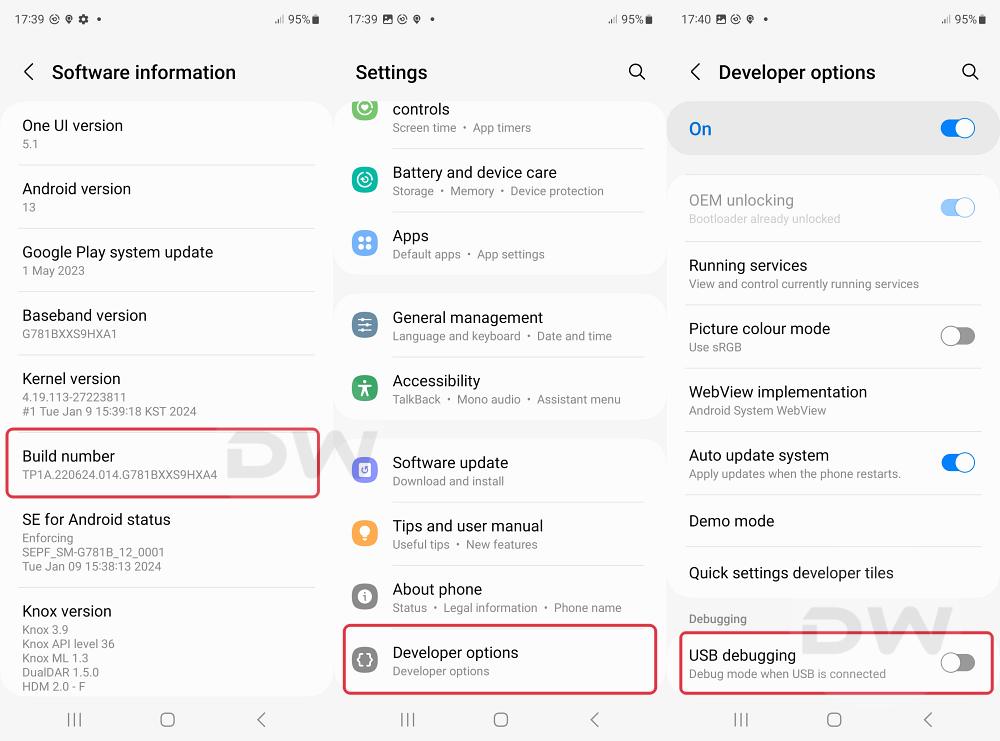
Regarding the CSC, head over to Settings > About Phone > Software Information > check the Service provider SW Ver. section. There will be four values, out of which, refer to the first value, it will be your CSC.
STEP 3: Extract Firmware
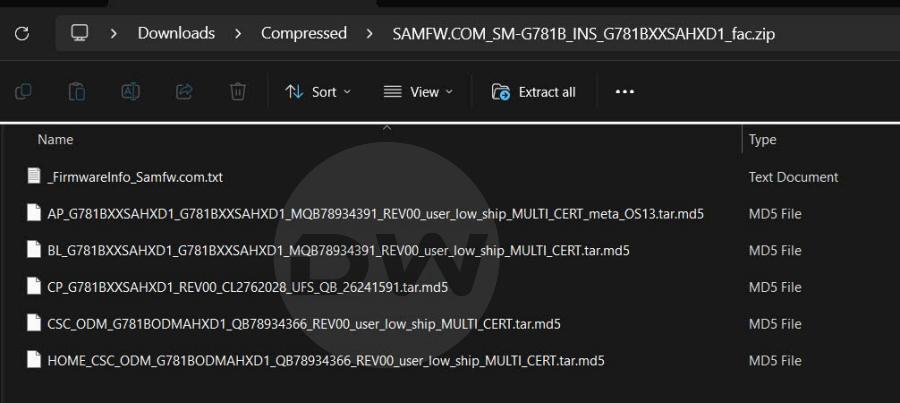
Once you have got the firmware, extract it to any convenient location on your PC. You’ll get the AP, BL, CP, CSC, and Home CSC, out of which the four files will be used. We will be using CSC instead of Home CSC because a data wipe is a must when it comes to going back to stock from a custom ROM on your Samsung device.
STEP 4: Download Odin
You’ll now have to get hold of the Odin Tool so that you can flash the extracted firmware files onto your device. So download the tool from below and extract it onto your PC.
Download Odin
STEP 5: Boot to Download Mode
You’ll now have to boot your device to Download Mode so that Odin can identify the device and henceforth allow you to flash the stock firmware. So you may either refer to our guide on How to Boot any Samsung Device to Download Mode or check out the below shorter instructions:
- To begin with, download and extract the Android SDK Platform Tools.
- Then enable USB Debugging and connect your device to a PC via a USB.

- Now type in CMD in the platform-tools folder address bar and hit Enter.
- This will launch the Command Prompt. Now type in the below command:
adb reboot download
- The device will now reboot to Download Mode in a matter of a few seconds.

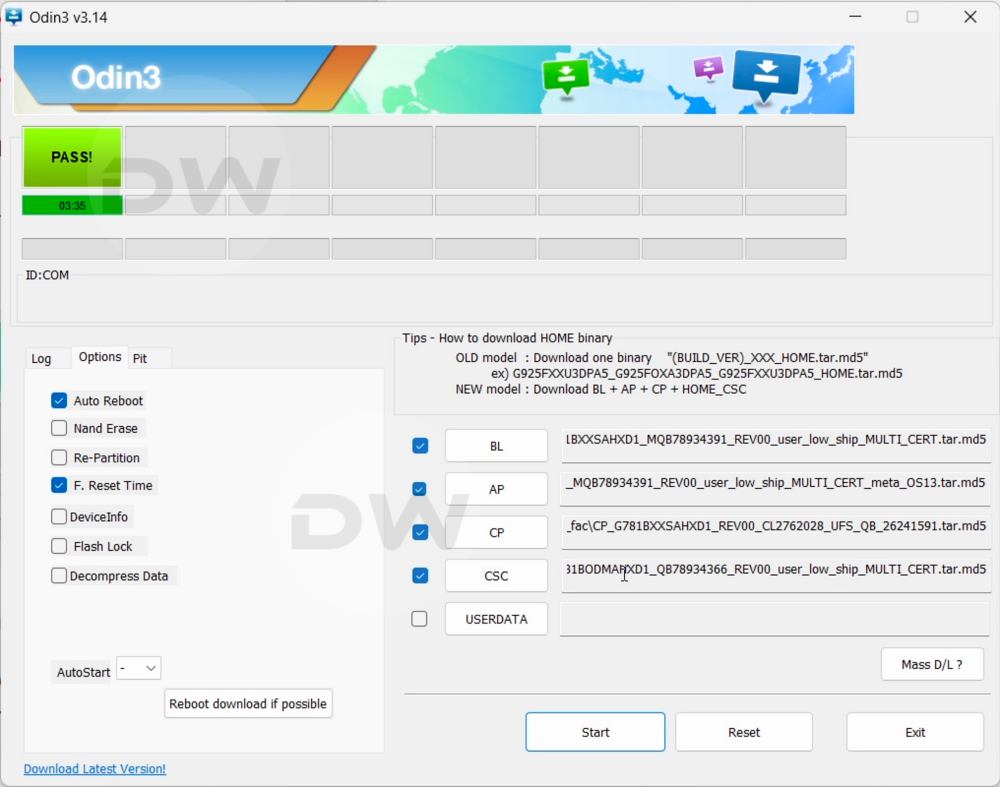
STEP 6: Flash Stock Firmware via Odin
- Launch Odin via its EXE file and then load the following files into their respective slots:
- AP file in the AP slot
- BL file in the BL slot
- CP file in the CP slot
- CSC in the CSC slot
- Once done, go to Options and make sure Auto Reboot and F.Reset Time are checked.
- Finally, hit Start and wait for the flashing to complete. It could take a while to complete.
- Once done, you’ll now get a Pass message on Odin and your device will boot to the OS.
That’s it. These were the steps to go back to stock ROM from any custom ROM on your Samsung device. Do note that since your device has undergone a reset, it will take a few additional minutes to boot to the OS, this is completely normal. Apart from that, if you have any other queries, then do let us know in the comments section below. We will get back to you with a solution as soon as possible.