In this guide, we will show you the steps to use the new Wireless Debugging feature present in Android 11. [If you are running an older Android build, then you may instead use the TCP IP method. Instructions for the same are given in this guide: Execute Android ADB Fastboot Commands Wirelessly on any Android version]. ADB and Fastboot Commands have become an integral part of the Android ecosystem. Earlier it was only limited to tech enthusiasts, but it’s now slowly expanding its domain for the general users as well.
For example, the general users could use these sets of commands to boot their device to stock recovery or to remove any bloatware from their devices. Then if we shift our attention towards the custom developments, these commands behold a plethora of useful functionalities. From booting to Fastboot Mode to unlocking the bootloader on your device, to even rooting it via flashing the Magisk patched boot.img file, there’s a lot to try out.
However, for any of these commands to be successfully executed, you need to have your device connected to the PC via USB cable. Well, not anymore! With the latest Android 11, the ability to execute commands over WiFi has now natively been added to the OS. As a result, you don’t need to go the extra mile and make use of any USB cable. All this is possible thanks to the addition of the new Wireless Debugging feature in Android 11. Without further ado, let’s check out its usage instructions.
Table of Contents
How to Use Wireless Debugging in Android 11
We are breaking down the instructions into separate sections for ease of understanding. Follow along in the same sequence as mentioned below. [Make sure that your device and PC are connected to the same wireless network].
- How to Run ADB Fastboot Commands directly on Android
- Use ADB and Fastboot Commands on Android Without PC
- How to Fix All ADB and Fastboot Errors
Install Android SDK

First and foremost, you will have to install the Android SDK Platform Tools on your PC. This is the official ADB and Fastboot binary provided by Google and is the only recommended one. So download it and then extract it to any convenient location on your PC, and you shall get the platform-tools folder.
Enable Wireless Debugging in Android 11
This time, you don’t need to enable USB Debugging as you aren’t going to connect the device via USB Cable. Rather, since you are using the wireless mode, you will have to enable Android 11’s Wireless Debugging feature.
- So head over to Settings > About Phone and tap on Build Number 7 times. This will enable USB Debugging.
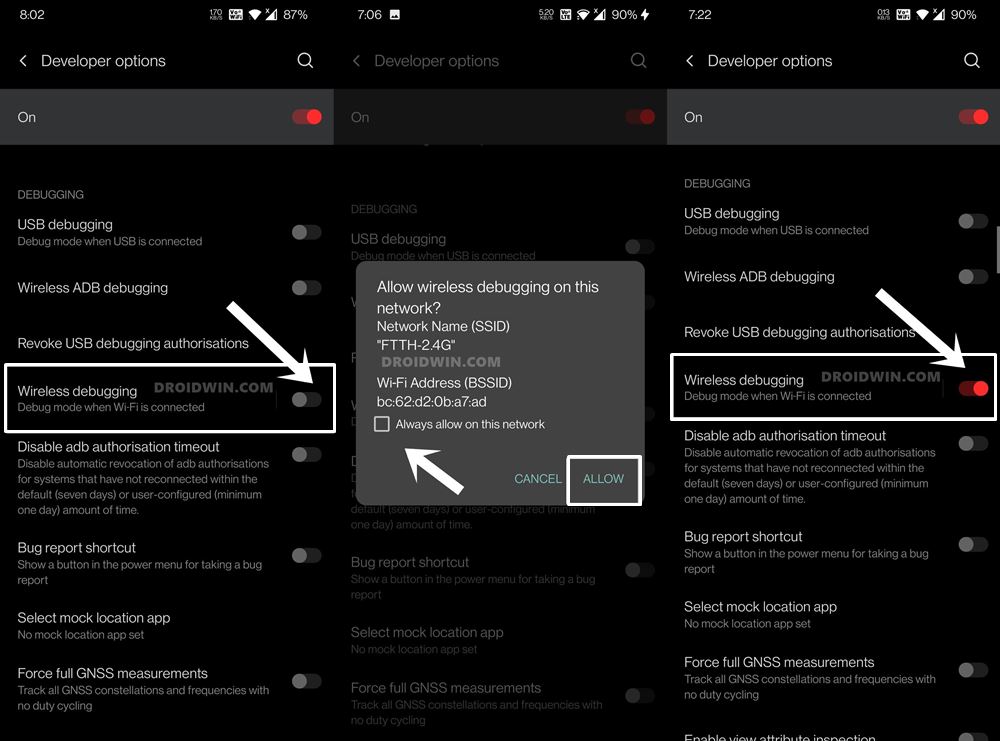
- Now go back to Settings > System > Developer Options and enable the Wireless Debugging toggle.
- You will now get a prompt, tap Allow. If this is your home WiFi, you may also checkmark the Always allow on this network option.
Get IP Address, Port, and Pairing Code
- Next up, you will now have to get hold of the WiFi IP Address, Port number, and a unique Pairing Code.
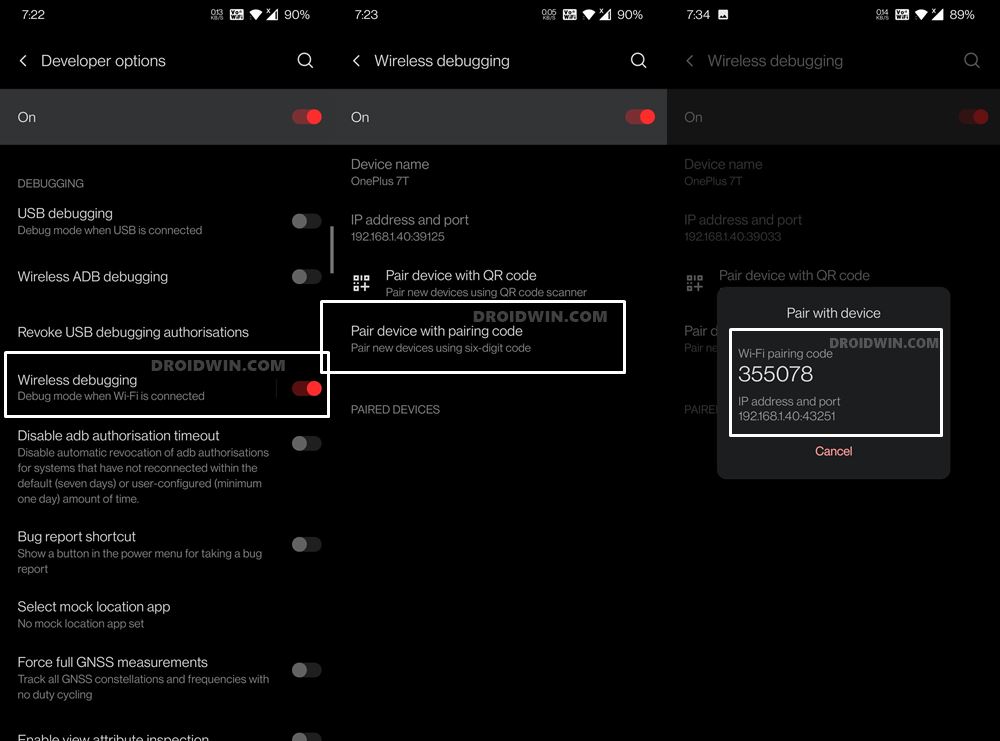
- For that, go to Developer Options and tap on the Wireless Debugging name.
- This shall take you to its settings page. Now tap on the Pair device with the Pairing Code option. This shall give you all the three information: IP Address, Port number, and the Pairing Code.

- The pairing code will be written right at the top. After that, you will get the IP Address and Port number
- Before the colon (:) is your IP address, and after that, is the port number. For example, in my case, the entire line reads out as:
192.168.1.40:43251
- So my IP is 192.168.1.40, the port number is 43251 [and Pairing Code is 355078].
- Similarly, note down the values in your case and proceed to the next step to use the new Wireless Debugging feature of Android 11.
Pair your Device and PC Wirelessly
Now that we have the required information at hand, we will use it to pair your PC and smartphone to the same WiFi network. Here’s how it could be done:
- Head over to the platform-tools folder, type in CMD in the address bar, and hit Enter.
- This will launch the Command Prompt inside the ADB directory.
- Now execute the below command in this CMD window, replacing the values accordingly:
adb pair ipaddress:portnumber
- In my case, the above command transforms to
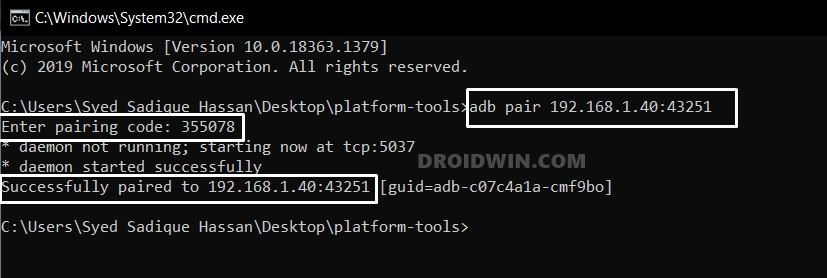
adb pair 192.168.1.40:43251
- As soon as you do so, the Command Prompt will now ask for a Pairing Code. Input the one that you got from the earlier section (in my case, it is 355078).
- Upon doing so, you shall get the “Successfully paired to IP: Port” message in the CMD. Likewise, on your smartphone, you should see a new device being added under the Paired Devices section.
- So on that note, let’s now move over to the final step to use the Android 11’s Wireless Debugging feature.

Establish Wireless Debugging Connection in Android 11
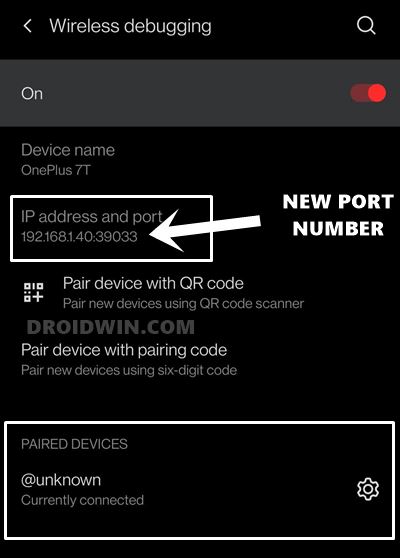
- Head over to the Wireless Debugging page and this time, check out the IP Address and Port section.
- While the IP Address will be the same as before (since you are connected to the same network), the Port Number will have been changed. So note down the new value.
- Now execute the below command in the CMD window that you have opened inside the platform-tools folder (make sure to replace the values accordingly):
adb connect ipaddress:port
- In my case, the IP Address is 192.168.1.40 whereas the new Port number is 39033, so my command transforms to:
adb connect 192.168.1.40:39033
- You shall now get the “Connected to IP Address:Port” message and your tasks stand complete. You may now easily execute any of your preferred ADB or Fastboot Commands, all in a wireless environment!

Executing ADB Commands Wirelessly on Android 11: Is it Safe?
One common query that a lot of users might have is whether or not it is safe to use this Android 11’s Wireless Debugging feature? True to my knowledge, Yes, it is. But you should be doing it on a Private network such as your home WiFi. It is never recommended to carry out these steps on a Public Network.
Furthermore, there’s another level of safety that you might have noticed. The WiFi Paring Code isn’t fixed and expires as soon as you close the dialog box. So for every instance, a new Pairing Code is generated. So even if someone gets hold of this code, you could easily regenerate a new one. All in all, it seems to a safer approach.
- TWRP: fastboot flash vs fastboot boot: Which command to use
- Fix Waiting for Device Error in ADB or Fastboot Commands
- How to Use ADB Sideload in Android [Stock and TWRP Recovery]
Conclusion
So this was all from this guide on how to use the new Wireless Debugging feature present in the latest Android 11 OS. What are your views on this? Does this method requires more effort and you’re instead satisfied with the conventional USB connection? Let us know your thoughts in the comments below. Furthermore, if you have any queries concerning the aforementioned steps, do let us know in the comments. We will get back to you with a solution at the earliest.


