So, it’s hardly been close to 24 hours since the device getting launched in India, and here we are with its unlocking and rooting guide. In this guide, we will have a detailed look at the steps needed to unlock the bootloader and root Mi A3. Read on further for more information.

The third iteration in the Mi Android One series, the Mi A3 has been launched among much fanfare. With the first and second devices (Mi A1 and Mi A2) was well and truly loved by all, there were some skeptics surrounding this one. But after looking at its price tag, one can totally justify its specifications. So is it really an upgrade over the Mi A2? Well, kind of. let’s have a look.
The biggest USP of this device over its predecessor is its camera. Having an impressive 48MP+8MP (wide angle)+2MP triple rear camera it has surely up the ante. Coupled with it, a cool 32 MP front camera makes for a complete camera package. On the battery front too, it has increased it from 3010mAh on the Mi A2 to around 4030mAh. So where does it lag behind, if any?
First, off the biggest drawback of Mi A3 is the absence of a Full HD Display. Having a screen size of more than 6 inches, but still deciding to go for a 720p resolution really makes no sense whatsoever. Well, even Mi A2 has a Full HD Display of 1080p resolution.
Apart from that, the A3 also has a Snapdragon 665 processor, which in reality is slightly slower than the Mi A2 660 (don’t go for the numbers, they may deceive you!). Still, if we consider the launch price of both of these devices (Rs 14999 to Rs 16999), the Mi A3 could well earn some brownie points after all.
With all the specifications said and done, let’s move on to the topic on how to Unlock Bootloader and Root Mi A3 via Magisk.
[Also have a look at detailed instructions on Unlocking Bootloader of Any Android Device]
Table of Contents
Guide to Unlock Bootloader and Root Mi A3
Unlocking the bootloader of an Android Device is like opening the gates of endless new possibilities. Two of the biggest functionalities that become possible include installing a custom ROM and rooting the device. Apart from that, you could install a custom recovery like TWRP, flash MODs, frameworks, modules, theme engines, etc.
And as opposed to the common notion, both the unlocking and rooting process has become extremely easy. You could unlock the bootloader of your Mi A3 as well as root it, in not more than 5 minutes. So follow the below guide to perform both the steps. For your convenience, the guide will be divided into two sections. The first one talks about unlocking the bootloader while the next one discusses the rooting process. So let’s begin.
Before beginning with the step to Unlock the bootloader of Mi A3 and then subsequently root it, make sure to follow the Prerequisites and Downloads section given below.
[At the time of writing this guide, neither the Official nor the Unofficial build of TWRP Recovery is available. We will be rooting the device via Magisk].
Prerequisites
- Unlocking the bootloader of your device will completely wipe all your data. So create a backup of all your data beforehand. You may create a backup of your apps and settings by going to Settings > System > Advanced > Backup. To backup images, videos, GIFs, etc sync them all via Google Photos to your primary Google Account. For WhatsApp backup, open the app and go to Settings > Chats > Chat Backup > BACK UP.
- Enable USB Debugging and OEM Unlocking: Go to Settings > About Phone > Tap on Build Number 7 times > Go back to Settings > System > Advanced > Developer Options > Enable USB Debugging and OEM Unlocking from there.
- Keep your device charged to at least 50% to avoid any sudden power off during the process.
Downloads
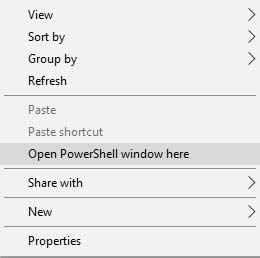
- Download and install the Android SDK Platform Tools. Suppose, you install in C:/adb, then go inside the adb > platform-tools folder, while pressing the Shift key right click on an empty area. Select Open PowerShell window here.

- Download the latest version of the Magisk Manager APK file: MagiskManager-v7.3.2.apk.
- Download the stock boot image for your Mi A3, corresponding to the firmware version. The latest available version is V10.3.5.0.PFQEUXM. Download from GitHub.
NOTE: Rooting will void the Warranty of your Mi A3. Neither Droidwin nor the author of this post takes any responsibility whatsoever if your device gets bricked (chances of which are very slim).
Unlock Bootloader of Mi A3
This is the first part of the guide on How To Unlock Bootloader and Root Mi A3 via Magisk. In the below process, the bootloader of your Mi A3 would be unlocked. But as mentioned before, it will format your data as well. So create a backup beforehand. Now, let us begin with the process.
- Connect your device to PC via the USB Cable.
- Open the PowerShell window and type the below code to boot your device to fastboot mode:
adb reboot bootloader
- Now type the following codes to unlock the bootloader of your device:
fastboot flashing unlock
fastboot flashing unlock_critical
After you type the first code (fastboot flashing unlock), your device will boot to Android OS. You need to again boot it to fastboot mode (via adb reboot bootloader) and then type the second command (fastboot flashing unlock_critical).
- That’s it. You have successfully unlocked the bootloader on Mi A3. Now head over to the next section of the guide on to root your device.
Steps to Root Mi A3 via Magisk
In this guide, we will be rooting the Mi A3 via Magisk. As already mentioned, TWRP Recovery is not yet available for this device. Once it gets released, the guide will be updated with the method of rooting via TWRP as well. With that said, follow the below points to have root privileges on your Mi A3 device.
- Download and transfer the Mi A3 Stock boot image file (boot.img) on your device’s internal storage.
- Also, install the Magisk Manager App on your Mi A3.
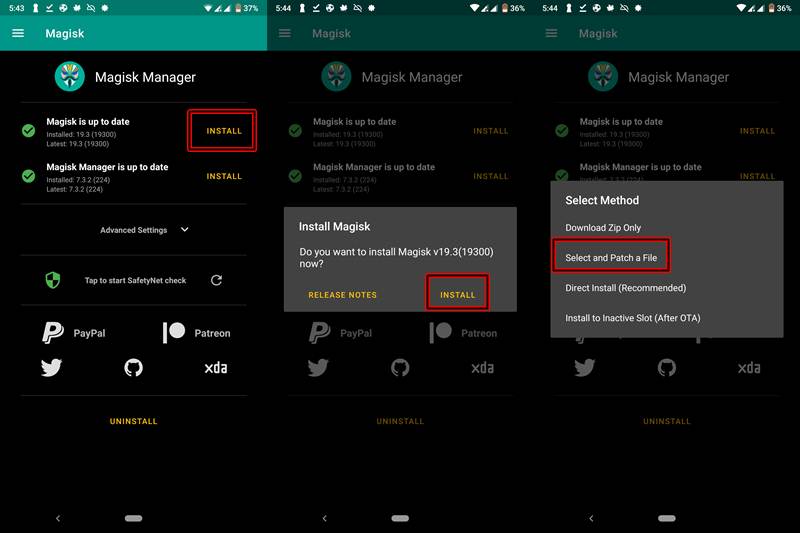
- Open the app and tap on Install.
- Again tap on Install.
- Now chose the option, “Select and patch a file“.
- Browse to the path where you have kept the stock boot.img file and select it.
- Magisk Manager will begin the process of patching the boot.img file. When the process is finished, the patched file could be found at Internal Storage > Download > magisk_patched.img (or similar name).
Now follow the last section of the guide on How To Unlock Bootloader and Root Mi A3 via Magisk.
[How to Root Any Android Device- 2 Detailed Methods]
Installing the Patched Boot.img File on Mi A3
In this section, we will be installing the boot image file which we have just patched via the Magisk Manager. Follow the below instructions set.
- Transfer the patched boot img file to your PC. It should be transferred inside the adb > platform-tools folder.
- Rename it to pboot (hence the complete name with extension will be pboot.img).
- Make sure that your device is connected to PC via USB Cable and USB Debugging is still enabled.
- Open PowerShell command window and type the following code to boot your device to fastboot mode:
adb reboot bootloader
- Now, type the following code to permanently flash the patched boot image file:
fastboot flash boot pboot.img
Where pboot is the name of the boot file patched by Magisk. [There is another way that you may have been following rather than the method I have mentioned. If that is the case, then have a look at the Extra Section at the end of this guide].
- [IMPORTANT] Finally, type the below code to reboot your device:
fastboot continue
In general cases, you have to type fastboot reboot, but here reboot should be replaced with continue. Otherwise, you will be stuck in a bootloop.
That’s it. You have successfully rooted your Mi A3 device. The first reboot may take some time, but that’s completely normal. You may also check whether your device is rooted or not via the Root Checker app.
EXTRAS
In this case, we have directly flashed the patched boot image file. Well, some of you may have done it via a different method. In those cases, you must have first booted your device with the patched file (fastboot boot pboot.img) rather than permanently flashing it.
Then you may have installed it via the Magisk Manager App (Install > Direct Install). Well, this also should work But I haven’t tried it as of now. I tried the first method of directly flashing the pboot.img and it worked. However, if anyone is willing to do try the second method mentioned here, he/she is most welcome. Just don’t forget to share your results with us!
Final Thoughts
With this, we conclude the guide on How To Unlock Bootloader and Root Mi A3 via Magisk. Go ahead and try tons of mods, custom ROMs, or even tweak your device settings via the “build.prop” file. Also, if you didn’t understand any part of this guide, feel free to contact me or drop your queries in the comment box below. Happy Rooting.