In this guide, we will show you the steps to unlock the bootloader and root the Asus ROG Phone 5/Pro/Ultimate device via Magisk. While the general set of Asus devices might not be among the most popular ones out there, its gaming devices have managed to capture the attention of the masses. The 144Hz refresh rate, 1080 x 2448 pixel resolution, and a 6.78-inch screen would give you an immersive gaming experience.
Then its octa-core Snapdragon 888 5G chipset coupled with up to 256GB 16GB RAM combination is sure to give you a lag-free experience. Likewise, its mammoth 6000 mAh battery with 65W Fast Charging would comfortably lead to a day’s battery life. Along the same lines, these devices are proving to be quite an active player in custom development.
Right from unlocking the bootloader to trying out a plethora of mods, the possibilities stand endless. You could even gain administrative privileges by rooting it via Magisk. And in this guide, we will show you how to do just that. So without further ado, let’s check out the steps to unlock the bootloader and root the Asus ROG Phone 5/Pro/Ultimate device via Magisk.
Table of Contents
Benefits and Risks of Unlocked Bootloader and Root
Before you could try out any of the modifications on your device, you need to unlock the bootloader. Doing so shall allow you to flash custom ROMs, a custom recovery like TWRP, or even gain access to the system partition. The latter will then allow you to flash mods such as magisk Modules, Substratum Themes, Xposed Framework, Viper4Android, etc. However, on the flip side, these tweaks do bring in some risks as well.
Upon rooting the device, the SafetyNet will be tripped [Fix: How to Pass Magisk SafetyNet on Rooted Android]. This would result in the inability to use banking apps or watch Netlfix in HD [Fix: How to Watch Netflix in HD on Rooted Devices with Widevine L1 Support]. So if all these are well and good, then let’s proceed with the steps to unlock the bootloader and root the Asus ROG Phone 5/Pro/Ultimate device via Magisk. Follow along.
Unlock Bootloader on Asus ROG Phone 5/Pro/Ultimate
Droidwin and its members wouldn’t be held responsible in case of a thermonuclear war, your alarm doesn’t wake you up, or if anything happens to your device and data by performing the below steps.
- To begin with, take a complete device backup. This is because the unlocking process will wipe off all the data from your device.
- Once done, download and install the Asus Unlock Bootloader APK corresponding to your device from the below links:
- ROG Phone 5: Unlock Device App
- ROG Phone 5 Pro: Unlock Device App
- ROG Phone 5 Ultimate: Unlock Device App
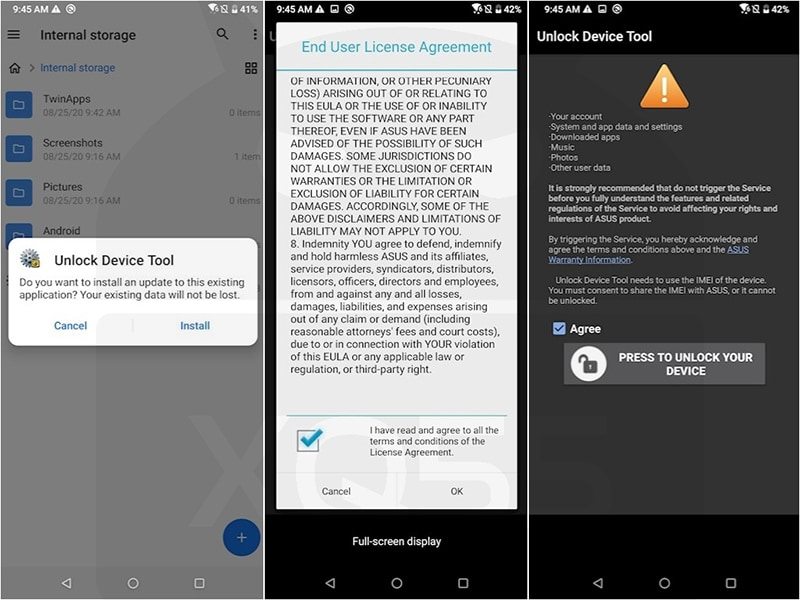
- Then launch the app, scroll to the bottom and accept the License Agreement.

- Again scroll to the bottom and hit the Agree button.
- Then type in your PIN and your device will then automatically reboot.
- Once the device boots up, you should see the Unlocked Bootloader Warning Message.
So with this, you have successfully unlocked the bootloader on your Asus ROG Phone 5/Pro/Ultimate device, let’s now check out the steps to root it.
How to Root Asus ROG Phone 5/Pro/Ultimate via Magisk
The below instructions are listed under separate sections for ease of understanding. Make sure to follow in the exact same sequence as mentioned.
STEP 1: Install Android SDK

First and foremost, you will have to install the Android SDK Platform Tools on your PC. This is the official ADB and Fastboot binary provided by Google and is the only recommended one. So download it and then extract it to any convenient location on your PC. Doing so will give you the platform-tools folder, which will be used throughout this guide.
STEP 2: Enable USB Debugging and OEM Unlocking
Next up, you will also have to enable USB Debugging and OEM Unlocking on your device. The former will make your device recognizable by the PC in ADB mode. This will then allow you to boot your device to Fastboot Mode. So head over to Settings > About Phone > Tap on Build Number 7 times > Go back to Settings > System > Advanced > Developer Options > Enable USB Debugging.
STEP 3: Download Asus ROG Phone 5/Pro/Ultimate Stock Firmware
The below two steps will now list out the instructions to download the stock firmware and then extract the stock boot.img from the payload.bin file. Currently, I am using Asus ROG Phone 5 Version CN-18.0840.2104.55, hence I have already performed both these steps.
So if you are also running the same firmware version and have the same device, then you may directly download the extracted stock boot.img file from here and skip the next two steps. Once downloaded, directly move over to the “Patch Stock Boot.img via Magisk” section.
Download for Asus ROG Phone 5: Stock Boot.img Version CN-18.0840.2104.55
Or manually download the firmware file for your device from the below links. Make sure to download the one that corresponds to your current build number. That is, the firmware version number should be the same as the one that is currently installed on your device.
- ROG Phone 5: Stock Firmware Collection
- ROG Phone 5 Pro: Stock Firmware Collection
- ROG Phone 5 Ultimate: Stock Firmware Collection
STEP 4: Extract Stock Boot.img from Asus ROG Phone 5/Pro/Ultimate Firmware
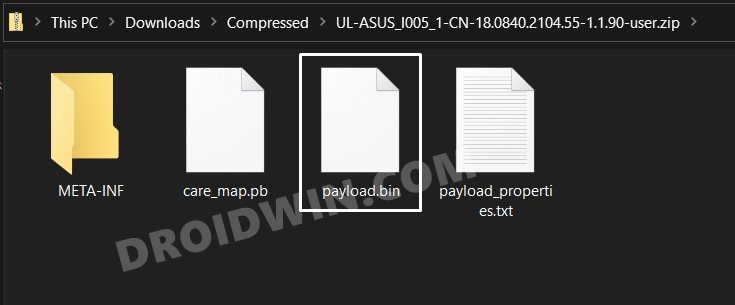
- Once you have downloaded the firmware, extract it to any convenient location on your PC.
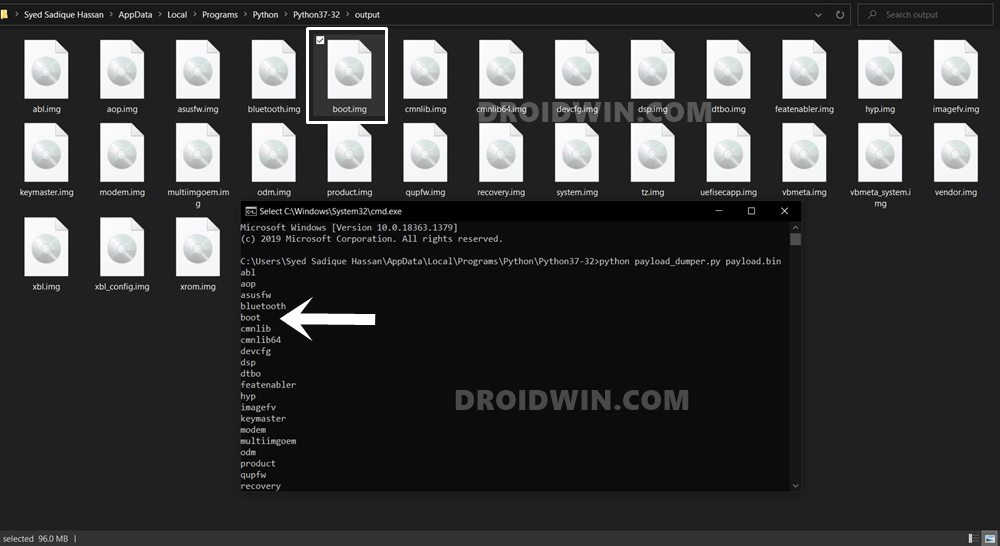
- You will see a couple of files, including the payload.bin. You will have to extract this payload.bin file to get the boot.img.
- So head over to our comprehensive tutorial on How to Extract payload.bin and get stock boot image file.
STEP 5: Patch Asus ROG Phone 5/Pro/Ultimate Stock Boot.img via Magisk
- To begin with, transfer the extracted stock boot.img file to your device.
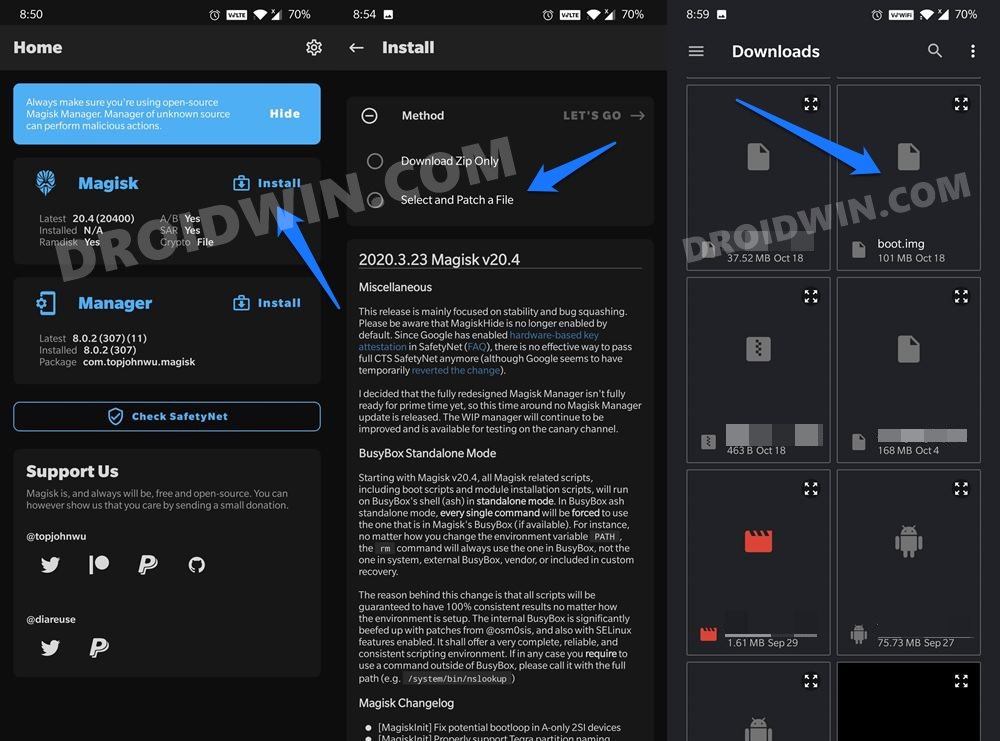
- Then install the Magisk app onto your device.
- Launch it and tap on Install next to Magisk.
- Choose Select and Patch a file option,
- Navigate to the extracted boot.img file and select it.
- Magisk will now begin patching this file.
- Once done, you shall get the magisk_patched.img file under the Downloads folder of your device. We will now use this file to root Asus ROG Phone 5/Pro/Ultimate via Magisk.

STEP 6: Boot to Fastboot Mode
- Connect your device to the PC via USB cable. Make sure USB Debugging is enabled.
- Then head over to the platform-tools folder, type in CMD in the address bar, and hit Enter. This will launch the Command Prompt.
- Type in the following command in the CMD window to boot your device to Fastboot Mode
adb reboot bootloader
- To verify the Fastboot connection, type in the below command and you should get back the device ID, as shown in the image.
fastboot devices
STEP 7: Flash Magisk Patched Boot.img and Root Asus ROG Phone 5/Pro/Ultimate
- First off, transfer the patched boot.img file to the platform-tools folder on your PC. Also, make sure that the name of the file is magisk_patched.img, if not, then rename it right away.
- Now with your device booted to Fastboot and connected to PC, type in the below command in the CMD window to flash the patched file:
fastboot flash boot magisk_patched.img
- Once the file has been flashed, you may reboot the device to the OS via the following command:
fastboot reboot
That’s it. These were the steps to unlock the bootloader and root Asus ROG Phone 5/Pro/Ultimate via Magisk. If you have any queries concerning the aforementioned steps, do let us know in the comments. We will get back to you with a solution at the earliest.