In this guide, we will show you the steps to uninstall Magisk Modules using TWRP Recovery. One of the biggest perks of having an open-source platform like Android is the fact that you could literally carry out a plethora of tweaks. Then if you step into the custom development, these possibilities get further multiplied. There is just one prerequisite that you need to check-mark- unlocking the device’s bootloader. Once you do so, you could then install custom ROMs, a custom recovery like TWRP, and a plethora of other mods.
Along the same lines, you could even gain access to the system partition by rooting it via Magisk. This will then allow you to flash Magisk Modules, Xposed Framework, Substratum Themes, etc. Among them, the Magisk modules seem to be the preferred option for quite a lot of users. Well, when you could spoof your device to Pixel 3A and get unlimited free Photos storage with just a single module, then there isn’t much to complain about.
However, in spite of all these goodies, there is always a chance of things going south. If you end up flashing an incompatible or outdated mod, or if two mods of the same domain conflicts with each other, then there are chances of your device going to a bootloop or soft brick. Fortunately, there’s a handy way out. You could easily uninstall Magisk Modules using TWRP Recovery itself. And in this guide, we will help you with just that. So without further ado, let’s get started.
- Root Android 11 via Magisk Patched boot.img (without TWRP)
- How to Update Magisk ZIP and Magisk Manager (without TWRP)
- Disable DM-Verity or Android Verified Boot without TWRP
- How to Root any Samsung device via Magisk and Odin
Table of Contents
How to Uninstall Magisk Modules using TWRP Recovery
So recently, I covered an article regarding how to Fix Magisk Module Bootloop without TWRP. In that guide, I had listed the steps to remove the magisk modules via ADB Command (without involving USB Debugging). The first step required you to power off your device. Since the device is stuck in bootloop, many users weren’t able to turn it off via the Power key.
They had to wait for quite some time for the battery to completely drain out. Considering that the device is already in a bootloop, this wait looked like an eternity. Echoing these thoughts, some users asked if there was an alternate way out. And this is where the idea of this article came into my mind. So without further ado, let’s check out the steps to uninstall Magisk Modules using TWRP Recovery.
STEP 1: Boot your device to TWRP Recovery
The first step involves you to boot up your device to the TWRP Recovery. Now there are different methods through which you could do the same. For example, you could use the device-specific hardware key combinations. Or you could also use the fastboot boot twrp.img command to temporarily boot to TWRP. In this regard, you may refer to our detailed guides on the said topic:
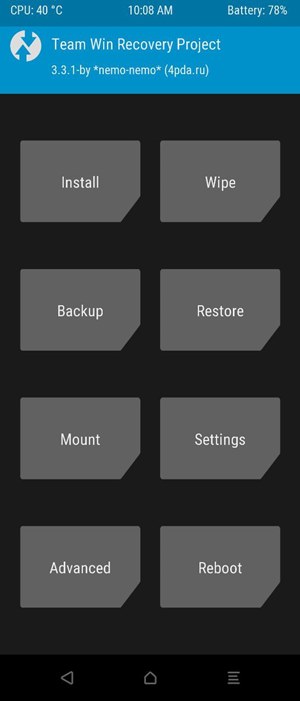
Once booted to the recovery, proceed to the next step to uninstall Magisk Modules using TWRP Recovery.
- Detailed Steps to Fix adb is not recognized Error
- How to fix ADB Device not found [List of Devices Attached is blank]
- Fix adb server version doesn’t match this client; killing...
- How to Fix Unauthorized Device with ADB Commands [3 methods]
STEP 2: Install Magisk Manager for Recovery Mode via TWRP
Now that you are booted to TWRP, it’s time to flash the Magisk Manager for Recovery Mode (MM) mod. For the unaware, this mod provides an interface to manage (edit/delete/tweak) all the installed Magisk Modules. It does so by making use of the TWRP’s Command Terminal. So our first job is to transfer this mod to your device and then we will be able to flash it. Follow along.
- To begin with, download Magisk Manager for Recovery Mode (MM) on your PC. We would like to thanks XDA Senior Member VR25 for this mod.
- Then connect your device (that is booted to TWRP) to the PC via USB cable.
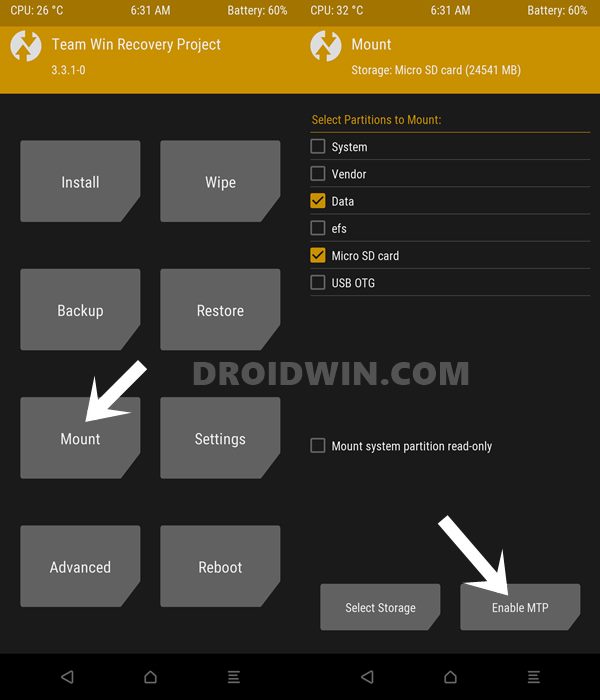
- Go to the Mount section of TWRP and tap on Enable MTP.

- Your device will now be recognized by the PC. So transfer the MM mod from the PC to your device. In case your device isn’t being recognized on your PC, then there are other ways of doing this file transfer. You may refer to our detailed guide for the same: [3 METHODS] How To Transfer or Install Files via TWRP Recovery. To save your time, directly head over to the ADB Sideload section of that guide.
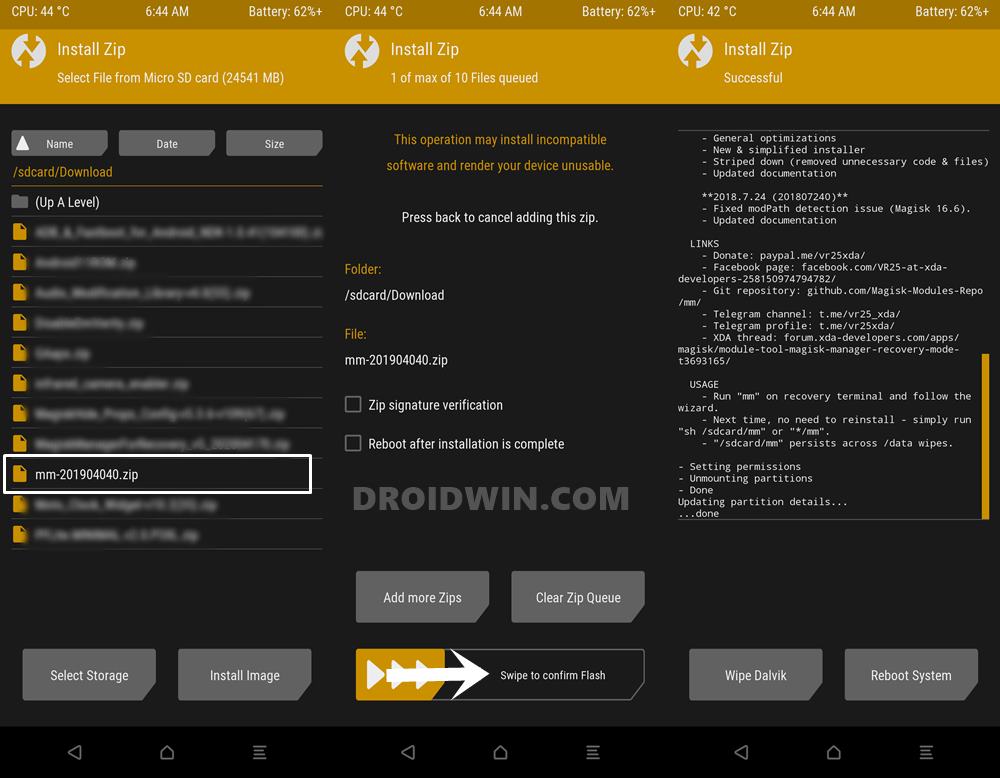
- Once the file is transferred, go to the Install section of TWRP. Then select the mm-201904040.zip file and perform a right swipe to install it.
- Once the file has been flashed, it’s time to uninstall Magisk Modules using TWRP Recovery and the MM mod. Proceed ahead to the next step.
STEP 3: Uninstall Magisk Modules using TWRP Recovery
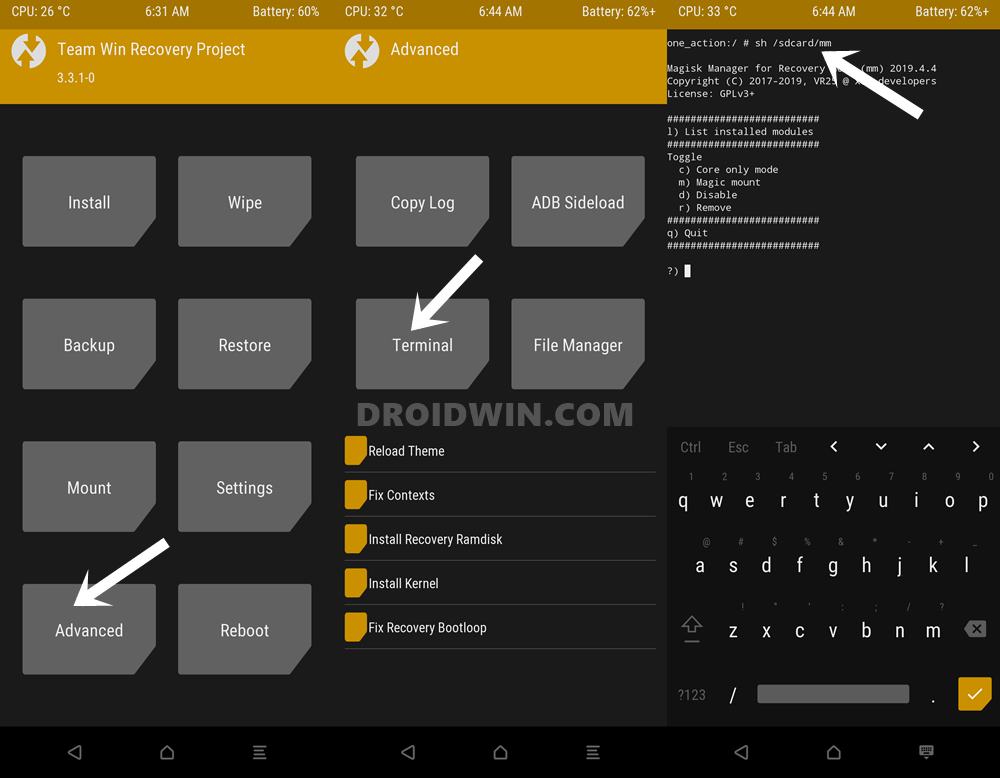
- Go to the Advanced section of TWRP and select the Terminal option.
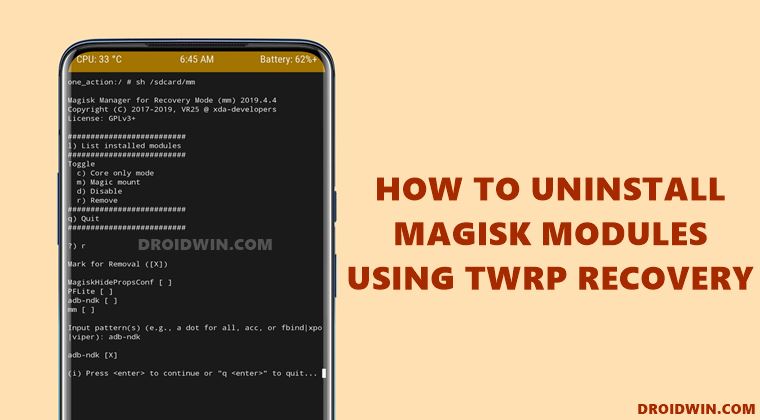
- Now type in the below command inside the TWRP’s Terminal:
sh /sdcard/mm
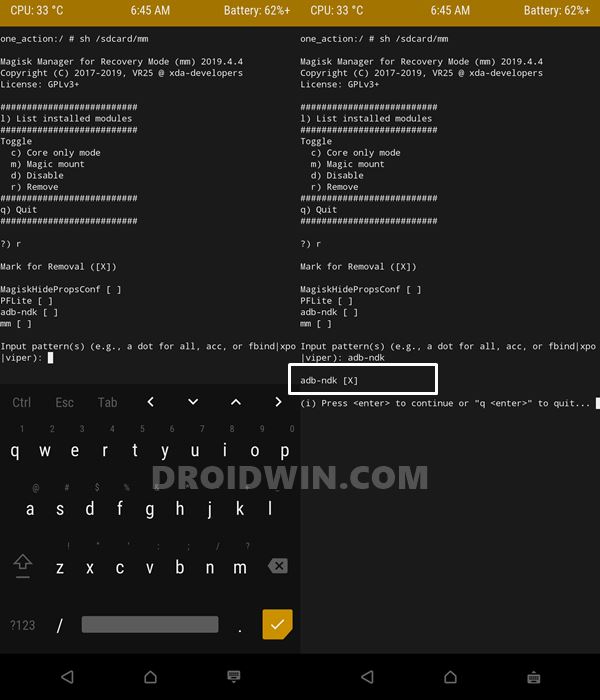
- This will bring up a list of options, type in r and hit Enter. You will get a list of all the installed Magisk Modules.
- Type in the exact name of the module that you need to remove and hit Enter.
- As soon as you do so, you should see the module getting selected. Furthermore, a cross next to that module will appear, verifying the same. [In the below image, I have selected the adb-ndk module, so you will see a cross next to it.]
- Finally, hit Enter and the module will then be uninstalled.
- You may now close the Terminal Command window. For that, type in q and hit Enter.
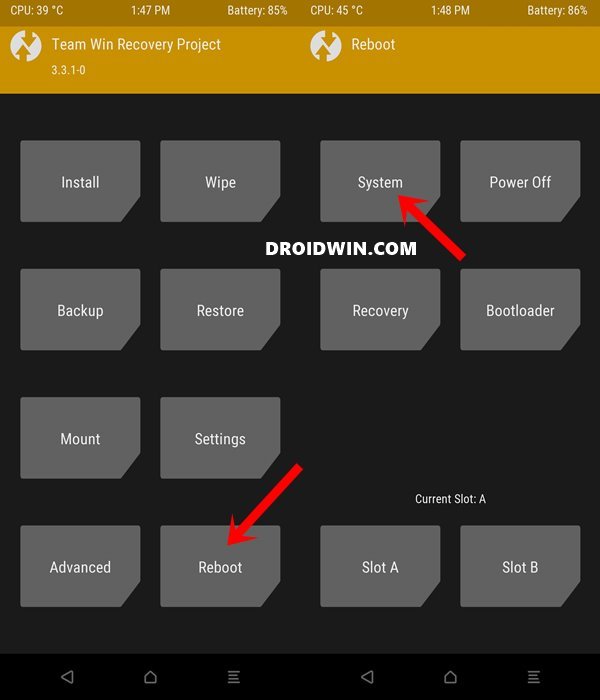
- This will take you to the home screen. Go to Reboot and tap System. Your device will now boot to the OS.
That’s it. These were the steps to uninstall Magisk Modules using TWRP Recovery. If you have any queries concerning the aforementioned steps, do let us know in the comments section below. We will get back to you with a solution at the earliest.


Lavinia
Emojuri iPhone
Diego Muñoz
This guide has been a lifesaver! Thank you!
Chris
Does this require TWRP to have access to that data partition? On encrypted devices this may not be possible (e.g. Samsung)