In this guide, we will show you the steps to uninstall drivers using Windows Recovery when your PC cannot boot to the OS. Manufacturers release regular updates to their drivers to make them compatible with the latest OS build. Along the same lines, these updates patch underlying bugs and improve the overall device’s functionality.
Moreover, these drivers are automatically installed, and this is where things might begin to go south. In some instances, a buggy driver update might be released, which would then automatically make a permanent abode on your PC. But since it had a few issues, it could well cause a problem or two to the OS. In extreme cases, it might even prevent the OS from booting up.
As a result, you wouldn’t be able to access the Device Manager to uninstall these drivers. But fret not. There does exist a handy method through which you could remove these drivers from your PC, even if you cannot access the OS. This task will be carried out from the Windows Recovery Environment. So without further ado, let’s check out the steps to uninstall drivers from Windows Recovery when your PC cannot boot to OS.
Table of Contents
How to Uninstall Drivers From Windows Recovery When PC Cannot Boot to OS
First off, you will have to create the Windows 10 Bootable Media. Even if you have Windows 11 installed, you could still used this method as we will only need the Windows 10 installation media to access your PC’s recovery environment. Moreover, we will be using a PenDrive for this purpose, which will undergo a format. So make sure you don’t have data inside it.
Once the bootable drive is created, we will then change the boot order via the BIOS and instruct the PC to boot to the Windows 10 setup screen via your Pendrive. Finally, we will launch the Command Prompt via the Windows 10 setup and then execute a few commands to uninstall the issue-causing drivers from your PC. Once that is done, your PC shall boot to the OS without any issues. So with that said, let’s now get on with the steps to uninstall drivers from Windows Recovery when your PC cannot boot to OS.
STEP 1: Create Windows Bootable USB Drive
- So head over to Microsoft website and download the Media Creation Tool [Direct Download Link].
- Once downloaded, open the setup file and accept the Terms and Conditions.
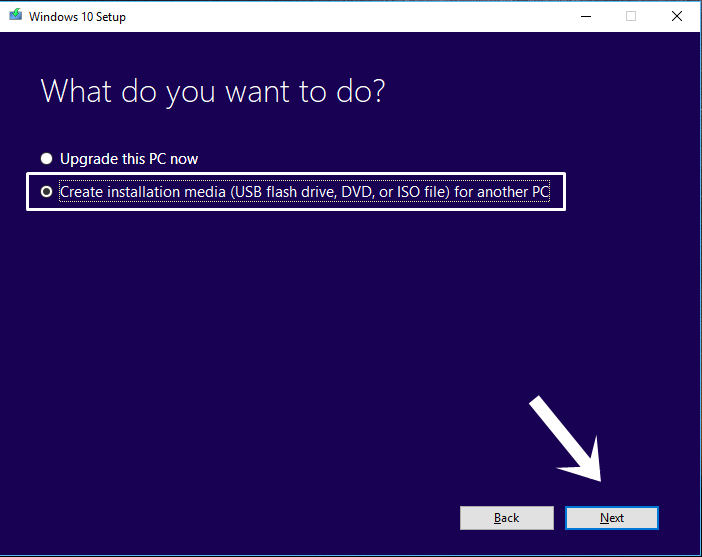
- After that, select “Create installation media (USB flash drive, DVD, or ISO file) for another PC” and click Next.

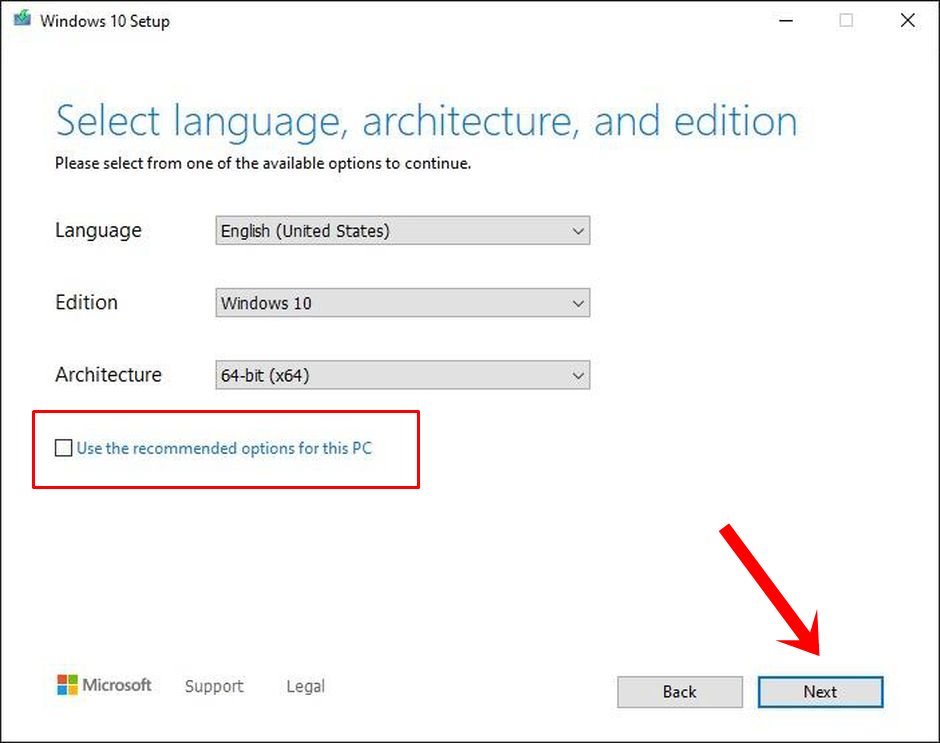
- Again, click Next. After that, checkmark “Use the recommended options for this PC” and click Next.
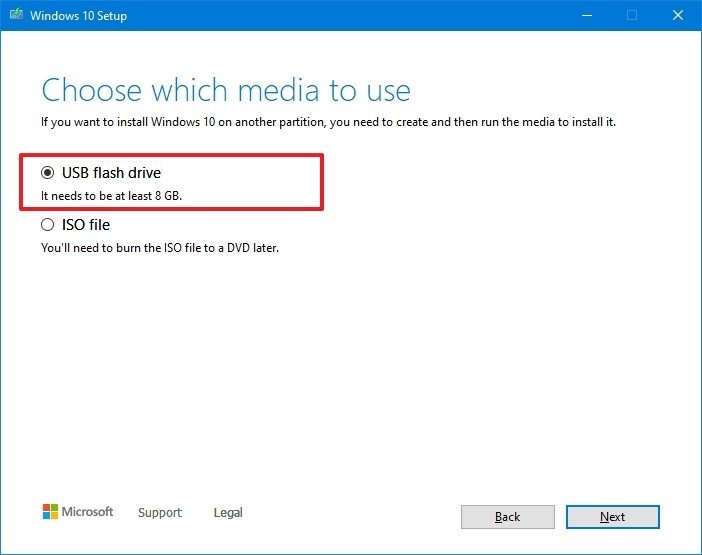
- Now select “USB flash drive” and click Next.
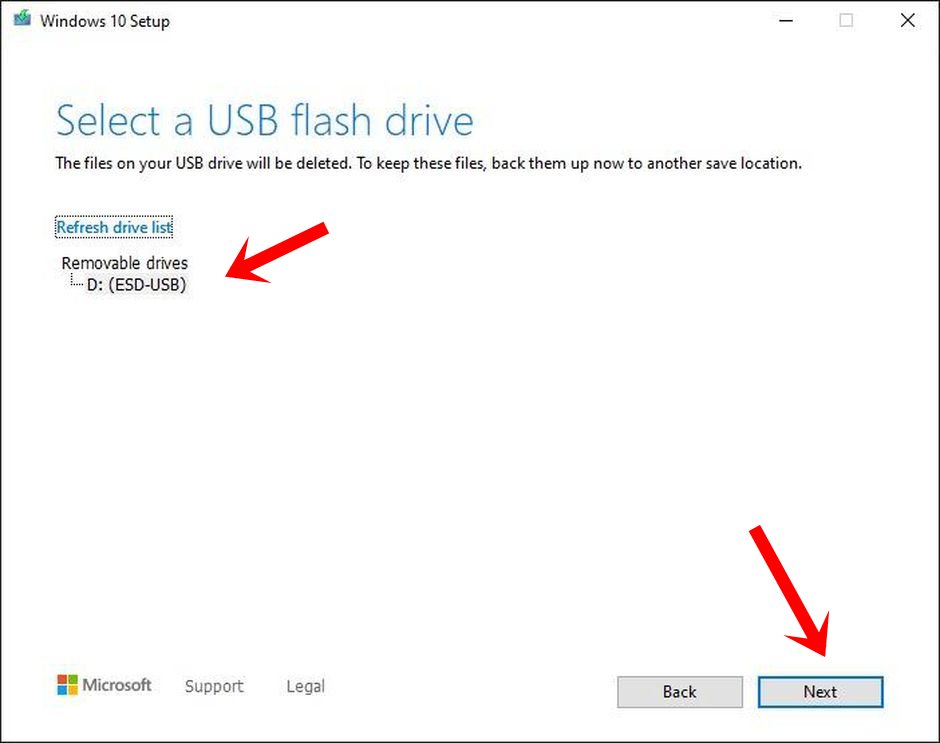
- Now select your USB drive from the list and click Next.
- Finally, click the Finish button. That’s it. You have successfully created a bootable Pendrive with Windows 10.
By default, Windows will boot to the OS via the C Drive. However, since we cannot access this drive, we will have to instruct Windows to boot via the Pendrive that we have just made bootable with Windows 10. So follow along for the rest of the steps to uninstall drivers from Windows Recovery when your PC cannot boot to OS.
STEP 2: Boot to Windows via USB PenDrive
- To being with, connect the USB Pendrive to your PC and then power it on.
- Then continuously press the Function key on your PC to boot to the BIOS (it’s usually F2 or F9 or F12, or in some cases, the Delete key. You could also Google it for your PC manufacturer).
- Once your PC boots to the BIOS, change its boot order and assign the PenDrive the first spot in the boot order.
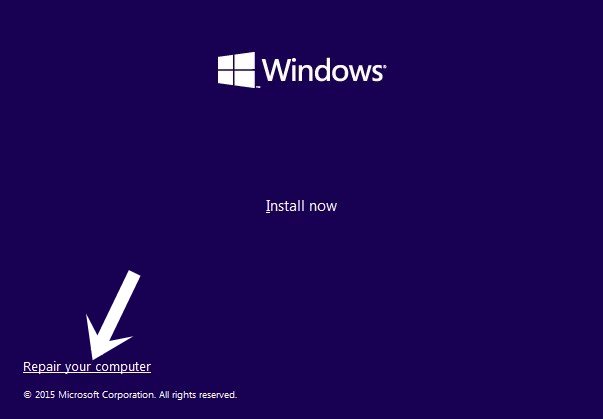
- Your PC will now boot to the Windows 10 setup screen via the Pendrive.
- Once that happens, click on the “Repair your computer” option situated at the bottom left.
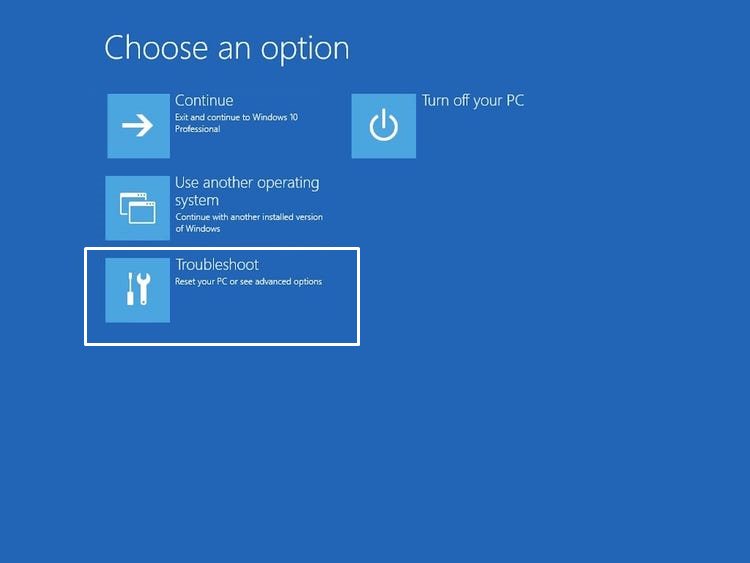
- Then click Troubleshoot from the Choose an option screen.
- After that, select Command Prompt under Advanced Options.
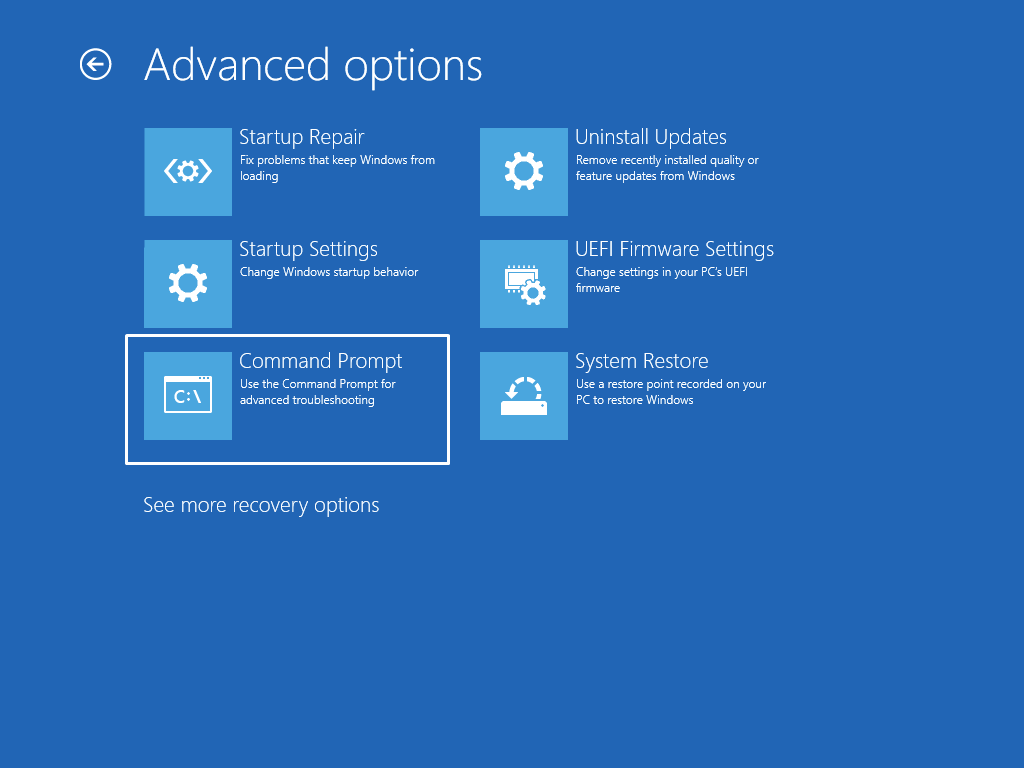
That’s it. You may now move over to the third and final section of this guide to uninstall drivers from Windows Recovery when your PC cannot boot to OS.
STEP 3: Uninstall Drivers via Command Prompt
Once the CMD window opens, you will have to check the drive where Windows is installed. Even though it may be installed in the C drive, but in the recovery environment, all these letters change! So you’ll have to manually find it, here’s how:
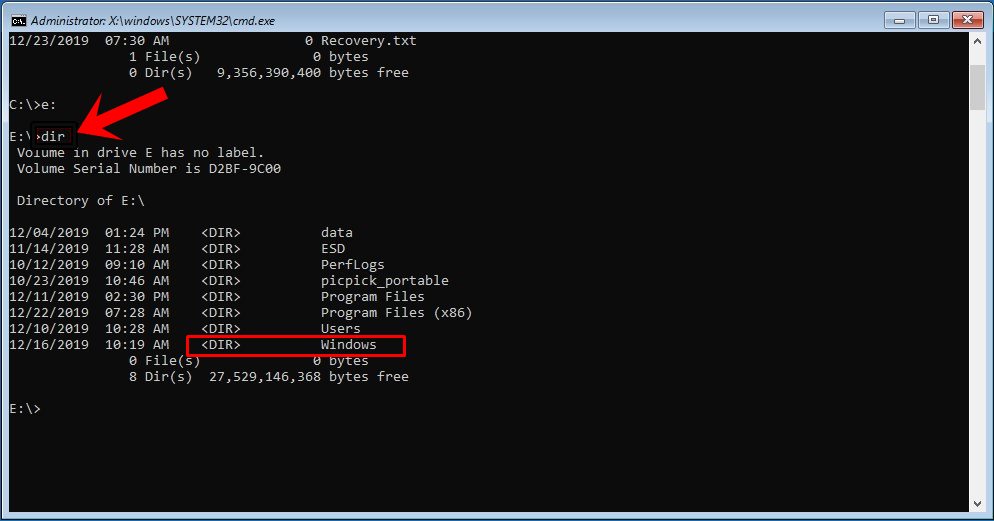
- More often than not, it’s the D or E drive. Let’s first check if it is the E drive or not. So type in the below command and hit Enter:
e:
- After that, type in the below command and hit Enter:
dir
- It shall bring up the directories of that drive. If you find the Windows folder, then you are in the right drive. However, if you don’t see the Windows directory, then try changing the drive letter and do so until you end up with the drive with the Windows folder.
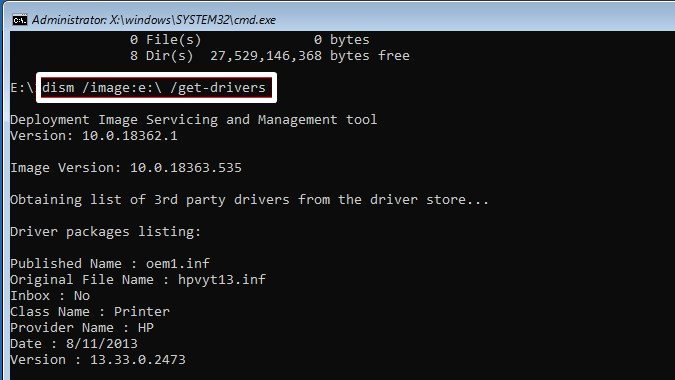
- Now copy-paste the below command and hit Enter. It shall bring up a list of all the installed drivers
dism /image:e:\ /get-drivers
- Make sure to change e: from the above command to the one that is your directory with the Windows folder.
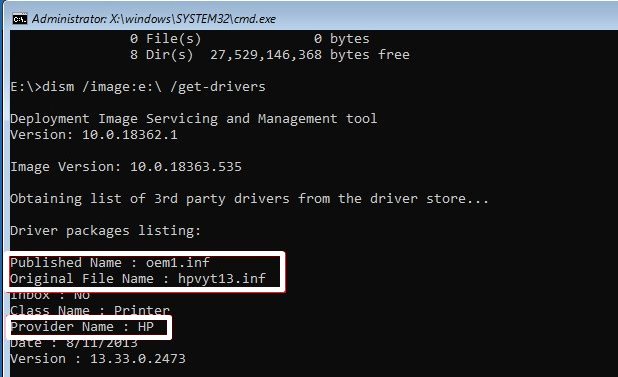
- Now scroll to the issue causing drivers and copy its Publisher Name (something like oem1.inf). You could check out the driver’s Original File Name and Provider Name to get more information about those drivers.
- You could also execute the below command to know more about that particular driver:
dism /image:e:\ /get-driverinfo /driver:oem1.inf
- Make sure to replace the Drive Name (e: in this case) and the Publisher Name (oem1.inf) accordingly in the above command.
- Finally, execute the below command to uninstall that issue-causing driver:
dism /image:e:\ /remove-driver /driver:oem1.inf
- As before, make sure to replace the drive name (e:) and publisher name accordingly (oem1.inf).
- Once done, you may now close the CMD window and click Continue. That’s it. Your PC will now boot to the OS without any issues.

So with this, we round off the guide on how you could uninstall drivers using Windows Recovery when your PC cannot boot to the OS. If you have any queries concerning the aforementioned steps, do let us know in the comments. We will get back to you with a solution at the earliest.


