In this comprehensive guide, we will show you the steps to unbrick the OnePlus 7/7 Pro /7T and the 7T Pro devices using MSM Download Tool. The event iteration from this popular OEM is probably the best OnePlus device to date. While recently they are definitely going through a rough patch when it comes to providing timely software upgrades, but there for the tech enthusiasts, there’s still plenty to cheer about.
Be it for flashing custom binaries, TWRP, or custom ROMs, there’s a lot to try out. Likewise, you could also gain administrative privileges by rooting your device via Magisk patched boot.img. However, each of these tweaks does bring in a few uninvited risks as well. Then the matter gets further complicated when we bring in the device’s A/B Partition into the picture. All in all, chances of things going south are always there.
If it is a soft brick or bootloop, then you could easily fix it by flashing the OxygenOS stock firmware via Fastboot Commands. But in the case of hard bricked, you would have to take the help of Qualcomm’s special Emergency Download Mode to force-flash the firmware onto your device. And in this guide, we will show you how to do just that. So without any further ado, let’s get started with the guide to unbrick the OnePlus 7/7 Pro /7T and the 7T Pro devices using MSM Download Tool.
- Root OnePlus 7/ 7T/ 7 Pro without TWRP via Magisk patched boot.img
- How to Unlock Bootloader, Install TWRP, and Root OnePlus 7T
- How to Install TWRP Recovery and Root OnePlus 7/7 Pro
Table of Contents
Unbrick OnePlus 7/7 Pro/7T/ 7T Pro using MSM Download Tool
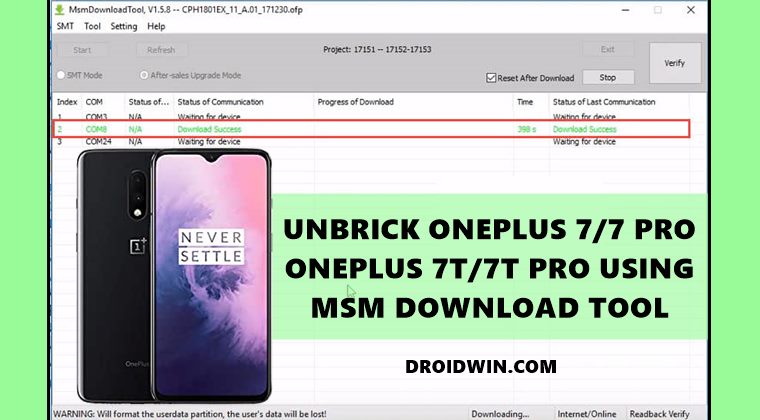
The below instructions are listed under separate sections for ease of understanding. Make sure to follow in the exact same sequence as mentioned. Droidwin and its members wouldn’t be held responsible in case of a thermonuclear war, your alarm doesn’t wake you up, or if anything happens to your device (although it’s already bricked!) and data by performing the below steps.
STEP 1: Disable Firewall/Antivirus
Many users have reported that they were unable to use the tool because Windows Defender or Antivirus app conflicted with the tool. So it’s better to temporarily disable them. Here is how to do so on Windows Defender:
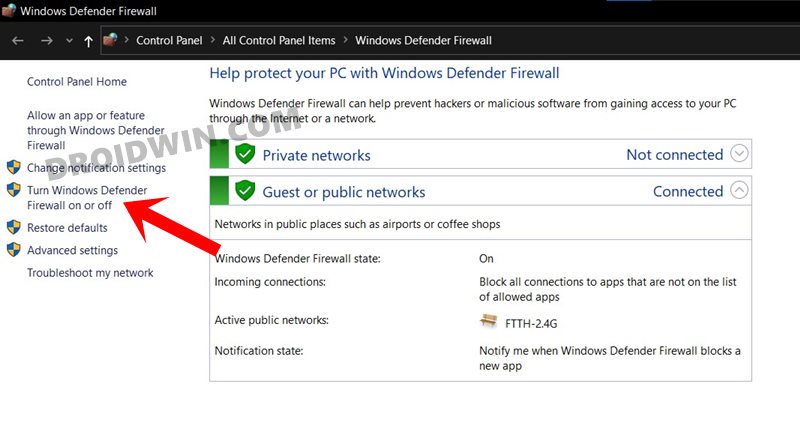
- To begin with, search for Windows Defender Firewall from the Start menu.
- Then click on Turn Windows Defender Firewall On or Off from the left menu bar.

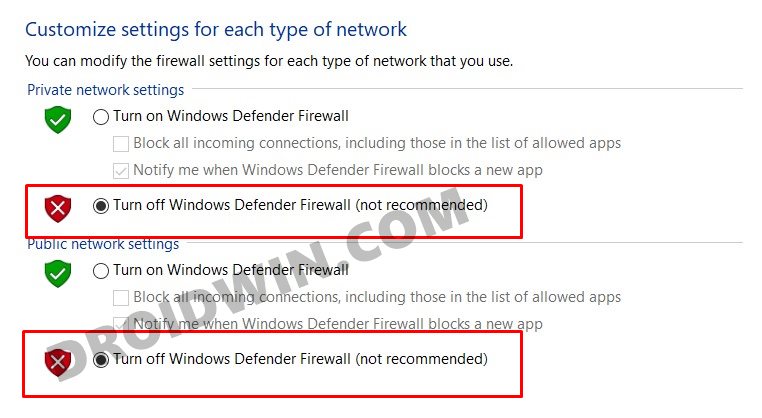
- Finally, select Turn off Windows Defender Firewall under both the Public and Private network sections.

STEP 2: Disable Windows Driver Signature Verification
You will also have to disable the Driver Signature Verification on your Windows PC so that you could install unsign driver Qualcomm (mentioned in the next step) and the MSM Tool. So refer to our guide to Disable Driver Signature Verification on Windows 10.
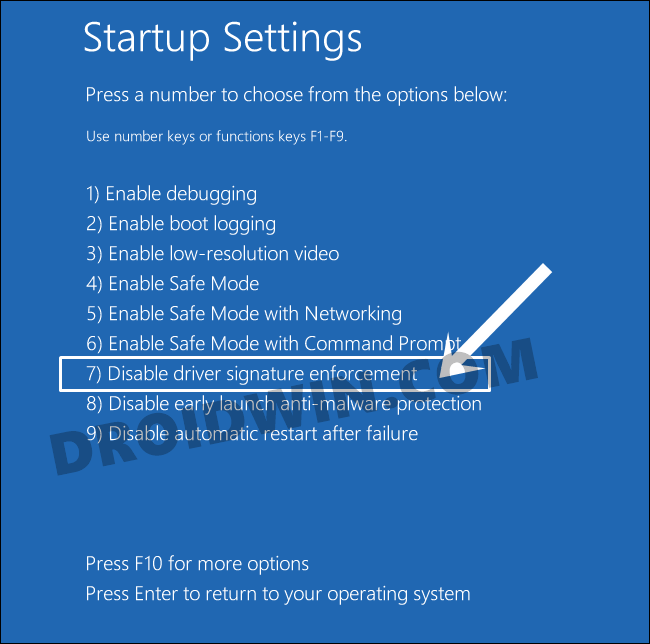
STEP 3: Install Qualcomm HS-USB QDLoader 9008 Drivers
Next up, you would require the drivers so that your PC is able to recognize the connected device in EDL Mode. As a result, your device will then be recognized as Qualcomm HS-USB QDLoader 9008 by the Device Manager.
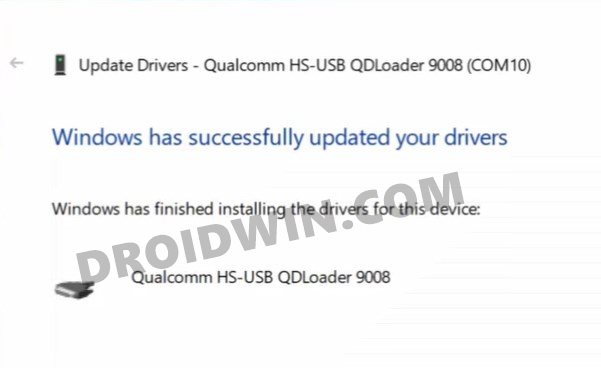
However, if you don’t install these drivers, then your PC wouldn’t be able to identify the connected device and the Device Manager would list pout the device as QHUSB_BULK. So refer to our guide to Download and Install Qualcomm HS-USB QDLoader 9008 Drivers.
STEP 4: Download MSM Download Tool for OnePlus
As opposed to other tools, MSM doesn’t come as a standalone tool. Rather it comes bundled with the firmware file as well. So you should only use the MSM Tool that corresponds to your device. If you wish to use it for any other device for whatever reason (though not recommended), then make sure to replace the OPS firmware with the one for your device.

OnePlus 7 International MSM Download Tool
| Device Name | OnePlus 7 | OnePlus 7 |
| Android Version | 9 | 10 |
| Region | International | International |
| Build | GM57AA | GM57AA |
| Downloads | 9.5.6 9.5.7 9.5.8 | 10.0.1 10.0.2 10.0.3 10.3.0 10.3.1 10.3.2 10.3.5 10.3.6 10.3.7 10.3.8 |
OnePlus 7 European MSM Download Tool
| Device Name | OnePlus 7 | OnePlus 7 |
| Android Version | 9 | 10 |
| Region | European | European |
| Build | GM57BA | GM57BA |
| Downloads | 9.5.6 9.5.7 9.5.8 | 10.0.2 10.0.3 10.0.4 10.0.5 10.0.7 10.0.8 10.0.9 10.0.10 |
OnePlus 7 Pro International MSM Download Tool
| Device Name | OnePlus 7 Pro | OnePlus 7 Pro |
| Android Version | 9 | 10 |
| Region | International | International |
| Build | GM21AA | GM21AA |
| Downloads | OOS 9.5.3 OOS 9.5.7 OOS 9.5.10 OOS 9.5.11 OOS 9.5.13 | OOS 10.0.2 OOS 10.0.3 OOS 10.3.0 OOS 10.3.1 OOS 10.3.2 OOS 10.3.5 OOS 10.3.6 OOS 10.3.7 OOS 10.3.8 |
OnePlus 7 Pro European MSM Download Tool
| Device Name | OnePlus 7 Pro | OnePlus 7 Pro |
| Android Version | 9 | 10 |
| Region | European | European |
| Build | GM21BA | GM21BA |
| Downloads | OOS 9.5.3 OOS 9.5.10 OOS 9.5.11 | OOS 10.0.2 OOS 10.0.3 OOS 10.0.4 OOS 10.0.5 OOS 10.0.8 OOS 10.0.9 OOS 10.0.10 |
OnePlus 7T International and Indian MSM Download Tool
| Device Name | OnePlus 7T | OnePlus 7T |
| Android Version | 9 | 10 |
| Region | International and Indian | International and Indian |
| Build | HD65AA | HD65AA |
| Downloads | 10.0.4 HD65AA 10.0.7 HD65AA 10.0.9 HD65AA 10.0.11 HD65AA 10.0.14 HD65AA 10.0.15 HD65AA 10.0.16 HD65AA |
OnePlus 7T European MSM Download Tool
| Device Name | OnePlus 7T | OnePlus 7T |
| Android Version | 9 | 10 |
| Region | European | European |
| Build | HD65BA | HD65BA |
| Downloads | 10.0.4 HD65BA 10.0.7 HD65BA 10.0.9 HD65BA 10.0.11 HD65BA 10.0.14 HD65BA 10.0.15 HD65BA |
OnePlus 7T Pro International and Indian MSM Download Tool
| Device Name | OnePlus 7T Pro | OnePlus 7T Pro |
| Android Version | 9 | 10 |
| Region | International and Indian | International and Indian |
| Build | HD01AA | HD01AA |
| Downloads | 10.0.3 10.0.4 10.0.5 10.0.7 10.0.8 10.0.11 10.0.12 10.0.13 10.0.14 |
OnePlus 7T Pro European
| Device Name | OnePlus 7T Pro | OnePlus 7T Pro |
| Android Version | 9 | 10 |
| Region | European | European |
| Build | HD01BA | HD01BA |
| Downloads | 10.0.3 10.0.4 10.0.5 10.0.7 10.0.8 10.0.9 10.0.11 10.0.13 |
STEP 5: Setup MSM Download Tool
- Once you have downloaded the package from the above link, extract it to any convenient location on your PC.
- Then double-click on the MSMDownloadTool V4.0.exe file to launch the tool.

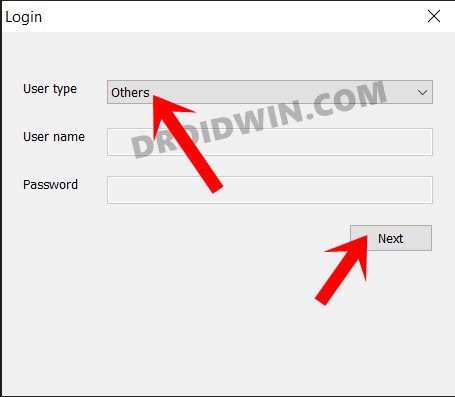
- In the first screen that appears, select User Type as Other and click Next.

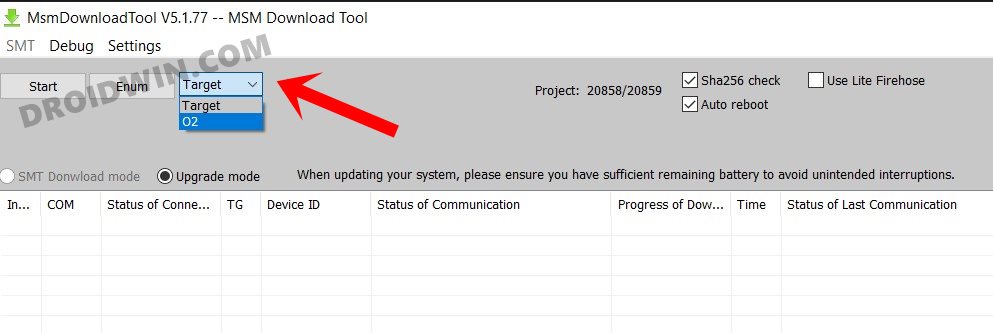
- Now click on the Target button and select either of the following:

- O2: Global Firmware/Tool
- India: Indian Firmware/Tool
- EU: European Firmware/Tool
STEP 6: Boot OnePlus 7/7 Pro/7T/7T Pro to EDL Mode | Flash Unbrick Firmware via MSM Tool
- To begin with, power off the device.
- Then press the Volume Up and Down keys together and your device shall boot to EDL.
- Keeping both the volume keys pressed, connect the device to the PC via USB cable.
- Then release the Volume Keys and hit the Start Button on the MSM Tool.
- The flashing process will now start and could take up to 10 minutes. (if the flashing doesn’t start, then refer to the FAQ section for an alternate way to boot the device to EDL Mode).
- Once done, you shall be notified of the same and your device shall boot to the OS.
That’s it, the process stands complete. So with this, we conclude the guide on how to unbrick the OnePlus 7/7 Pro/7T/ 7T Pro devices using MSM Download Tool. If you have any queries concerning the aforementioned steps, do let us know in the comments. We will get back to you with a solution at the earliest.
- How to Force 90Hz Refresh Rate on OnePlus 7/7T/Pro
- Downgrade Android 11 Open Beta to Stable Android 11 OnePlus 7/7T/Pro?
- Fix Missing AOD on OnePlus 7 series after Android 11 OxygenOS 11
- Rollback OnePlus 7/Pro/7T/7T Pro to Android 10 OxygenOS 10
- Download OnePlus 7/7T Android 11 OxygenOS 11 Open Beta 1
FAQs: Unbrick OnePlus 7/7 Pro/7T/ 7T Pro via MSM Tool
Here are some of the most frequently asked questions as well as some fixes for some of the most common issues faced by the users.
Fix MSM Tool OnePlus 7/7 Pro/7T/ 7T Pro stuck on “Param pre-processing”
If the MSM Tool, while flashing the unbrick firmware, shows the Param pre-processing error, then fret not. The fix is fairly simple- all you need to do is install the Qualcomm HS-USB QDLoader 9008 drivers onto your PC [see STEP 3]. Likewise, it is also recommended that you disable the Windows Driver Signature Verification [See STEP 2].
Fix MSM Tool OnePlus 7/7 Pro/7T/ 7T Pro “Sahara communication failed”
Sahara Communication failure is among the most common issue with MSM Tool. There isn’t any single fix as such for this issue, there around 8-10 different tweaks that you would have to try out to rectify this error. So please refer to our guide to Fix the Sahara communication failed error in MSM Download Tool.
An alternate way to Boot OnePlus 7/7 Pro/7T/ 7T Pro to EDL and Start Flashing
- As soon as you have set up the MSM Download Tool, click on the Start button.
- Since your device is not connected yet, you should get the “waiting for device” message, not an issue, let’s proceed ahead.
- Now turn off your device.
- Then connect one end of the USB cable to your PC.
- And connect the other end to your device and immediately start the EDL Mode.
- For that, press the Volume Up, Volume Down, and Power keys together for a few seconds.
- As soon as the process starts, you may release all the pressed keys.
As of now, this is all from this tutorial on how to unbrick the OnePlus 7/7 Pro/7T/ 7T Pro devices using MSM Download Tool. All queries are welcomed in the comments section below.
Unbrick OnePlus 7/7T/7T Pro via Fastboot Enhance
This is a tool created by XDA Senior Member xzr467706992 and beholds a slew of intriguing features, including the ability to directly flash the payload.bin file, without the need to even manually extract it first. Do note that even though this tool was created for OnePlus 8T but it should work across other OnePlus devices too. [Well, I have personally tested it on OnePlus 7T and OnePlus 10 Pro, it works well and good even on those devices].
Moreover, as is evident from the tool’s name, it will only work if you could at least access the Fastboot Mode, which is a possibility when your device is soft brick or in a bootloop mode. However, if your device is completely bricked [in EDL Mode], then this method would not work [unless you could aces Fastboot Mode somehow] and you will have to ty out the MSM Download Tool method mentioned above.
STEP 1: Download Fastboot Enhance Tool
Download the Fastboot Enhance Tool from GitHub [direct link]. Once downloaded, extract it to any convenient location on your PC. The biggest advantage of this tool is that you could directory flash the payload.bin file, there is no need to extract it and get the resultant IMG files!
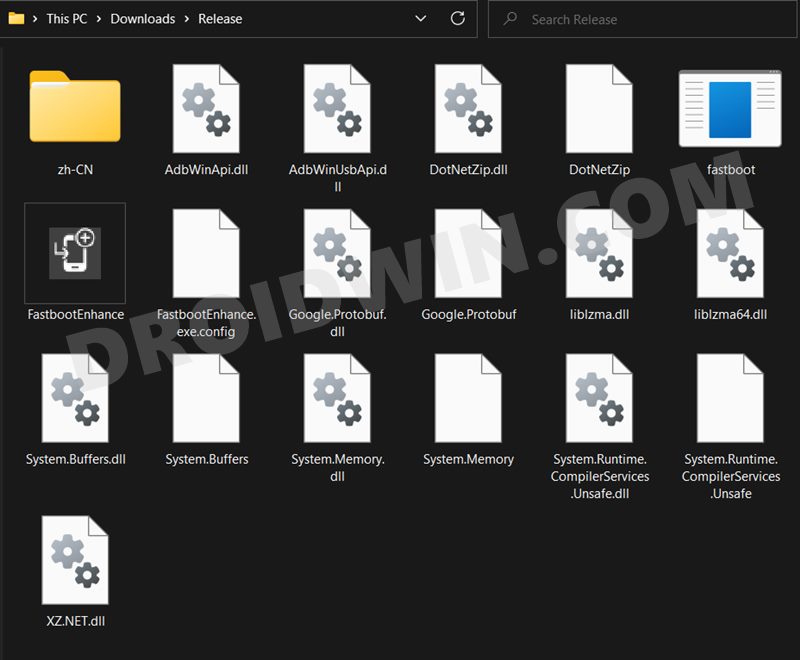
STEP 2: Download OnePlus OnePlus 7/7T/7T Pro ROM
- Next up, get hold of the firmware for your device from below:
OnePlus 7/7T/7T Pro Stock Firmware
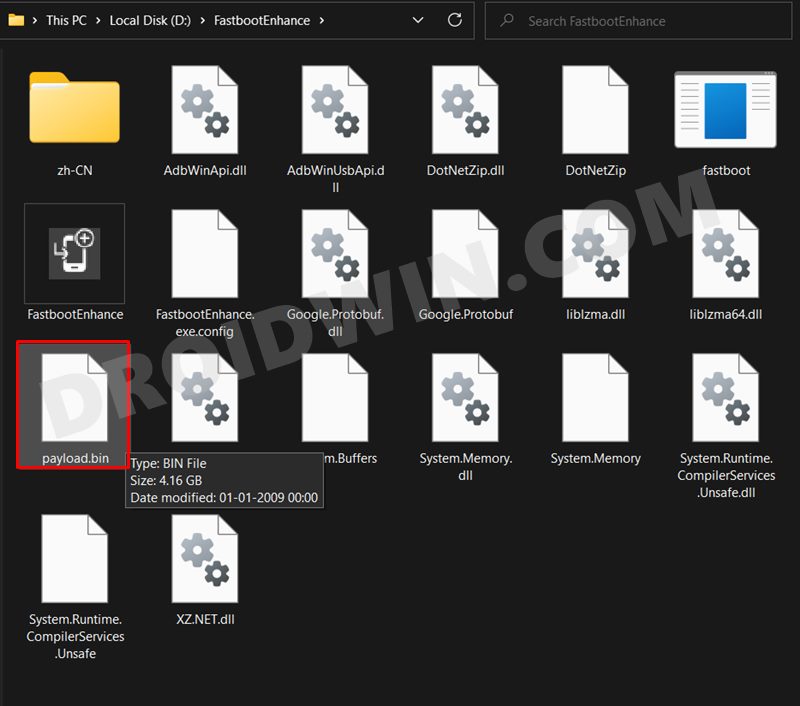
- Once downloaded, extract it and transfer the resultant payload.bin file to the Fastboot Enhance Tool folder.

STEP 3: Install Android SDK
Next up, install the Android SDK Platform Tools on your PC. This is the official ADB and Fastboot binary provided by Google and is the only recommended one. So download it and then extract it to any convenient location on your PC. Doing so will give you the platform tools folder, which will be used throughout this guide.

STEP 4: Install Fastboot Drivers
The tool doesn’t come with the Fastboot Drivers, so you will manually have to install it on your PC. For that, please refer to our guide on How to Install Fastboot Drivers in Windows 11. Likewise, make sure to install the OnePlus USB Drivers as well [they are usually automatically installed as soon as you connect your device to the Windows PC for the first time].
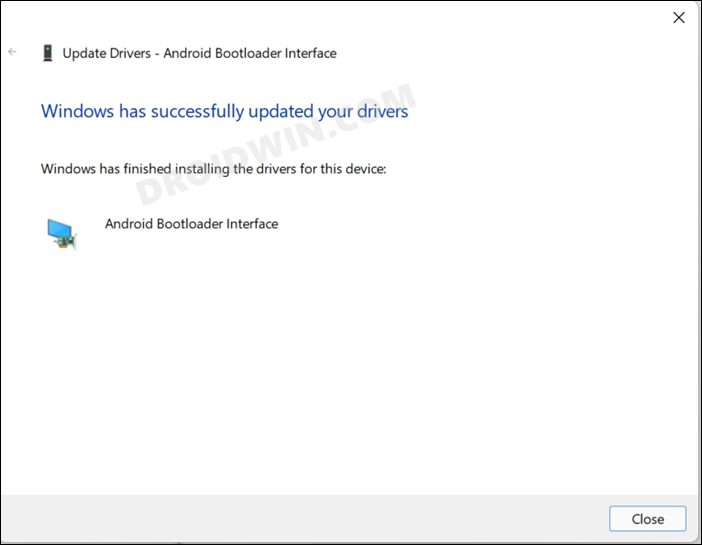
STEP 5: Boot to Fastboot Mode
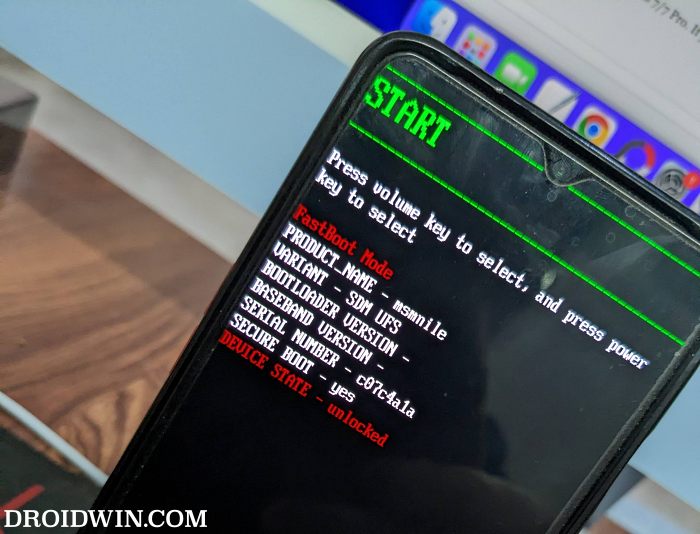
- Since your device is currently in a brick state, you wouldn’t be able to use the adb reboot bootloader command to boot your device to Fastboot Mode. Rather, you will have to take the help of the Hardware key combinations to get this job done.

- Once booted, type in the below command and you should get back the device ID. This signifies that the Fastboot connection stands successful.
fastboot devices

STEP 6: Flash Downgrade Firmware on OnePlus 7/7T/7T Pro via Fastboot
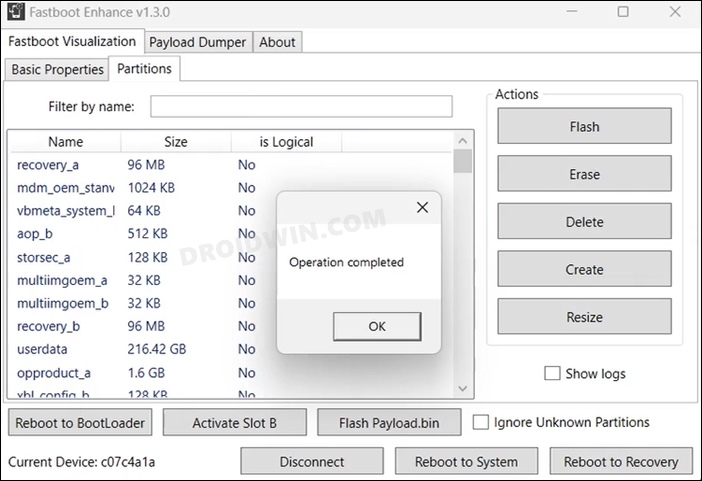
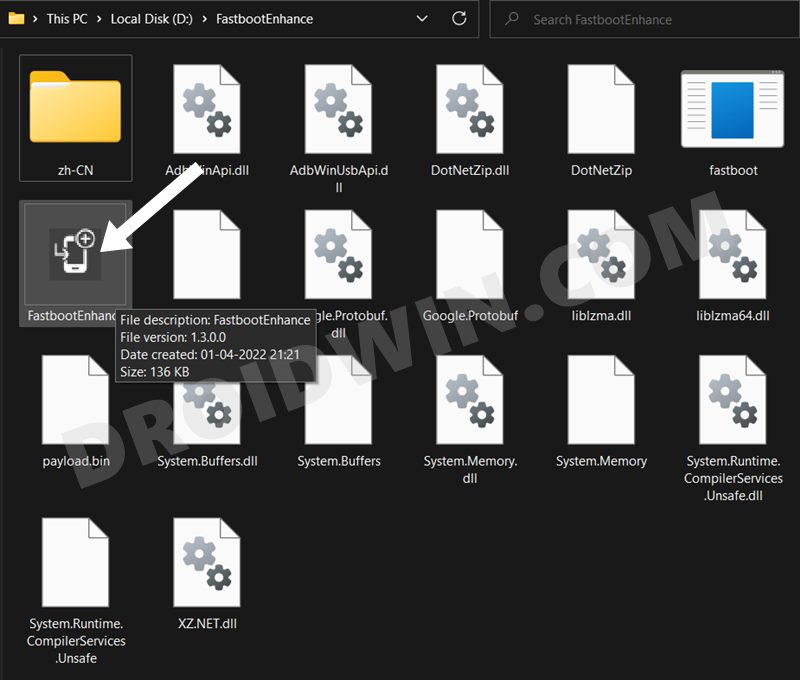
- To begin with, launch the Fastboot Enhance Tool via its EXE file.

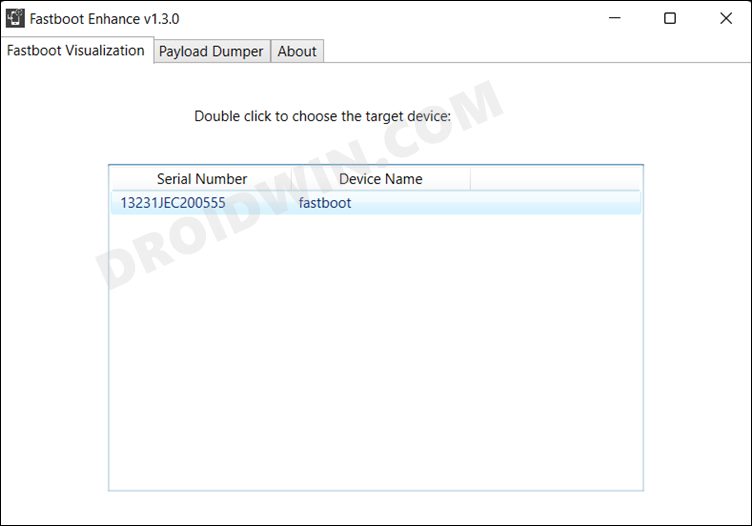
- Your device should be listed under the Fastboot Virtualization tab, select it.

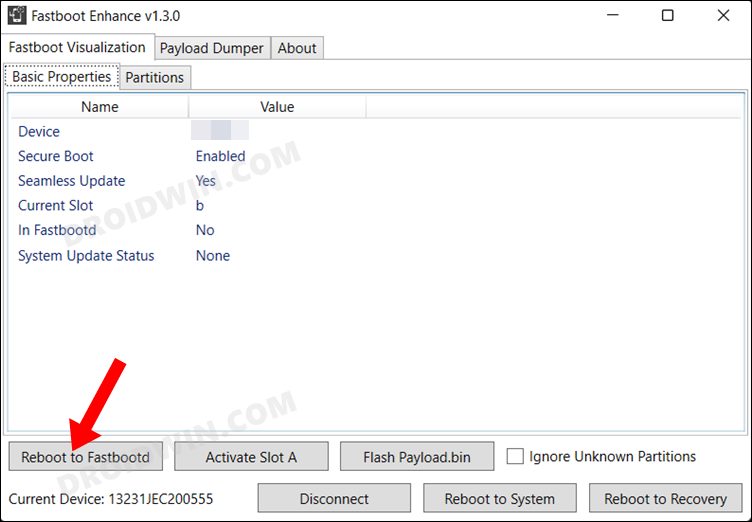
- After that, click on the Reboot to FastbootD button.

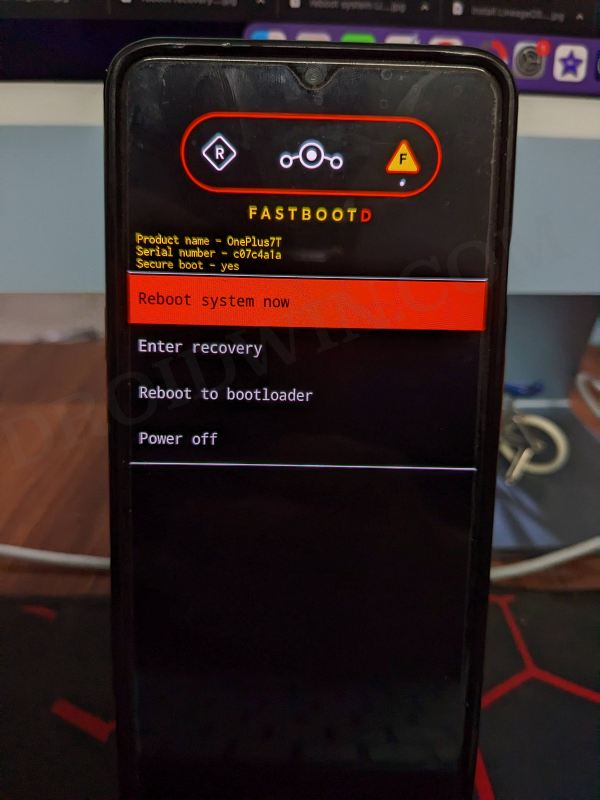
- Your device will boot to FastbootD Mode.

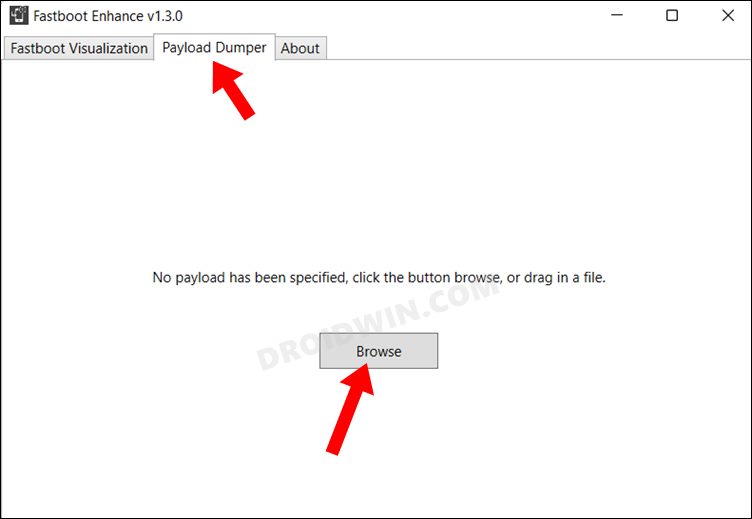
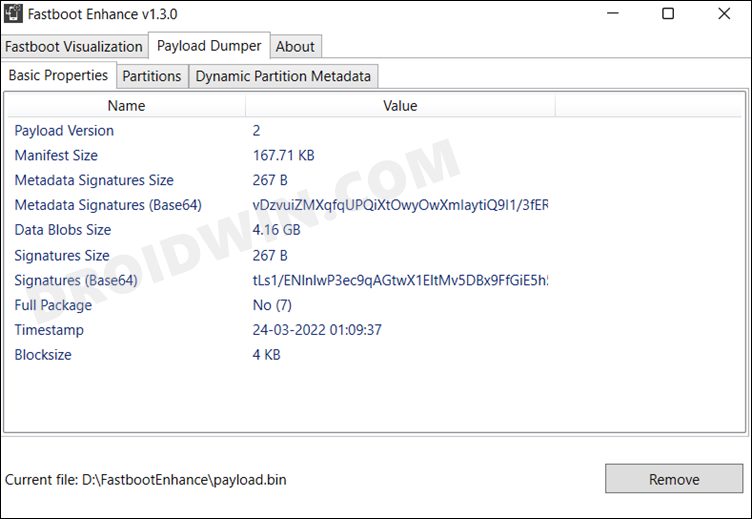
- Now go to the Payload Dumper tab and click on Browse.

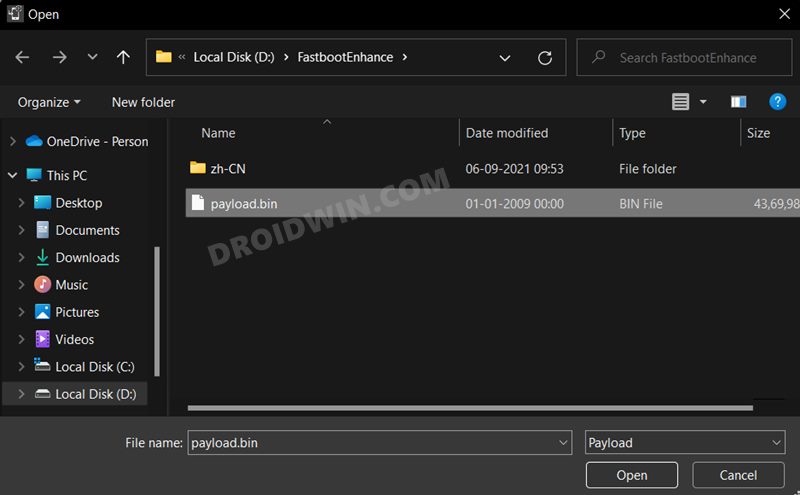
- Navigate to the payload.bin file, select it and click Open.

- The file will now be loaded in the tool, displaying the resultant information.

- Now go to the Fastboot Virtualization tab and click on Flash payload.bin. If the flashing starts, well and good.

- However, if you get the ‘Virtual A/B temporary partitions exist’ popup, then click on No.

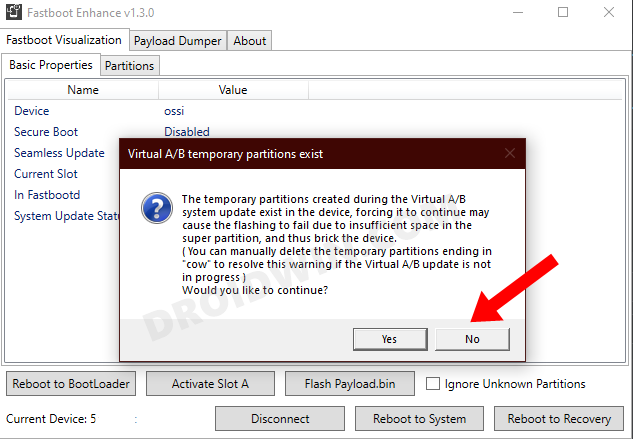
- After that, go to the Partitions tab and type in cow in the Filter by name box.

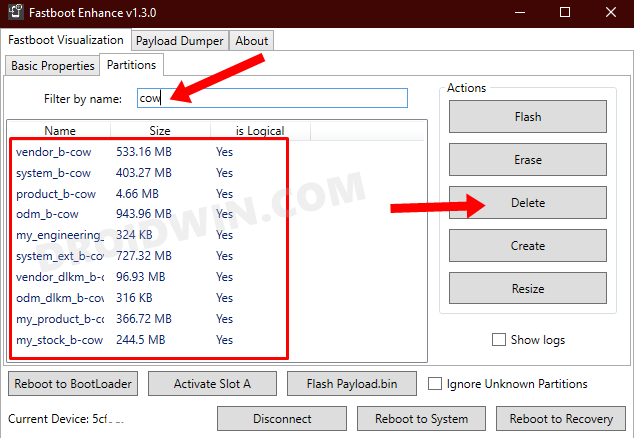
- Select all the partitions from the results that have cow in their name and hit the Delete button.
- Once done, click on Flash payload.bin. This time the flashing will start without any issues.


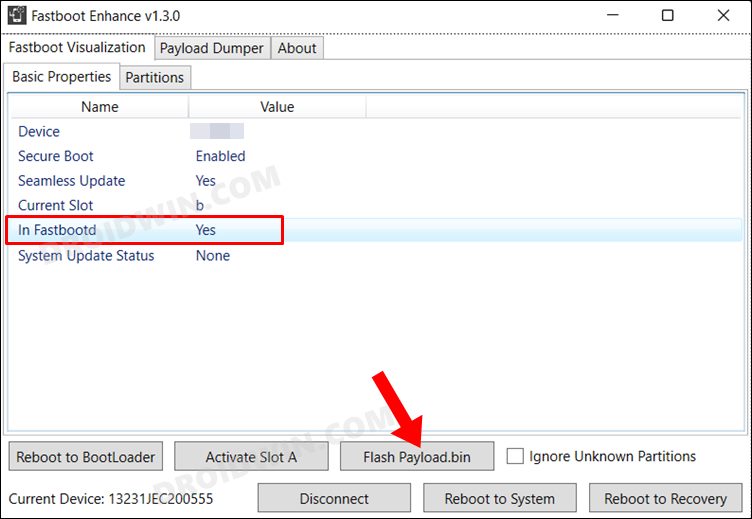
- Once complete, you will be notified of the same. You may now boot to the OS by clicking on Reboot to System.




Syed
Is this good even for OnePlus 6?