In this guide, we will show you five different methods to stop or disable the Windows 11 Update on your PC. Updates are an integral part of the OS. They bring stability to the overall system, patch underlying bugs, and might also introduce some new features. However, these are just the documented facts. In reality, things might be a little bit different. There have been many instances when an update tends to break the functionality of the OS, causes conflicts with third-party apps, or worse, makes the entire system unusable.
And if you are on the Developer Preview or Beta builds, then Microsoft will do its best to justify these statements. Therefore, the safest approach is to disable these automatic updates on your PC and only manually download and install them as and when needed. And in this guide, we will show you how to do just that. Given here are five different methods to stop or disable Windows 11 updates. Follow along.
Table of Contents
[5 Methods] How to Stop or Disable Windows 11 Update
We have shared five different methods to carry out this task. You may try out the one that you find most comfortable to deal with.
Method 1: Temporary Pause Windows 11 Update
If you are looking to put a halt to these updates just for a particular time frame, then you should consider pausing these updates. Here’s how it could be done:
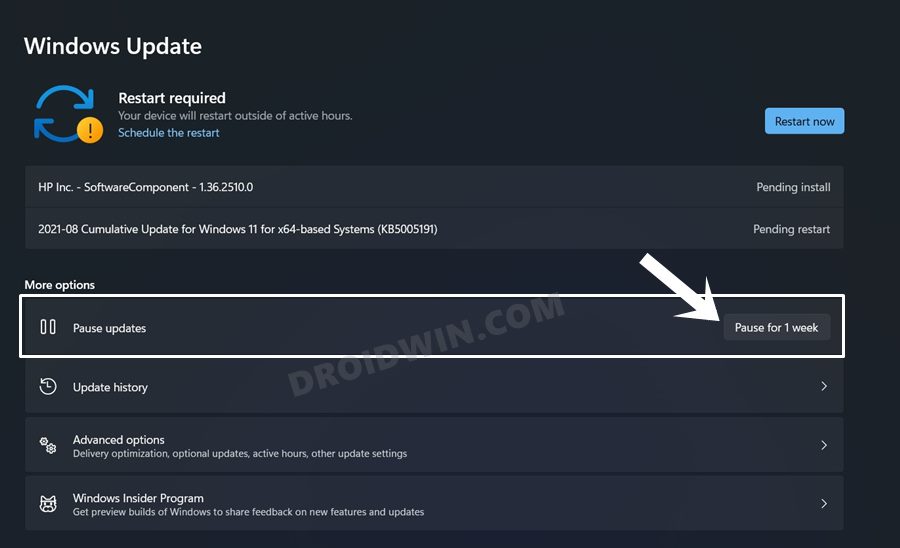
- Use the Windows+I shortcut keys to bring up the Settings page.
- Then go to the Windows Update section from the left menu bar.
- Finally, click on the ‘Pause for 1 week’ button.
There’s no direct option to pause it for more than a week. However, you could come back after a week and again click on this button to extend the pause duration by another week and so on.
Method 2: Stop Windows 11 Update by Disabling Windows Update Service
The next method to stop or disable Windows 11 updates is by disabling the service that is responsible for detection, downloading, and installation of Windows updates. In other words, disabling the Windows Update services.
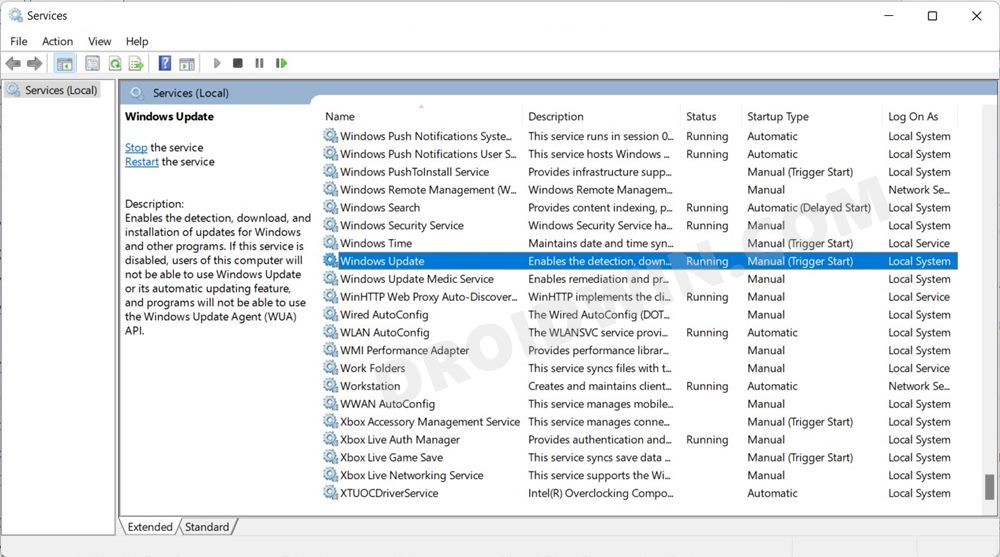
- So bring up the Run dialog box via Windows+R shortcut keys.
- Then type in services.msc and hit Enter. This shall open the Services menu.
- Now scroll to Windows Update and double click on it to open its Properties.

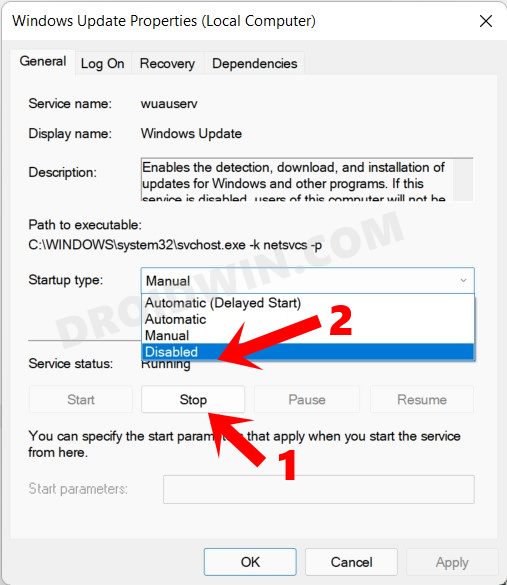
- Then click on the Stop button. After that, click on the drop-down menu next to Startup Type.
- Change its state from Automatic to Disabled and hit OK. That’s it.
Method 3: Stop Windows 11 Update via Group Policy Editor
The third method to stop or disable Windows 11 updates is by configuring the Automatic Updates settings and changing its mode to Disabled. All this would be carried out via Group Policy Editor (GPE).
In this regard, the Windows Professional, Enterprise, and Education users would already be having this GPE. However, for Windows 11 Home users, they would need to first enable it via this guide: How to Enable Group Policy Editor in Windows 11 Home. Once that is enabled, you may proceed with the below instructions:
- Use the Windows+R shortcut keys to bring up the Run dialog box.
- Then type in gpedit.msc and hit Enter. This shall launch the GPE.
- Now go to the following location in the GPE from the left menu bar:
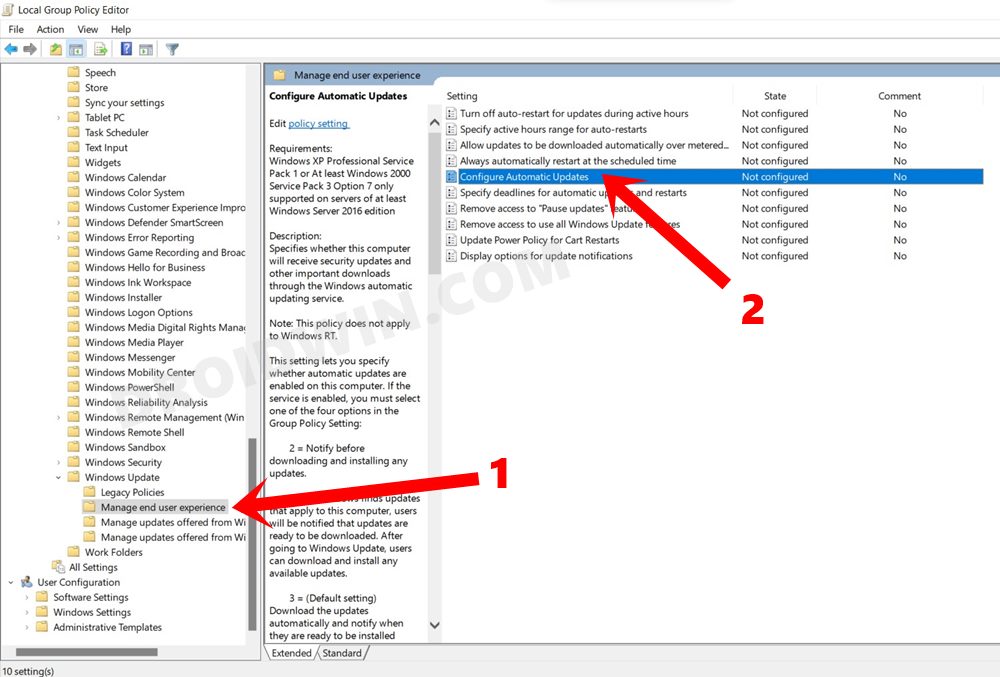
Computer Configuration > Administrative Templates > Windows Components > Windows Update > Manage end-user experience
- After that, double click on the Configure Automatic Updates to open its properties.
- Finally, select Disabled from the top left side and click OK.

PRO TIP: In the Configure Automatic Updates Options section, click on Configure automatic updating. It shall bring up a drop-down menu with the following options:
- 2 – Notify for download and auto-install.
- 3 – Auto download and notify for install.
- 4 – Auto download and schedule the install.
- 5 – Allow local admin to choose settings.
- 7 – Allow download, Notify to install, Notify to restart.
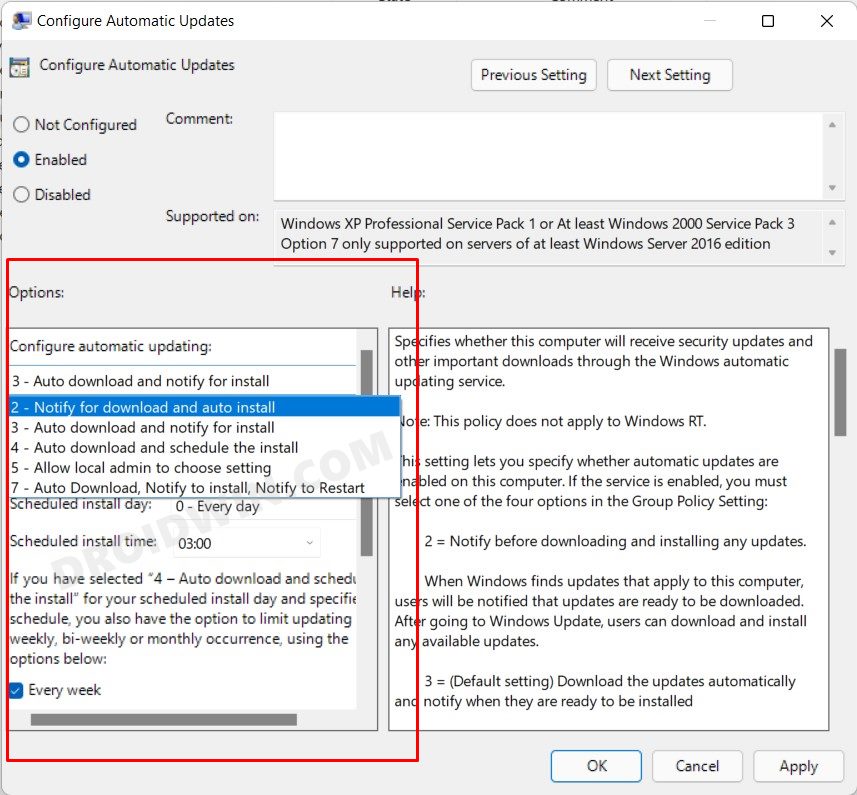
So if you don’t want to disable the updates altogether, then you instead go ahead with any of the aforementioned options as well.
Method 4: Disable Windows 11 Update via Registry
The fourth method to stop or disable Windows 11 Update is via the Registry Editor. It is near about similar to what we did via the GPE, the only difference is it requires more manual efforts than the former. Anyways, here’s how you could try it out:
- Bring up the Run dialog box via the Windows+R shortcut.
- Then type in regedit and hit Enter. This shall launch the Registry Editor.
- Now copy-paste the below location in the Registry Editor’s address bar:
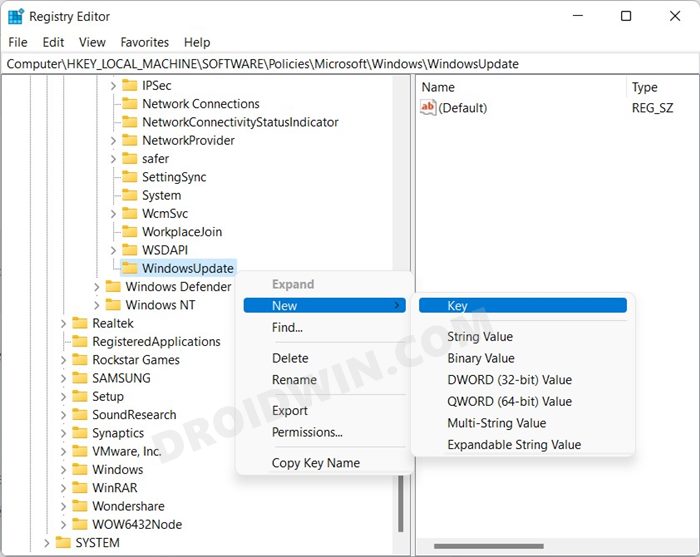
Computer\HKEY_LOCAL_MACHINE\SOFTWARE\Policies\Microsoft\Windows
- Right-click on the Windows folder situated at the left menu bar and select New > Key.
- Name it WindowsUpdate and hit Enter to save it.
- Now right-click on this newly created WindowsUpdate and select New > Key.
- Name it AU and hit Enter to save the name.
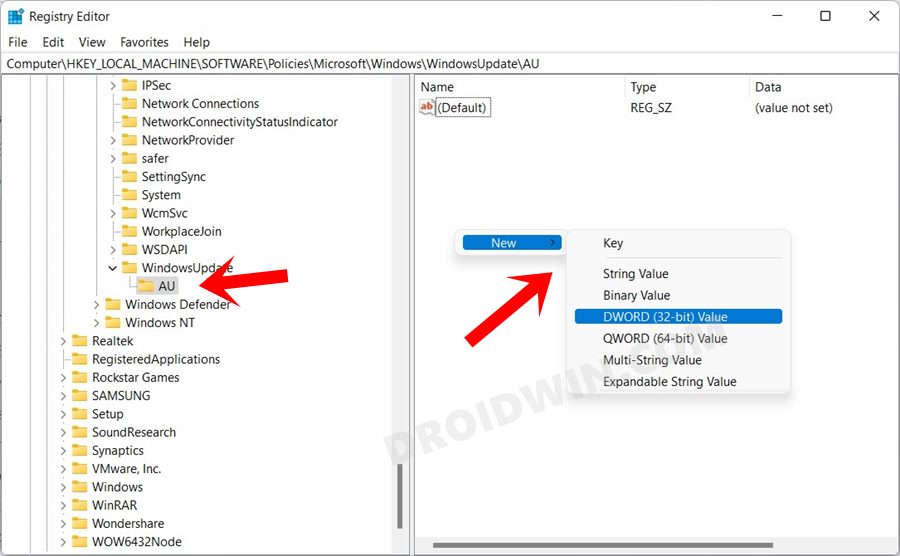
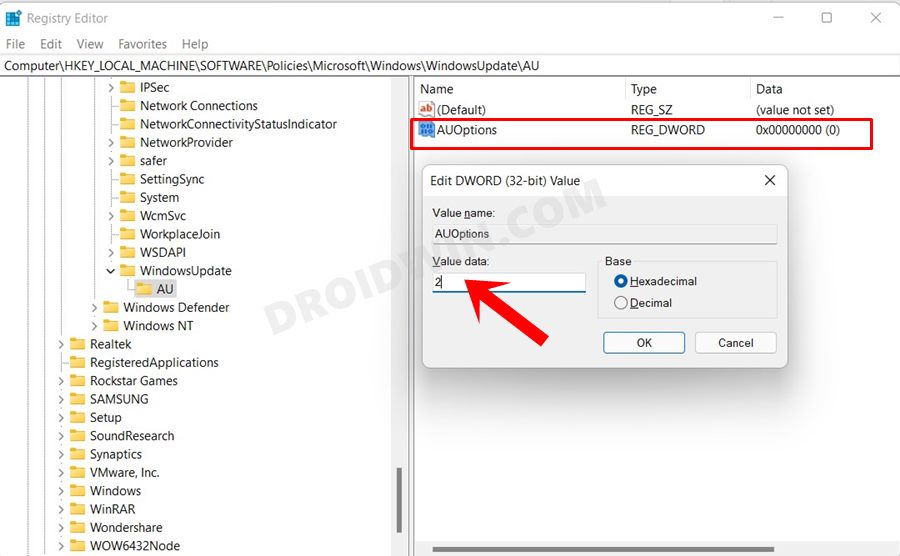
- Now right-click on the empty space present on the right-hand side and select New > DWORD (32-bit) Value.
- Name this AUOptions. Then double click to open it and then assign it any of the following values under the Value Data field:
- 2 – Notify for download and auto-install.
- 3 – Auto download and notify for install.
- 4 – Auto download and schedule the install.
- 5 – Allow local admin to choose settings.
- 7 – Allow download, Notify to install, Notify to restart.
- Finally, click OK to save the changes. That’s it, the process stands complete.

The major difference between this Registry method and the earlier GPE method is that the former doesn’t give you an option to completely disable the updates.
Method 5: Disable Windows 11 Updates via Metered Connection
By metering the WiFi connection, you are instructing the OS to limit the data usage. As a result, it will put restrictions on all the data extensive tasks, including the downloading and installing of updates. So here’s how to set up a metered connection and hence stop the Windows 11 updates:
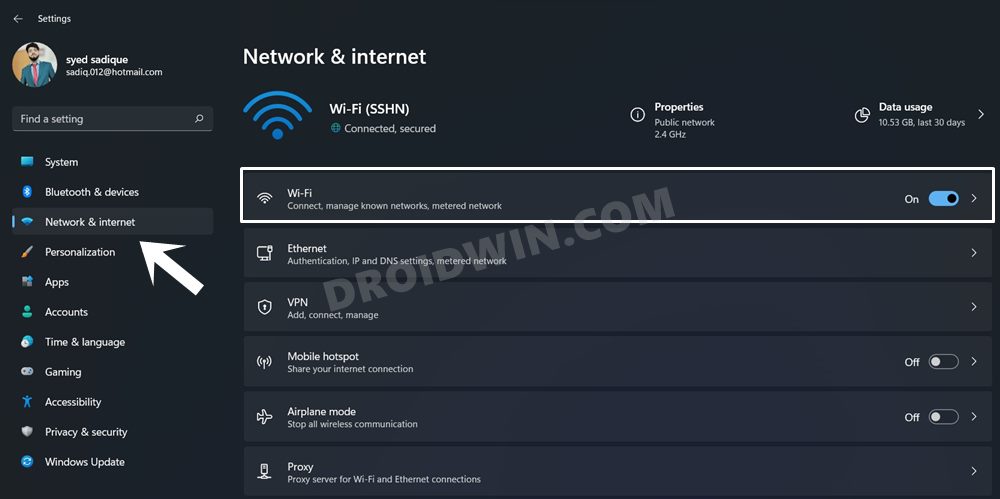
- Bring up the Settings menu via the Windows+I shortcut keys.
- Then click on Network & Internet from the left menu bar and go to the WiFi section.
- Now click on your WiFi and just enable the toggle next to Metered connection.
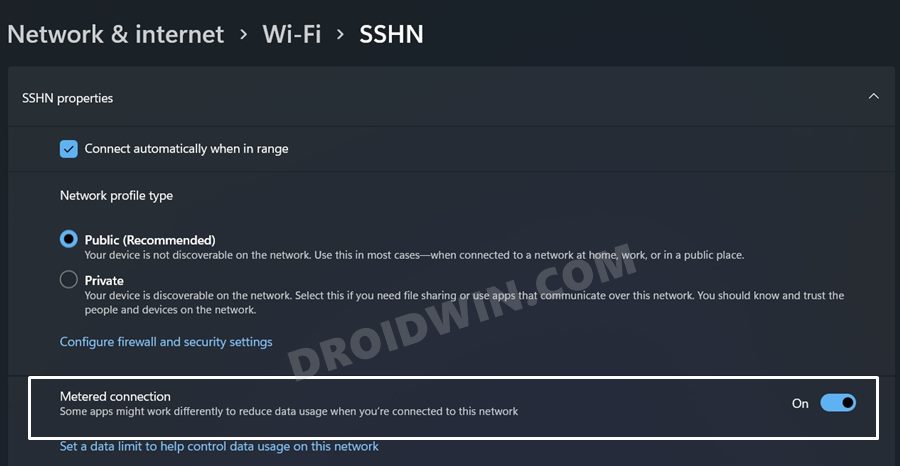
One drawback with this method is that it might affect the internet usability across the OS as a whole, and not only with the downloading of the updates. So use it accordingly.
With this, we round off the guide on how you could disable and stop Windows 11 updates. We have shared five different methods for the same. Do let us know in the comments section which one you ultimately decided to settle for.


