In this tutorial, we will show you the steps to root all the Vivo devices without using TWRP Recovery. We would only be using the Magisk Manager APK file. So how will this be achieved? To begin with, we would extract the stock boot.img file from the stock ROM of your Vivo device. After this, we would patch this stock boot image file via Magisk. Finally, this magisk_patched.img file will be flashed onto your device via Fastboot Commands.
Vivo has lined up quite a decent series of smartphones. Catering to the needs of the budget segment, it checkmarks all the prerequisites that one could have asked for. Without burning a hole in your pockets, it manages to meet the requirements for everyday users. Along the same lines, we are seeing an ever-growing community of custom development. From bootloader unlocking to custom recoveries and custom ROMs, the options are aplenty. Along the same lines, there are a plethora of tweaks and mods that have made their way.
But to carry out all of these tweaks, there is a pretty important requirement that your device needs to meet. And that is gaining the access to administrative privileges or system partition. This, in simpler terms, is also known as rooting your device. And in this guide, we will help you with just that. So without further ado, here are the instructions to root your Vivo device via Magisk, without using TWRP Recovery. As mentioned before, this guide is valid for all Vivo devices. On that note, let’s begin.
- How to Install OTA Updates in Rooted Android Device
- How to Permanently Install TWRP without TWRP ZIP File (only using TWRP.img file)
- Root Android Devices Without TWRP Recovery
- How to Fix TWRP Error 7 (While Flashing Custom ROM via TWRP)
Table of Contents
How to Root All Vivo Devices via Magisk without TWRP
Before we begin with the instructions steps, there are a couple of requirements that your device needs to qualify. Make sure to checkmark all these prerequisites before proceeding ahead with the rooting steps.
Prerequisites
- To begin with, create a complete device backup. This is because unlocking the bootloader will wipe off all the data from your device. Even if your device is already unlocked, and you have come here just to root your device, we still recommended taking a complete device backup to be on the safer side.
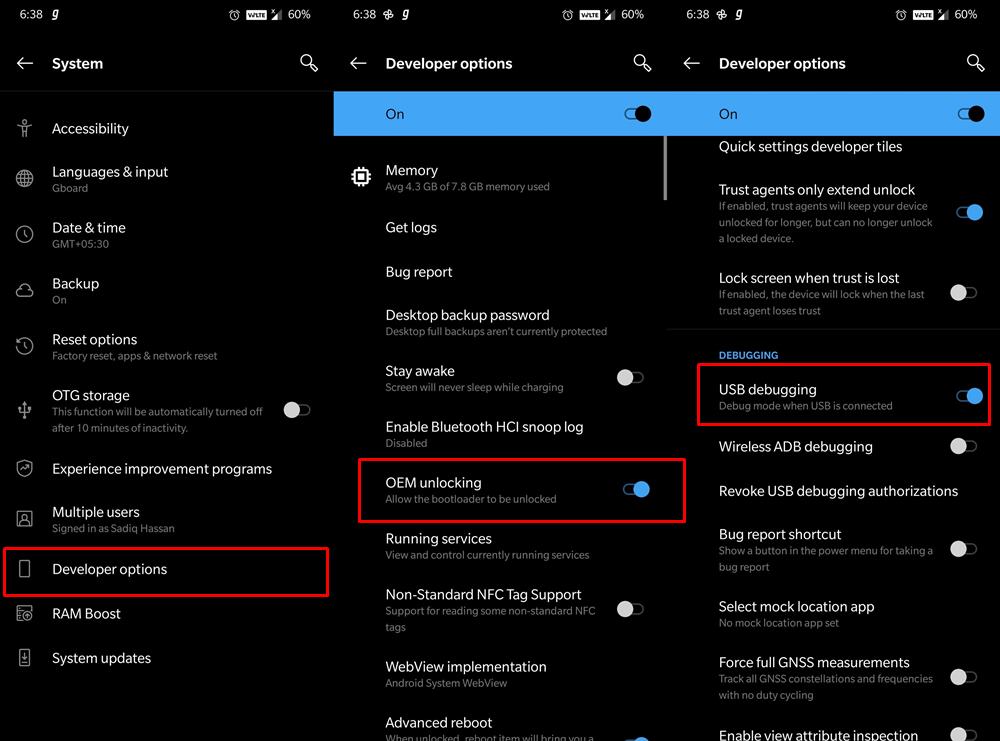
- Next up, enable USB Debugging and OEM Unlocking on your device. The reason for enabling these two? USB Debugging is enabled so that your device gets recognized by your PC in ADB Mode. This mode will then be used to boot your device to Fastboot and flash the magisk_patched.img (more on that later).

Reference Image - On the other hand, OEM Unlocking will allow your device’s bootloader to be unlocked. To enable them, head over to Settings > About Phone > Tap on Build Number 7 times > Go back to Settings > System > Advanced > Developer Options > Enable USB Debugging as well as OEM Unlocking [Don’t Miss: Enable USB Debugging on a Broken Android Device’s Screen? Here’s a Workaround].
- Likewise, install the Android SDK Platform Tools on your PC. While there are many customized ADB software but this one from Google is the best in its class. So go ahead with this one only to root your Vivo device without TWRP.
STEP 1: Unlock the Bootloader
First and foremost, you have to unlock the bootloader on your Vivo device. Do keep in mind that it will wipe off all the data from your device and could also make the warranty null and void. Now if you wish to proceed ahead, then refer to our detailed Bootloader Unlock Guides for all Vivo devices.
- [GUIDE] Flash ROMs/Magisk/TWRP/Kernels on A/B Partition Devices
- Everything About Magisk- Manager, Modules, and More
- Best Magisk Modules of 2020 [PART-1]
- [3 METHODS] Unroot any Android Device-Uninstall Magisk
STEP 2: Get the Vivo Stock Boot.Img File
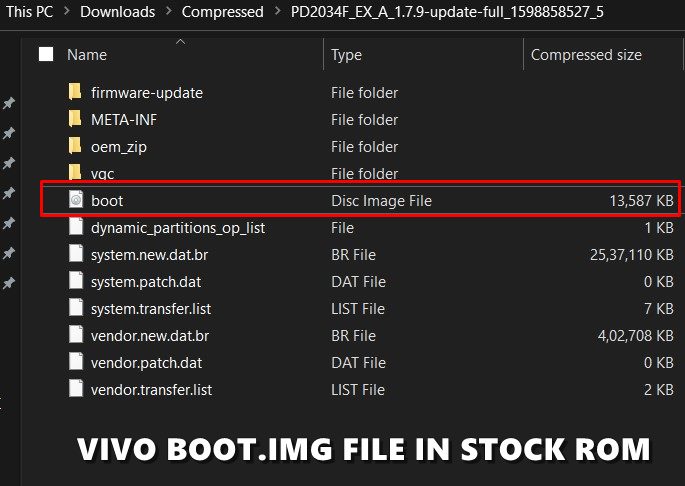
Now here’s the good news. Vivo is the only OEM among all the ones that are part of BBK Electronics that has its firmware in ZIP format. As a result, you could easily extract the stock firmware via WinZIP or WinRAR and get hold of the stock boot.img file. On the other hand, OnePlus uploads its most of the firmware file inside payload.bin that requires Python to extract. Oppo and Realme use the OZIP format that calls for Python and the Ozipdecrypt tool. But since Vivo is still following the old route, you just need to extract the stock ROM/firmware and copy the boot.img file from it.
The above image is of the Vivo Y20i PD2034F_EX_A_1.7.9 Indian Variant. And I have uploaded its stock boot.img file as well [GOOGLE DRIVE DOWNLOAD LINK] So if you are having this device and are on this software version, you could directly download this boot.img file rather than the entire firmware. As for other users, head over to Vivo System Update section and download the firmware for your device and region. Then extract the stock boot.img file from it and proceed with the below steps to root any Vivo device via Magisk without TWRP.
STEP 3: Patch Vivo Stock Boot Image
It’s now time to patch the stock boot.img file via Magisk. To do so, follow the below steps. On the other hand, if you are using the latest Magisk Manager v8 that has support for Android 11, then refer to our separate guide on the said topic: How to Update Magisk ZIP and Magisk Manager (without TWRP).
This newer Magisk has the same functionality as the older one. The only change is in the UI and this might confuse a few users. That’s why if you have the newest Magisk v8, then check out the screenshots from the above-linked guide. On the other hand, you could simply refer to the below steps if you are on the older Magisk build.
- Transfer the stock boot.img file to your device.
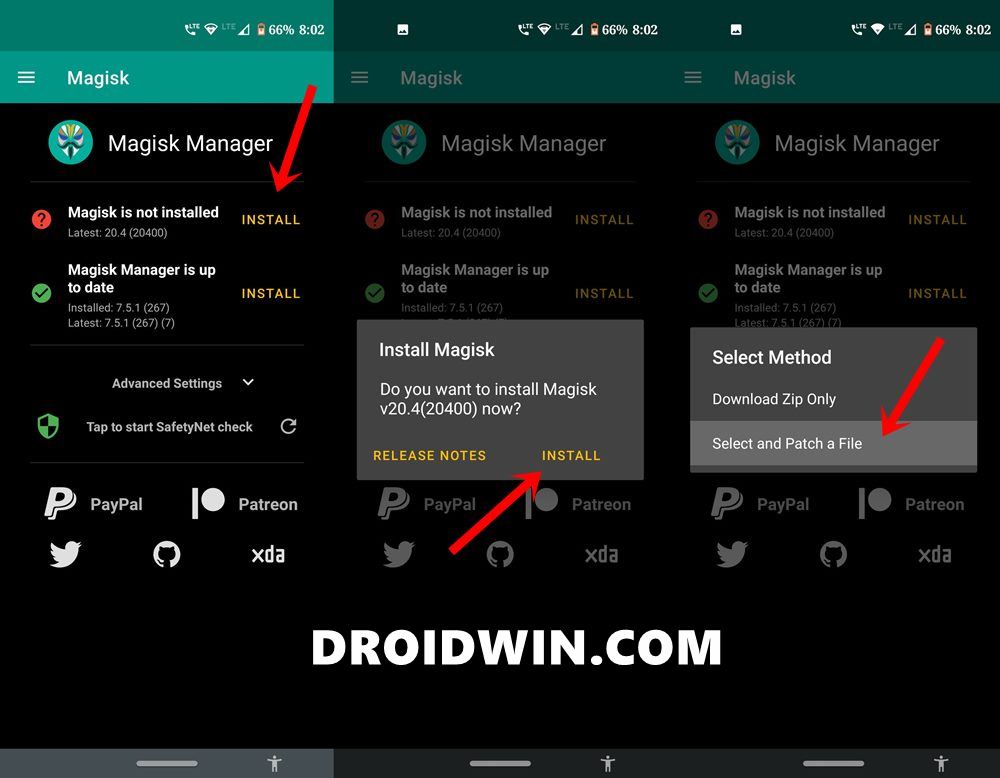
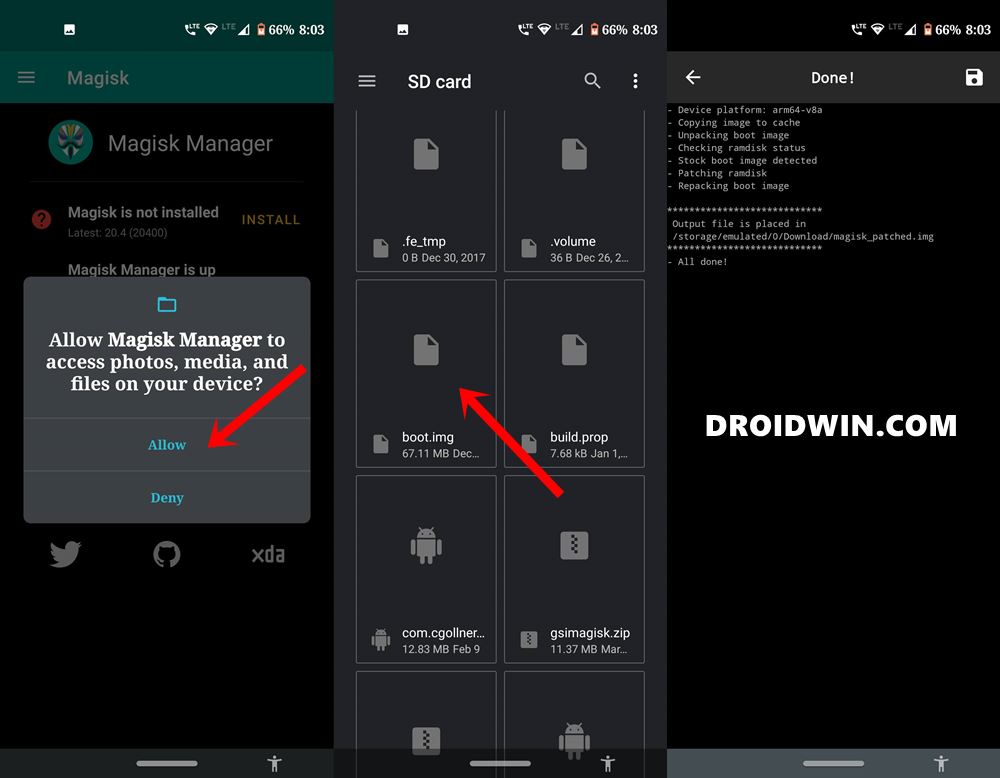
- Launch the Magisk Manager app and tap on Install next to the “Magisk is not installed keyword”, as shown in the image.
- Again tap on Install in the popup that appears.
- Next, tap on Select and Patch a File.
- Browse to the boot.img file and select it.
- Magisk will take a few seconds to load that file and will then patch it. The entire process shall only take a few seconds.
- Once that is done, head over to Internal Storage > Downloads folder and you will find the magisk_patched.img file.
With this, you have successfully patched the stock boot file. It is now time to flash it onto your Vivo device and root it, without TWRP
- How to Fix TWRP Error 20 GApps after flashing LineageOS
- Fix Magisk Module Bootloop without TWRP Recovery
- How to Fix TWRP Error 70 [With Screenshots]
- How to Fix Error: Cannot load recovery.img
STEP 4: Flash Patched Boot Image and Root Vivo Device
In this section to root Vivo without TWRP, we would use the fastboot commands to flash this patched boot file onto your device. For that, make sure that you have installed Android SDK Platform Tools on your PC.
- Connect your device to PC via USB Cable. Make sure that USB debugging has been enabled.
- Transfer the magisk_patched.img file from your device to the platform-tools folder.
- Inside the same platform-tools folder, type in CMD in the address bar and hit Enter. This will launch the Command Prompt.
- Execute the below command to boot your Vivo device to the Fastboot/Bootloader mode:
adb reboot bootloader
- Finally, type in the below command to root your Vivo device:
fastboot flash boot magisk_patched.img
- Once the file has been flashed, you may reboot your device to the OS as follows:
fastboot reboot

With this, we conclude the guide on how to root any Vivo device without TWRP Recovery. If you have any queries, do let us know in the comments section below. We will get back to you with a solution as soon as possible.


Ryu
it says fastboot: error: ANDROID_PRODUCT_OUT not set when I type fastboot flash boot magisk_patched.img
Ajay
After I complete this step adb reboot bootloader
it reboot in recovery mode and after which option select and when the next command paste?
Godsavedanidiot
I’ve got a Vivo y55s i want to root to make the sd card the storage as it is like 16gb and I’ve made sure it doesn’t have many apps even though it doesn’t have many apps it just leaves 1gb storage to use. I do have an sd card. The sd card cannot be made internal storage hence carried on to try to root but inevitably stuck with the bootloader lol. It can’t unlock the thing {I’ve tried everything I can searched every thing I can}. So I’m doomed. U probably like buy a new mobile yea I want but I’m stuck rn. Help if u can Thanks.
Someone
I am trying to root a vivo y21l and after I flash patched boot.img, when I reboot my phone is stuck in a bootloop. it shows VIVO for a minute then nothing, again shows vivo then nothing and this goes on. I flashed the stock boot image again and phone is ok now but as it is not patches image I don’t have root. is there any fault in patching the boot img or something, help!
Himanshu Tyagi
same here but with vivo 1714 aka y69 , i have unlocked the bootloader sucessfully.
abhijith
can you have a video for this.if havint please recommeed me another video inn youtube which is followinng these steps above menthoned
Joseph Fowles
vivo z1 pro the adb command “adb reboot bootloader” boots the phone into fastboot no problem… but after that the “fastboot flash boot” command just hangs with a “waiting for any device” code. So the USB is working to reboot the device, after that nothing works. I have to kill the demon and restart..
any one else have this problem?
Sadique Hassan
Once you are in Fastboot Mode, could you execute any other Fastboot Command, such as fastboot reboot? Because it seems to be a driver’s issue. So please manually download and install Google’s Fastboot Drivers from here How to Install Google’s Android Bootloader Interface Drivers
Norman
I have successfully unlock my bootloader
For confirmation i did this on CMD
“fastboot getvar all”
And it returns that the bootloader is unlocked.
But after that while using the command
“fastboot flash boot magisk_patched.img”
It returns a “Remote : Verify state Locked”
Could help me with this?
Im stuck on that..
Sadique Hassan
Well, the error message suggests that the bootloader is still locked. Could you let me the whether the securestate is unlocked and iswarrantyvoid is YES from the fastboot getvar all command