In this tutorial, we will show you the steps through which you could easily unlock the bootloader and hence root your Samsung Galaxy S10. Many OEMs make it pretty easy to unlock the bootloader of your device. You could either directly flash the Magisk ZIP file via TWRP or modify and patch your stock boot.img file. We have already covered a detailed guide on both, you may go and have a look. However, it is with the Samsung OEM that try and complicate matters up to the maximum possible extent. And this is the reason why it took a lot of time in finding the perfect root solution for Samsung Galaxy S10. But now that it’s available, let’s check out the steps to do so.
Table of Contents
Samsung Galaxy S10 Specifications
Before beginning with the guide, let us check out what the device has to offer. The specs sheet is officially provided on the official Samsung website, So you could be 100% sure of its correctness.
- Processor
- CPU Speed2.7GHz, 2.3GHz, 1.9GHz
- CPU TypeOcta-Core
- Display
- Size (Main_Display)15.51cm (6.1″) full rectangle / 15.17cm (6.0″) rounded corners
- Resolution (Main Display)3040 x 1440 (Quad HD+)
- Technology (Main Display)Dynamic AMOLED
- Color Depth (Main Display)16M
- Camera
- Rear Camera – Resolution (Multiple)12.0 MP + 16.0 MP + 12.0 MP
- Front Camera – Resolution10.0 MP
- Video Recording ResolutionUHD 4K (3840 x 2160)@60fps
- Slow Motion960fps @HD, 240fps @FHD
- Memory
- RAM_Size (GB)8
- ROM Size (GB)128
- Available Memory (GB)*107.8
- External Memory SupportMicroSD (Up to 512GB)
In this guide, the following device is compatible with the rooting tutorial:
- Samsung Galaxy S10: Exynos variants with codename: beyond1lte. The Model Number is SM-G973F/FD. The device should be running on Android 9.0 Pie or Android 10.0:
How to Root Samsung Galaxy S10
Rejoice, S10 users! (and EMUI 9 users) Successfully made recovery and Magisk dual exist on the same partition! You will be able to switch between Magisk and recovery with volume key combos 😇
— John Wu (@topjohnwu) April 1, 2019
In this process, first of all, we will be unlocking the bootloader of your device. After that, we will be using the stock AP file from the Samsung firmware. Then we will be patching this file using magisk Manager. Finally, the file will be flashed onto your device using the Odin software. So with that said, here are the complete instructions to root your Samsung Galaxy S10.
Prerequisites
- First of all, make a complete backup of your device,
- Also, download the download Odin v3.14.4 and extract it to a convenient location on your PC.
- Download the latest Magisk file (both ZIP and APK).
That’s it. These were the two requirements needed for our guide on how to root Samsung Galaxy S10. Now follow the below steps.
STEP 1 of Rooting Samsung Galaxy S10: Unlock Device’s Bootloader
That’s the only thing that Samsung has made it pretty easy. To unlock the bootloader of your Samsung Galaxy S10, you don’t need to use the ADB and Fastboot Tools. You could easily do so from the device itself. Here is how it could be done:
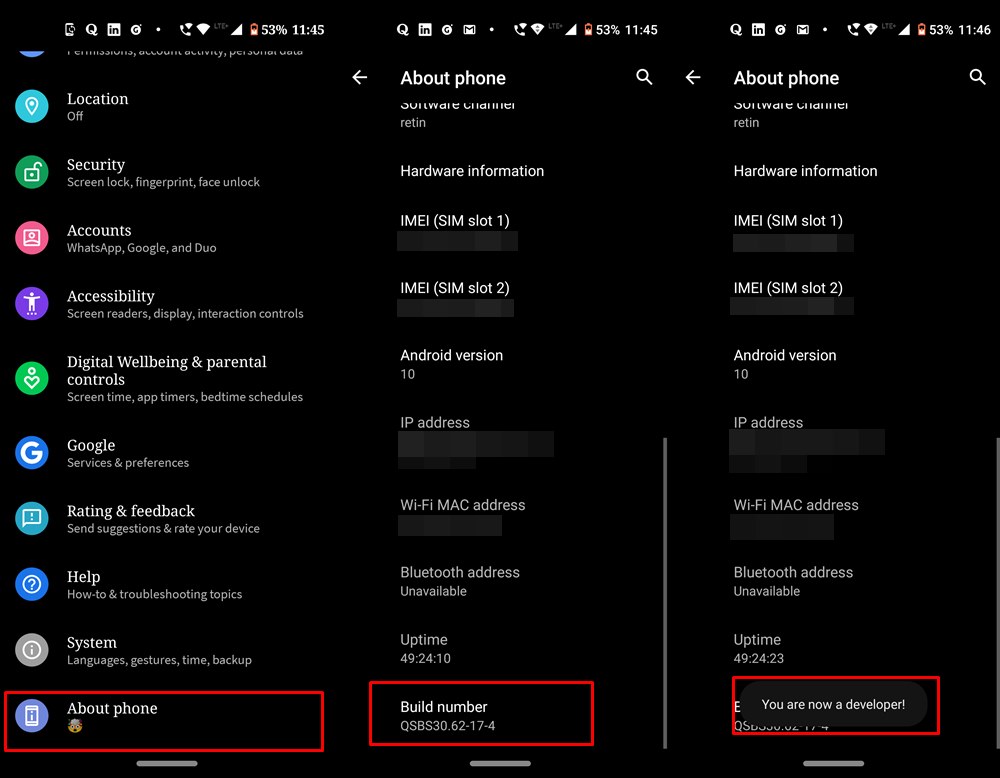
- Head over to Settings > About phone > Software information.
- Tap on the Build Number 5-7 times until you see the Developer Mode has been enabled toast message.
- Now go back to Settings and tap on Developer Options. This should be situated at the very end of the page.
- Next, tap on OEM Unlocking and then tap on Enable.
- Power off your device and boot it to Download Mode. Now long-press the Volume Up button to enter the Device unlock mode.
- Finally hit the Power Up button to confirm your decision. Doing so will wipe all the data on your device and then unlock your device’s bootloader.
That’s it. You have completed the first step to root your Samsung Galaxy S10. Now follow the next step accordingly.
STEP 2 of Rooting Samsung Galaxy S10: Patch AP Firmware File using Magisk
- First of all, download the stock firmware of your Samsung Galaxy S10 device: Galaxy S10 (SM-G973F): SamMobile | SamFrew
- Extract the downloaded firmware file onto your PC, anywhere of your place of convenience.
- Now copy the AP file which will be in .tar extension, to your phone’s internal storage.
- Download and install the latest Magisk Manager APK on your device.
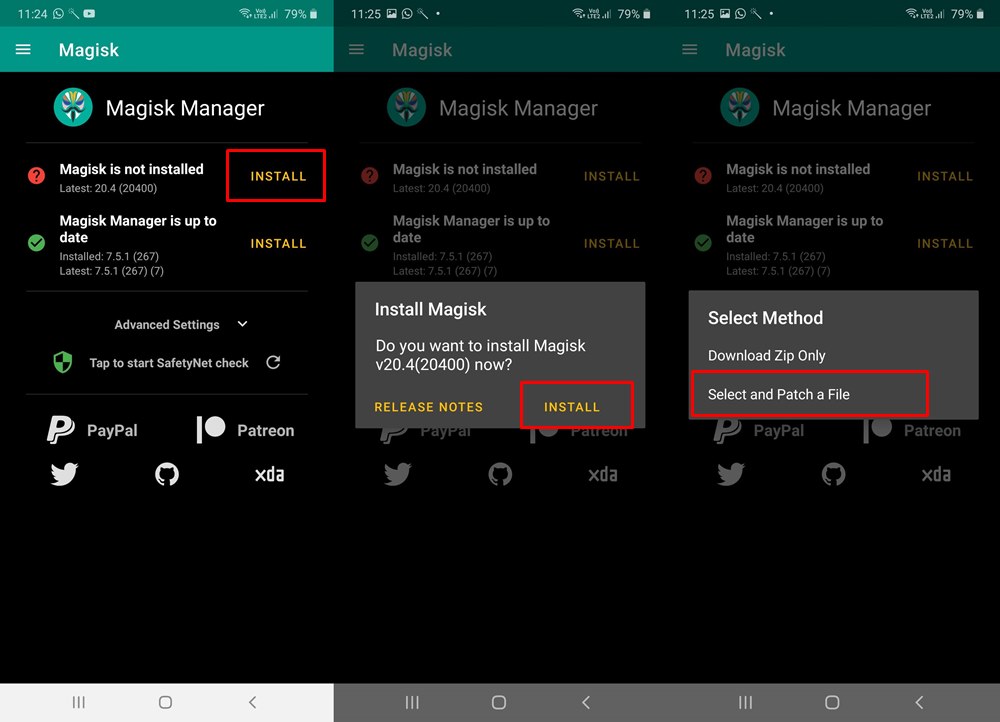
- Open it and tap on Install, next to Magisk Manager is not installed keyword.

- In the next popup that appears, again tap on Install.
- Next up, in the Select Method dialog box, tap on Select and patch a file.
- Navigate to the AP tar file and select it. magisk will now patch the file and will save it as magisk_patched.tar in Internal Storage > Downloads folder.
Step 3: Flash Patched AP Firmware to Root your Samsung Galaxy S10
- This is where the real fun begins! So start by transferring the magisk_patched file to your PC. Then launch the Odin v1.13.1 tool
- Now power off your device and boot into the Download Mode. To do so, press and hold the Power button and then select the Power Off option to shut down your phone. Once the device has been turned off, press and holds the Volume Down and Bixby buttons. At that instance, connect your device to the PC via the USB cable. You will also see a warning message on your screen. Tap the Volume Up Button and your device will now boot to the Download Mode.
- The ID: COM section in ODIN should now be lit up. Next, click on the Options tab in Odin and make sure to uncheck the Auto-Reboot option.
- Now click on the following buttons and choose the corresponding firmware files:
- BL: Select the firmware file starting “BL”
- AP: Select the magisk_patched.tar file (the Patched AP firmware).
- CP: The firmware file starting with “CP”
- CSC: Choose the firmware file starting with “HOME_CSC”
- Finally, hit the Start button to flash the file and root your device. Once the process completes, don’t reboot your device at this point. You will first have to reset your device from the Stock Recovery. If you don’t do so, you will end up in a bootloop. Therefore follow the below steps to reset your device and hence root Samsung Galaxy S10. Here is how it could be done.
Step 4: Factory Reset Samsung Galaxy S10
- Disconnect your device from PC and press the Power and Volume Down button together. You will now exit the Download Mode.
- As soon as the device turns off, press the ‘Power’, ‘Bixby’, and ‘Volume Up’ buttons together to boot your device to stock recovery.
- Now use the Volume keys to highlight the Factory Data Reset option and press the Power key to confirm your choice.
- Once that is done, select the Reboot system now option and at that instance, press the Power, Bixby, and Volume Up buttons together. You will now see the Bootloader Warning screen when that happens to release the keys.
- That’s it. Your device will now boot to the rooted Android OS! Welcome to the world of custom development, my friend!
Conclusion
So with that, we conclude the guide on how to root Samsung Galaxy S10. We hope the above articles might have helped you in achieving the desired results. Furthermore, now that your device is rooted, don’t forget to check our other such guides related to custom development, root, Magisk, and TWRP: