In this tutorial, we will show you how to root the Realme 1 device. First off, we will extract the OZIP firmware. Then we will use the stock boot.img file from that extracted OZIP firmware, which will then be patched using the Magisk Manager app. Finally, this patched boot image will be flashed on to your Realme 1 device via Fastboot Commands.
The device has a 6-inch screen and a 1080 x 2160 pixel resolution. The device came out with Android 8.1 (Oreo) and has since received the update to ColorOS 6, based on Android 9.0 (Pie). The OEM has this habit of restricting most of its budget devices to just a single year of Android upgrades. As a result, the Realme 1 device owners missed out on Realme UI.
Anyways, moving on, under the hood you get an octa-core Mediatek MT6771 Helio P60 chipset and Mali-G72 MP3 GPU. The device comes in three different variants: 32GB 3GB RAM, 64GB 4GB RAM, and 128GB 6GB RAM. The single rear 13MP camera and the front 8MP selfie camera both could record videos at 1080p@30fps. All these features are supported by a 3410 mAh battery. Thi9s should be enough to easily make your device last an entire day.
Being a budget device, it isn’t short on custom development, and this is really great news. By making use of Android’s open-source ecosystem, you could easily unlock the device’s bootloader. This will then open the floodgates to the plentitude of customizations. To begin with, you could replace the device’s stock recovery with a custom one like TWRP.
This in turn will allow you to take Nandroid backup, Wipe device partitions and even flash Custom ROMs, ZIPs and IMG files. Along the same lines, you could even gain access to the system partition and carry out system-level tweaks. This will be possible by rooting your device via Magisk. And in this guide, we will be focusing on just that. So here are the required instructions to root the Realme 1 device without using TWRP Recovery.
- How to Root any Android Device without PC
- How to Install OTA Updates in Rooted Android Device
- Permanently Install TWRP without TWRP ZIP File (only using TWRP.img file)
- Root Android Devices Without TWRP Recovery
Table of Contents
Rooting Realme Devices: What’s the Major Hurdle?

There exist two different methods to root any Android device. The first one simply involves flashing the Magisk Installer ZIP via TWRP. However, not every device has a working custom recovery like TWRP. In that case, the second alternative stands rooting the device without TWRP, using Magisk. All that is needed is a stock boot.img file for your firmware which could then be patched via Magisk and flashed via Fastboot commands.
However, with Realme, things begin to get a little bit difficult in this. The thing is all the Realme stock firmware comes in OZIP extension. Hence you cannot extract the firmware contents ‘the normal way’. You will have to make use of Python and a Decrypt tool to extract this firmware and get the boot image file. Trust us all these sounds difficult only on paper but in practice, it is way too much easier to execute. And in this guide, we will be making use of just that.
On that note, here are the complete instructions to root the Realme 1 device via Magisk without TWRP Recovery. here is the blueprint of this guide- we will first use Python and Decrypt tool to convert OZIP stock firmware to the ZIP package. Then we will extract that ZIP package via WinZIP or WinRAR. After this, the extracted stock boot.img file will be patched via Magisk. Finally, the magisk patched image fill be flashed via Fastboot on your Realme device. Follow ahead for the complete instructions.
How to Root Realme 1
To begin with, there are a few requirements that your device needs to qualify. Make sure to go through them before you proceed with the rooting steps. Droidwin or any of its members won’t be held responsible if anything happens to your device. Proceed ahead at your own risk.
Prerequisites
- Download and install the Android SDK Platform Tools on your PC. This will give us the necessary ADB and fastboot binaries.
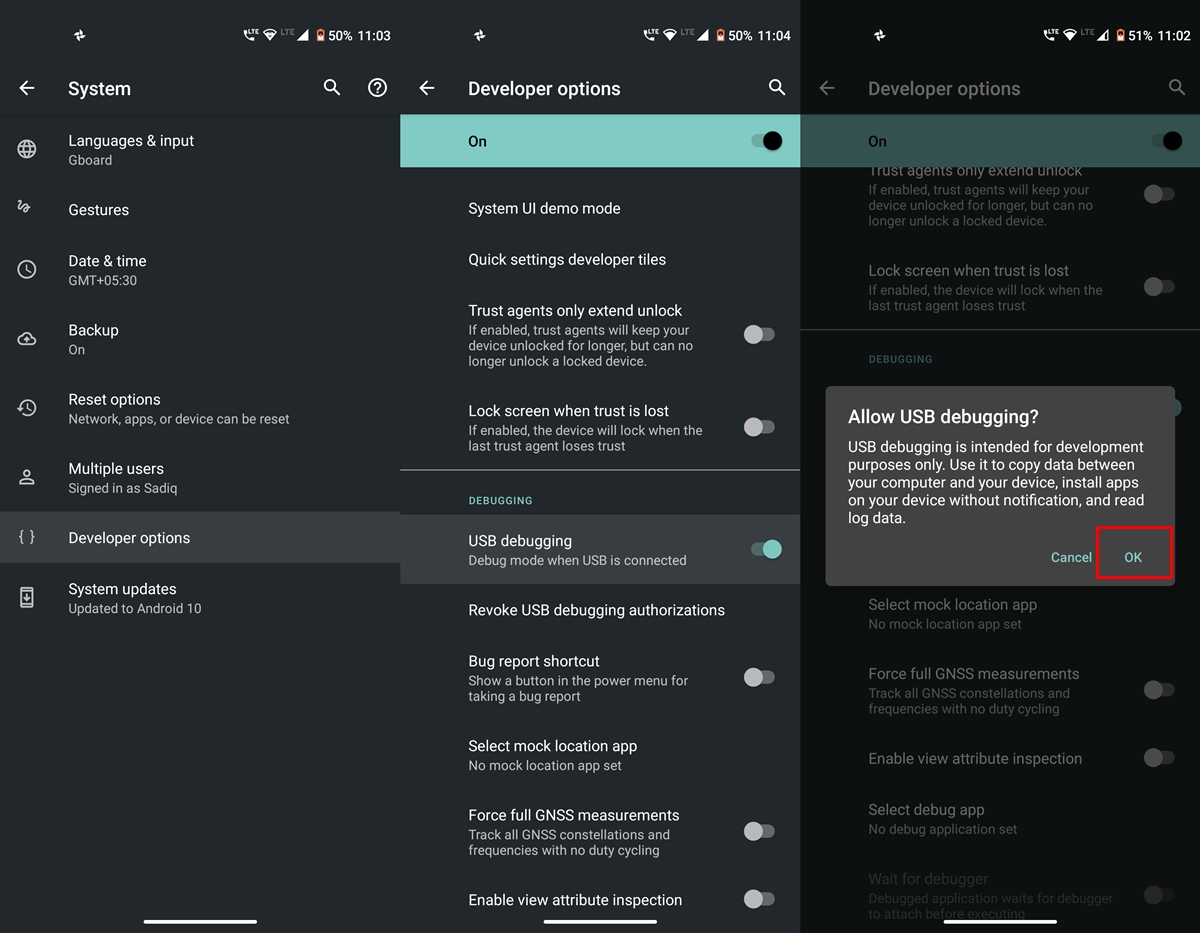
- Next up, enable USB Debugging on your Realme device. It will help your PC in recognizing your device in ADB mode. We would be needing to access ADB mode to reboot your device to Fastboot Mode. To enable Debugging, head over to Settings > About Phone > Tap on Build Number 7 times > Go back to Settings > System > Advanced > Developer Options > Enable USB Debugging.

USB Debugging on Android - Finally, download and install the Magisk Manager APK file onto your Realme device.
You may now proceed with the steps to root Realme 1 via Magisk, without TWRP Recovery. Follow along.
- [GUIDE] Flash ROMs/Magisk/TWRP/Kernels on A/B Partition Devices
- Everything About Magisk- Manager, Modules, and More
- Best Magisk Modules of 2020 [PART-1]
- [3 METHODS] Unroot any Android Device-Uninstall Magisk
STEP 1: Unlock Bootloader
To begin with, you will have to unlock the device’s bootloader. If you haven’t done so, refer to our detailed guide on How to Unlock Bootloader on Realme 1 . For that, we would be making use of the Realme 1 In-Depth Test Tool APK and one ADB and one Fastboot command. All the instructions are given in the linked guide. Do keep in mind that this process will wipe off all the data from your device and might also make the warranty null and void. Proceed ahead with caution.
STEP 2: Convert Realme 1 Firmware from OZIP to ZIP
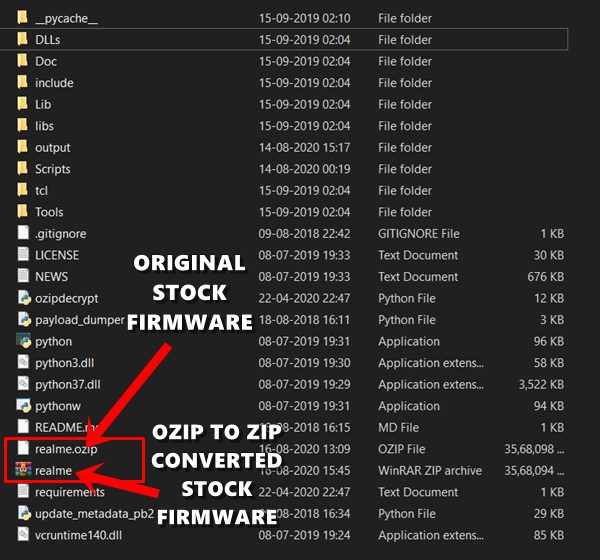
You now have to covert the Convert Realme 1 Firmware from OZIP to ZIP. We need to do this because then only we could extract the boot image file from ZIP. Extracting an OZIP file is just not possible using WinZIP or WinRAR. For that, a specific set of tools and instructions are needed. So head over to our comprehensive tutorial on How to Extract OZIP Realme Stock ROM (Firmware).
STEP 3: Extract Stock Boot Image File

Once you have converted your device’s stock firmware from OZIP to ZIP, make use of the WinZIP or WinRAR tool to extract the stock boot.img file. No need to extract all the contents of stock firmware. Just the boot.img file will do. Once you have extracted the file, move to your device’s Internal Storage.
STEP 4: Patch Stock Boot Image via Magisk
STEP 4 & STEP 5 outlines the steps to patch stock boot.img file via Magisk and then flash it via Fastboot Commands. For detailed instructions on this topic, refer to our guide on how to Patch Stock Boot Image via Magisk and Flash it using Fastboot.
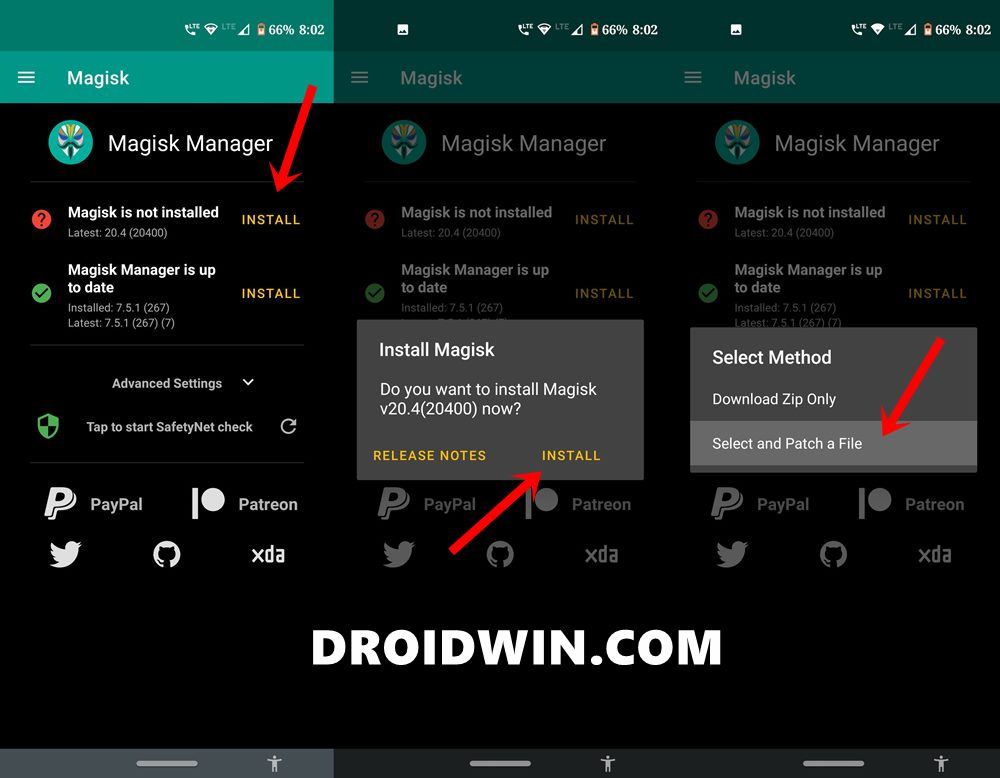
- Launch Magisk Manager APK on your device.
- Tap on Install next to the Magisk status (which would show Magisk is not Installed).
- Now install Magisk popup will appear, tap on Install.
- Under the Select method dialog box, tap on Select and Patch a file.
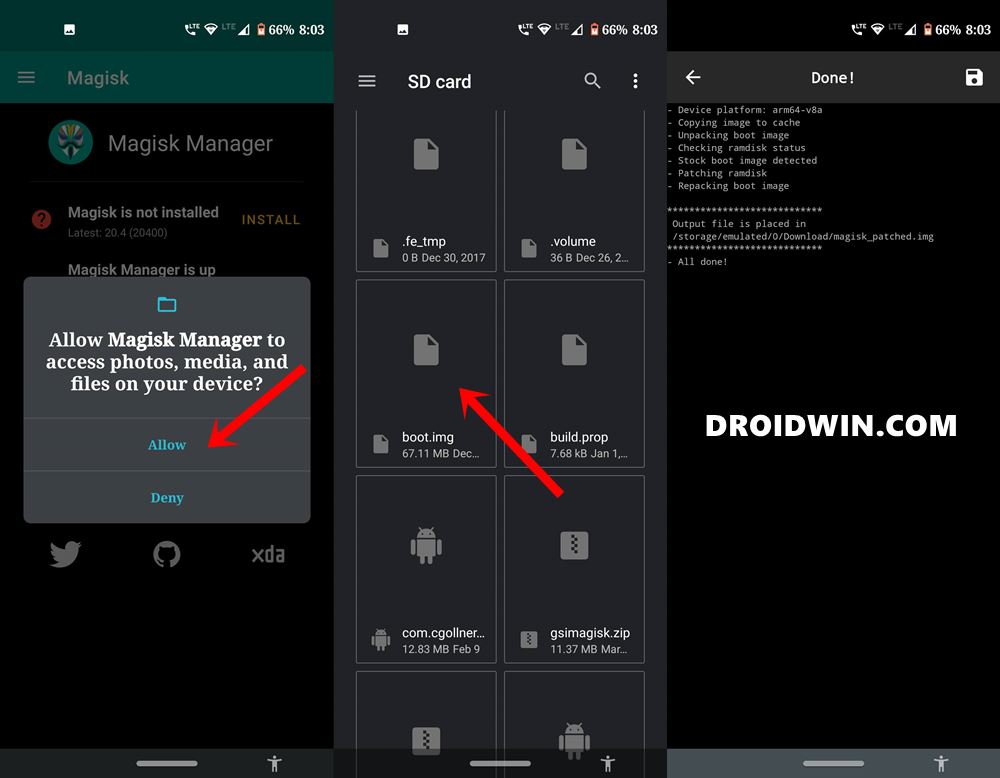
- Navigate to the stock boot.img file that you have transferred to your device in the earlier section and select it.
- Magisk will then patch this file and the entire process shall only take a few seconds.
- Once that is done, head over to Internal Storage > Downloads folder and you will find the magisk_patched.img file there.
- [GUIDE] Flash ROMs/Magisk/TWRP/Kernels on A/B Partition Devices
- How to Flash Various Files in A/B Partition Devices
- Install Custom ROMs on any Android Device- Includes A/B Partition
- How to Fix FAILED (remote: unknown command) Error
STEP 5: Flash Magisk Patched Boot Image onto Realme 1
- Transfer the magisk_patched.img file from your device to the folder where Android SDK Platform Tools are installed. This should be the platform-tools folder on your PC.
- Now connect your device to PC via USB cable. Make sure USB debugging is enabled.
- Head over to that platform-tools folder, type in CMD in the address bar, and hit Enter. This will launch the Command Prompt.
- Execute the following command in the CMD window to boot your Realme device to fastboot mode:
adb reboot bootloader
- Finally, make use of the below command to flash the Magisk patched boot image file:
fastboot flash boot magisk_patched.img
- Once the flashing is done, you may reboot your device. For that either use the hardware key or the below command:
fastboot reboot

With this, we conclude the guide on how to root the Realme 1 device via Magisk, without making use of the TWRP Recovery. If you any doubts, do let us know in the comments section below. Furthermore, now that Android 11 is live in its stable build, here are some Android 11 guides that deserve your attention as well.