This guide lists out detailed instructions set on how to root Google Pixel 4 without TWRP Recovery. Android thanks to its open-source nature, givers you a plentitude of opportunities at hand. These include installing new icons packs, fonts, launchers, and themes. For the geeks, they take this a step further and try out tweaking with the device’s OS.
In this regard, the first step involves unlocking the bootloader of your device. Once that is done, you will root your device to achieve administrative level privileges. With that said, there are two methods through which you could perform this root: with or without TWRP. In this guide, we will focus on the latter, which is how to root Pixel 4 without using TWRP Recovery.
Table of Contents
Why Choose the Non-TWRP Root Method For Pixel 4
A question might arise as to why one should go for this method. Well, the point is that with Android 10, things have gone south with custom recoveries like TWRP. There has been quite a few ups and downs (more downs than ups to be frank) and it has resulted in quite a patchy relationship. With some massive changes to the ramdisk, developing TWRP is now an extremely tough job. So all the devices that comes with Android 10 out of the box suffers from this ‘limitation’. Here is what the TWRP Team has to say in this regard:
A lot of components in AOSP recovery were moved into subfolders, which makes merging the latest changes into TWRP more time consuming. The ramdisk that we use for recovery is now handling part of normal boot in addition to recovery, so we’re not sure what the best way will be to go about replacing recovery without affecting the ability to boot up normally.
In the past, the executable binaries in the ramdisk were built as static binaries with no linked libraries. TWRP has almost always been built with separate linked libraries. The new dynamically linked stock ramdisk will make it harder for us to slip TWRP into the ramdisk. Normally TWRP leaves /system alone so that we can mount the system partition to its usual location of /system. If we leave things the way they are, mounting the system partition gets tricky.|
As a result, it becomes pretty obvious that in the absence of the TWRP Recovery, you are only left with one method to root your Pixel 4: using Magisk. And in this guide, we will be doing just that. So without further ado, let’s check out the steps.
Prerequisites
- Download and install the latest Magisk Manager APK file on your device: Magisk Manager
- The bootloader of your device should be unlocked. Have a look at our guide on how to do so.
- Although rooting is going to wipe your data, still, it is recommended to make a complete backup of all your data.
- Keep your device appropriately charged, at least to a minimum recommended level of 50%
- Install ADB and Fastboot Tool for entering Fastboot commands.
- Also, download and install the USB Drivers for your device. This helps in successfully connecting your device to the PC.
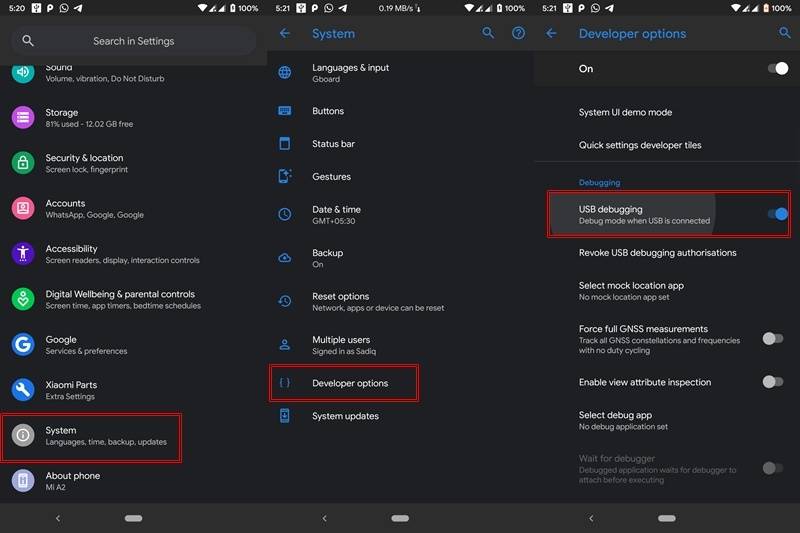
- Enable the ‘USB Debugging’ option. Go to ‘Settings’ -> ‘About Phone -> Tap on Build Number 7 times -> Go back to Settings -> Developer Options -> Toggle on the USB Debugging’ switch.
STEP 1: Get a Stock Boot.Img File
The first step in this regard requires you to have a stock boot.img file from your current ROM/firmware. For that, you could head over to your respective firmware download page and download the firmware file which is currently installed on your device. Then extract the firmware and copy the boot.img file from there. If you can’t find the stock boot.img file, let us know your device name and the firmware version in the comments, we will share the same on Google Drive.
STEP 2: Patch the Stock Boot.Img File
Now that you have the stock boot.img file, transfer it to your device. Then follow the below steps. Or if you are new to all this, we would highly recommend going through our article on the said topic: Patch Stock Boot Image via Magisk and Flash it using Fastboot (just the first half).
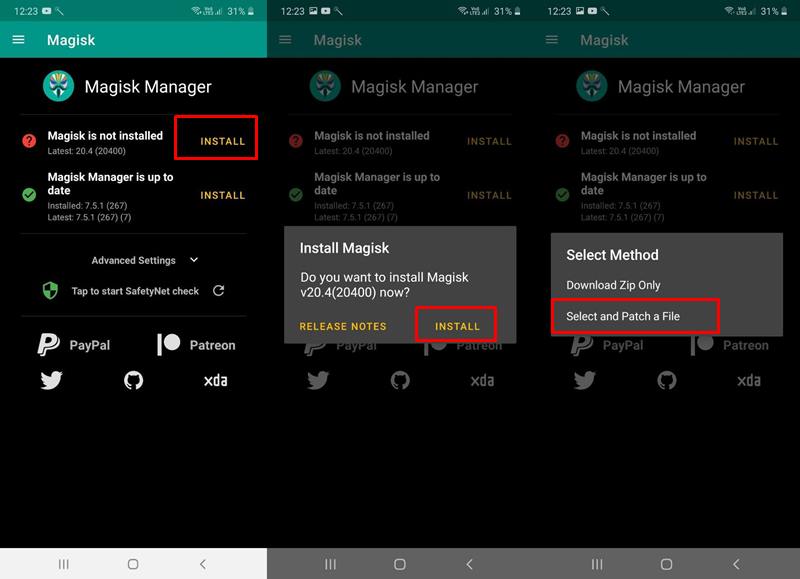
- Open the Magisk Manager app on your device.
- Tap on Install > Install > ‘Patch Boot Image File‘.
- Navigate to the folder where the stock boot.img file is present and then select it.
- Magisk will now begin patching the file. Once that is done, the file will be saved most probably in Internal Storage > Downloads folder.
STEP 3: Temporary Boot the Patched Boot Image File
Now we will temporarily boot this patched boot.img file. Follow the below steps in the same manner as mentioned:
- Connect your device to PC via USB Cable.
- Make sure you have installed the ADB and Fastboot Tool on your PC.
- Transfer this boot image file to the folder where ADB and Fastboot tools are installed, i.e inside the platform-tools folder.
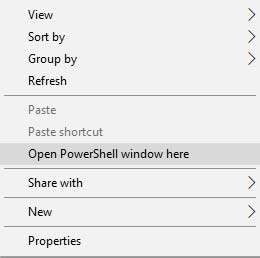
- Inside the same folder, while pressing the ‘Shift’ key, right-click in an empty area.
- Select ‘OpenPowerShell window here’.
- Or you could also type in cmd in the platform-tools folder’s address bar and hit Enter. This will open the Command Prompt.
- Type in the below code to check whether your device is successfully connected to PC:
adb devices
If you get an alpha-numeric code with ‘device’ written next to it, then you are good to go. Otherwise, check whether the correct USB drivers are installed or not. Also, make sure USB Debugging is enabled.
- Next, type in the below code to boot your device to fastboot mode:
adb reboot bootloader
- Now, type the following command to temporary boot your device with the patched boot image file:
fastboot boot patched-boot-filename.img
Replace the ‘patched-boot-filename’ with the actual name of the patched boot image.
After executing the above command, your device will reboot to Android System. Now you need to permanently install this patched boot file. Head over to the below section.
STEP 4: Permanently Install the Patched Boot Image File
- Open the Magisk Manager app on your Android device.
- Tap on the first ‘INSTALL‘ button (which is just next to the ‘Magisk’ status).
- In the ‘Install Magisk’ dialog box that appears, tap on ‘INSTALL‘.
- Under ‘Select Method’, select the ‘Direct Install (Recommended)‘ option.
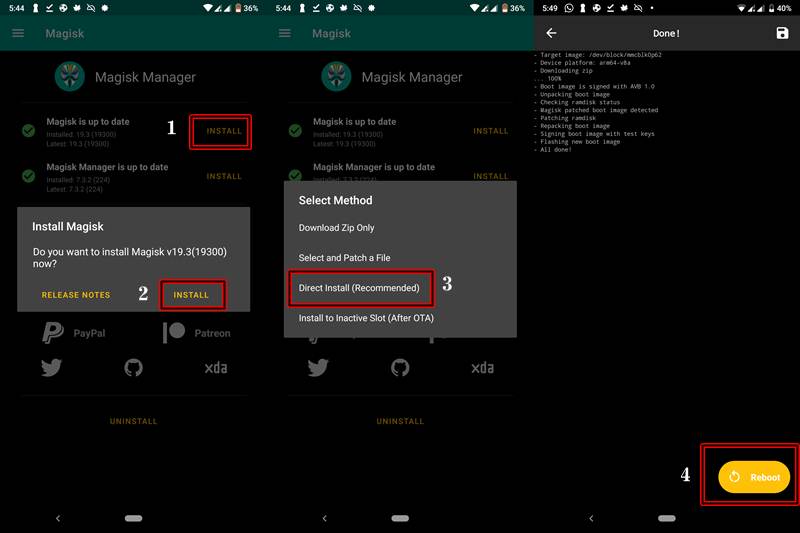
- Now Magisk will begin flashing the patched boot image on your device.
- Once complete, tap on the ‘Reboot‘ button situated at the bottom right corner. Once your device reboots, it will be successfully rooted.
Conclusion
So with this, we conclude the guide on how to root your Pixel 4 without TWRP Recovery. If you are stuck at any of the above steps, do drop in your queries in the comments below. Rounding off, here are some other rooting guides that you should check out: