In this tutorial, we will show you the steps to root Pixel 3a, Pixel 3a XL, Pixel 3, Pixel 3 XL running the latest Android 11, without using TWRP. To begin with, we would be using the latest Magisk Manager app v8 that has full support for Android 11. After this, we would patch the stock boot.img file via Magisk.and then flashing this patched boot image file via Fastboot commands. While Pixel devices aren’t really known for the hardware, yet when it comes to the software side, it manages to take all the praise. To begin with, you get the cleanest stock Android experience. Then add to the fact that these devices are slated to get the fastest Android upgrades, and one couldn’t have asked for more. [Update 1: Added a Fix for Android 11 Boot.img patch issues].
Well, even the Pixel 3A, to this date, is considered by many as the device with the best overall offering. Add to the fact that these devices have the best software on any Android smartphones, and it more brownie points to its name. Furthermore, you wouldn’t see the 48,64 or 108MP camera or quad rear camera setup in the Google devices. The reason is simple- megapixels aren’t the sole yardstick for measuring the camera quality. Even the 10-12MP camera of Pixel could easily outlast the 48 and 64MP cameras of other devices. However, all these are just the beginning.
You could add much more to your device if you step into the custom development. These include flashing custom ROMs, custom recoveries like TWRP or LineageOS recovery, or gaining system-level privileges. The latter, in simpler terms, is also known as rooting your device. And as opposed to the earlier notion, rooting is no longer limited to the tech geeks (refer to our survey for surprising results: Rooting Poll: Is it Worth the Risk? You Decide and let us know). So on that note, here are the detailed instructions steps to root Pixel 3a, Pixel 3a XL, Pixel 3, Pixel 3 XL running the latest Android 11, without using TWRP Recovery.
- [GUIDE] Flash ROMs/Magisk/TWRP/Kernels on A/B Partition Devices
- How to Flash Various Files in A/B Partition Devices
- Install Custom ROMs on any Android Device- Includes A/B Partition
- How to Fix FAILED (remote: unknown command) Error
Table of Contents
How to Root Pixel 3a, 3a XL, 3 & 3 XL running Android 11 without TWRP
Before we begin with the instructions steps, there are a few requirements that you need to meet. Please go through the prerequisites section and make sure you checkmark all the necessities. Droidwin and its members wouldn’t be held responsible in case of a thermonuclear war, your alarm doesn’t wake you up, or if anything happens to your device and data by performing the below steps.
Prerequisites
- First and foremost, you need to unlock the device’s bootloader. If you haven’t done, then refer to our detailed guide on How to Unlock Bootloader Of Google Pixel Devices
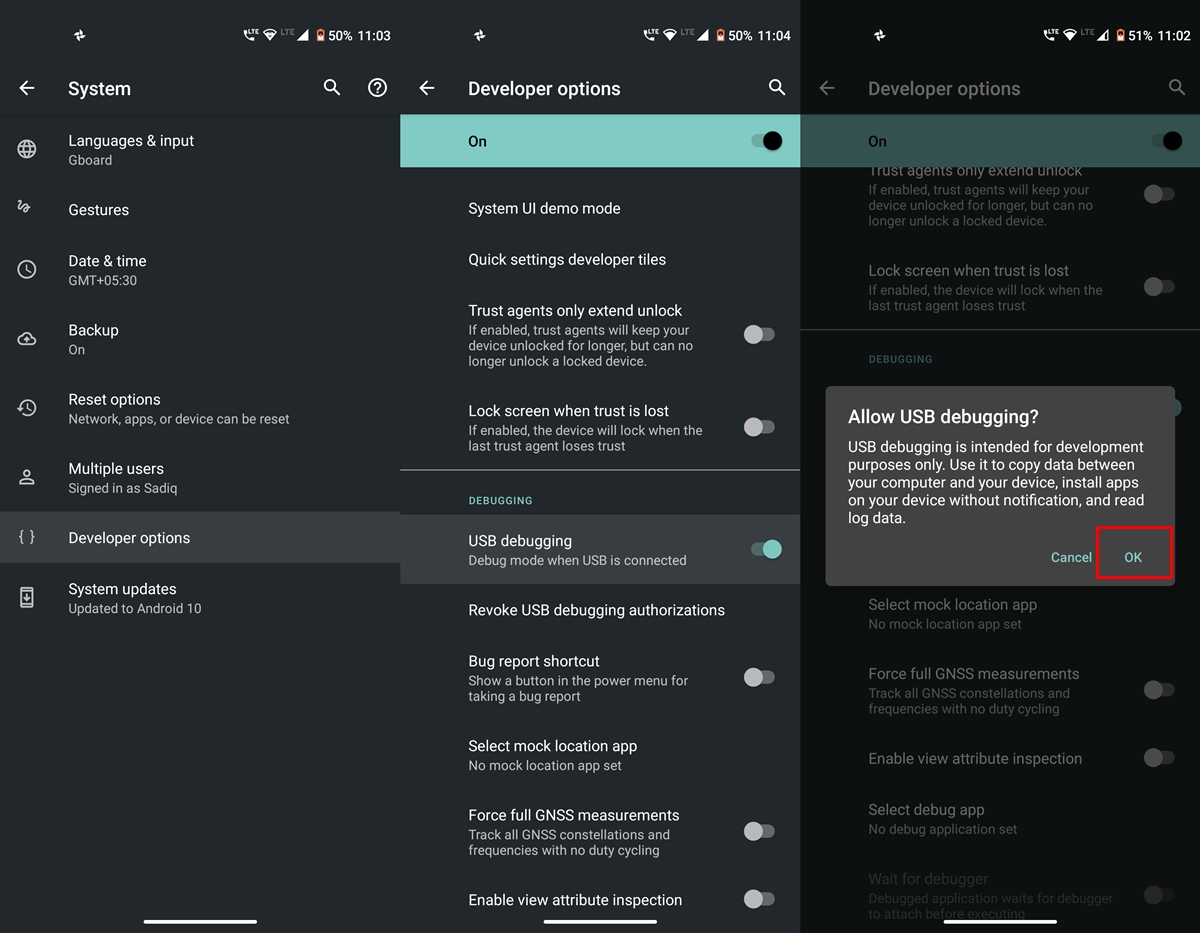
- Next up you will also have to enable USB Debugging. This will be needed to boot the device to Fastboot Mode. So head over to Settings > About Phone > Tap on Build Number 7 times > Go back to Settings > System > Advanced > Developer Options > Enable USB Debugging. [Don’t Miss: Enable USB Debugging on a Broken Android Device’s Screen? Here’s a Workaround].

- You will also have to install the Android SDK Platform Tools. This will provide the necessary ADB and Fastboot binaries.
- Finally, download the latest Magisk Manager v 8.0.2. You don’t need to download the Magisk ZIP File, only the Magisk Manager APK is required.
That’s it. These were all the required files. You may now proceed with the steps to root Pixel 3a, Pixel 3a XL, Pixel 3, Pixel 3 XL running the latest Android 11.
STEP 1: Extract Stock boot.img
To begin with, download the stock boot.img file corresponding to the firmware version installed on your Pixel device. For that, download the stock firmware for your Pixel device from Google’s website. If you are going to download the OTA package then upon extraction you will find the payload.bin file. In that case, refer to our guide on How to Extract payload.bin and get the stock boot image file.
![]()
On the other hand, if you download the factory image, then you will find a couple of files, including a zipped image file. You will have to decompress that file and there you will find the stock boot image file.
![]()
- How to Disable DM-Verity or Android Verified Boot without TWRP.
- Everything About Magisk- Manager, Modules and More
- Best Magisk Modules of 2020 [PART-1]
- Patch Stock Boot Image via Magisk and Flash it using Fastboot
STEP 2: Patch Stock Boot.img file
UPDATE 1: Quite a few Android 11 users are facing issues while patching the stock boot.img file via Magisk manager. Well, I have found the fix to this issue, please refer to our detailed guide on the same: Fix Magisk patched boot.img issue while Rooting Android 11. If you wish to save a click, then here’s the explanation in short: You have to install the Magisk Canary build instead of the stable and then change the update channel to Canary from within the app itself. Once you have done the said change, you may then proceed with the below steps to patch the stock boot image file using Magisk and flash it via Fastboot commands to root Pixel 3a, Pixel 3a XL, Pixel 3, Pixel 3 XL running Android 11.
- Launch the Magisk Manager app on your Pixel device.
- Then tap on the Install button situated next to Magisk.
- From the Method section, choose Select and Patch a file.

- Browse to the extracted boot.img file and select it.
- Then tap on the Let’s Go option situated at the top right.
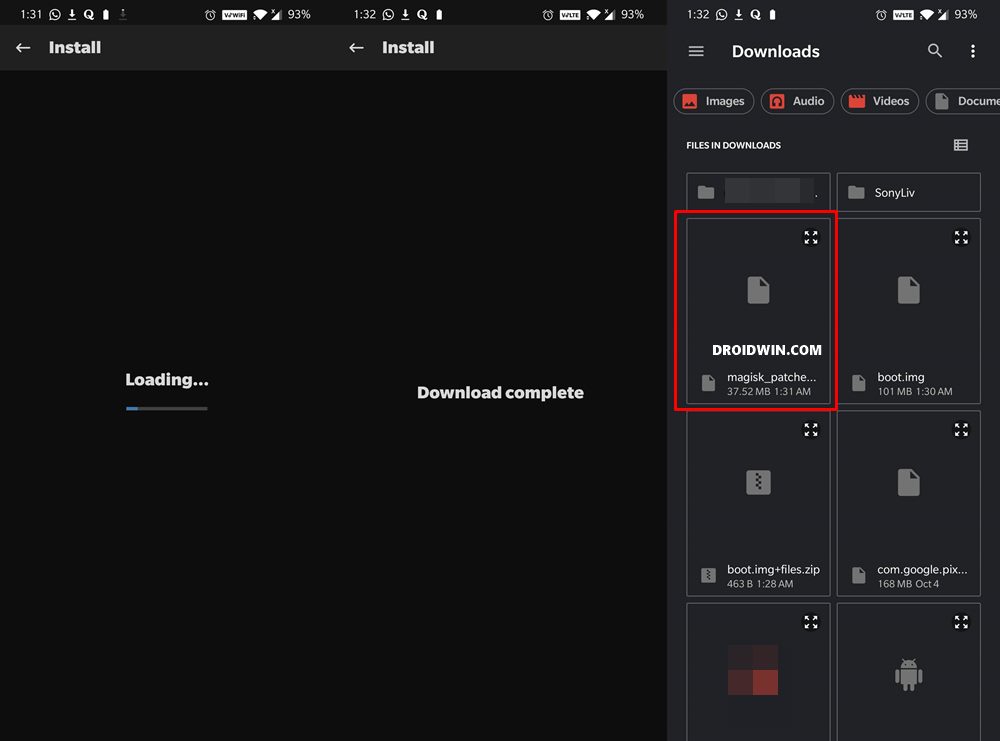
- Magisk will now load the boot.img file and will patch it accordingly. Once that is done, you would get the Download Complete message.

- The patched boot image file will be saved in Internal Storage > Downloads. The name of the file will be magisk_patched.img
STEP 3: Flash Patched Boot.img file via Fastboot
In this third and final section to root Pixel 3a, Pixel 3a XL, Pixel 3, Pixel 3 XL running Android 11, we will be flashing the patched boot.img via Fastboot Commands. Follow along.
- First off, move the magisk_patched.img file to the platform-tools folder on your PC. This is the folder where you have installed the Android SDK.
- Now connect your device to PC via USB cable. Make sure you have enabled USB Debugging.
- Head over to the platform-tools folder, type in CMD in the address bar, and hit Enter. This will launch the Command Prompt.

- Next up, execute the below command to boot your device to Fastboot Mode:
adb reboot bootloader
- It’s now time to flash the patched boot.img file onto your Pixel device. Type in the below command and hit Enter
fastboot flash boot magisk_patched.img
- Finally, you could now boot your device to the OS. Use the below command for that:
fastboot reboot
That’s it. With this, we conclude the guide on how to root Pixel 3a, Pixel 3a XL, Pixel 3, Pixel 3 XL, running the latest Android 11, without using TWRP. If you have any queries, do let us know in the comments section below We will get back to you with a solution as soon as possible.


John
Hi,
I following above steps and rooted my phone. I use most root checker app confirmed it’s rooted.
In magisk settings I have superuser access “Apps and ADB”
But I can not run adb root command and can not remount the system folder to r/w. Any step I’m missing?
Hey
Hi, will this method factory reset internal storage?
Peradaban
Hi Hassan i have rooted using abovr method and it worked however i cant access any modules.
When i tried to search a modules nothing show up.
Joseph
Any idea on how how to overcome this error?
fastboot: error: boot partition is smaller than boot image
The patched img file is the same size as the original image file I pulled from the zip.
corby moore
but when i took the boot.img from 7zip and flashed it to my phone is was successful, does that mean it rooted or did i just do something wrong?
Sadique Hassan
Hi Corby, did you patch it via magisk and then flashed it, or simply flashed the stock boot.img file. If the latter is the case, then you have just flashed the stock boot.img to your device that was already installed. Unfortunately, your device wouldn’t be rooted in such a case. You will have to patch it via Magisk and then flash the resultant magisk_patched boot.img file
Silent
device pulls up in front of all apps, “sim manager stopped working” how do I fix this? didn’t happen until after I used this method.
image-sargo-rq1a.210105.002
Silent
also, its an unlocked pixel 3a
Sadique Hassan
Hi Silent. Just to double-check, have you patched and flashed the stock boot.img that corresponds to the current firmware installed on your device, right?
swxtr
Hi thanks. But My pixel 3 XL stuck on fastboot mode 🙁 after the instructions for rooting it.. then I had to flashall. I can not root. it.
Sadique Hassan
Hi mate, could you please let me know at which step you got stuck? Furthermore, please verify that the stock boot.img that you are using is having the same build number that is currently installed on your device?