In this guide, we will show you the steps to root your Nokia device using the NB0/payload.bin firmware file and Magisk. The OEM has made it extremely difficult to step into the custom development by blocking the entry point of this journey. In other words, it isn’t possible any longer to unlock the device’s bootloader the official way. However, there do exist a couple of unofficial workarounds that seem to have spelled out success for the users.
Once they do so, their next preferred course of action is to obtain administrative privileges, or in other words, root their device. For that, there are two different approaches- either via TWRP or by using the boot.img file. And it is the latter one that is mostly preferred by the users. In this regard, your first course of action is to extract the stock firmware. However, this is proving to be quite a challenging task in itself.
For the unaware, Nokia packs the firmware under three formats- ZIP, payload.bin, and NB0. While the ZIP file is relatively easy to deal with, it’s the latter two that are proving to be a cause of concern for some. If you are also on the same page, then this guide shall help you out. In this tutorial, we will show you the steps to extract the NB0 / payload,bin firmware, get the stock boot.img and then root your Nokia device via Magisk. Follow along.
Table of Contents
How to Root Nokia using Magisk and NB0/Payload.bin
The below instructions are listed under separate sections for ease of understanding. Make sure to follow in the exact same sequence as mentioned. Droidwin and its members wouldn’t be held responsible in case of a thermonuclear war, your alarm doesn’t wake you up, or if anything happens to your device and data by performing the below steps.
STEP 1: Install Android SDK

To begin with, install the Android SDK Platform Tools on your PC. This is the official ADB and Fastboot binary provided by Google and is the only recommended one. So download it and then extract it to any convenient location on your PC. Doing so will give you the platform-tools folder, which will be used throughout this guide.
STEP 2: Enable USB Debugging and OEM Unlocking
Next up, you will have to enable USB Debugging and OEM Unlocking on your device. The former will make your device recognizable by the PC in ADB mode. This will then allow you to boot your device to Fastboot Mode. On the other hand, OEM Unlocking is required to carry out the bootloader unlocking process.
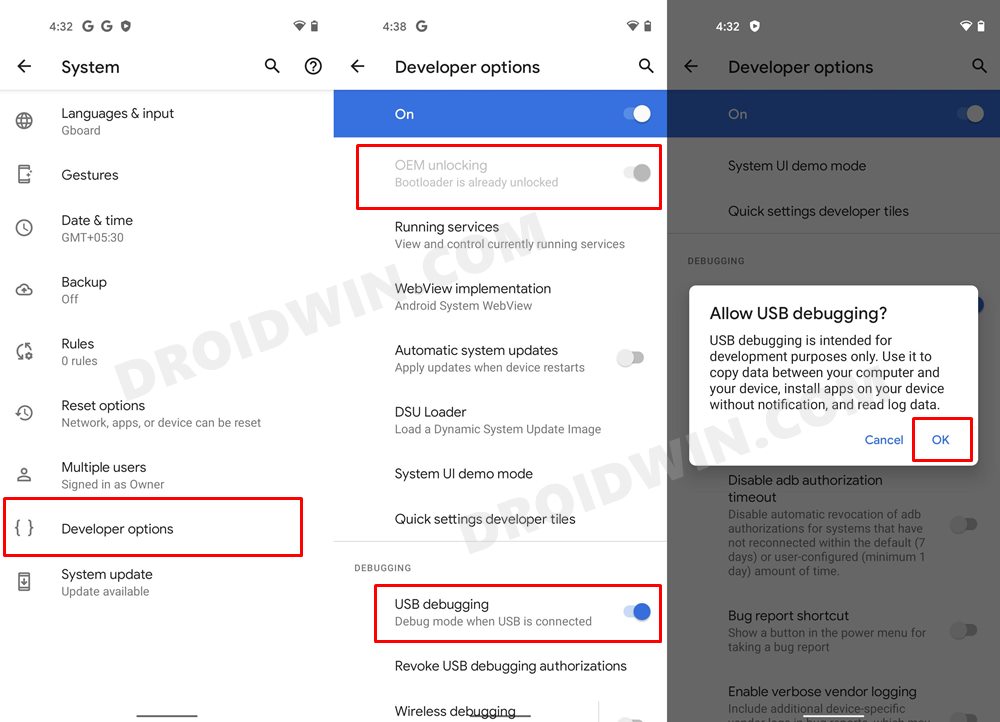
So head over to Settings > About Phone > Tap on Build Number 7 times > Go back to Settings > System > Developer Options > Enable USB Debugging and OEM Unlocking.
STEP 3: Unlock Bootloader on Nokia
While the OEM did its best to prevent us from unlocking the device’s bootloader but the developers, as usual, were a step ahead. They did manage to find a rather ‘official’ (and free) workaround through which you could easily carry out this task. So refer to our bootloader unlocking guides with respect to your device from below. Do keep in mind that this process will wipe off all the data from your device, so please take a backup beforehand.
- How to Unlock the Bootloader on Nokia 6.2
- How to Unlock the Bootloader on Nokia 7.2
- Unlock Bootloader Nokia 8: Downgrade to Android Oreo 8.1

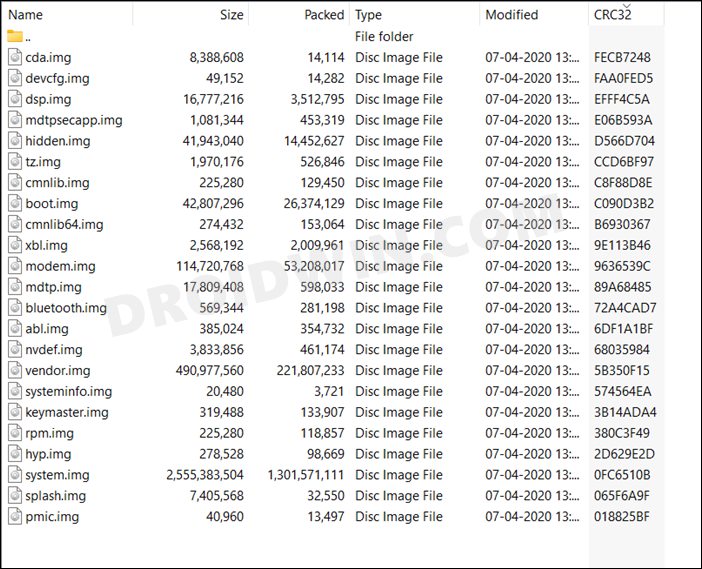
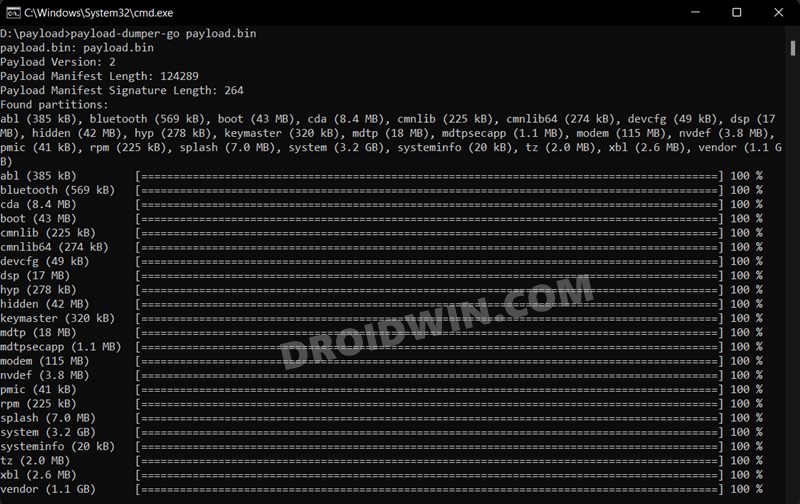
STEP 4: Extract Nokia NB0/Payload.bin Firmware
- To begin with, download the stock firmware for your Nokia device from a trustworthy site.
- Then extract it to any convenient location on your PC. Now check out its contents:
- If it is in ZIP, then just extract it via WinZIP/WinRAR and get the stock boot.img file.

- On the other hand, if it is in payload.bin format, then refer to our guide on How to Extract Payload.bin Firmware.
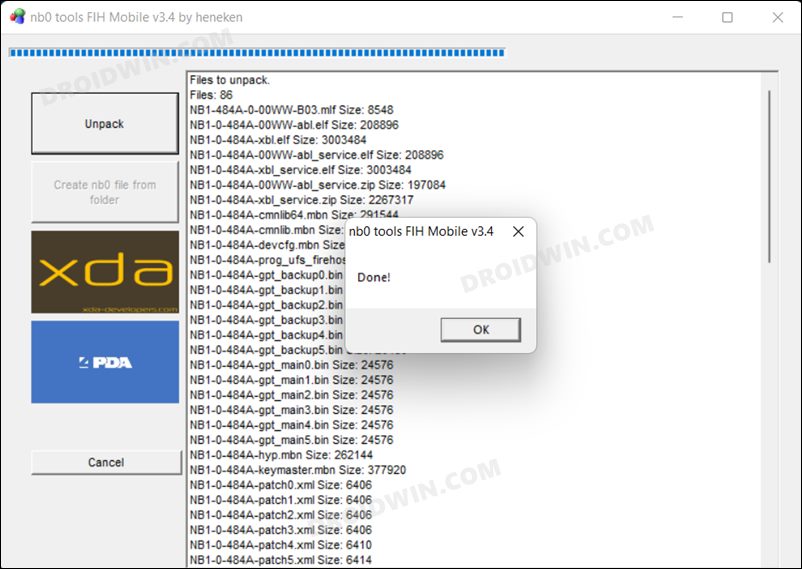
- Likewise, if the firmware is in NB0 format, then check out our guide on How to Extract Nokia NB0 Firmware File.
- Once you extracted the firmware, you will get the boot.img file, apart from various other IMG partition files.
- So transfer this boot.img file to your device. We will use this file to root your Nokia device via Magisk.
STEP 5: Patch Nokia Stock Boot.img via Magisk
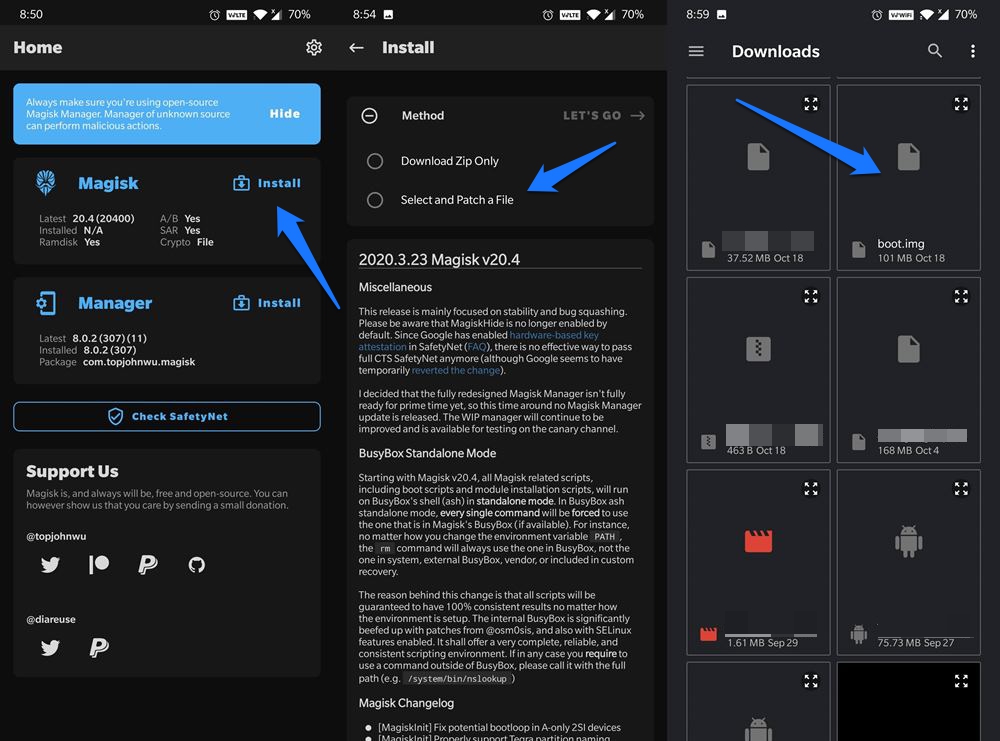
- First off, install the Magisk App on your device.
- Then tap on the Install button situated next to Magisk.
- From the Method section, choose Select and Patch a file.
- Browse to the extracted boot.img file and select it.
- Then tap on the Let’s Go option situated at the top right.
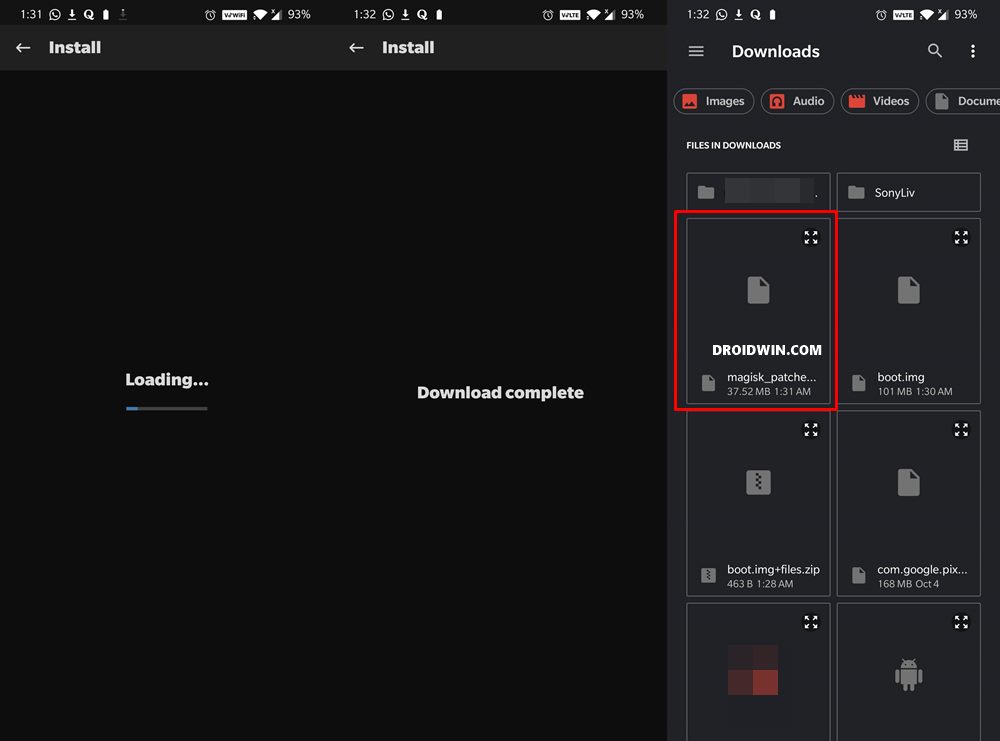
- Magisk will now load the boot.img file and will patch it accordingly.
- Once that is done, you would get the Download Complete message.
- The patched boot image file will be saved in Internal Storage > Downloads. Make sure to rename it to magisk_patched.img, if that is already not the case.
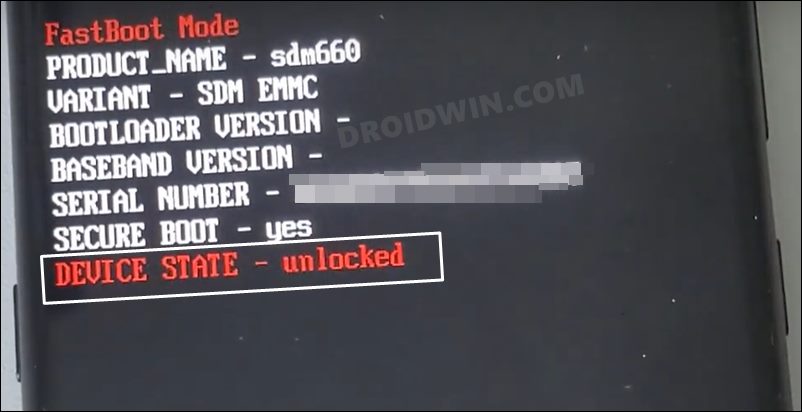
STEP 6: Boot Nokia to Fastboot Mode
- Connect your device to the PC via USB cable. Make sure USB Debugging is enabled.
- Then head over to the platform-tools folder, type in CMD in the address bar, and hit Enter. This will launch the Command Prompt.
- Type in the following command in the CMD window to boot your device to Fastboot Mode
adb reboot bootloader

STEP 7: Boot Nokia via Patched Boot.img
Rather than directly flashing the patched boot.img, we will first boot your device via this file. This will give you the temporary root. Then if everything is working well and good in this environment, you could proceed ahead with the steps to permanently root your Nokia device via Magisk.
- To begin with, transfer the magisk_patched.img file to the platform-tools folder.
- Then type in the below command in the CMD window (that is opened inside the platform-tools folder) to boot your device via the patched boot.img file
fastboot boot magisk_patched.img
- Your device will now boot to the OS with a temporary root. If everything’s fine, then move over to the next step to achieve permanent root.
On the other hand, if your device isn’t booting, then do a restart. Doing so will replace the patched boot.img with the stock one and your device will be booted to the OS.
However, if you are still stuck in Fastboot, then transfer the stock boot.img to the platform-tools folder and use the fastboot flash boot boot.img command to manually flash the file. This shall rectify the issue.
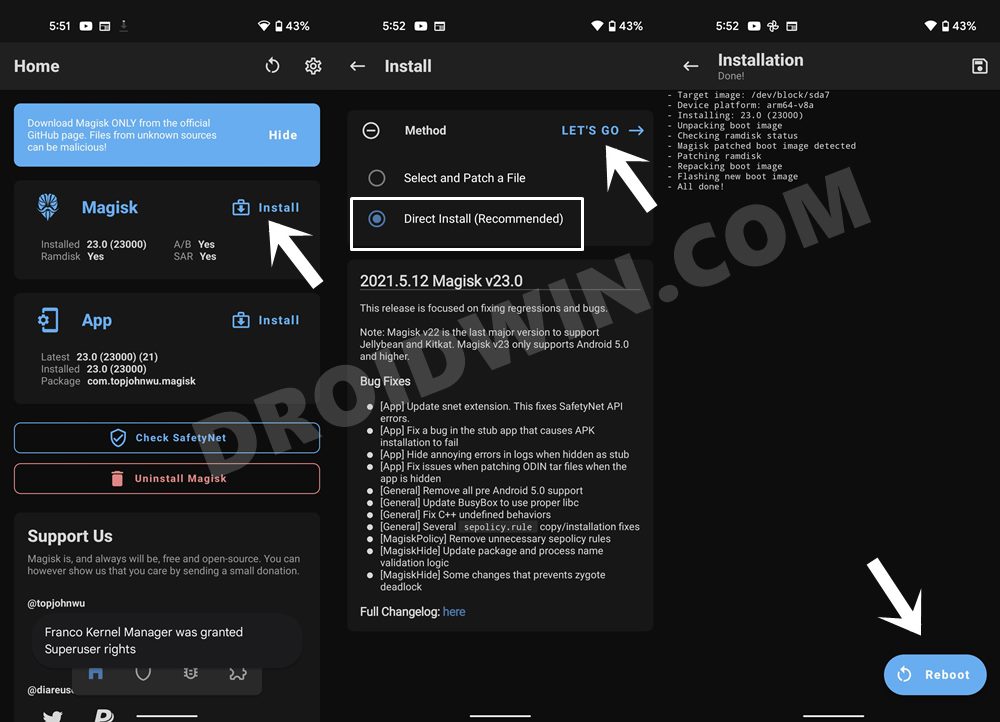
STEP 8: Root Nokia via Magisk Patched Boot.img
- To begin with, launch the Magisk Manager App.
- Then tap on Install > Direct Install and tap Let’s Go situated at the top-right.
- Once done, hit the Reboot button situated at the bottom right.
- That’s it, your device will now boot to the rooted OS.
That’s it. These were the steps to root your Nokia device via Magisk. If you have any queries concerning the aforementioned steps, do let us know in the comments. We will get back to you with a solution at the earliest.