In this tutorial, we will show you the steps to replace LineageOS Recovery with TWRP. Furthermore, we will also list out complete instructions to permanently install TWRP on top of LineageOS Recovery. You may proceed with any of the two that meet your requirements. When it comes to Custom ROMs, CyanogenMod was right there at the top. Well, even the OnePlus One and a few Micromax devices had adopted it as their primary OS.
While it is no longer available in its original form, yet the LineageOS seems to have taken the lineage in the right direction. These ROMs are never known to offer a plethora of customizations. Rather it stays close to AOSP, providing only the important tweaks. All in all, it maintains a rich balance between features and stability. However, as of late, when you install this ROM onto your device, chances are it would install its own LineageOS recovery as well.
This is something that I have never been a fan of. Not that the recovery isn’t good, but the fact that they don’t take the user consent and end up force-installing the recovery is something that is a big no from the tech community as a whole. Since most of us are used to TWRP Recovery by now and are fully aware of its functionality, there is no reason as such why one would go for LineageOS Recovery. So if you echo this thought process as well, then here are the required instructions to replace LineageOS Recovery with TWRP.
- How to Fix TWRP Error 70 [With Screenshots]
- How to Fix TWRP Error 20 GApps after flashing LineageOS
- Fix TWRP Error 7 (While Flashing Custom ROM via TWRP)
- How to Boot into Recovery (TWRP/Stock) from Fastboot Mode
Table of Contents
How to Boot to TWRP Recovery from LineageOS Recovery
Nandroid Backups, wiping device partitions, installing ZIPs, and IMG files, using MTP functionality, switching slots are just some of the noteworthy features that TWRP Recovery beholds. Plus the fact that it provides a simple and easy to navigate user interface, it hs become everyone’s preferred custom recovery. Infact its support for touch-based functionality is one major reason why CWM Recovery had to go into oblivion.
So it doesn’t make any much sense as such in switching over to another recovery, atleast in my case. But if you have installed the LineageOS Custom ROM, then you might not have much say in this decision making. As already mentioned, installing this ROM straight-away installs the Recovery as well. However, there does exist a handy workaround through which you could install or boot to TWRP Recovery right from the LineageOS Recovery, in other words, replace the LineageOS Recovery with TWRP. Here’s how this could be achieved.
Prerequisites
- Since you already have LineageOS installed, so it’s safe to assume that your device’s bootloader is unlocked.
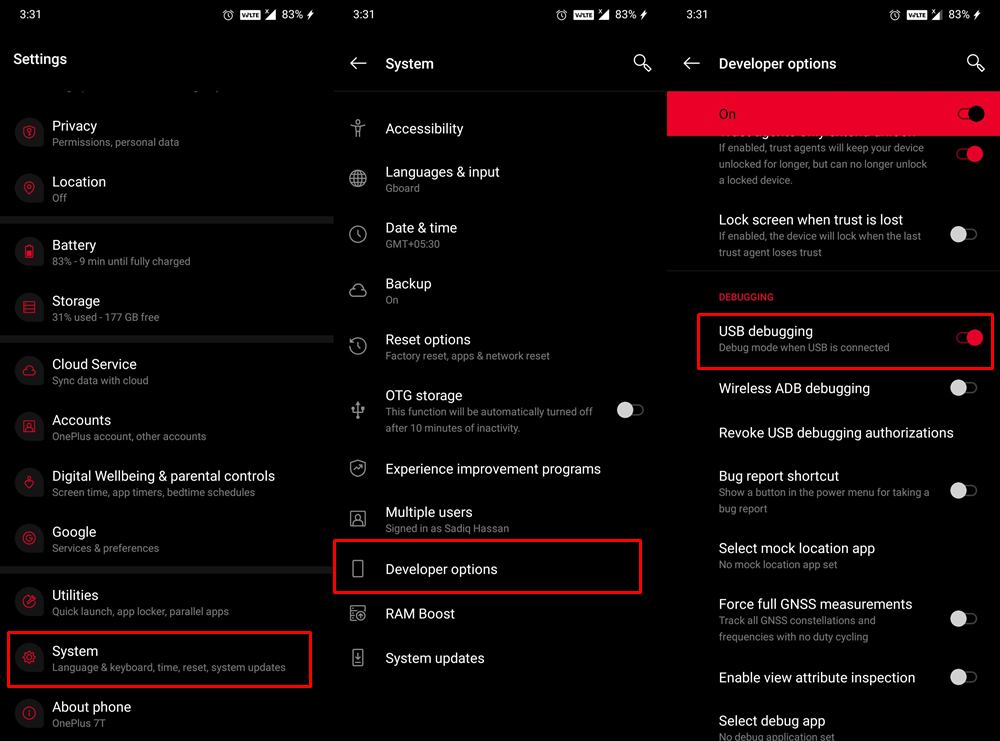
- You should also enable USB Debugging on your device. This would be needed so that your device gets recognized by your PC in ADB Mode. head over to Settings > About Phone > Tap on Build Number 7 times > Go back to Settings > System > Advanced > Developer Options > Enable USB Debugging. [Don’t Miss: Enable USB Debugging on a Broken Android Device’s Screen? Here’s a Workaround].

- Next up, download and install the Android SDK Platform Tools on your PC. This will give you the required ADB and Fastboot binary files.
- Finally, download the TWRP Recovery for your device. You could download the official build from the TWRP website. If it isn’t available then search for an unofficial one at XDA Forums.
That’s it. These were the requirements. You may now proceed with the steps to replace LineageOS Recovery with TWRP.
- How to Update Magisk ZIP and Magisk Manager (without TWRP)
- Disable DM-Verity or Android Verified Boot without TWRP
- Fix Magisk Module Bootloop without TWRP Recovery
- How to Root Android Devices Without TWRP Recovery
STEP 1: Placing Files in the Right Directory
To begin with, transfer the TWRP IMG file to the platform-tools folder. Furthermore, rename this IMG file to twrp, hence the complete name will be twrp.img. Likewise, if your device has a TWRP ZIP file as well, you should transfer it to your device’s internal storage. However, if there is no TWRP ZIP file for your device, then transfer the TWRP IMG file itself to your device. When that’s done, it’s now time to install or boot to TWRP from LineageOS Recovery.
STEP 2: Replace LineageOS Recovery with TWRP
- Connect your device to PC via USB cable. Make sure USB Debugging is enabled.
- Now head over to the platform-tools folder, type in CMD in the address bar, and hit Enter. This will launch the Command Prompt window.
- Type in the below command to boot your device to Fastboot mode:
adb reboot bootloader
- Now execute the below command to boot your device to TWRP Recovery (make sure that you have renamed the recovery to twrp)[if you get any error then please refer to FAQ].
fastboot boot twrp.img
- Your device will now be booted to TWRP. However, it is just a temporary installation. For the permanent installation, there are two routes forward, one for the users who have the TWRP ZIP file and the second one for those that don’t have the TWRP ZIP.
- If you have the TWRP ZIP file, then head over to the Install section of TWRP, select the TWRP ZIP file and perform a right swipe to flash it.
- On the other hand, if you don’t have a TWRP ZIP, but only the TWRP IMG file, then the steps are somewhat different. Hence we would request you to refer to our detailed guide on How to Permanently Install TWRP without TWRP ZIP File (only using TWRP.img file).
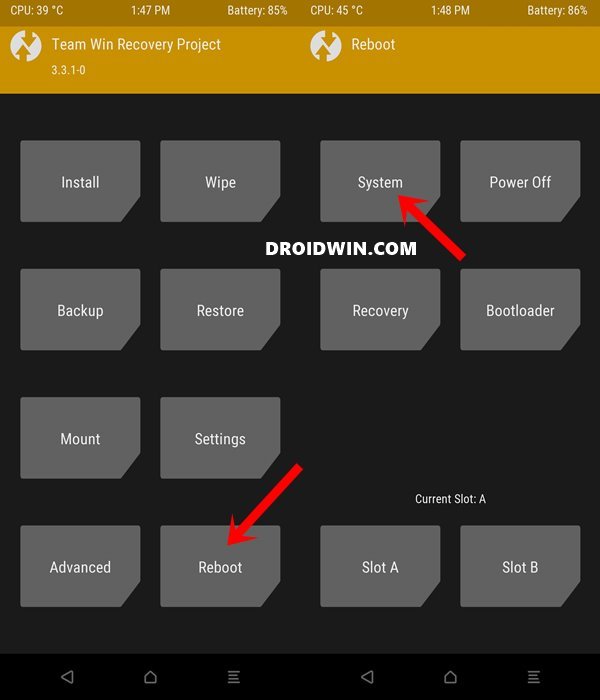
- Once you have permanently installed TWRP, it’s time to reboot your device. For that, go to the Reboot section of TWRP and select System.


That’s it. These were the steps to replace LineageOS recovery with TWRP. If you have any queries, do let us know in the comments section below.
FAQ: Fastboot Boot Command Doesn’t Work
If the above command doesn’t boot the recovery for you, then your device might be having a standalone recovery partition and hence you could directly flash the TWRP to the recovery partition via the below command:
fastboot flash recovery twrp.img
Furthermore, here are some guides that might help you out in this regard:


adsfasf
I follow your instruction then I can’t boot to system. It would boot to TWRP recovery only. Until I install boot.img to both AB slot as this article.
https://xdaforums.com/t/after-flashed-twrp-cant-boot-to-system-it-boot-to-twrp.4611091/
If I flash TWRP, I can’t boot to system again. But if I only install boot.img, then the recovery is still lineageOS recovery😅 How to solve this?
psz
I installed LineageOs with MicroG and when I follow your process I do boot into Recovery with TWRP, however my password to decrypt no longer works and all I get when I look for my device files is all gibberish. I’ve gone back to my devices stock ROM ( Oxygen) and then my password works in TWRP. I then re-flashed LineageOs and I am still having the password issue upon booting into recovery with TWRP. Any suggestions?
Bendy
ps. I have a technical question. Why does the fastboot flash recovery instruction fail to install the twrp recovery?!? I am certain that this was how I permanently installed it originally. Has the Lineage Recovery somehow managed to block it from being replaced via fastboot?
Bendy
Hello. I just installed Lineage OS 18.1 on my old Nexus 7 and found I could not fastboot flash recovery to twrp afterwards. I did a google and found this article.
Sadly, it did not work, as I only have an IMG file and TWRP for Nexus 7 does not support the features necessary to flash the IMG file permanently.
Fortunately I did find a way, which I will share here, and perhaps you can update your article with this method.
(1) Root Device with Majisk
(2) Install Official TWRP App
(3) Use it to Flash the IMG file to the Recovery partition
This successfully got rid of the Lineage Recovery which means I can enjoy the backup features of TWRP again. Sadly, I imagine the next time I install a Lineage OS upgrade, it will undo all my hard work. I really don’t appreciate them doing this, it should be up to the user to decide.
Cheers
Lucas
instead with
fastboot boot twrp.img
go to
fastboot flash boot twrp.img
mi a2 lite
Hello! There is a lot more easy way to do this. I just downloaded the official twrp installer. You can install it from the lineageOS recovery and it replaces himself.
Bendy
Nice. I should have read this before writing my own post lol. Still, I did point out you need root for this method..
mohsin
how
Anwarul
umm where to get the zip file?
amin ghasemi esfahlan
step 4
don’t work
it says
Sadique Hassan
Hi Amin, did the fastboot boot twrp.img command didn’t work for you? could you let me know the error message as well as the device name? Maybe your device has a recovery partition and you could directly flash TWRP, instead of booting it first. All these are speculations as of now, let me know the error first and then I’ll confirm it.
mohsin
unknown command fastboot
redmi 6 pro
Jyotpal
Hi Sadique,
I recently installed lineage os 18 for POCO F1 and it seems to be running great. But I want to install a different OS now. I had no idea that installing lineage os would automatically replace my twrp with lineage os recovery which sucks.
Now I cannot install twrp recovery and remove lineage os. I followed all the steps and have enabled usb debugging as well. When I give an ADB command to boot into bootloader it does. But then when I want to flash the twrp recovery it gives the following error.
FAILED (Write to device failed (unknown error))
fastboot: error: command failed
Any guidance would be appreciated
Sadique Hassan
Hi Jyotpal, it seems Poco F1 does have a standalone recovery partition, and hence you could directly flash TWRP to the recovery partition via fastboot flash recovery twrp.img. [However, Do so at your own risk and please let us know the results as well if you wish].
Nitanshu Idnani
I also have a similar problem. However I tried both commands (flash and boot). It didn’t work. It says FAILED ( Write to device failed ( Too many links)).
Tried different generations of usb ports and different versions of twrp but it never works.
Any help would be highly appreciated.