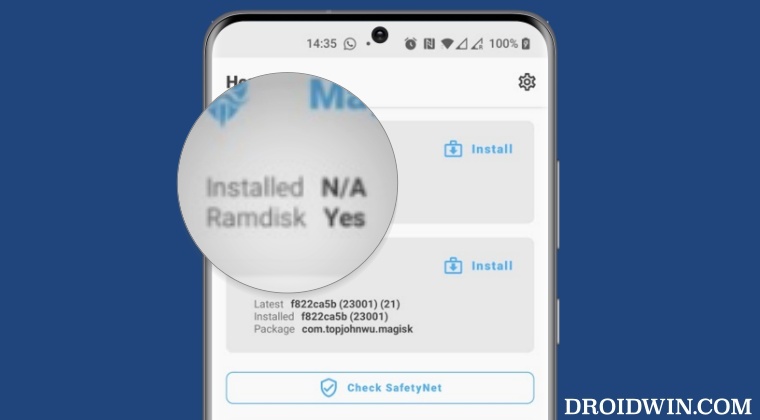
In this guide, we will show you a couple of methods to fix the issue of Magisk displaying Installed N/A. When it comes to gaining administrative privileges via root, then Magisk is the go-to choice or rather the only choice that tech enthusiasts have at their disposal. With that said, the entire process of obtaining root is pretty straightforward but you might occasionally hit a few roadblocks as well. One among them is the issue wherein Magisk tends to display the Installed N/A.
In this regard, some have even said that their device does stands rooted, but Magisk still shows that prompt. Whereas others have said that the root is only valid for already installed apps, they cannot grant root permission to new apps or flash new modules. For some, the issue is all the more concerning as they aren’t able to root their device in the first place. If you are also getting bugged by any of these issues, then this guide will help you out. Follow along for the fixes.
Table of Contents
Fix Magisk showing as Installed N/A
It is recommended that you try out each of the below-mentioned workarounds and then see which one spells out success. So with that in mind, let’s get started. Droidwin and its members wouldn’t be held responsible in case of a thermonuclear war, your alarm doesn’t wake you up, or if anything happens to your device and data by performing the below steps.
FIX 1: Reverify the Root Process
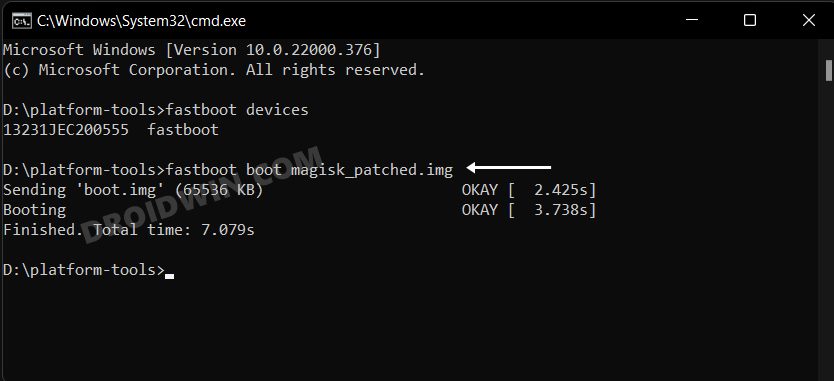
First off, make sure that you have carried out the rooting process in the correct manner. For that, do check out our detailed guide on How to Root Android 13 via Magisk Patched Init_Boot/Boot. In short, here’s what you need to do:
- Extract stock boot.img from the same firmware version which is installed on your device.
- Then patch it via Magisk. After that, boot your device using this patched boot.img file:
fastboot boot magisk_patched_boot.img

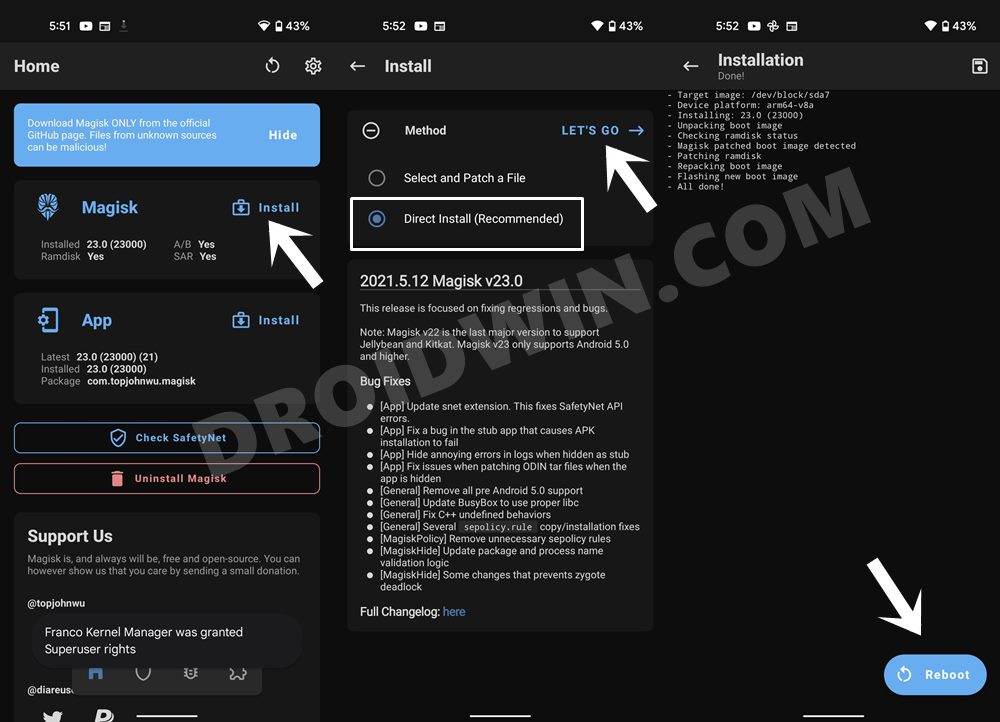
- Now launch Magisk, tap on Install next to Magisk, and choose Direct Install.
- Once done, hit Reboot. Check if it fixes the issue of magisk showing Installed N/A.
FIX 2: Recreate the Magisk Database
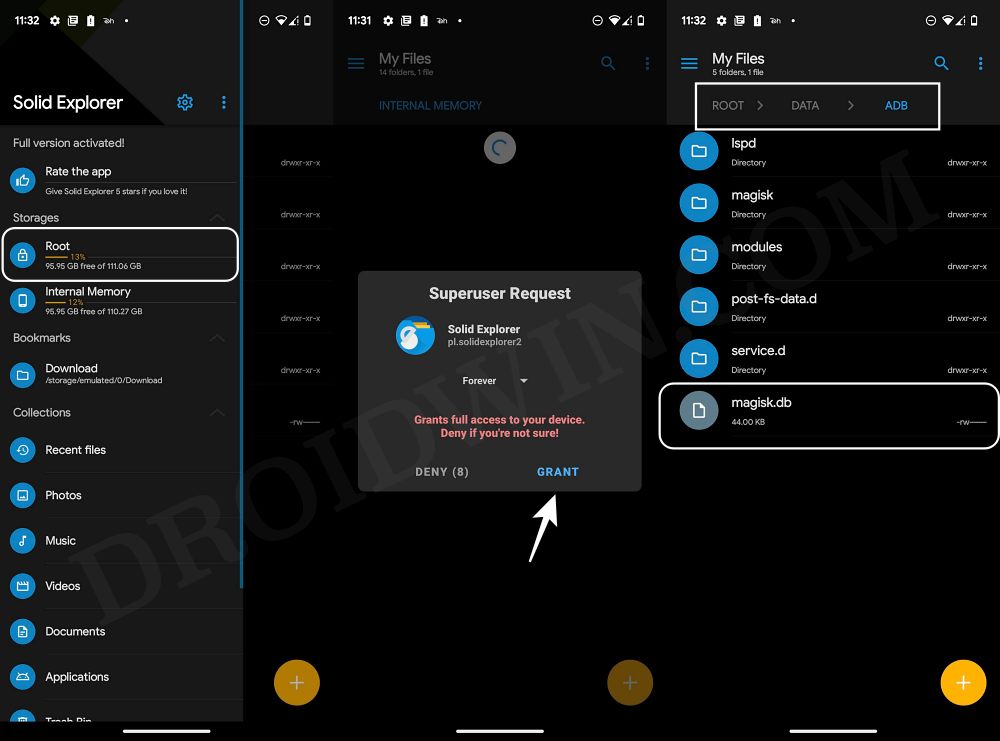
- Download and install a root-supported File Explorer such as Solid Explorer.
- Then launch it, tap on the hamburger menu, and select the Root directory.
- Now tap Grant in the Magisk prompt that appears. Then go to the below directory:
/data/adb/magisk.db
- Then rename the magisk.db file to something else [don’t delete it as it will act as a backup]
- Now restart your device and launch Magisk. Then carry out the rest of the rooting step.
- Check if it fixes the issue of magisk showing Installed N/A.
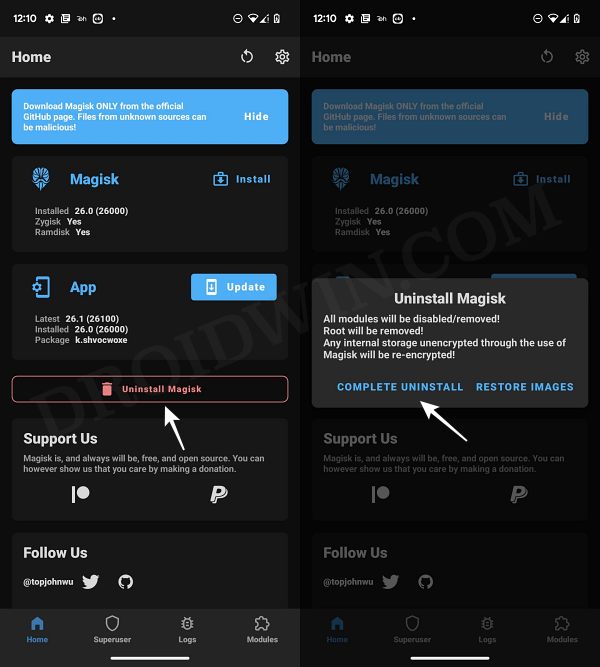
FIX 3: Restart the Rooting Process
- Disable and remove all the Magisk Modules and also unhide Magisk, if you had earlier hidden it.
- Then tap on Uninstall > Complete Uninstall and wait for the process to complete.
- Once done, your device will undergo a reboot. Once that happens, retry rooting your device and check out the results.
That’s it. These were the three different methods that should help you fix the issue of Magisk displaying Installed N/A. If you have any queries concerning the aforementioned steps, do let us know in the comments. We will get back to you with a solution at the earliest.


Daniel
Hello,
I want to root my Mi Mix Fold 3. By the way, this is the first time I am trying to do this root issue.
I do the following in steps:
1. Install Magisk from Github on the phone.
2. Download ROM for Mix Fold 3 MIUI 14.1.9 on the computer and send the boot file inside the folder to the phone.
3. Open Magisk from the phone, tap the “Install” link in the Magisk section, select “Select and Patch a File”, select the boot file and click “Let’s Go”.
4. Move the created Patch into the “Minimal ADB and Fastboot” folder installed on the computer.
5. From “Minimal ADB and Fastboot”, type the command “fastboot flash boot magisk_patched-26300_VgY42.img” and move the file to the phone.
6. Reboot the phone and open Magisk.
At this point the Magisk section says “Installed N/A”. And the Superuser and Modules tabs are not active.
I need your valuable experience on how to overcome this problem. I have attached the screenshot, you can also send an e-mail to [email protected] for a solution to the problem.
Thank you very much in advance.