In this guide, we will show you the steps to install TWRP Recovery and then root the Samsung Galaxy S20, S20+, S20 Ultra devices. The latest flagships from Samsung have already created quite a buzz in the smartphone industry. Having the top-end specs accompanied by the exceptional build quality, there’s a truckload of features that deserves your attention. Likewise, there is something for the tech enthusiasts as well.
The device has now been blessed with the TWRP custom recovery as well. This straightaway translates to your ability to flash tons of custom binaries, ROMs, and mods. Along the same lines, you could also gain access to the system partition and administrative level access as well. Both of these are possible by rooting your device via Magisk. Once you do so, you could flash Substratum Themes, Magisk Modules, Xposed Frameworks, and other such tweaks.
So with that in mind, we will start off with this guide by unlocking the device’s bootloader. After this, we will disable the Android Verified Boot on your device. When that is done, TWRP will then be flashed onto your device via Odin. Following this, the device’s data partition will be decrypted. Finally, we will be flashing the Magisk ZIP Installer via TWRP to root your device. So without further ado, let’s start off with the guide to install TWRP Recovery and root Samsung Galaxy S20, S20+, S20 Ultra.
- How to Install Android 11 (OneUI 3.0) on any Samsung Phone via Odin
- Downgrade Samsung from Android 11 to Android 10 (OneUI 3.0 to 2.0/2.5)
- How to Root any Samsung device via Magisk and Odin
- How to Patch Samsung AP Firmware via Magisk
Table of Contents
How to Install TWRP and Root Samsung Galaxy S20, S20+, S20 Ultra
We have listed out the entire instructions into separate sections for ease of understanding. Follow along in the exact same sequence as mentioned. Do keep in mind that the below process will wipe off all the data on your device, so make sure to have a backup beforehand.
Likewise, flashing custom binaries will trip the Knox Counter. As a result, apps such as Samsung Pay that are dependent on it might no longer function. Droidwin and its members wouldn’t be held responsible in case of a thermonuclear war, your alarm doesn’t wake you up, or if anything happens to your device and data by performing the below steps.
STEP 1: The Prerequisites
First and foremost, there are a few files that we would be needing to install TWRP Recovery and root Samsung Galaxy S20, S20+, S20 Ultra. Here are all the files along with their usage instructions:
- VBMeta Disabler: Used to disable the verification of the Android Verified Boot (AVB) Metadata Image. Download: vbmeta_disabled.tar. [Credits: XDA Recognized Developer jesec]
- Samsung MultiDisabler: It is used to “semi-permanently disable a number of device protection features and services that become problematic on a rooted device”. Download: multidisabler-samsung-3.1.zip. [Credits: XDA Senior Member ianmacd].
- Odin Tool: This tool is used to flash files to their respective partitions on a Samsung device. As for this guide, it will be used to flash the Vbmeta Disabler TAR file and TWRP TAR file. Download: Odin3-v3.14.4 .zip
- Magisk ZIP: The Magisk ZIP Installer will be flashed via TWRP to root your device. Download: Magisk_v21.4.zip
- Android SDK Platform Tools: This is the official tool from Google that provides all the necessary ADB and Fastboot binaries. So download and extract it to any convenient location on your PC. Download: Android SDK Platform Tools
That’s it. These were the required files. Let’s move to the next step to download TWRP for Samsung Galaxy S20, S20+, S20 Ultra and then root it via Magisk.
STEP 2: Download TWRP for Samsung Galaxy S20, S20+, S20 Ultra
Following are the supported device list with this TWRP Recovery:
- Samsung Galaxy S20 Ultra: G9880, G988N, G988U, G988U1 and G988W.
- Galaxy S20 Plus: G9860, G986N, G986U, G986U1, and G986W.
- Galaxy S20: G9810, G981N, G981U, G981U1, and G981W.
If your model number is part of this list, then download the device-specific TWRP from the below link: We would like to give a huge thanks to XDA Senior Member afaneh92 for these recovery files
TWRP for Samsung Galaxy S20 5G
TWRP for Samsung Galaxy S20+ 5G
TWRP for Samsung Galaxy S20 Ultra 5G
Now that you have downloaded the recovery file, let’s proceed ahead with the steps to install TWRP and root Samsung Galaxy S20, S20+, S20 Ultra devices via Magisk.
STEP 3: Unlock Bootloader on Samsung Galaxy S20, S20+, S20 Ultra
Before you could actually flash any file onto your device, its bootloader needs to be unlocked. So if you haven’t done it yet, then please refer to our comprehensive guide on How to Unlock Bootloader on Samsung Galaxy S20, S20+, S20 Ultra [Using New VaultKeeper Method]. If you don’t wish to check out that guide, then here are the instructions in short:
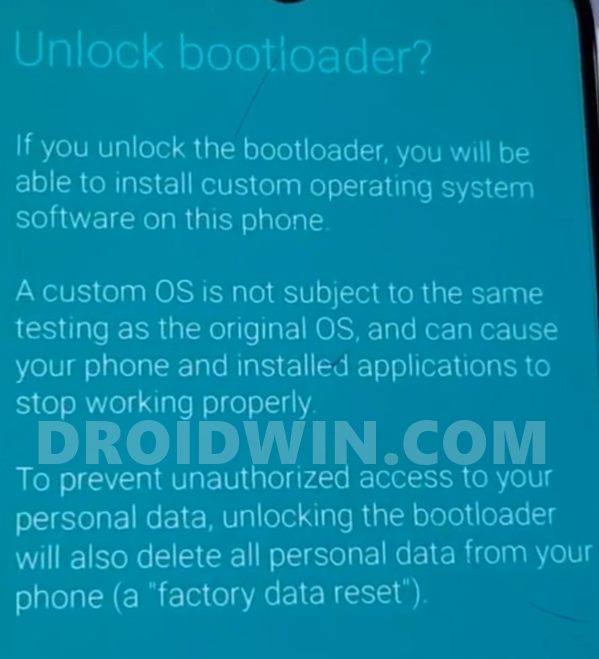
- Enable Developer Options followed by OEM Unlocking on your device.
- Then boot it to the Download Mode.
- After this, press and hold the Volume Up key for a few seconds, until you are taken to the Device Unlock Mode.
- Finally, hit the Volume Up button to confirm the unlocking of the bootloader.
- When your device boots up, connect it to the Internet and verify the OEM Unlocking is enabled.
STEP 4: Boot Samsung Galaxy S20, S20+, S20 Ultra to Download Mode
Next up, you will have to boot your device to Download Mode so that Odin is able to identify it and you could then start with the flashing process. So refer to our comprehensive guide on How to Boot any Samsung Device to Download Mode. The shorter instructions:

- Power off your device. Then press and hold the Volume Up and Volume Down keys together.
- While pressing both these keys connect your device to the PC via USB cable.
- Finally, leave both these buttons and hit the Volum Up key to boot to Download Mode.
If you like to deal with the Command Line interface, then you could also use the adb reboot download command to carry out this task. Anyways, now that the device is booted to Download Mode, move to the next step to install TWRP and root Samsung Galaxy S20, S20+, S20 Ultra devices via Magisk.
- New Method to Boot to Recovery Mode on Samsung OneUI 3.0 Android 11
- How to Stop Samsung Find My Device Offline Finding Notifications
- Steps to Create Samsung Combination Firmware and Flash it via Odin
- How to Boot Rooted Samsung to Recovery Mode and Rooted OS
STEP 5: Disable AVB on Samsung Galaxy S20, S20+, S20 Ultra
You will now have to disable the Android Verified Boot Image by flashing the VBMeta Disabler file via Odin. here are the required instructions for the same. Make sure your device is connected to the PC via USB cable and is booted to Download Mode.
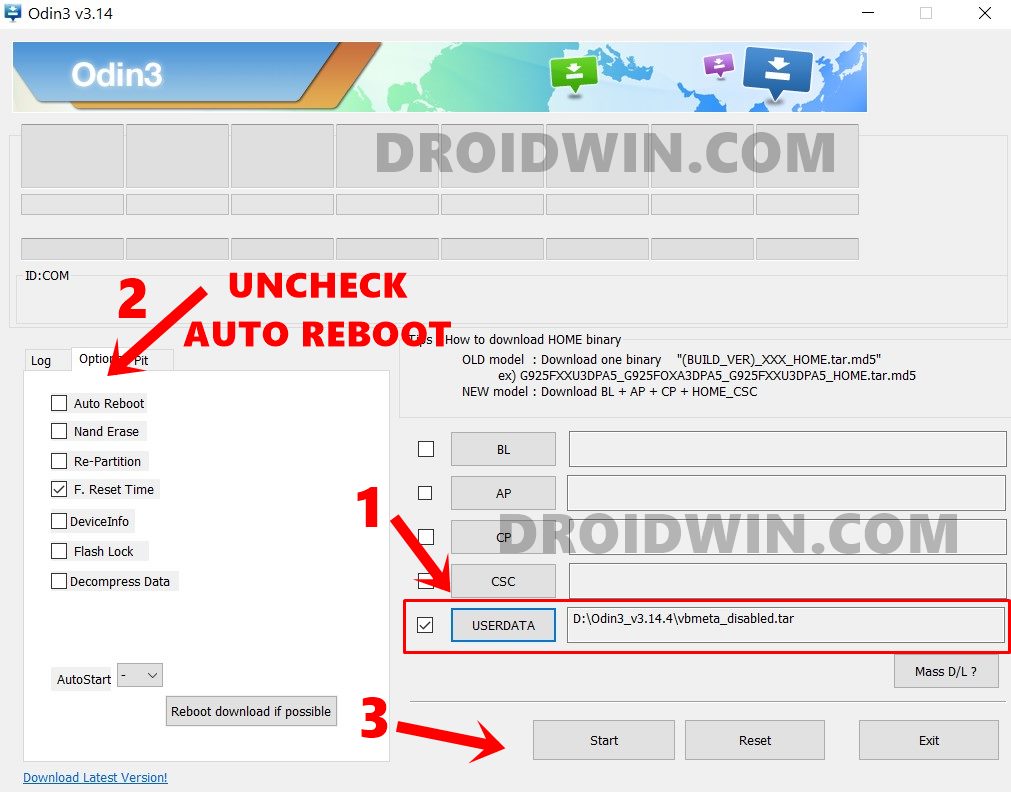
- Launch the Odin Tool on your PC.
- Then click on the Userdata button and load the vbmeta_disabled.tar file into it.
- When that is done, head over to the Options tab and uncheck Auto-Reboot.
- Finally, hit the Start button and wait for the process to finish.
- Once it completes, your device will be booted to the recovery mode and will ask to reset the device.
- So select that option via the Volume Keys and press the Power key to confirm.
Once the data wipe is complete, your device shall automatically boot to the OS. You may now start off with the steps to install TWRP and root Samsung Galaxy S20, S20+, S20 Ultra devices via Magisk.
STEP 6: Install TWRP Samsung Galaxy S20, S20+, S20 Ultra via Odin
Its now time to install the TWRP Recovery onto your device via Odin. Here are the required instructions for the same:
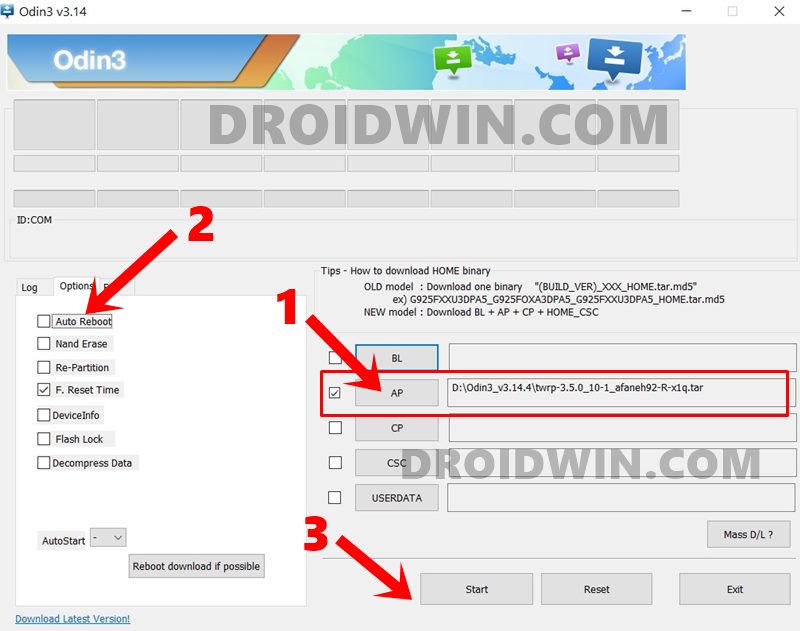
- To begin with, boot your device to Download Mode (as discussed in STEP 4).
- Then launch the Odin Tool on your PC.
- Click on the AP button and load the TWRP TAR file into it.
- Then go to the Options section and uncheck the Auto-Reboot option.
- Finally, hit Start and wait for the flashing to complete.
Once done, you should get the Pass message. Now directly move to the next step to boot your device to TWRP, without carrying out any other task in between.
STEP 7: Boot Samsung Galaxy S20, S20+, S20 Ultra to TWRP
- You will now have to boot your device to the just flashed TWRP Recovery. As of now, your device would be booted to Download Mode.
- So press and hold the Volume Down and Power keys together for a few seconds until the device exits the Download Mode
- Your device will now turn off. As soon as that happens, let go of the Volume Down key and press the Volume Up key (Power Key should be remained pressed).
That’s. The Samsung Galaxy S20, S20+, S20 Ultra is now booted to TWRP, it’s time to decrypt the data partition and root it via Magisk. Follow along.
- How to Install Android 11 (OneUI 3.0) on any Samsung Phone via Odin
- Downgrade Samsung from Android 11 to Android 10 (OneUI 3.0 to 2.0/2.5)
- How to Root any Samsung device via Magisk and Odin
- How to Patch Samsung AP Firmware via Magisk
STEP 8: Decrypt Data Partition on Samsung Galaxy S20, S20+, S20 Ultra
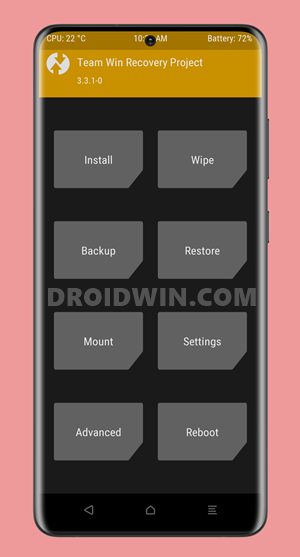
It’s now time to decrypt the data partition via TWRP. Here is how it could be done:
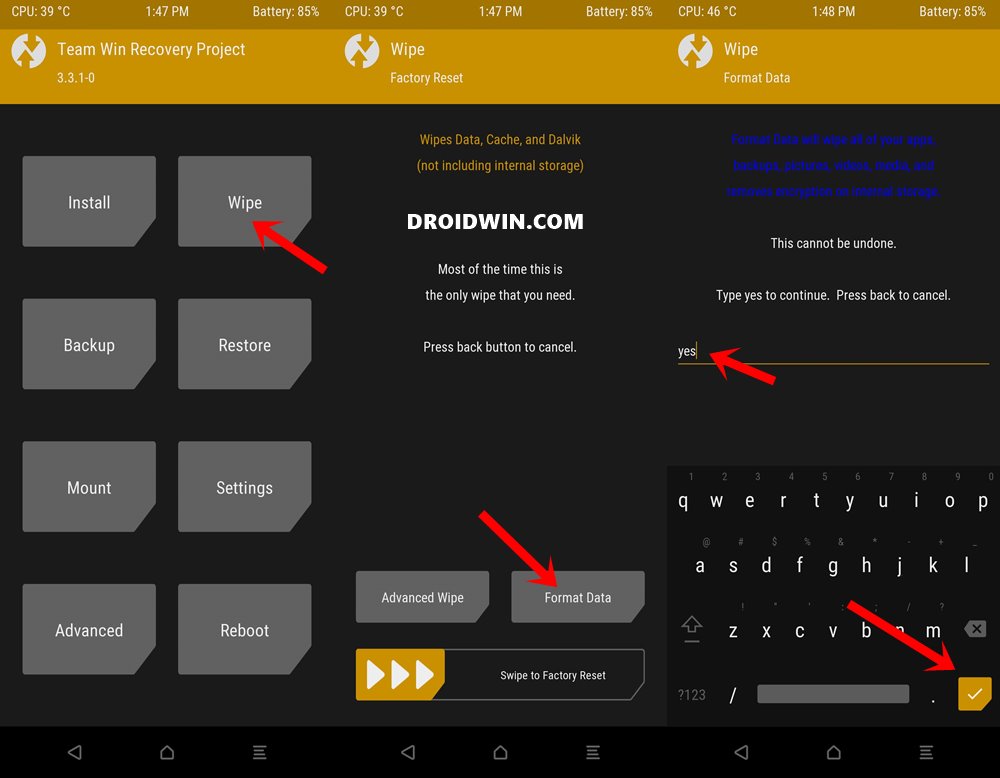
- From the TWRP home screen, go to Wipe and select Format Data.
- Then type in YES in the space provided and tap on the blue checkmark situated at the bottom right.

- Once the data has been wiped, transfer the multidisabler-samsung-3.1.zip as well as Magisk ZIP to your device. To transfer these files you may refer to our guide:[3 METHODS] How To Transfer or Install Files via TWRP Recovery.
- Shorter Method: Use the adb push filename.zip command to transfer the files. Make sure to open the CMD inside the platform-tools folder and both these files should be placed inside this directory itself.
- Now that the files have been transferred, go to Install and select the multidisabler-samsung-3.1.zip. Now perform a right swipe to flash this file.
STEP 9: Root Samsung Galaxy S20, S20+, S20 Ultra via Magisk and TWRP
- Finally, it’s time to root your device via Magisk.
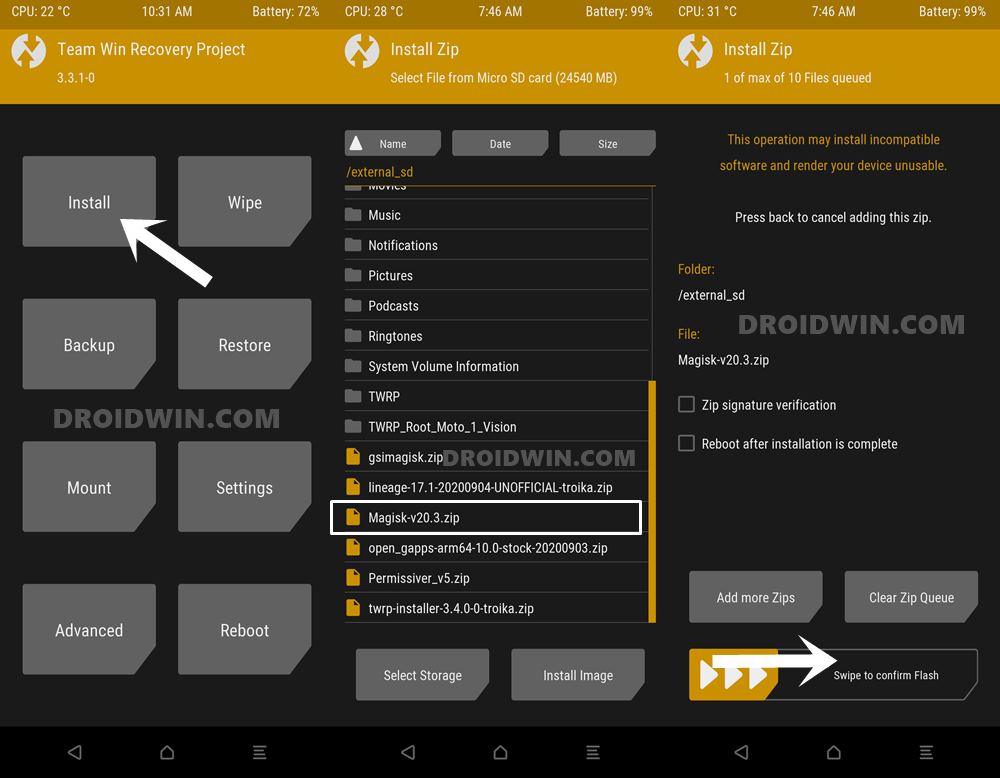
- So from TWRP, go to Install and select the Magisk ZIP file.
- Then perform a right swipe to flash the file.
- Once that is done, go to Reboot and tap on System. Your device will now boot to the OS and the process stands complete.
With this, we conclude the guide on how to install TWRP Recovery and then root the Samsung Galaxy S20, S20+, S20 Ultra devices. if you have any queries concerning the aforementioned steps, do let us know in the comments section below. We will get back to you with a solution at the earliest.


EDWARD
GOEDENAVOND EDWARD HIER IK HEB DE STAPPEN GEVOLGD EN HIJ WIL NIET OPSTARTEN WAT KAN IK DAAR AAN DOEN