In this guide, we will show you the steps to install the TWRP Recovery on your Samsung Galaxy A51 device and then root it via Magisk. This device has managed to create a niche segment of the loyal fanbase for itself. The mid-range offering from Smasug tick marks most of the requirements, considering the price segment to which it belongs.
While its underlying chipset is Exynos based, yet there are already quite a few custom binaries available for it. Likewise, the custom development is also brimming with tons of mods for this device. Be it the custom recovery like TWRP, gaining access to the system partition via Magisk, or flashing of the plethora of ZIP and IMG files, the possibilities stand endless.
There stands just one requirement from your end- an unlocked bootloader. Once you do so, you have literally opened the floodgates to the plethora of tweaks. In this guide, we will be looking at two of the most important ones. Today, we will show you how to install the TWRP Recovery and root your Samsung Galaxy A51 device. Likewise, we will also make you aware of the associated benefits and risks of these tweaks. So without further ado, let’s get started.
- How to Root any Samsung device via Magisk and Odin
- How to Patch Samsung AP Firmware via Magisk
- Steps to Flash magisk_patched.tar (patched Samsung AP file) via Odin
- How to Patch Samsung AP Firmware via Magisk
Table of Contents
Benefits and Risks of TWRP and Rooting Samsung Galaxy A51
The most popular custom recovery out there, Team Win Recovery Project or TWRP beholds a plethora of options. These include the likes of creating and restoring Nandroid Backups, wiping various partition on your device, flashing IMG and ZIP files, and even rooting your device via Magisk. While you could also root the device without TWRP, but that calls for a lot of effort ( patching and flashing the stock boot. img).
Anyway, once rooted, you would have gained administrative privileges. This in turn will allow you to flash Magisk Modules, Xposed Framework, Substratum Themes, etc. However, these tweaks come with a few risks as well. When you unlock the device’s bootloader, you will have to bid adieu to the device’s warranty. Likewise, all the data on your device will be wiped off.
Furthermore, on rooting, apps like Google Pay and Pokemon might not function along the expected lines. Then the Widevine L1 Certificate will be degraded to L3 as well (which means no HD on Netflix, Amazon Prime, and the likes). You wouldn’t also be able to receive and install OTA updates. So if all these are well and good, then here are the steps to install the TWRP Recovery and root your Samsung Galaxy A51.
How to Install TWRP Recovery and Root Samsung Galaxy A51
The entire instructions have been listed out in separate sections for ease of understanding. Follow along in the exact same sequence as mentioned. Droidwin and its members wouldn’t be held responsible in case of a thermonuclear war, your alarm doesn’t wake you up, or if anything happens to your device and data by performing the below steps.
STEP 1: Unlock Galaxy A51 Bootloader
First and foremost, you will have to unlock the bootloader on your Galaxy A 51 device. For that, please refer to our detailed guide on How to Unlock the Bootloader on Samsung Galaxy A51. Once this is done, proceed to the next step to install the TWRP Recovery and root your Samsung Galaxy A51.
- New Method to Boot to Recovery Mode on Samsung OneUI 3.0 Android 11
- How to Stop Samsung Find My Device Offline Finding Notifications
- Steps to Create Samsung Combination Firmware and Flash it via Odin
- How to Boot Rooted Samsung to Recovery Mode and Rooted OS
STEP 2: Download the Required Files
Here are all the files that you need to download in order to install the TWRP Recovery and root your Samsung Galaxy A51 device. Credit to XDA Member azteria2000 for TWRP and MultiDisabler files.
- TWRP for Samsung Galaxy A51: recovery_disabler_vb_meta.tar
- MultiDisabler for Samsung: multi_disabler_samsung_3_1.zip
- Magisk Installer to Root your device: Magisk ZIP
- Disable_DM-Verity_ForceEncrypt to Decrypyt the Data partition: no-verity-opt-encrypt-6.1.zip.
STEP 3: Boot Samsung Galaxy A51 to Download Mode
Next up, you will have to boot your deivce to the Download Mode. Refer to the below steps for that. You may also refer to our guide on this topic: How to Boot any Samsung Device to Download Mode.

- To begin with, power off your device.
- Then press and hold Vol Up + Vol Down together and connect your device to the PC via USB cable.
- As soon as you see the Warning message on your device, release the pressed keys.
- Finally, hit the Volume Up key to boot your device to Download Mode.
STEP 4: Install Odin on your PC
- Download the latest version of the Odin Tool: Odin3-v3.14.4.zip. This tool will be used to flash the TWRP TAR file to your device.
- Once downloaded, extract the contents to any convenient location on your PC.
- Finally, double-click on the Odin.exe file to launch the Tool.

- That’s it. Now that Odin is installed, let’s start off with the guide to install the TWRP Recovery and root your Samsung Galaxy A51.

STEP 5: Install TWRP Recovery on Samsung Galaxy A51 via Odin
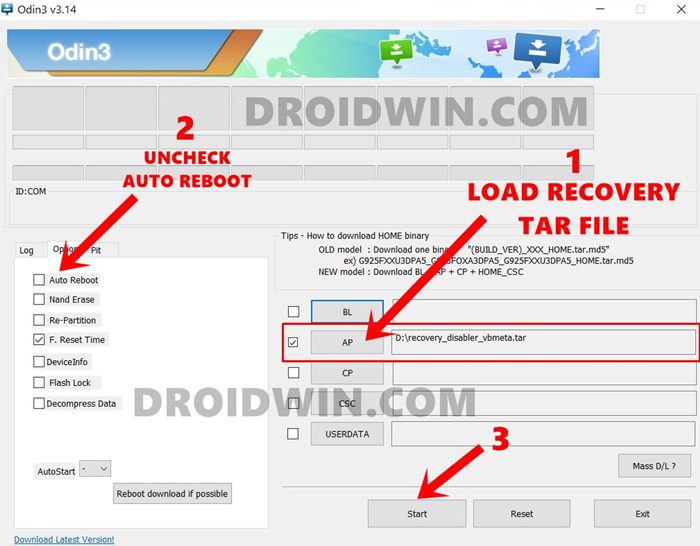
- With the device booted to Download Mode, connect it to PC via USB cable.
- Now launch the Odin Tool on your PC.
- Click on the AP button, navigate to the download recovery_disabler_vbmeta.tar file and select it.
- Then go to the Options menu of Odin and untick the Auto Reboot option.
- Finally, hit the Start button and wait for the process to complete. Once done, you should get the Pass Message.
- You may now remove your device from the PC as well.

With this, TWRP has been installed on your device. But before performing any other action, you should directly boot to TWRP, as mentioned below.
STEP 6: Boot Samsung Galaxy A51 to TWRP
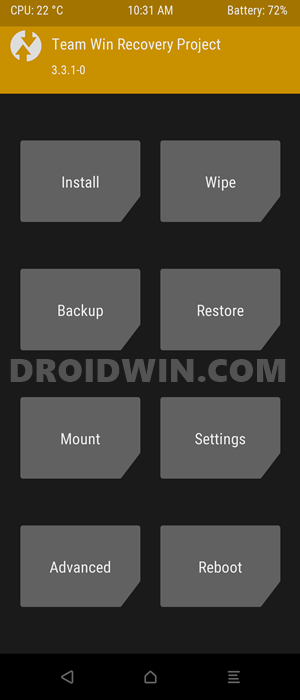
- Press and hold the Power + Volume Down Key until the screen goes blank.
- When that happens, press and hold the Power + Volume Up Key.
- Then as soon as you see the Samsung logo, release the Power Key, but keep pressing the Volume Up key until you are booted to the TWRP Recovery.
- That’s it. Your Samsung Galaxy A51 device is now booted to TWRP, let’s proceed ahead to root it.
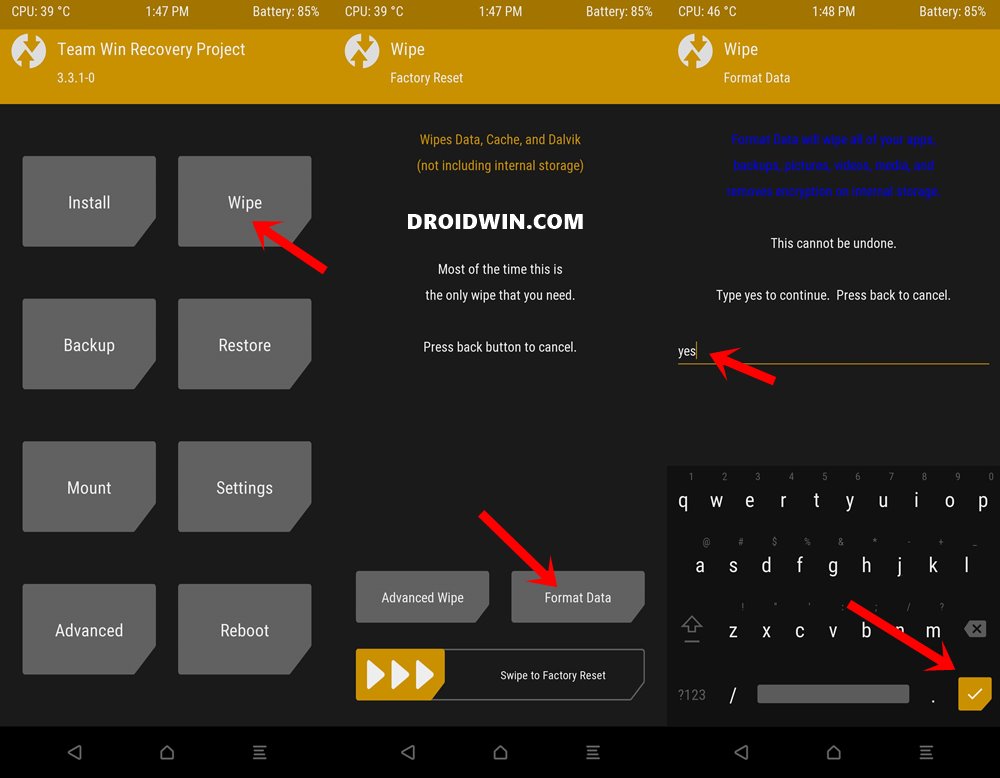
STEP 7: Decrypt Data Partition on Samsung Galaxy A51
As of now, your device will be booted to TWRP, so it’s time to decrypt the data partition. Follow along for the detailed instructions:
- From the TWRP home screen, go to Wipe.
- Then select Format Data and type in YES in the space provided.
- Finally, hit Enter situated at the bottom right and wait for the process to complete.
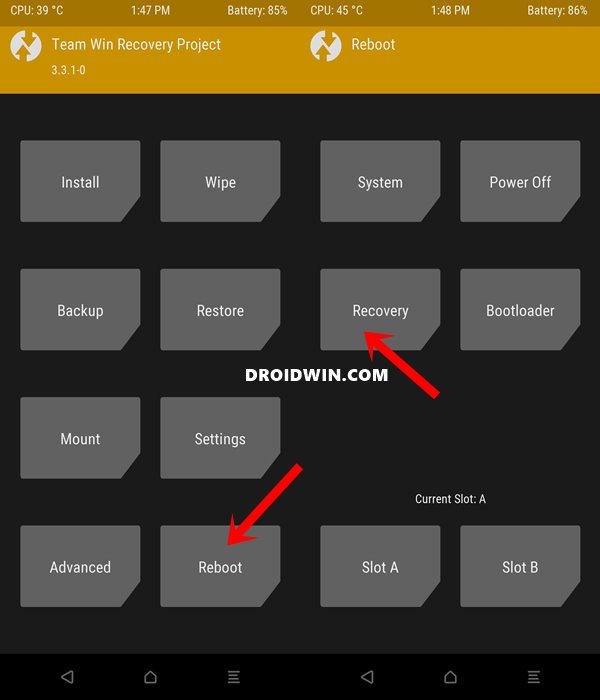
- Once done, go to Reboot and select Recovery. Your device will reboot to TWRP.
- Now transfer the MultiDisabler ZIP file to your device via TWRP.
- Then go to Install, select the MultiDisabler ZIP file and perform a right swipe to install it.
- Once installed, go to Wipe > Format and type in YES to confirm the wipe.
- After this, again go to Reboot and select Recovery to reboot your device to TWRP.
That’s it. With this, the data partition has been successfully decrypted. Let’s now proceed to the final step to root your Samsung Galaxy A51 device. Even if you don’t wish to root, you should flash the Disable_DM-Verity_ForceEncrypt ZIP file, as mentioned below. Flashing this file is a must, irrespective of the root.
- How to Install Android 11 (OneUI 3.0) on any Samsung Phone via Odin
- Downgrade Samsung from Android 11 to Android 10 (OneUI 3.0 to 2.0/2.5)
- Download Samsung Stock Firmware/ROM via Frija Tool
- How to Update Magisk ZIP and Magisk Manager (without TWRP)
STEP 8: Root Samsung Galaxy A51 via Magisk
- Transfer the Disable_DM-Verity_ForceEncrypt and Magisk ZIP file to your device via TWRP.
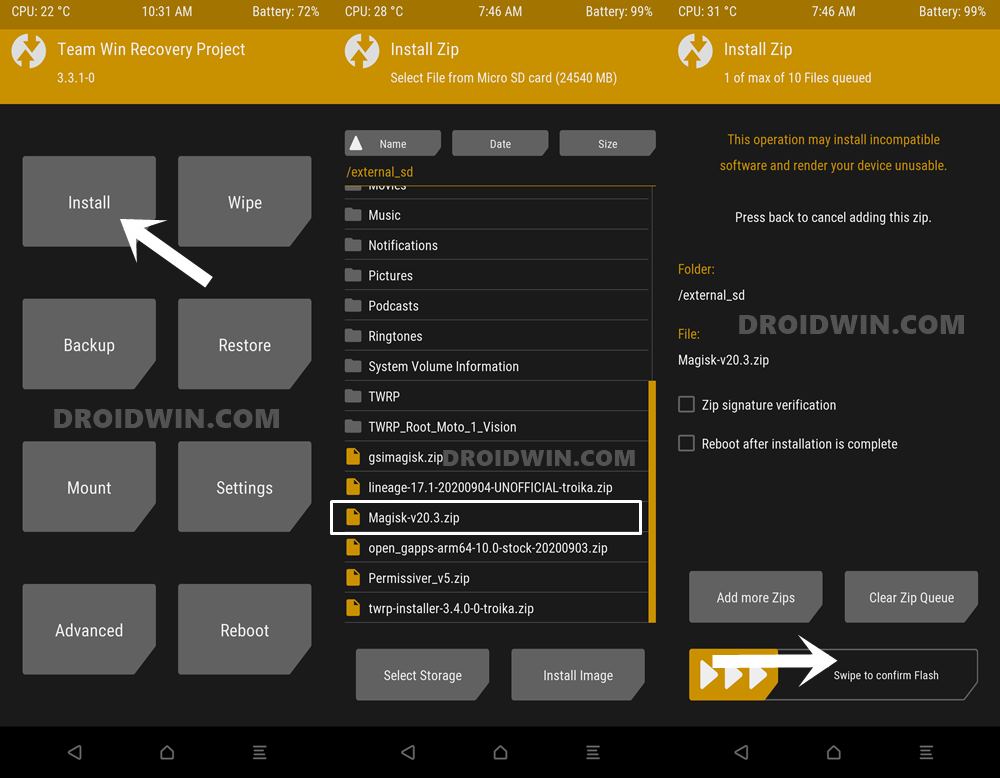
- Now go to Install, select the Magisk ZIP file and perform a right swipe to install it.
- Once done, again go to Install. This time select the Disable_DM-Verity_ForceEncrypt ZIP file and perform a right swipe to install it as well.
- Finally, it’s time to reboot your deivce to the OS. For that go to Reboot and select System.

The boot might take a few minutes. This is completely normal. Furthermore, you will have to set up the device from scratch, as a complete wipe has taken place. On that note, we conclude the guide on how to install the TWRP Recovery and root your Samsung Galaxy A51. If you have any queries concerning the aforementioned steps, do let us know in the comments section below. We will get back to you with a solution at the earliest.


Frank
Shukran for this excellent guide Hassan