In this guide, we will show you the steps to unlock the bootloader, install TWRP, and root OnePlus 7 and 7 Pro devices. OnePlus have always known to be a fan-favorite mainly due to the fact that it offers a plethora of features at affordable prices. Plus its customized Android OS skin, OxygenOS, has managed to gather quite a lot of praises. While as of now the company seems to be going through a rough patch, especially after the co-owner parting ways and Nord’s announcement of getting only one year of OS upgrades, but its past is still one to behold.
If we talk about its seventh iteration, all the three devices were impressive in their own regards. Likewise, these devices are among the most active players in custom development. Well, this shouldn’t surprise many because the OEM has always been highly supported in this domain. Making use of the same, we will show you how to install TWRP and then root OnePlus 7 and 7 Pro. Rooting a device takes two different approaches.
The first method involves flashing Magisk via custom recovery. The second method involves getting hold of the stock boot.img (after extracting it from payload.bin in case of OnePlus), patching it via Magisk, and then flashing it via Fastboot. With so many efforts involved, many users prefer to take the shorter route to root their device. And we can’t really blame them. On that note, this guide will outline the steps to install TWRP and then root OnePlus 7 and 7 Pro devices. Follow along for the instructions.
- Enable 960fps and Macro Mode in OnePlus 7
- How to Unbrick OnePlus 7 and bring it back from a Dead State
- Restore OnePlus 7/7T/7T Pro to Stock via Fastboot Commands
- How to Unbrick Your OnePlus 7 Pro Device from Dead State
Table of Contents
How to Install TWRP Recovery and Root OnePlus 7/7 Pro
I wouldn’t be discussing the benefits of unlocking the bootloader, installing TWRP, or rooting the device. However, let me make you aware of the risks involved in these tweaks: Device warranty becoming null and void, apps like Google Pay and Netflix not functioning along the expected lines, or device getting boot-looped or bricked (say Hi to MSMTool!) are just some of them. So proceed ahead with caution. Droidwin and its member wouldn’t be held responsible for any of the above consequences, and also in case of a thermonuclear war!
Just to reiterate the facts, TWRP doesn’t support OxygenOS 11 yet. But since as of now, the OnePlus 7 series haven’t received the stable Android 11 update or even the Open Beta update. you might be running OxygenOS 10 (Android 10 only). Hence TWRP will work perfectly without any issue.
But if you are seeing this guide a few months down the line with OxygenOS 11 installed, and this error message is still there, then you should head over to another guide to root your OnePlus 7/7 Pro that doesn’t involve TWRP (using the boot.img method)
STEP 1: The Prerequisites
- To begin with, take a complete device backup. This is because unlocking the bootloader wipes off all the data from your device. Even if you have the bootloader unlocked and have just come here to install TWRP or root your device, taking a backup is still recommended.
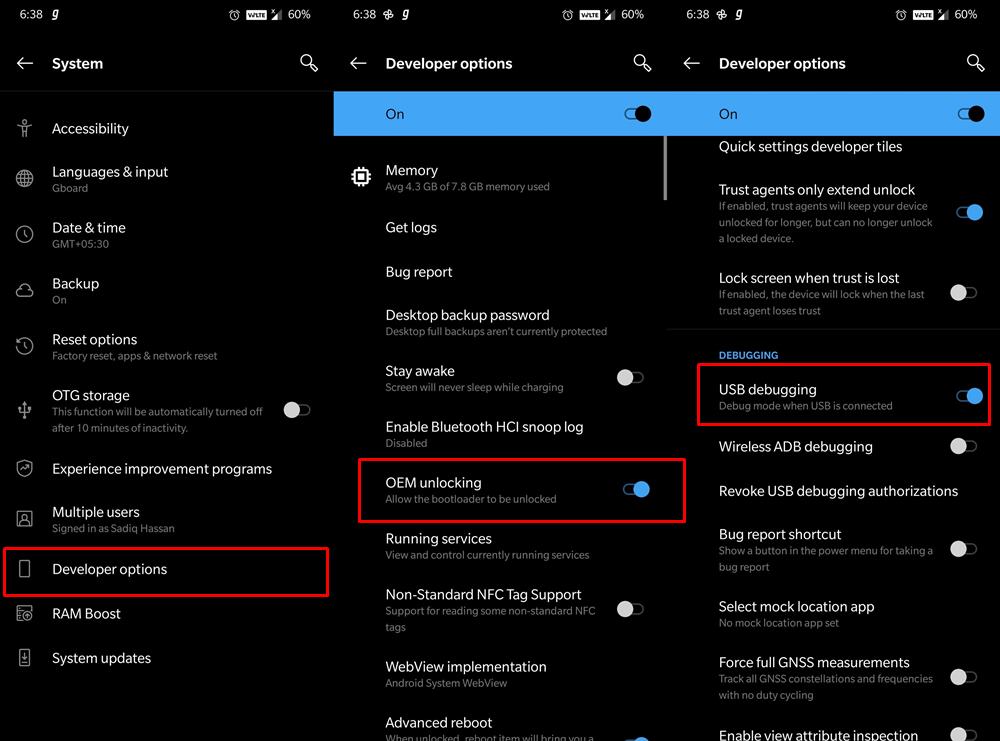
- Next up, enable USB Debugging and OEM Unlocking. The former is required so that your device gets recognized by your PC in ADB Mode. But why would you need ADB Mode? Well, it will be needed to boot your device to Fastboot. And Fastboot is required for unlocking the bootloader and booting to TWRP.
- On the other hand, OEM Unlocking is needed to carry forward the process of bootloader unlock. With that said, head over to Settings > About Phone > Tap on Build Number 7 times > Go back to Settings > System > Advanced > Developer Options > Enable USB Debugging and OEM Unlocking.

- Next up, install Android SDK Platform Tools on your PC. This will provide you with the necessary ADB and Fastboot binaries.
- Also, download the latest Magisk Installer ZIP on your device.
- Finally, download the TWRP IMG and ZIP files for your OnePlus 7/7 Pro. This is a unified build, meaning it is supported on both devices (7 and 7 Pro). We would like to thank XDA Recognized Developer mauronofrio for this recovery:
So these were all the requirements. You may now proceed with the steps to install TWRP and then root OnePlus 7 and 7 Pro.
STEP 2: Unlock Bootloader on OnePlus 7/7 Pro
The first step to custom development requires you to unlock the device’s bootloader. So follow the below steps for that:
- Connect your device to PC via USB cable. Make sure USB Debugging and OEM Unlock is enabled.
- Then head over to the platform-tools folder, type in CMD in the address bar, and hit Enter. This will launch the Command Prompt.
- Type in the following command in the CMD window to boot your device to Fastboot Mode
adb reboot bootloader
- Once your device boots to Fastboot, execute the below command to unlock the bootloader on your OnePlus 7/7 Pro
fastboot oem unlock
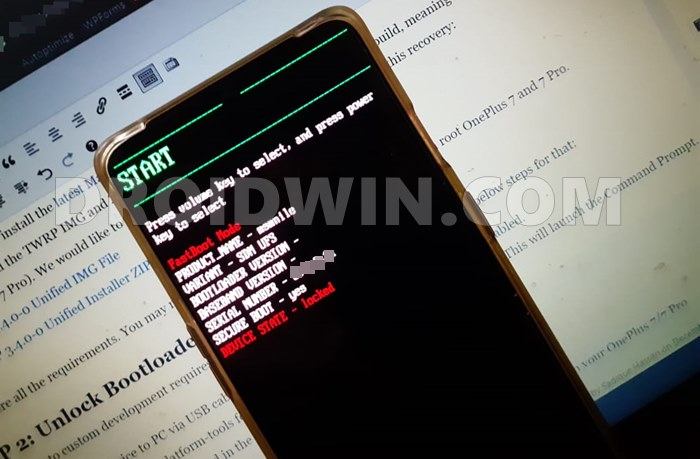
- You will now get a confirmation message on your device, select the Unlock the Bootloader option via Volume Keys, and hit the Power key to confirm the decision.
- Your device will now boot to the OS with an unlocked bootloader. If it boots back to Fastboot Mode, then use the below command to boot it to the system:
fastboot reboot
That’s it. These were the steps to unlock the bootloader, let’s now proceed ahead to install TWRP and root OnePlus 7 and 7 Pro. Now there are two different methods to install the TWRP Recovery. If you are just looking to install TWRP and do not wish to root your device, then refer to STEP 3A. On the other hand, if you wish to have TWRP Recovery as well as want to root your device, then refer to STEP 3B. In short: Only TWRP (No Root): STEP 3A, TWRP+Root (Magisk): STEP 3B.
- How to Pass Magisk SafetyNet on Rooted Android 11
- Root Android 11 via Magisk Patched boot.img (without TWRP)
- Fix Magisk patched boot.img issue while Rooting Android 11
- Disable DM-Verity or Android Verified Boot without TWRP
STEP 3A: Install TWRP on OnePlus 7/7 Pro (No Root Method)
As already stressed before, this method is for those users who only wish to install TWRP but don’t prefer root. To carry out these steps, we would be using your device’s Ramdisk partition. If you prefer to learn more about this, then please refer to our detailed guide: How to Permanently Install TWRP without TWRP ZIP File (only using TWRP.img file). With that said, let’s now get on with the instructions:
- To begin with, rename the TWRP IMG file recovery file to just twrp so that the complete name becomes twrp.img. Now you will have to transfer this twrp.img file to two places: to the platform-tools folder on your PC and to your device’s internal storage as well.
- Now connect your device to the PC via USB cable (make sure USB Debugging is enabled).
- After this, head over to the platform-tools folder, type in CMD in the address bar and hit Enter. This will launch the Command Prompt.
- Type in the following command in the CMD window to boot your device to Fastboot Mode
adb reboot bootloader
- Now execute the below command to boot your device to TWRP Recovery
fastboot boot twrp.img
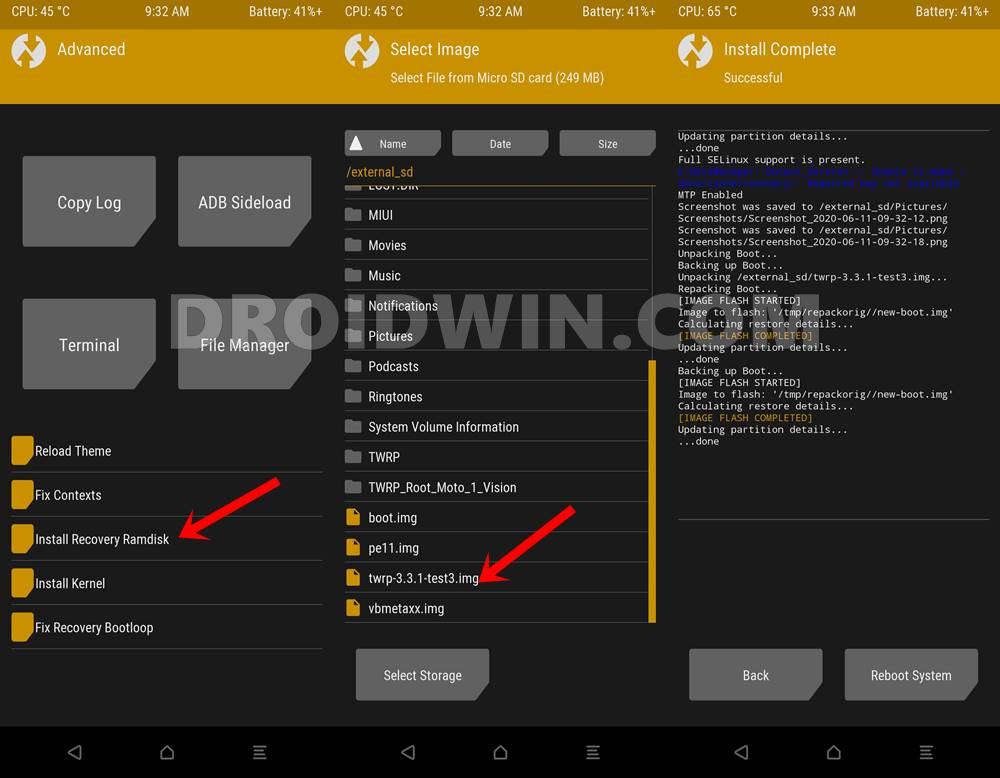
- Once your OnePlus 7/7 Pro boots to TWRP, go to Advanced.
- Then select the Recovery Ramdisk option.
- Navigate to the twrp.img file and perform a right swipe to install it.
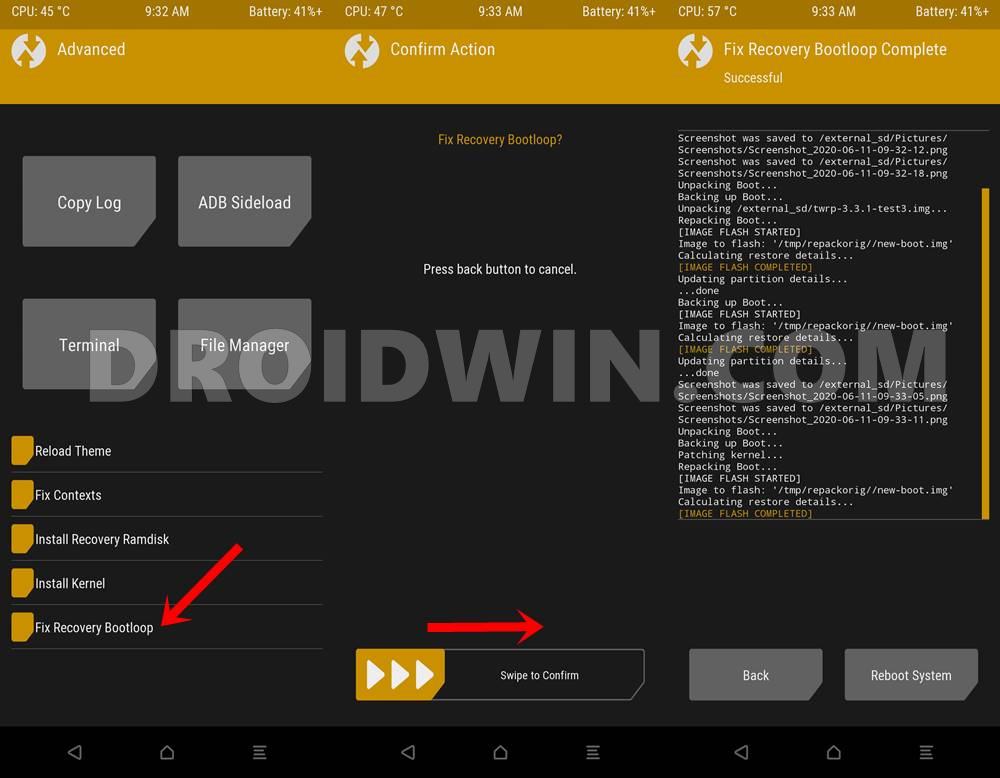
- When that is done, again go back to the Advanced menu. This time select the Fix Recovery Bootloop option.
- After this, perform a right swipe on the Swipe to Confirm button.
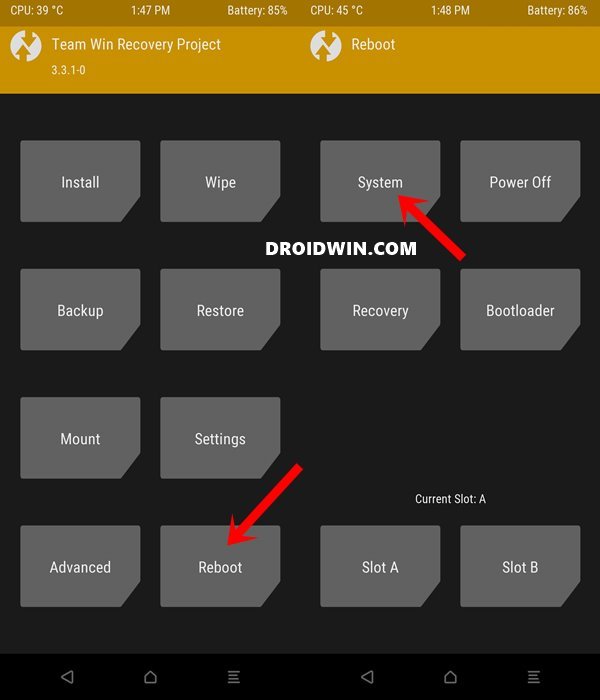
- When that is done, head over to the Reboot option and reboot to Recovery.
- Once your device is booted to TWRP, you may now reboot it to the OS. For that, go to Reboot and select System.

So these were the steps to install TWRP Recovery onto OnePlus 7/7 Pro for those who don’t want root. Let’s now check out the steps for those users who wish to install TWRP and then root their OnePlus 7/7 Pro device as well.
- [3 METHODS] How To Transfer or Install Files via TWRP Recovery
- How to Flash Various Files in A/B Partition Devices
- Install Custom ROMs on any Android Device- Includes A/B Partition
- [GUIDE] Flash ROMs/Magisk/TWRP/Kernels on A/B Partition Devices
STEP 3B: Install TWRP IMG on OnePlus 7/7 Pro (If you Want Root)
Now, these are the steps for those users who wish to have the TWRP Custom Recovery as well as administrative access to their device (root). Follow along.
- First off, rename the downloaded TWRP IMG file to just twrp, so that the complete name becomes twrp.img. Then transfer this file to the platform-tools folder on your PC.
- On the other hand, transfer the TWRP ZIP to your device’s internal storage. Likewise, also transfer the Magisk ZIP file to your device’s internal storage.
- On all this done, connect your device to the PC via USB cable (make sure USB Debugging is enabled).
- Then head over to the platform-tools folder, type in CMD in the address bar, and hit Enter. This will launch the Command Prompt.
- Type in the following command in the CMD window to boot your device to Fastboot Mode
adb reboot bootloader
- Now execute the below command to boot your device to TWRP Recovery
fastboot boot twrp.img
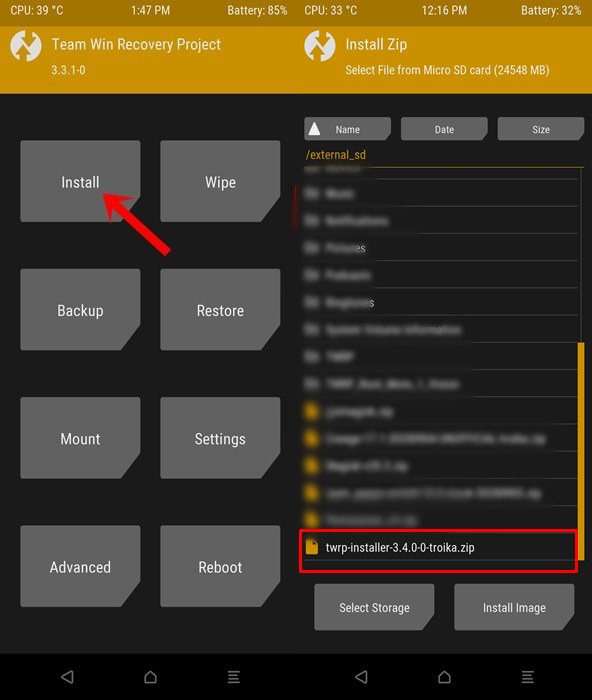
- Once your OnePlus 7/7 Pro boots to TWRP, go to the Install section.
- Browse to the TWRP ZIP file, select it and perform a right swipe to install the recovery.
- With this, TWRP has been successfully installed on your OnePlus 7/7 Pro, let’s root it now.
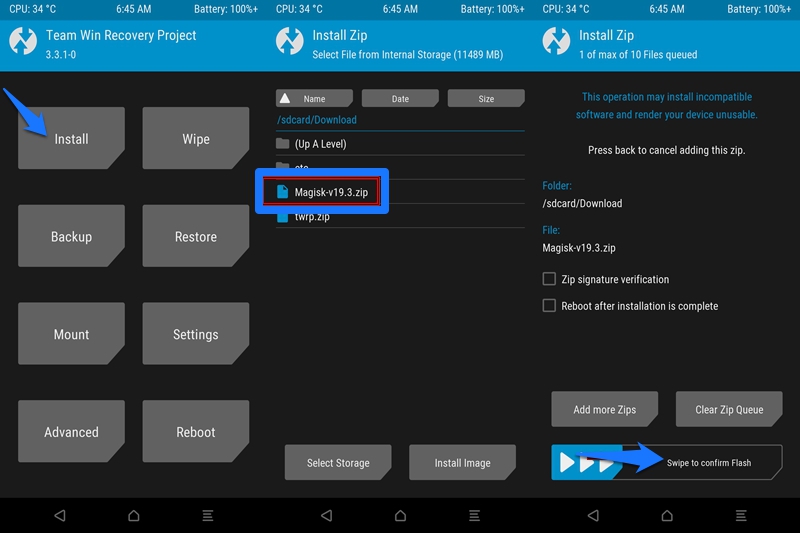
- So go to the Install section of TWRP. Then navigate to the Magisk ZIP file, select it and perform a right swipe to install it.
- Once done, your device stands rooted and you may now boot to the OS. For that, go to Reboot and select System.
That’s it. You have now installed TWRP and rooted your OnePlus 7/7Pro device as well. Let’s now address another important point.
STEP 4: Install OTA on Rooted OnePlus 7/7Pro
Well, I have got queries from many users whether they could install the OTA updates on their rooted OnePlus device. Well, the question is completely genuine, and the answer, fortunately, is in the affirmative. Yes, you could install OTA updates on your rooted OnePlus 7/7 Pro. Refer to our comprehensive guide to know the detailed steps for the same: How to Install OxygenOS OTA on Rooted OnePlus devices.
That’s it. These were the steps to unlock the bootloader, install TWRP, and root OnePlus 7/7 Pro. If you have any queries concerning any of the aforementioned steps, do let us know in the comment section. We will get back to you with a solution at the earliest.


