In this guide, we will show you the steps to install TWRP Recovery and then root your Asus ROG Phone 3 device via Magisk. There exist two different methods through which you could root your device. The first one is by extracting the boot.img from the stock firmware, patching it via Magisk, and flashing it via Fastboot Commands. This calls for a lot of effort (considering the fact that you would have to extract from a payload.bin file).
Hence this approach is only preferable if your device doesn’t have a working custom recovery. The second method, on the other hand, is pretty straightforward and just requires flashing the Magisk App (beginning with v22, Magisk Manager and ZIP are both combined into Magisk App). Since this third iteration of the gaming smartphone from Asus already has working TWRP, it only makes sense to proceed with this method.
Furthermore, TWRP also comes with a plethora of benefits. These include the ability to create and restore Nandroid Backups, flash custom ROMs, and install ZIP and IMG files. So keeping all these in mind, let’s start off with this guide to root your Asus ROG Phone 3 device via TWRP Recovery. [Don’t Miss: How to Root Asus ROG Phone 3 via Magisk without TWRP].
Table of Contents
How to Install TWRP Recovery and Root Asus ROG Phone 3
We have listed the instructions under separate sections for ease of understanding. Make sure to follow the exact same sequence as listed below. Droidwin and its members wouldn’t be held responsible in case of a thermonuclear war, your alarm doesn’t wake you up, or if anything happens to your device and data by performing the below steps.
Unlock Bootloader on Asus ROG Phone 3
First and foremost, you will have to unlock the bootloader on your device. While OEMs generally follow the fastboot oem unlock command, with Asus, things are different. They have really made the entire process quite easy. You just have to install an app, and with a single click, the process stands complete. With that said, the process will wipe all the data on your device and could also make the warranty null and void. So proceed with the below instructions only after taking a backup:
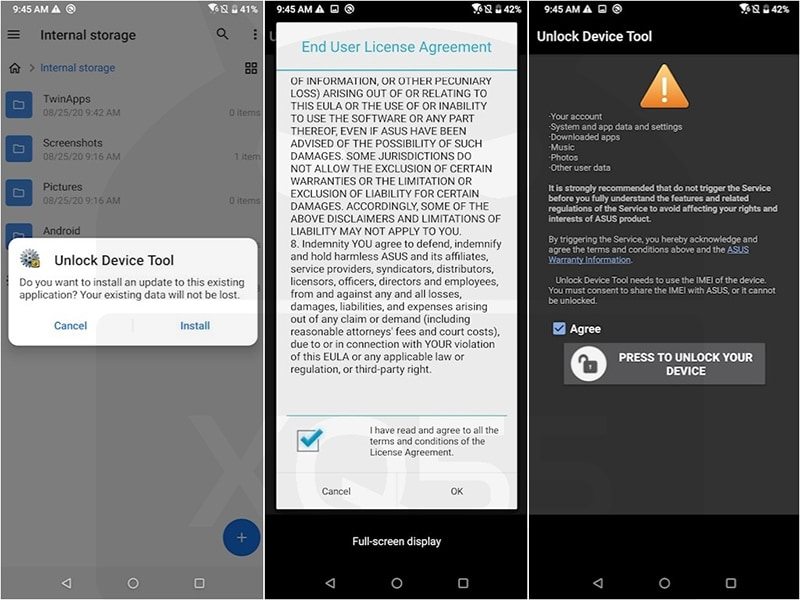
- Start off by downloading the official Asus ROG Phone 3 Unlock Device App.
- Now install and launch and agree to the Terms and Conditions.
- Finally, hit the Press to Unlock your device button and the bootloader stands unlocked.
You may now proceed with the steps to install TWRP Recovery and then root your Asus ROG Phone 3.
Install Android SDK

Next up, install the Android SDK Platform Tools on your PC. This is the official ADB and Fastboot binary provided by Google and is the only recommended one. So download it and then extract it to any convenient location on your PC. Doing so will give you the platform-tools folder, which will be used throughout this guide.
Download Asus ROG Phone 3 TWRP and Magisk ZIP
- Get hold of the latest official TWRP Recovery file for your ROG 3 device from here: twrp-3.5.0_10-0-I003D.img. Once downloaded, rename it to twrp, so that the complete name becomes twrp.img. Then transfer it to the platform-tools folder on your PC.
- Likewise, download the Magisk Installer ZIP file. If you are planning to try out the latest Magisk v22, then you will get the Magisk APK. Make sure to rename it to Magisk ZIP before flashing. On the other hand, if you are downloading an older build (such as v21, v20.4, etc), then directly download the Magisk ZIP Installer itself. Once downloaded, transfer it to your device.
Boot Asus ROG Phone 3 to Fastboot Mode
The next step in this guide to install TWRP Recovery and root your Asus ROG Phone 3 requires your device to be booted to Fastboot Mode. So power off your device. Then press and hold the Volume Up and Power keys together for a few seconds and your device shall be booted to Fastboot. Or you may also use the below universal Fastboot method:
- Enable USB Debugging on your device and connect it to the PC via USB cable.
- Then head over to the platform-tools folder, type in CMD in the address bar, and hit Enter. This will launch the Command Prompt.

- Type in the following command in the CMD window
adb reboot bootloader
- Your device will now be booted to the Fastboot mode.
Install TWRP Recovery on Asus ROG Phone 3
There are two points to keep in mind. First off, it is a dual partition device and hence we will flash the TWRP to both partitions. Furthermore, it has retained the recovery partition, hence we will directly flash it to this partition, rather than booting it via the boot partition and flashing TWRP ZIP for permanent installation.
The below instructions shall make it all clear. Just make sure that you transferred the recovery file to the platform-tools folder and renamed it to twrp.img. Likewise, the Magisk ZIP should have been transferred to your device as well. If that’s well and good, then proceed with the below steps:
- Go to the platform-tools folder, type in CMD in the address bar, and hit Enter. This will launch the Command Prompt
- Type in the following command in the CMD window to flash the recovery to the A slot:
fastboot flash recovery_a twrp.img
- Likewise, use the below command to flash the recovery to the B slot:
fastboot flash recovery_b twrp.img
- Once done, you will now have to boot your device to TWRP. For that, use the Volume Keys to bring up the Recovery option on your device and then hit the Power key to confirm it.
Your device will now be booted to TWRP, perform a right swipe on the Swipe to Allow Modifications button. You should then be taken to the TWRP home screen. That’s it, TWRP Recovery is installed on your Asus ROG Phone 3, let’s now proceed ahead to root it.
Root Asus ROG Phone 3 via TWRP and Magisk
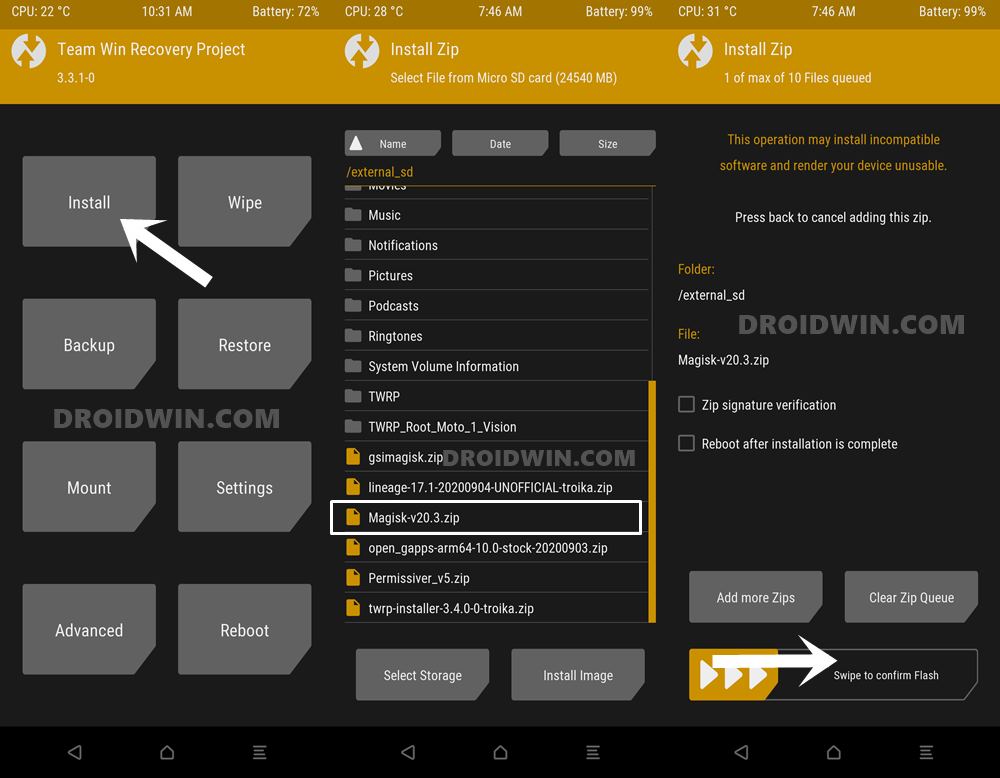
- Go to the Install option of TWRP.
- Navigate to the downloaded Magisk ZIP and select it.

- Now perform a right swipe to flash it.
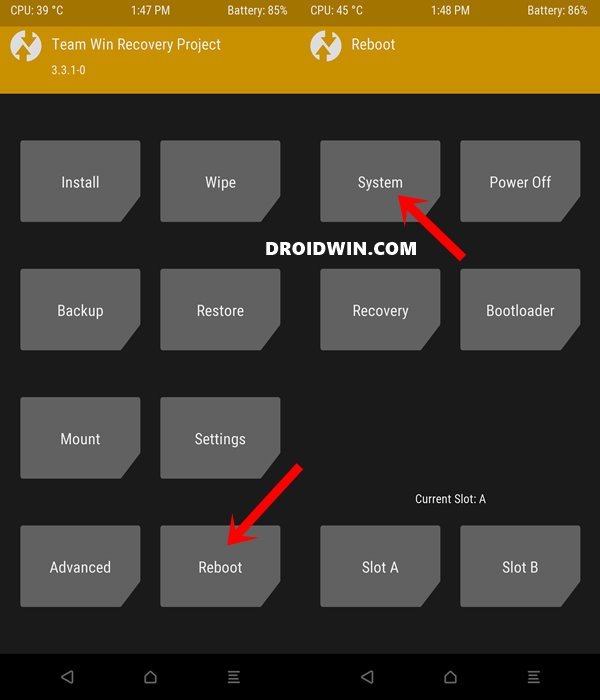
- Once done, you may reboot the device to the OS.
- For that, go to Reboot and select System.
So this was all from this guide on how to install TWRP Recovery on your Asus ROG Phone 3 device and root it via Magisk. Now that you are rooted, you may refer to our guide to Install OTA Updates in Rooted Android Device. Likewise, you could now also Pass Magisk SafetyNet on Rooted Android.
Furthermore, if WideVine L1 has degraded to L3, then refer to this guide to Watch Netflix in HD on Rooted Devices (Get Widevine L1 Support ). Apart from that, if you have any queries concerning the aforementioned steps, do let us know in the comments. We will get back to you with a solution at the earliest.


