In this guide, we will show you the steps to install the PitchBlack Recovery on any Android device. When it comes to making full use of Android’s open-source ecosystem, there are a lot of things to try out. All that is needed is an unlocked bootloader. Once you do so, you stand at the pinnacle of customizations.
From flashing custom binaries to installing custom ROMs, or gaining access to the system partition, there are a plethora of modifications to try out. However, for most of these tweaks to be effectively carried out, you will need to have a custom recovery installed. And TWRP has always been the go-to choice when we talk about custom recoveries. However, it isn’t the only player in this domain.
There are a couple of other names in this market that, although based on TWRP Recovery itself, yet tend to provide plenty of goodies. One such name is PitchBlack that is upscaling the popularity charts in no time whatsoever. The reason for the same is the impressive feature set that it beholds, which we have listed in the below section. So let’s go through it after which, we will also make you aware of the steps to install the PitchBlack Recovery on your Android device.
Table of Contents
Features of PitchBlack Recovery
Here are some of the noteworthy features of the PitchBlack Recovery that deserves your attention:
All Features of TWRP
It checkmarks all the important features of TWRP Recovery. These include the ability to flash ZIP and IMG files, Wipe various device partitions, create and restore Nandroid Backup, Mount various device partitions, and many more.
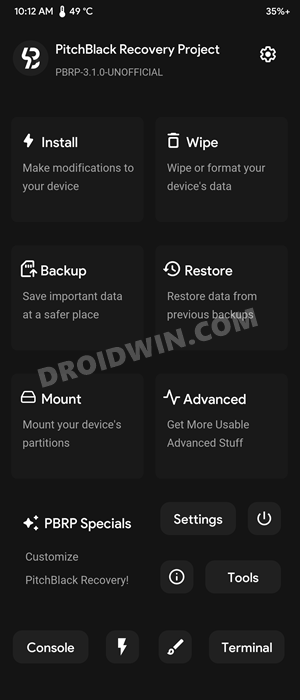
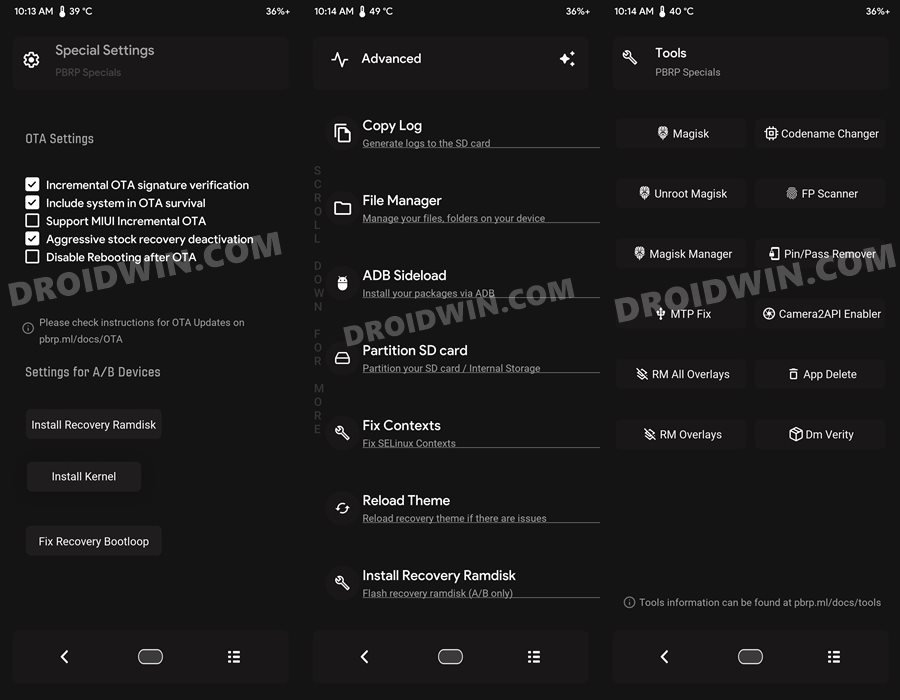
Tools
It comes with a plethora of useful utility tools. These include the likes of Magisk to root your device, Device Codename Changer, Fingerprint Scanner app, PIN/Password Removal, MTP Fix, Camera2API Enabler for Google Camera Ports, DMVerity, and plenty of others.
Support Various Devices
It supports over 30+ devices spread across various architectures. Likewise, it also includes support for Treble, A/B Partition, ARB support, among others.
Material Design UI
The recovery comes with the Material Design user interface with the ability to change themes in future updates.
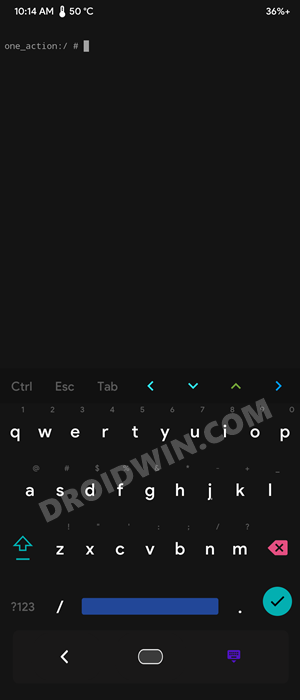
Terminal
The recovery has a built-in terminal window using which you could execute the desired commands. Likewise, there’s also a console that keeps a log of activities that you perform inside this recovery.
So this would have given you a decent idea regarding what this recovery has to offer. Let’s now check out the steps to install the PitchBlack Recovery onto your Android device. Follow along.
Prerequisites to Install PitchBlack Recovery
The below instructions are listed under separate sections for ease of understanding. Make sure to follow in the exact same sequence as mentioned. Droidwin and its members wouldn’t be held responsible in case of a thermonuclear war, your alarm doesn’t wake you up, or if anything happens to your device and data by performing the below steps.
Install Android SDK

First and foremost, you will have to install the Android SDK Platform Tools on your PC. This is the official ADB and Fastboot binary provided by Google and is the only recommended one. So download it and then extract it to any convenient location on your PC. Doing so will give you the platform-tools folder, which will be used throughout this guide.
Enable USB Debugging and OEM Unlocking
Next up, you will also have to enable USB Debugging and OEM Unlocking on your device. The former will make your device recognizable by the PC in ADB mode. This will then allow you to boot your device to Fastboot Mode. On the other hand, OEM Unlocking is required to carry out the bootloader unlocking process.
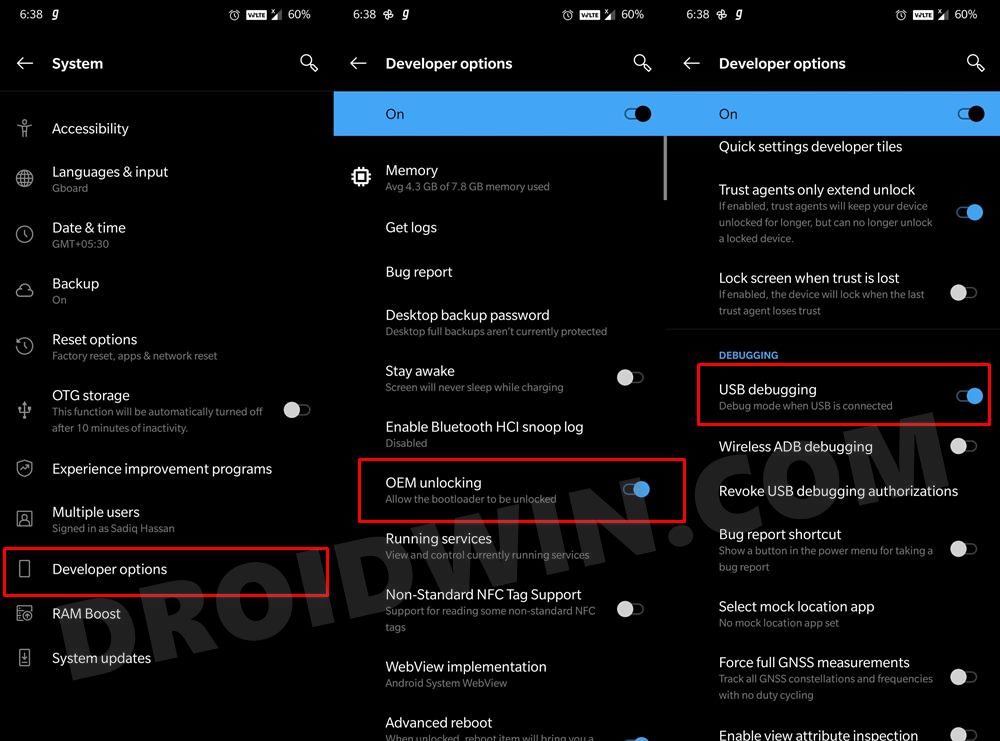
So head over to Settings > About Phone > Tap on Build Number 7 times [MIUI Number in Xiaomi devices] > Go back to Settings > System > Advanced > Developer Options > Enable USB Debugging and OEM Unlocking.
Unlock Bootloader
Before you proceed to install the PitchBlack Recovery onto your Android device, you will have to unlock its bootloader as well. Do keep in mind that doing so will wipe off all the data from your device and could nullify its warranty as well. So if that’s well and good, then please refer to our guide on How to Unlock Bootloader on Any Android Device.
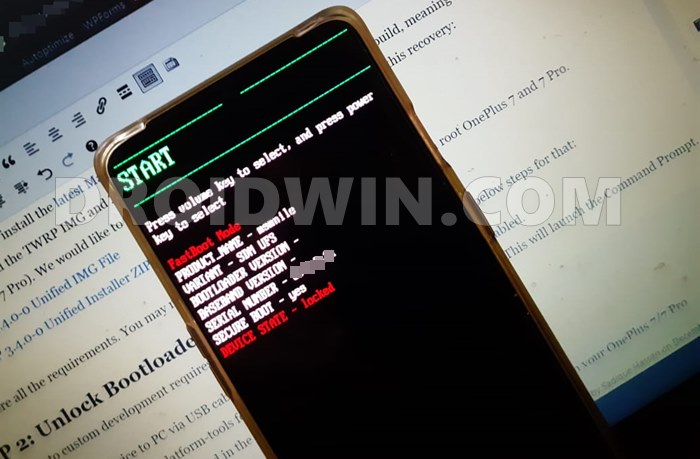
Boot to Fastboot Mode
- Now connect your device to the PC via USB cable. Make sure USB Debugging is enabled.
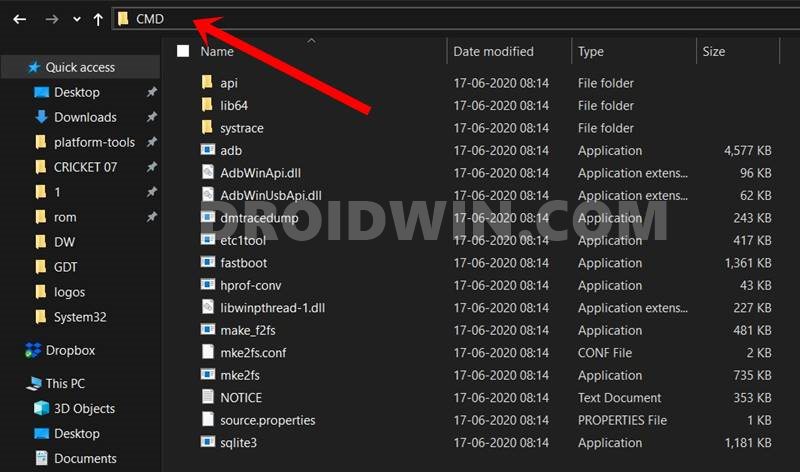
- Then head over to the platform-tools folder, type in CMD in the address bar, and hit Enter. This will launch Command Prompt.
- Type in the following command in the CMD window to boot your device to Fastboot Mode
adb reboot bootloader
- To verify the Fastboot connection, type in the below command and you should get back the device ID, as shown in the image.
fastboot devices
Download PitchBlack Recovery
The official builds of the PitchBlack Recovery could be downloaded from their official site itself. However, there are a few devices that don’t have official support but the unofficial ones are working well and well. You could download them from the XDA Developers site.
- Download Official PitchBlack Recovery: Official PitchBlack Website
- Download Unofficial PitchBlack Recovery: XDA-Developers
Given below are two different methods to install the PitchBlack Recovery. The first one is for those who already have a custom recovery such as TWRP or OrangeFox installed. On the other hand, the second method is for those who have the stock recovery.
METHOD 1: Install PitchBlack Recovery from TWRP Recovery
This method is for those users who already have the TWRP Recovery installed and are planning to make a switch to the PitchBlack Recovery. Here’s what needs to be done in such cases:
- To begin with, download the PitchBlack Recovery ZIP file and transfer it to your device.
- Now connect your device to the PC via USB cable. Make sure USB Debugging is enabled.
- Then head over to the platform-tools folder, type in CMD in the address bar, and hit Enter. This will launch the Command Prompt.

- Type in the following command in the CMD window to boot your device to TWRP Recovery:
adb reboot recovery
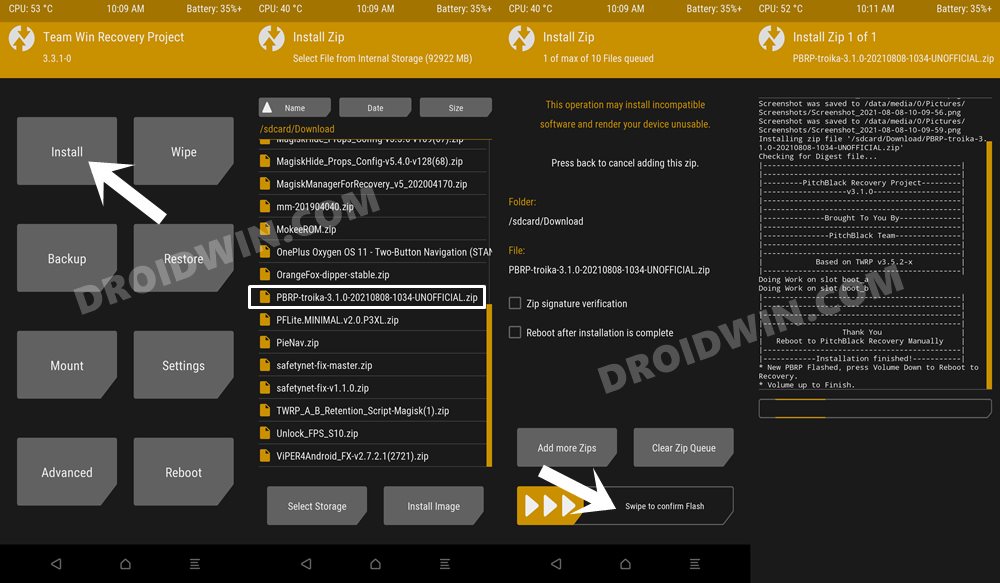
- Now go to the Install section of TWRP, navigate to the PitchBlack Recovery ZIP file, and select it.
- Then perform a right swipe to flash it onto your device.
- Once the flashing is complete, your device should automatically boot to the PitchBlack Recovery.
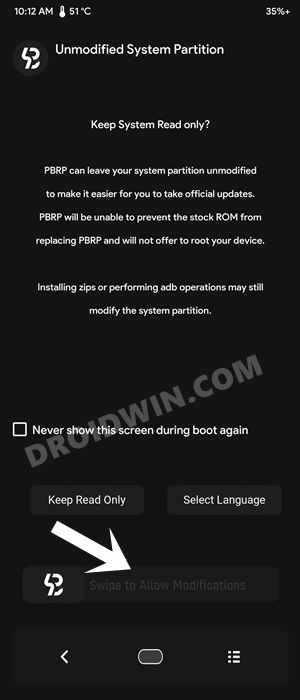
- Now perform a right swipe to allow for system modifications and carry out the desired flashing.
- Once everything is done, go to Reboot > Reboot System to boot your device to the OS.

That’s it. This is how you could install the PitchBlack Recovery onto your Android device using TWRP Recovery.
METHOD 2: Install PitchBlack Recovery via PC
If you don’t have a custom recovery installed, but just have the stock recovery that came shipped with your device (which might be the case with many of our readers), then here’s what you need to do. [Important Point: The below steps are written keeping in mind the A/B Partition scheme– something that the majority of today’s device follows (check for your device here). If your device is an older one and follows a single partition, then please check out the FAQ section that follows after the instructions].
- To begin with, download the PitchBlack Recovery ZIP file.
- Then extract it to any convenient location on your PC and you should get the resultant IMG file.
- Rename it to pb, so that the complete name becomes pb.img.
- Now transfer this pb.img file to the platform-tools folder on your PC.
- Connect your device to the PC via USB cable. Make sure USB Debugging is enabled.
- Now transfer the PitchBlack Recovery ZIP file (that you had downloaded in the first step) to your device.
- Then head over to the platform-tools folder, type in CMD in the address bar, and hit Enter. This will launch the Command Prompt.
- Type in the following command in the CMD window to boot your device to Fastboot Mode:
adb reboot bootloader
- Now execute the below command to boot your device to the PitchBlack Recovery
fastboot boot pb.img
- Once your device boots to PitchBlack Recovery, perform a right swipe to allow modifications.
- Then go to its Install section, select the PitchBlack Recovery ZIP file and perform a right swipe to flash it.
- You may carry out the desired task. If you wish to now boot the device to the OS, then go to Reboot and select Reboot System.
With this, we conclude the guide on how you could install the PitchBlack Recovery on your Android device. If you have any queries concerning the aforementioned steps, do let us know in the comments. We will get back to you with a solution at the earliest.
FAQs related to A/B Partition and Recovery
If your device follows the A/B partition scheme, then it wouldn’t have a native recovery partition. Rather you will have to make use of the boot partition to first temporarily boot the recovery and then permanently flash it onto your device.
On the other hand, if your device is A-only, then it would have the recovery partition. So instead of the ‘fastboot boot pb.img’ command, you could directly use the below command to flash PitchBlack to the recovery partition:
fastboot flash recovery pb.img
After that, you may reboot the device to the recovery right from the Fastboot Mode itself. And if you want to learn more on that, then please do check out our guide on TWRP: fastboot flash vs fastboot boot: Which command to use. On that note, we round off the steps to install the PitchBlack Recovery on your Android device. All the queries are welcomed in the comments section below.


nooname
cmd stucked on sending boot