In this guide, we will show you the steps to install Magisk in the recovery partition and root your Android device that doesn’t have Ramdisk. So how will this entire process be carried out? First off, we will download the stock firmware of your device and get the recovery.img file. This will then be patched via the Magisk App, giving us the magisk_patched.img file. Finally, this patched file will be flashed to the recovery partition and your device stands rooted. Follow along for the detailed instructions.
In one of my articles: How to Root Android device without TWRP Recovery, the first prerequisite is that your device needs to have Ramdisk. If that is not the case, then you wouldn’t be able to patch the stock boot.img file and then flash it to the boot partition. And this is exactly what happened with one of our readers- his device didn’t come with a boot ramdisk.
So he asked for an alternate route (apart from flashing the Magisk app via TWRP, since there was no custom recovery for his device). Turned out, there exists another method to root a device that doesn’t have Ramdisk. And this guide is going to focus on this set of devices only. So without further ado, here are the steps to install Magisk in the recovery partition and then root your Android device.
Table of Contents
How to Install Magisk in Recovery and Root Android [No Ramdisk]
Well, you all might be aware of the benefits of rooting a device (installing Magisk Modules, Xposed Framework, Substratum Themes). We wouldn’t be divulging much into that. Just makes sure to take a backup of all the data on your device before proceeding with the below instructions. Droidwin and its members wouldn’t be held responsible in case of a thermonuclear war, your alarm doesn’t wake you up, or if anything happens to your device and data by performing the below steps.
STEP 1: Enable USB Debugging and OEM Unlocking
To begin with, you will have to enable USB Debugging and OEM Unlocking on your device. The former will make your device recognizable by the PC in ADB mode. This will then allow you to boot your device to Fastboot Mode. On the other hand, OEM Unlocking is required to carry out the bootloader unlocking process.
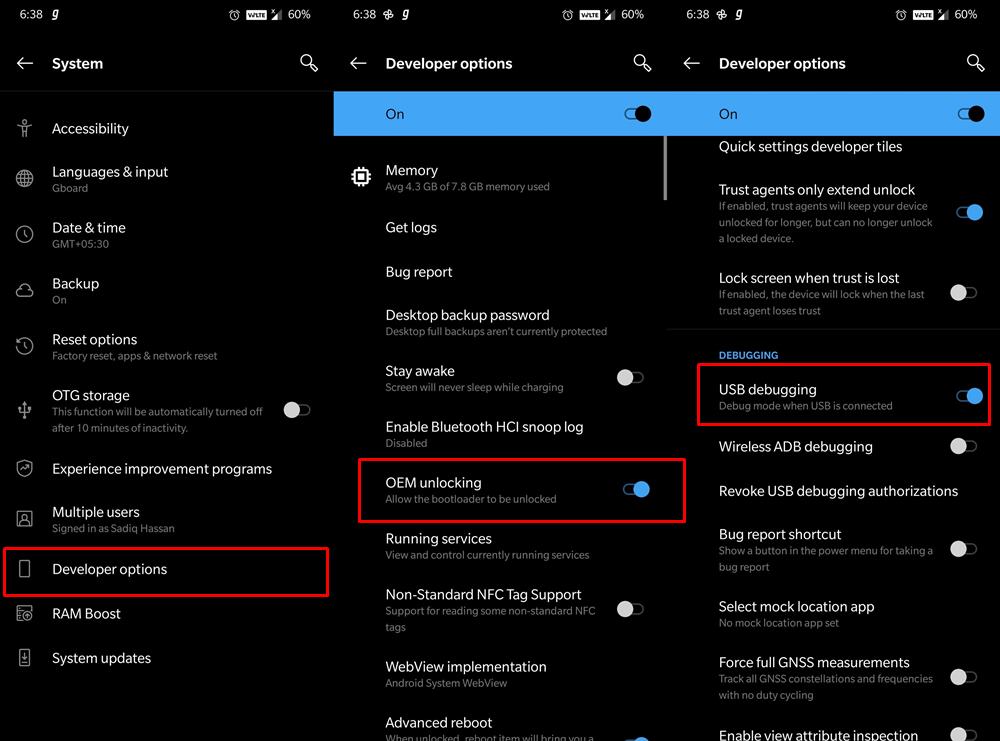
So head over to Settings > About Phone > Tap on Build Number 7 times > Go back to Settings > System > Advanced > Developer Options > Enable USB Debugging and OEM Unlocking. [Don’t Miss: How to Enable USB Debugging on a Broken Android Device Screen? ]
STEP 2: Instal Android SDK
Next up, install the Android SDK Platform Tools on your PC. This is the official ADB and Fastboot binary provided by Google and is the only recommended one. So download it and then extract it to any convenient location on your PC. Doing so will give you the platform-tools folder, which will be used throughout this guide.
STEP 3: Unlock Bootloader
Next up, you will have to unlock the device’s bootloader. If you haven’t done so, then you may refer to our below guides. Do keep in mind that doing so will wipe off all the data on your device and might void the warranty as well. Furthermore, apps like Google Pay (due to SafetyNet getting tripped) and Netflix (due to WideVine L1 degradation to L3) might not function along the expected lines. So if that’s well and good, then here are the guides that will help you unlock the bootloader:
- How to Unlock Bootloader on any Sony Xperia Device
- How to Unlock Bootloader on any Samsung Device [New VaultKeeper Method]
- A Universal Guide to Unlock Bootloader on any Realme Device
- How to Unlock Bootloader on any Motorola Device
- Unlock Bootloader on any Realme Device
- How To Unlock Bootloader on OnePlus devices
Once you have unlocked the bootloader, move over to the next step of this guide to install Magisk in the recovery partition and then root your Android device.
STEP 4: Extract recovery.img from Stock Firmware
Next up, download the stock firmware for your device. Most of the OEMs upload the firmware file over to their official site itself. In the case of Samsung, you could use a standalone tool such as Frija to download the firmware. Once you have downloaded the firmware, extract it to any convenient location on your PC.
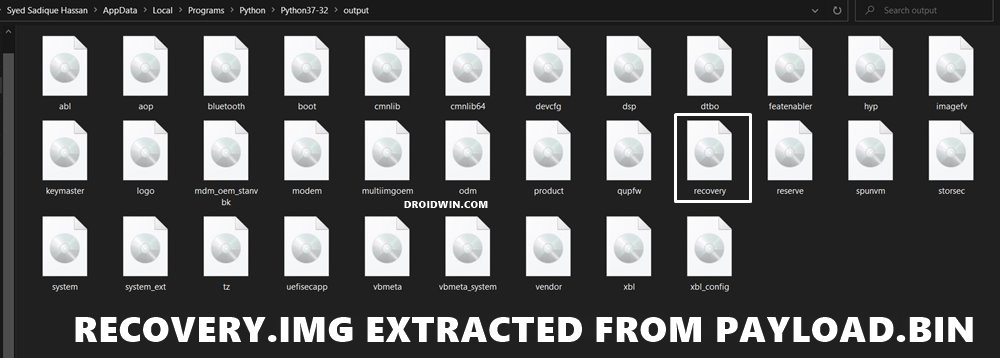
In the case of Pixel, the firmware files are present as ZIP, so you could easily extract them via WinRAR. However, things aren’t so easy for other OEMs. For example, OnePlus have their partition files in payload.bin. On the other hand, Oppo and Vivo pack it under OZIP format. Likewise, devices with Spreasdtrum and Unisoc chipsets have their firmware as a PAC file. So in those cases, you may refer to our below guides.
- Extract payload.bin and get the stock boot image file
- How to Extract OZIP Stock ROM (Firmware)
- How to Extract Spreadtrum and Unisoc PAC Firmware File
STEP 5: Install Magisk App | Check for Ramdisk
Now install the latest Magisk App v22 onto your device. [For the unaware, the latest build of Magisk has unified the Magisk Manager and Magisk Installer ZIP and they both are now part of a single package, known as the Magisk App]. Once you have installed the app, let’s verify that your device indeed doesn’t have the Ramdisk partition.
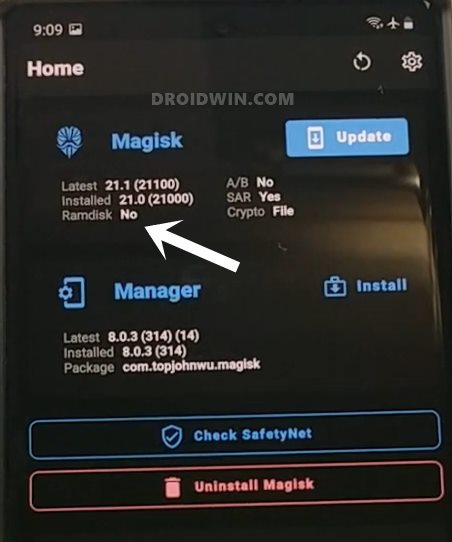
hence launch the app and have a look under the Magisk section. If Ramdisk spells out NO, then you are good to proceed ahead. [If your device has Ramdisk, then it’s better to root your device via Magisk patched boot.img]. Now that the ramdisk check is complete, let’s move over to the next step to install Magisk in the recovery partition and then root your Android device.
STEP 6: Patch recovery.img via Magisk
- To begin with, transfer the stock recovery.img file to your device.
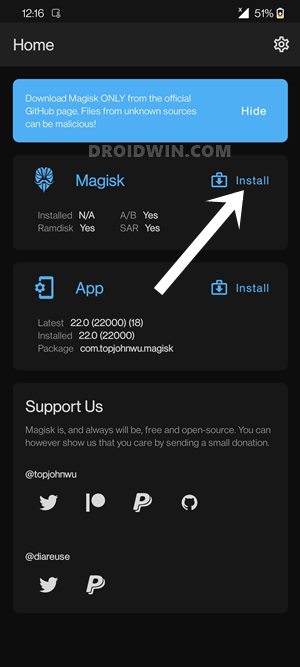
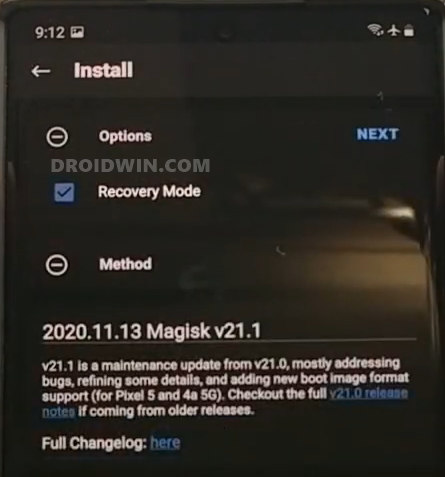
- Now launch the Magisk app and tap on the Install button next to Magisk.

- Checkmark Recovery Mode under the Options section (if it isn’t enabled by default) and tap Next.
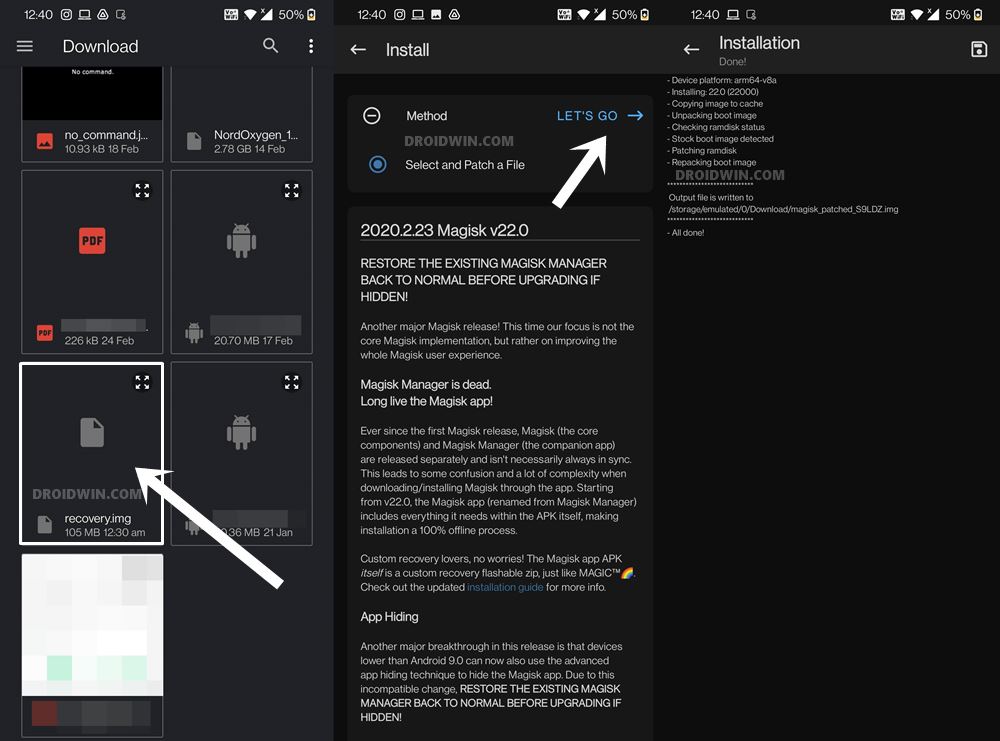
- Now go to the Method section and choose Select and Patch a File.
- Browse to the extracted recovery.img file and select it.
- Now tap on the Let’s Go button situated at the top right and Magisk will begin patching the file.
- Once done, you should get the magisk_patched[random numbers].img file in the Downloads folder of your device.
- It is recommended that you delete the random numbers from the end so that the complete file name becomes magisk_patched.img
STEP 7: Boot Device to Fastboot Mode
To install this Magisk patched recovery file and then root your Android device, you will have to boot your device to Fastboot Mode. Here’s how it could be done:
- With USB Debugging enabled, connect your device to the PC via USB cable.
- Then head over to the platform-tools folder, type in CMD in the address bar, and hit Enter. This will launch the Command Prompt.
- Now type in the following command in the CMD window
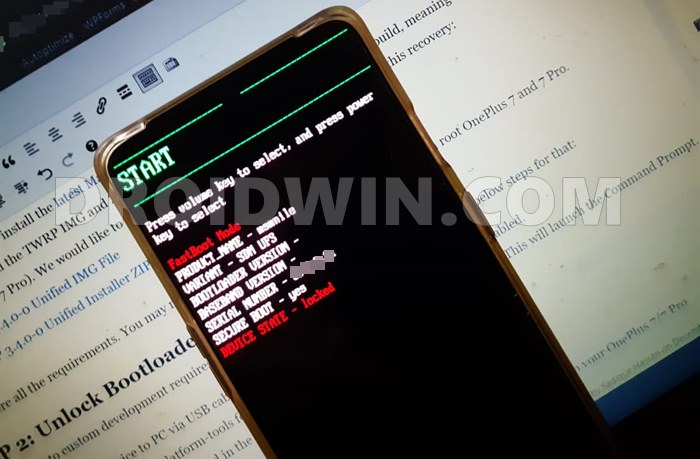
adb reboot bootloader
Reference Image - Your device shall now boot to the Fastboot/Bootloader mode.

STEP 8: Flash Magisk Patched recovery.img via Fastboot | Root Android
We will now flash/install this Magisk patched recovery file via Fastboot Commands to your Android device to root it. Follow along
- Transfer the magisk_patched.img file from your device to the platform-tools folder on your PC.
- Now type in the below command (inside the CMD window opened inside platform-tools) to flash the file to the recovery partition on your device:
fastboot flash recovery magisk_patched.img
- Once flashed, you may now reboot your device to the OS via the following command:
fastboot reboot
That’s it. With this, we conclude the guide on how to install Magisk in the recovery partition and then root your Android device that doesn’t have Ramdisk. If you have any queries concerning the aforementioned steps, do let us know in the comments. We will get back to you with a solution at the earliest.


Avinash
After I enter the fastboot flash recovery command then it says waiting for any device. Can you please tell me what to do next?
sherwin
C:\Users\Touma\Downloads\platform-tools>fastboot flash recovery magisk_patched.i
mg
Sending ‘recovery’ (65536 KB) OKAY [ 2.117s]
Writing ‘recovery’ FAILED (remote: ‘unknown comm
and or device is lock’)
fastboot: error: Command failed
qaribeh216
How to Unlock Bootloader on Lenovo Tab V7 PB-6505M
Alexis
Oye amigo sabras por que mi celular no puede entrar al modo fastboot es un ZTE V10 Vita, y he querido hacerlo root pero no encuentro muche informacion acerca del tema 🙁
Xenon
Hi. I use hot 7 pro. X625C. I patch the recovery, but I only get root access when I hold volume + for 5 sec on restart and no network . But if I restart normal without holding volume +, I do not get root access but I get phone network.
My magisk Says no ramdisk too.
Xenon
Hi, am using infinix Hot 7 Pro x625c, would this procedure work for my device. Cuz I just checked magisk and it has no ramdisk too
Fureki
fastboot flash recovery magiskpatched.img When you execute the command of “remote:partition length get errer”Is displayed.The terminal uses Huawei p20 lite.I also unlocked the bootloader and put in TWRP.
tosh
Hi, my device is an Oppo r17. I only have a mac laptop so I downloaded a VPN to be able to run python and complete of the other steps. I have got as far as step 7 but when I enter “adb reboot bootloader” I get this error message – ‘adb’ is not recognized as an internal or external command, operable program or batch file.
I have tried some of the fixes that come up in google searches but none work. Even when I manually put in the pathway it comes up with either “The directory name is invalid” or “the system cannot find the path specified”
I’d love some help with this because I really want to successfully root my phone.
Thanks!
Sadique Hassan
Hi Tosh, have you installed the Android SDK Platform Tools? Likewise, you need to open the Command Window inside the platform-tools folder itself.
Zeulty
Hi My Device Xiaomi Redmi 6 (Cereus) I want root it I have Twrp I tried flash magisk.zip and it was succesfull bot theres no magisk or root I guess because I dont Flash Any Boot or Recovery image So Ypu Can Help me ?
Sadique Hassan
Hi Zeulty, now that you have flashed Magisk via TWRP, go ahead and install the Magisk App onto your device. Then launch it and grant it the Admin rights. As far as flashing boot.img is concerned, it is needed when you root the device without TWRP. Since you are using the TWRP Method, that isn’t needed.
John Ephraim
Help please .
I did all the required steps and everything worked but after I entered the reboot command ,my phones gets stuck in boot loop, I even tried entering the recovery mode ,but it doesn’t work. Help me please. The name of the device is infinix s5 lite
MUJAHID
SAME HAPPENED WITH MEH
KWASITUNTUM
i think you have to flash the stock recovery image back.
Iqbal Azman
I’m worried to flash twrp after finished install magisk. Did i need to patch twrp img with magisk?
Ibrahim
MI-RECOVREY always back after reboot my xiaomi mi 9t –
after flashing twrp it work only one time after reboot it gone and replaced by mi-recovery –
also after installing magisk.zip by twrp my phone won’t switch on and i face boot loop to resolve it i need to uinstall magisk then my phone will switch on normaly ;
note : my xiaomi mi 9t was rooted and unrooted after facing some boot issue now i want to root it again
i use 12.0.5 miui global version
Sadique Hassan
Hi Ibrahim, first off, which Fastboot Command are you using? if it is the fastboot boot twrp.img, then TWRPO would only be temporarily installed. You would have to use the fastboot flash recovery twrp.img command. Furthermore, as soon as it boots to TWRP, go to Reboot and select Recovery to reboot your device back to TWRP. Let me know if it fixes the issue or not.
Apurba Sarkar
where can i find the stock recovery.img, also I’m using lineage os17.1 in raphaelin.
Sadique Hassan
Stock recovery could be found inside the stock firmware itself. However, as of now, since you are using Lineage, I guess you would have installed the TWRP or Lineage Recovery installed. So patching and flashing the stock recovery might lead to a few issues. Could you let me know your device name so that I may check for any other rooting method.
Zoltan Ambrud
I have a Samsung galaxy xcover 4s which doesn’t have fastboot mode thus I can’t install recovery image which results almost always system crash and reboot when unlock screen every time this tutorial is useless for those devices do you have other alternative method???
Sadique Hassan
Hi Zoltan, could you please let me know where does it take you to after executing the adb reboot bootloader command.
Naol
Samsung devices don’t have fastboot mode, how can we flash the recovery.img?
gdergg
In redmi note 8 it says “system has been destroyed” help please
Sadique Hassan
Hi gdergg, you will have to unlock the bootloader via Mi Unlock Tool (which will wipe the data and make the warranty null and void) and then flash the stock Fastboot ROM via Fastboot Commands
Orlando Henrique
very very very thank you so much, I didn’t understand and you helped me, god bless you!
Sadique Hassan
Glad that I could be of help 🙂
LUIS OTAVIO COSTA DOS SANTOS
Olá, tudo bem? Espero que sim, estou com dificuldade de encontrar o recovery.img do mi 9 lite, posso baixar o arquivo twrp.img oficial e modificar lá no magisk como imagem de inicialização?