In this guide, we will show you the steps to install LineageOS 19 based on Android 12 on Sony Xperia 10/Plus. Both these devices did manage to encapsulate the attention of the masses upon their release. With a power-packed feature set, exceptional build quality, support for Fast Charging, and Android 9 out of the box, there’s a lot to look forward to. However, the OEM only blessed both these devices with a single update and Android 10 was the last major OS upgrade that it got a taste of.
But thanks to the open-source nature of the OS, the developers were right on their toes and released the subsequent Android upgrades in no time whatsoever. As of now, you could now welcome the latest OS build onto your device right away, all thanks to the popular custom ROM LineageOS. For the unaware, the USP of this ROM is to maintain an equilibrium between the features and the overall device usage. So on that note, let’s get started with the steps to install LineageOS 19 based on Android 12 on Sony Xperia 10/Plus.
Table of Contents
Install LineageOS 19 [Android 12] on Sony Xperia 10/Plus
Before starting, make sure that you are on the latest Android firmware. Moreover, take a data backup beforehand as the process will reset your device. Droidwin and its members wouldn’t be held responsible in case of a thermonuclear war, your alarm doesn’t wake you up, or if anything happens to your device and data by performing the below steps.
Supported Devices
Xperia 10
I3113
I3123
I4113
I4193

Xperia 10 Plus
I3213
I3223
I4213
I4293
STEP 1: Install Android SDK
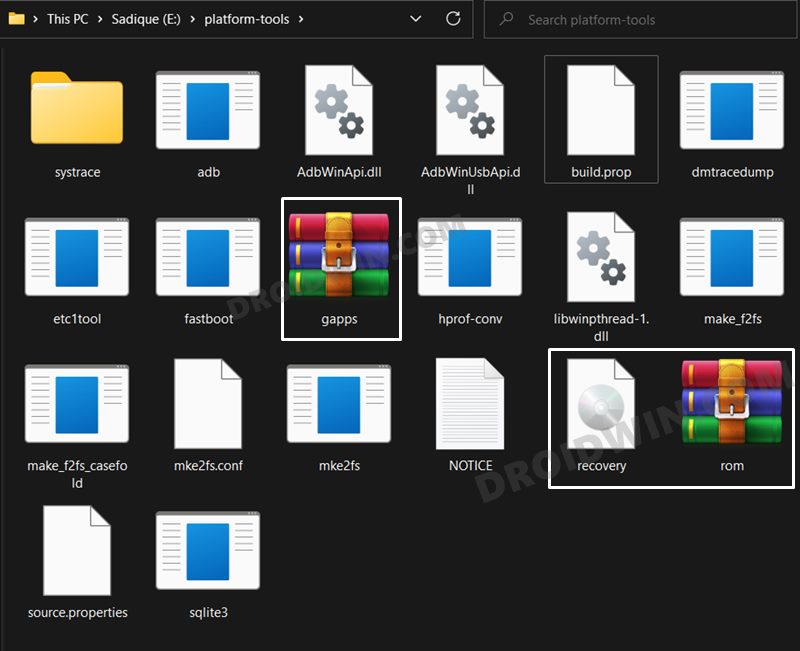
First and foremost, you will have to install the Android SDK Platform Tools on your PC. This is the official ADB and Fastboot binary provided by Google and is the only recommended one. So download it and then extract it to any convenient location on your PC. Doing so will give you the platform-tools folder, which will be used throughout this guide.

STEP 2: Download LineageOS 19 [Android 12] ROM
Next up, get hold of the ROM for your device from below. Along with that, make sure to download its associated recovery file as well. Moreover, if you want Google apps and services, then download the GApps as well. Regarding which, there are many different GApps providers, as for this guide, we are using the NikGApps, you are free to use the one that you prefer.
Xperia XA2 [Pioneer]: ROM + RECOVERY
Xperia XA2 Plus [Voyager]: ROM + RECOVERY
GApps: NikGApps
Once you have downloaded all the three files [ROM, recovery, and GApp], transfer them to the platform-tools folder on your PC. Likewise, rename the LineageOS 19 ROM to rom.zip, the LineageOS recovery file to recovery.img, and the GApps package to gapps.zip.
STEP 3: Enable USB Debugging and OEM Unlocking
Next up, you will have to enable USB Debugging and OEM Unlocking on your device. The former will make your device recognizable by the PC in ADB mode. This will then allow you to boot your device to Fastboot Mode. On the other hand, OEM Unlocking is required to carry out the bootloader unlocking process.
So head over to Settings > About Phone > Tap on Build Number 7 times > Go back to Settings > System > Advanced > Developer Options > Enable USB Debugging and OEM Unlocking.
STEP 4: Unlock Bootloader on Sony Xperia 10/Plus
Next up, you will also have to unlock the device’s bootloader. Do keep in mind that doing so will wipe off all the data from your device and could nullify its warranty as well. So if that’s all well and good, then please refer to our detailed guide on How to Unlock Bootloader on any Sony Xperia Device.
STEP 5: Boot to Fastboot Mode
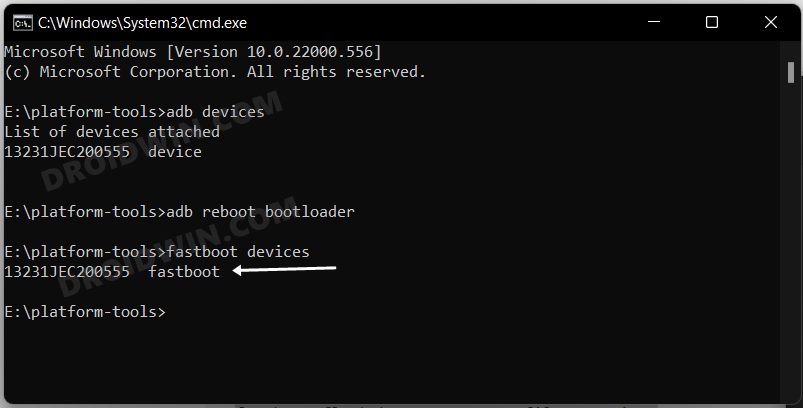
- Connect your device to the PC via USB cable. Make sure USB Debugging is enabled.
- Then head over to the platform-tools folder, type in CMD in the address bar, and hit Enter. This will launch the Command Prompt.

- After that, type in the following command in the CMD window to boot your device to Fastboot Mode
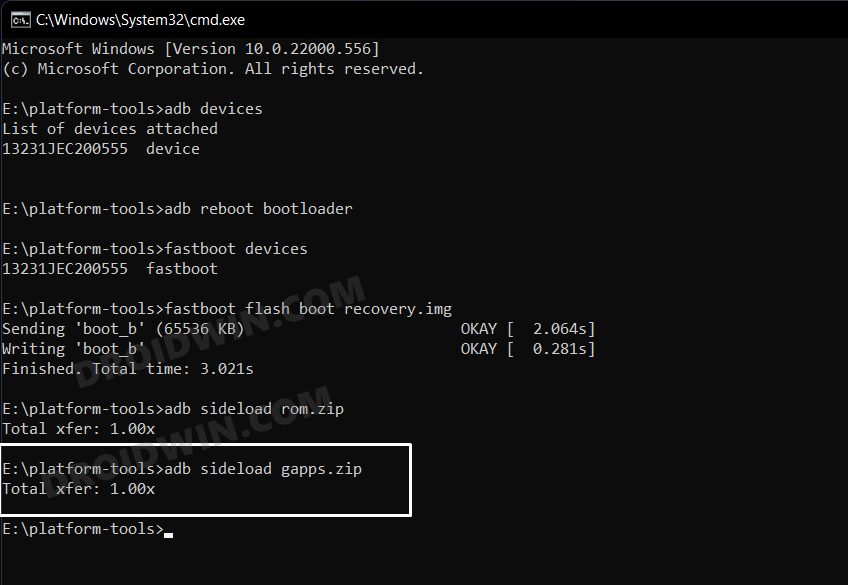
adb reboot bootloader
- To verify the Fastboot connection, type in the below command and you should get back the device ID.
fastboot devices

STEP 6: Install LineageOS Recovery on Sony Xperia 10/Plus
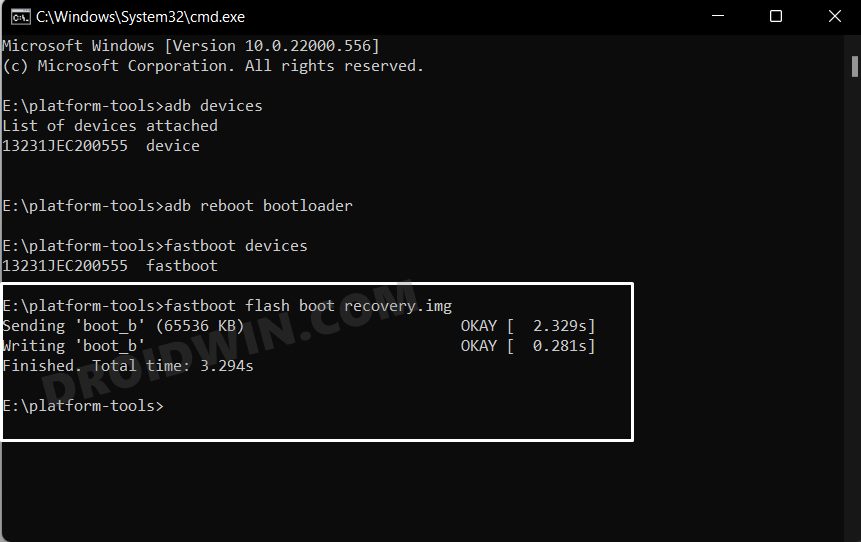
- Execute the below command in the CMD window to flash the LineageOS 19 Recovery
fastboot flash boot recovery.img
- Now use the Volume keys to bring up the Recovery option and hit the Power key to confirm it.
- Your device will now boot to the LineageOS Recovery.
STEP 7: Copy Contents of Slot A to B
in order to maintain consistency of the firmware versions between the two partitions on your device, we will now be copying all the contents of Slot A to Slot B.
- So download the copy-partitions.zip file and transfer it to the platform-tools folder [rename the file to copy-partitions.zip].
- After that, select Apply Update > Apply from ADB from the recovery’s main menu.
- Then open Command Prompt inside the platform-tools folder and execute the below command
adb sideload copy-partitions.zip
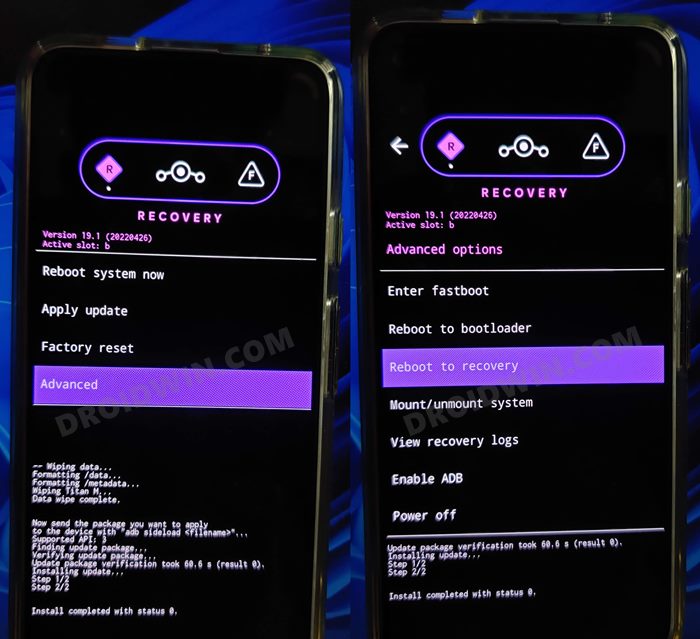
- Once done, you will have to reboot to recovery by going to Advanced > Reboot to Recovery.


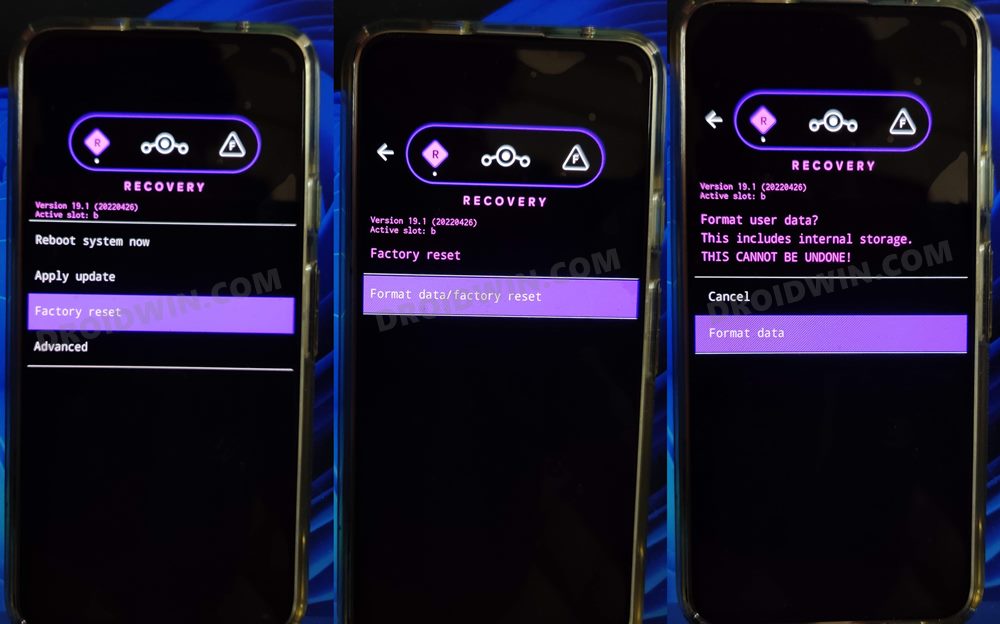
STEP 8: Install LineageOS 19 ROM on Sony Xperia 10/Plus
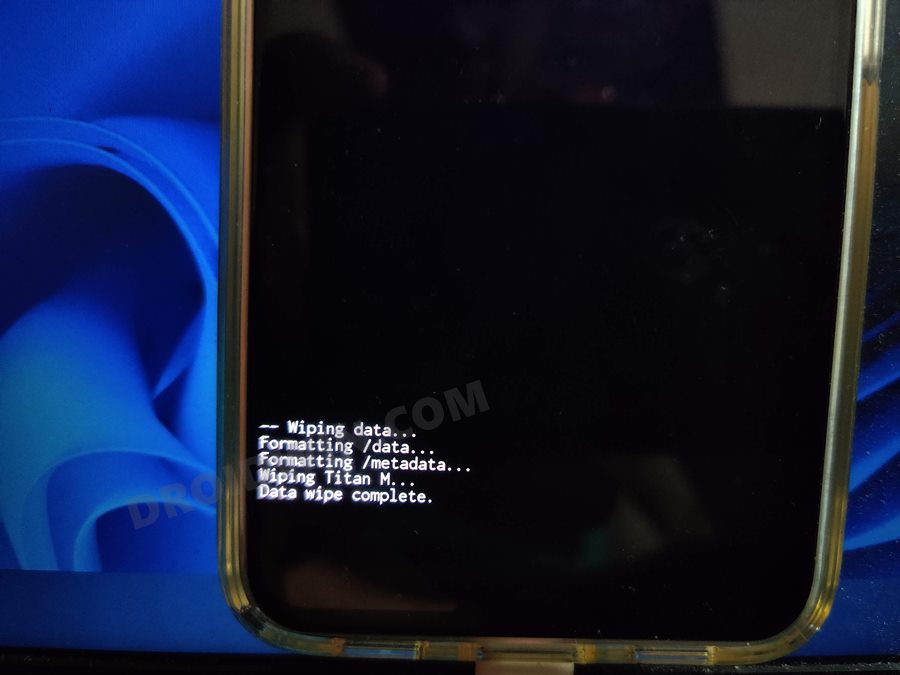
- To begin with, go to Factory Reset > Format Data/Factory Reset > Format Data.
- Your device will now undergo a reset. Once done, you will get the Data Wipe complete message.
- Now go to the recovery’s home page and select Apply Update > Apply from ADB.
- After that, execute the below command that is opened inside the platform-tools folder.
adb sideload rom.zip
- The ROM will now be flashed. Once done, you will get the Total xfer: 1.00x message.

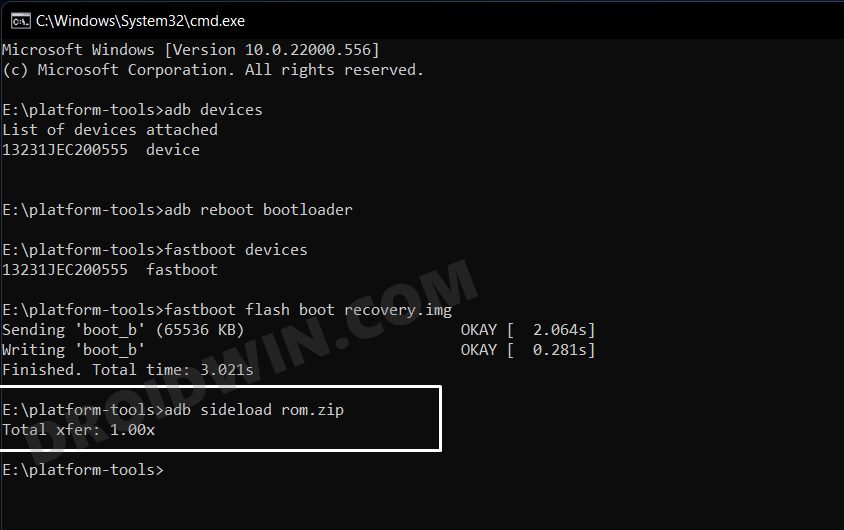
NOTE: In some cases, the process will stop at 47% and report adb: failed to read command: Success. Likewise, it could also report adb: failed to read command: No error or adb: failed to read command: Undefined error: 0. All these messages signify that the flashing has been successfully completed.
STEP 9: Install GApps on Sony Xperia 10/Plus
If you want to Google apps and services, then you will have to flash GApps right now, you cannot do so at a later stage. So refer to the below instructions to flash it.
- From the LineageOS recovery, go to Advanced > Reboot to Recovery.
- Once your device reboots to recovery, go to Apply Update > Apply from ADB.
- After that, execute the below command to flash the GApps package
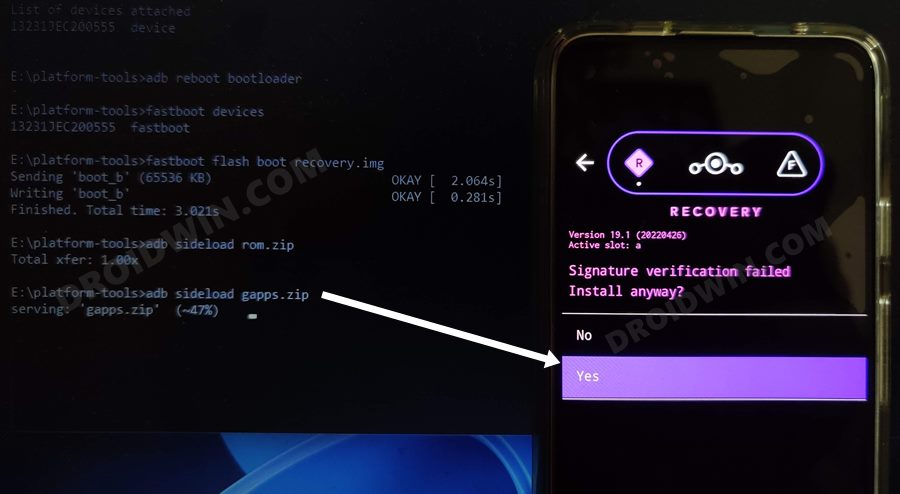
adb sideload gapps.zip
- You might get a signature verification failed message, reply YES [any file that hasn’t been signed by Lineage will throw this error, it is completely normal].
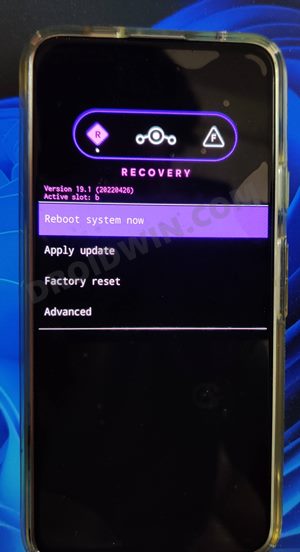
- Once the flashing is complete, go to the recovery home page and select Reboot System Now. Your device will now boot to the newly installed OS.

That’s it. These were the steps to install the latest LineageOS 19 onto your Sony Xperia 10/Plus. If you have any queries concerning the aforementioned steps, do let us know in the comments. We will get back to you with a solution at the earliest.


