In this guide, we will show you the steps to install numerous Android 13 Custom ROMs onto Galaxy S10/S10+/S10 5G/E. These devices from the South Korean conglomerate come with Samsung’s in-house One UI. While it is definitely one of the most popular players in the town, however, one cannot negate the fact that beholds a truckload of unnecessary features, some of which might even be categorized as bloatware.
If you are also of the same opinion, then you’ll be glad to know that you could now break free from the shackles of the Samsung ecosystem and bring a clean stock OS experience that is as close to AOSP as it gets. And not to mention the fact that they are based on the latest OS build. So without any further ado, let’s show you the steps to install numerous Android 13 Custom ROMs onto Galaxy S10/S10+/S10 5G/E.
Table of Contents
Install Android 13 Custom ROMs on Galaxy S10/S10+/S10 5G/E

The below instructions are listed under separate sections for ease of understanding. Make sure to follow the same sequence as mentioned. Droidwin and its members wouldn’t be held responsible in case of a thermonuclear war, your alarm doesn’t wake you up, or if anything happens to your device and data by performing the below steps.
Download Android 13 Custom ROMs for Galaxy S10/S10+/S10 5G/E
To begin with, get hold of the desired custom ROM based on the thirteenth iteration of the OS for your device from below. Once you have downloaded the ROM, make sure to transfer them to your device’s Internal Storage. [NOTE: We will be using TWRP for flashing custom ROMs, except for LineageOS and PixelExtended, both of which require LineageOS recovery].
Pixel Experience/Plus
Galaxy S10e
Regular: ROM / PE Recovery
Plus: ROM / PE Recovery

Galaxy S10
Regular: ROM / PE Recovery
Plus: ROM / PE Recovery

Galaxy S10+
Regular: ROM / PE Recovery
Plus: ROM / PE Recovery

Galaxy S10 5G
Regular: ROM / PE Recovery
Plus: ROM / PE Recovery
Evolution X
Download Link
NOTE: beyond0lte= s10e | beyond1lte= s10 | beyond2lte= s10+ | beyondx= s10 5g
crDroid
ROM for beyond0lte
ROM for beyond1lte
ROM for beyond2lte
ROM for beyondx
Cherish OS
Download Link
NOTE: beyond0lte= s10e | beyond1lte= s10 | beyond2lte= s10+ | beyondx= s10 5g
Pixel Extended
Galaxy S10e (beyond0lte)
Galaxy S10 (beyond1lte)
Galaxy S10+ (beyond2lte)
Galaxy S10 5G (beyondx)
LineageOS
Samsung Galaxy S10 (beyond1lte)
Samsung Galaxy S10 5G (beyondx)
Samsung Galaxy S10+ (beyond2lte)
Samsung Galaxy S10e (beyond0lte)
Pixel Extended
Galaxy S10e (beyond0lte)
Galaxy S10 (beyond1lte)
Galaxy S10+ (beyond2lte)
Galaxy S10 5G (beyondx)
STEP 1: Unlock Bootloader on Galaxy S10/S10+/S10 5G/E
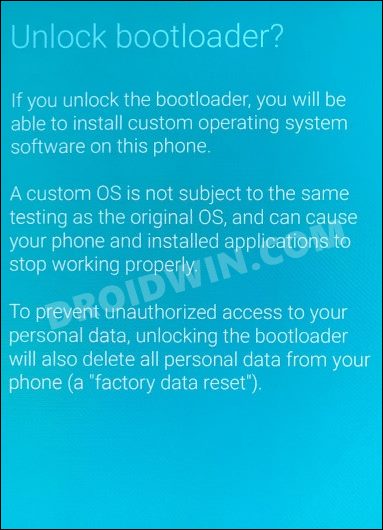
First and foremost, you will have to unlock the bootloader on your device. For that, you may refer to our comprehensive guide on Unlock Bootloader on Samsung Galaxy Devices. Once the process is complete and your device boots up, don’t restore the data yet, as your device will again have to go for a wipe in the subsequent step.
STEP 2: Boot Galaxy S10/S10+/S10 5G/E to Download Mode
You will have to boot your device to Download Mode so that you are able to flash the required mods. So either refer to our detailed guide on How to Boot any Samsung Device to Download Mode or refer to the below shorter instructions:
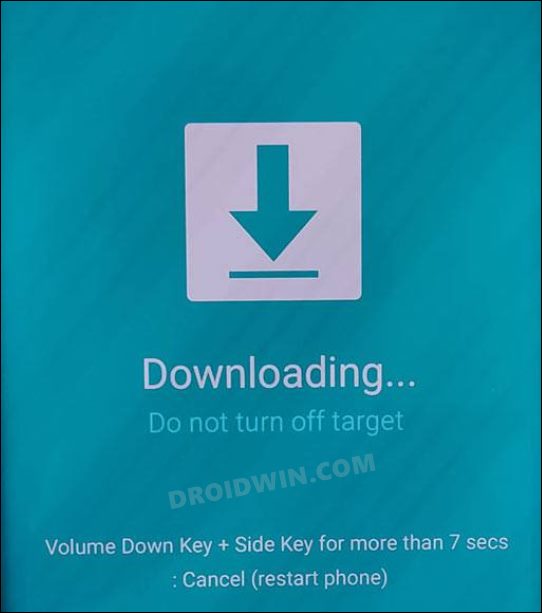
- To begin with, power off your device.
- Then press and hold the Power and Volume Up keys and your device will be booted to Stock Recovery.
- Now highlight the Reboot to Bootloader option using the Volume keys and then press the Power key to confirm it.
- Your device should now boot to the Download Mode.
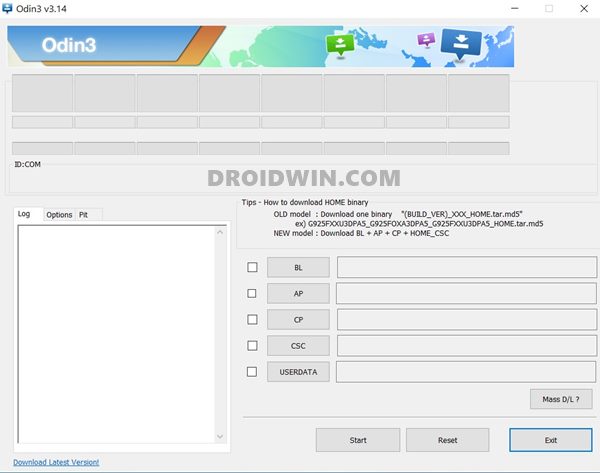
STEP 3: Install Odin
Next up, you will have to download and install the Odin Tool onto your PC. This is needed to flash the TWRP and to disable AVB on your device. So get hold of the latest Odin from here: Download: Odin3-v3.14.4.zip. Once downloaded, extract it to any convenient location on your PC.
STEP 4: Disable Android Verified Boot on Samsung Galaxy A71
Next up, you will have to disable AVB on your device which would then allow you to flash the desired custom binary (in this case, TWRP).
- So start off by downloading the vbmeta_disabled.tar file onto your PC.
- Now connect your device to the PC via USB cable (make sure that it is booted to Download Mode)
- Then launch the Odin Tool and click on the Userdata button.

- Navigate to the vbmeta_disabled.tar file, select it and click Open.
- Finally, click on the Start button. You shall now get a prompt on your device, stating that “You have to reset your device to factory settings”.
- So use the Volume Keys to select the reset option and hit the Power key to confirm it.


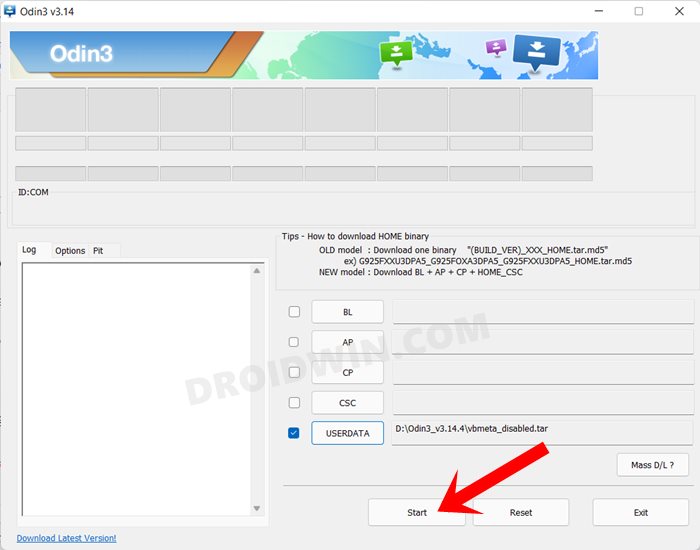
Your device will now undergo a reset and then, the AVB stands disabled. You may now proceed ahead to install the TWRP Recovery on your Samsung Galaxy A71.
STEP 7: Install TWRP Recovery on Galaxy S10/S10+/S10 5G/E
Skip this TWRP installation section if you are planning to install LineageOS or Pixel Extended ROM.
- To begin with, download the TWRP for your device from below:
TWRP Recovery for Galaxy S10/S10+/S10 5G/E: Download Link
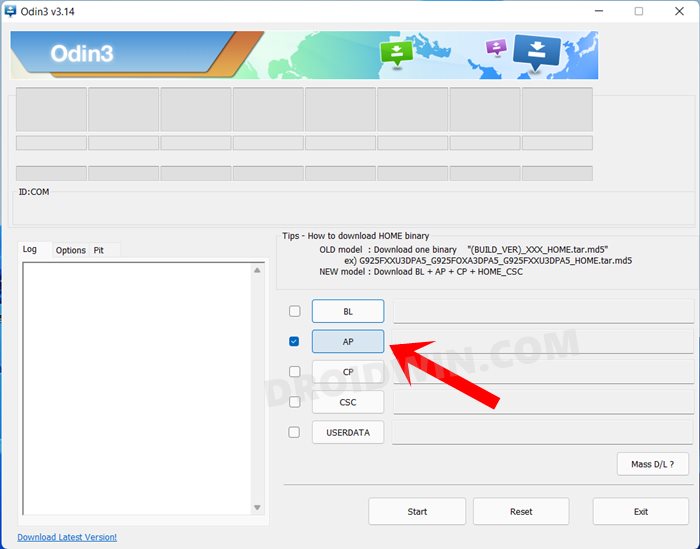
- Then launch the Odin Tool on your PC and click on the AP button.
- Navigate to the downloaded TWRP.tar file, select it and click Open.
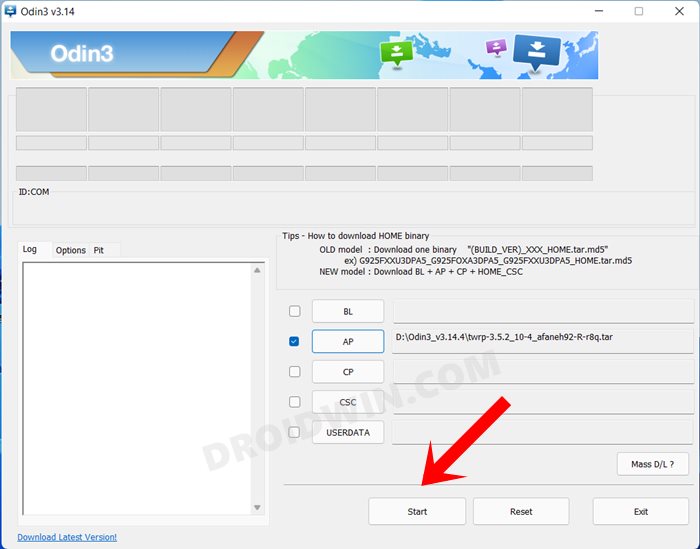
- Finally, hit the Start button and TWRP will be flashed onto your device.
- Once you press Start, grab the phone and press Vol up + Bixby + Power to force it to boot straight in TWRP after flashing

STEP 8: Disable Encryption on Galaxy S10/S10+/S10 5G/E via TWRP
Skip this section if you are planning to install LineageOS or Pixel Extended ROM.
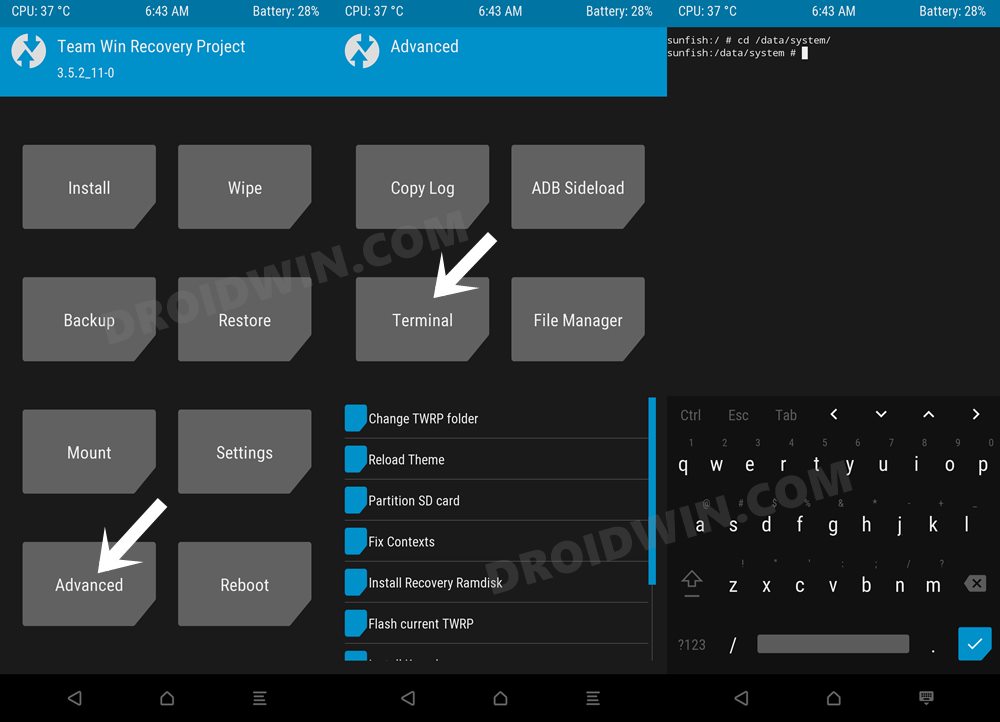
- Once your device boots to TWRP, go to Advanced > Terminal.
- Then type in the below command and hit Enter
multidisabler
- Your device will now resize the vendor and will ask you to run multidisabler again.
- So again execute the below command and hit Enter
multidisabler
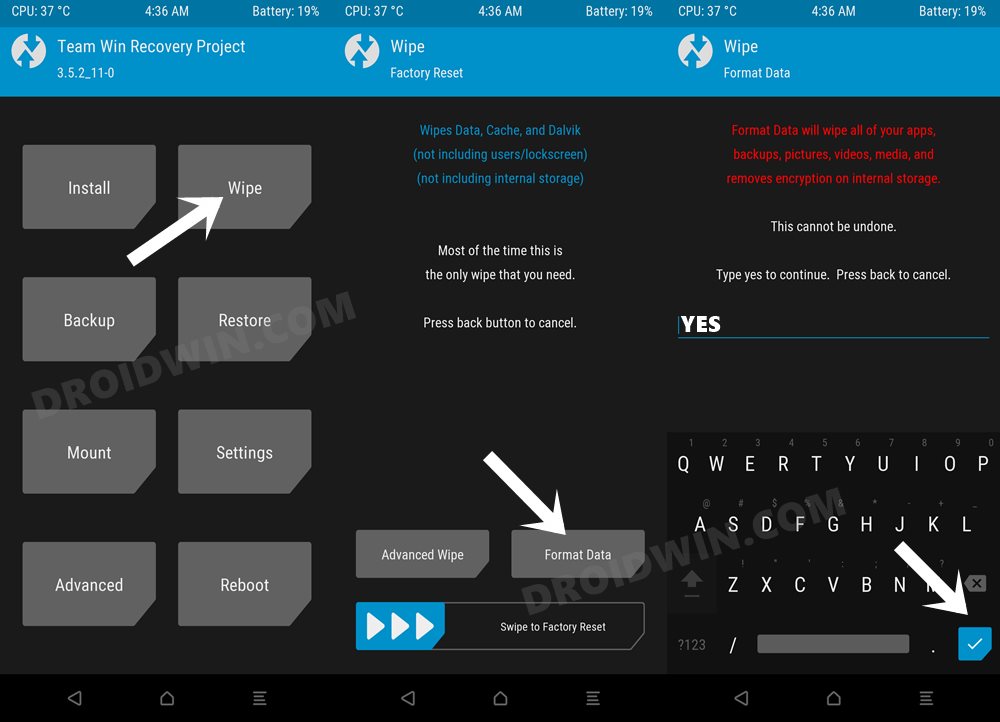
- Once done, go to Wipe and select Format Data. Then type in YES in the space provided.
- Now tap on the checkmark situated at the bottom right. Your device will now be reset.
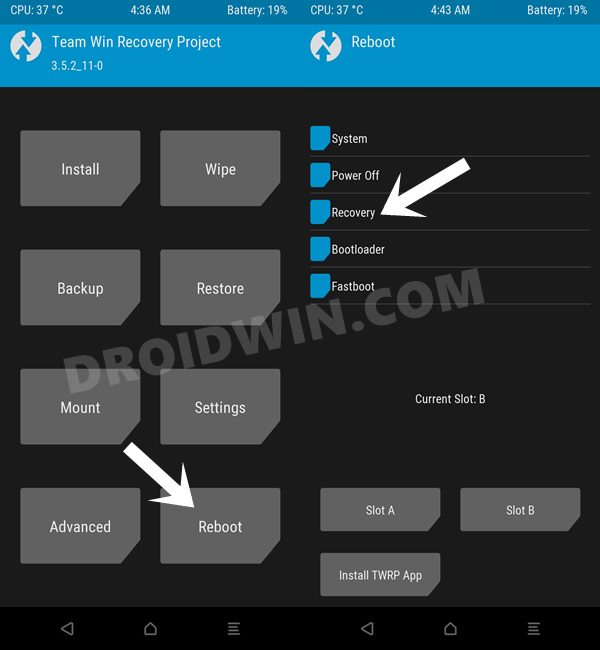
- Once the format is complete, go to Reboot and select Recovery. Your device will reboot to TWRP.
Install Pixel Experience Android 13 ROM on Galaxy S10/S10+/S10 5G/E
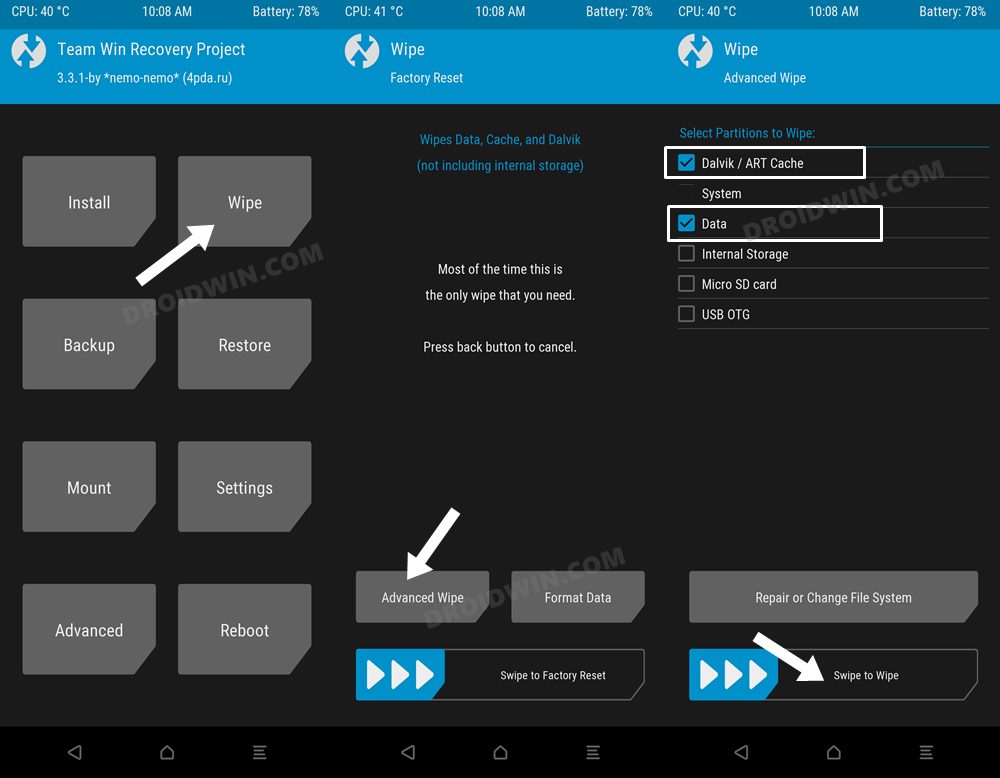
- From TWRP, go to Wipe > Advanced Wipe and select Data, Cache, and System partitions.
- Then perform a right swipe to wipe the data on these partitions.
- Once done, go to Install, select the ROM.zip file, and perform a right swipe to flash it.
NOTE: If you haven't yet transferred the ROM file to your device, then you could do so now as well, directly from TWRP itself.
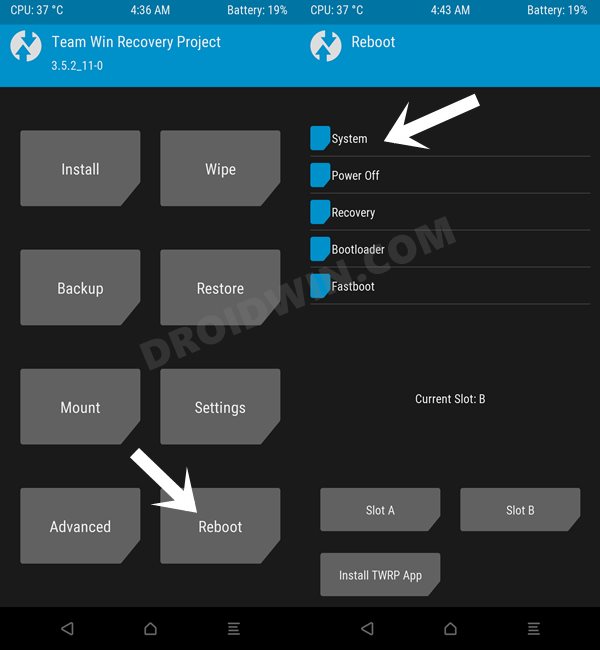
- Finally, go to Reboot and select System. Your device will now boot to the newly installed OS.

That’s it. These were the steps to install Pixel Experience Android 13 ROM on Galaxy S10/S10+/S10 5G/E. If you have any queries concerning the aforementioned steps, do let us know in the comments. We will get back to you with a solution at the earliest.
Install Evolution X Android 13 ROM on Galaxy S10/S10+/S10 5G/E
- From TWRP, go to Wipe > Advanced Wipe and select Data, Cache, and System partitions.
- Then perform a right swipe to wipe the data on these partitions.
- Once done, go to Install, select the ROM.zip file, and perform a right swipe to flash it.
NOTE: If you haven't yet transferred the ROM file to your device, then you could do so now as well, directly from TWRP itself.
- Finally, go to Reboot and select System. Your device will now boot to the newly installed OS.

That’s it. These were the steps to install Evolution X Android 13 ROM on Galaxy S10/S10+/S10 5G/E. If you have any queries concerning the aforementioned steps, do let us know in the comments. We will get back to you with a solution at the earliest.
Install crDroid Android 13 ROM on Galaxy S10/S10+/S10 5G/E
- From TWRP, go to Wipe > Advanced Wipe and select Data, Cache, and System partitions.
- Then perform a right swipe to wipe the data on these partitions.
- Once done, go to Install, select the ROM.zip file, and perform a right swipe to flash it.
NOTE: If you haven't yet transferred the ROM file to your device, then you could do so now as well, directly from TWRP itself.
- Finally, go to Reboot and select System. Your device will now boot to the newly installed OS.
That’s it. These were the steps to install crDroid Android 13 ROM on Galaxy S10/S10+/S10 5G/E. If you have any queries concerning the aforementioned steps, do let us know in the comments. We will get back to you with a solution at the earliest.
Install Cherish OS Android 13 ROM on Galaxy S10/S10+/S10 5G/E
- From TWRP, go to Wipe > Advanced Wipe and select Data, Cache, and System partitions.
- Then perform a right swipe to wipe the data on these partitions.
- Once done, go to Install, select the ROM.zip file, and perform a right swipe to flash it.
NOTE: If you haven't yet transferred the ROM file to your device, then you could do so now as well, directly from TWRP itself.
- Finally, go to Reboot and select System. Your device will now boot to the newly installed OS.
That’s it. These were the steps to install Cherish OS Android 13 ROM on Galaxy S10/S10+/S10 5G/E. If you have any queries concerning the aforementioned steps, do let us know in the comments. We will get back to you with a solution at the earliest.
Install LineageOS Android 13 ROM on Galaxy S10/S10+/S10 5G/E
First off, make sure to carry out steps 1 to 4 listed above and only then proceed with the below steps.
STEP 1: Install LineageOS Recovery on Samsung Galaxy Tab S5e
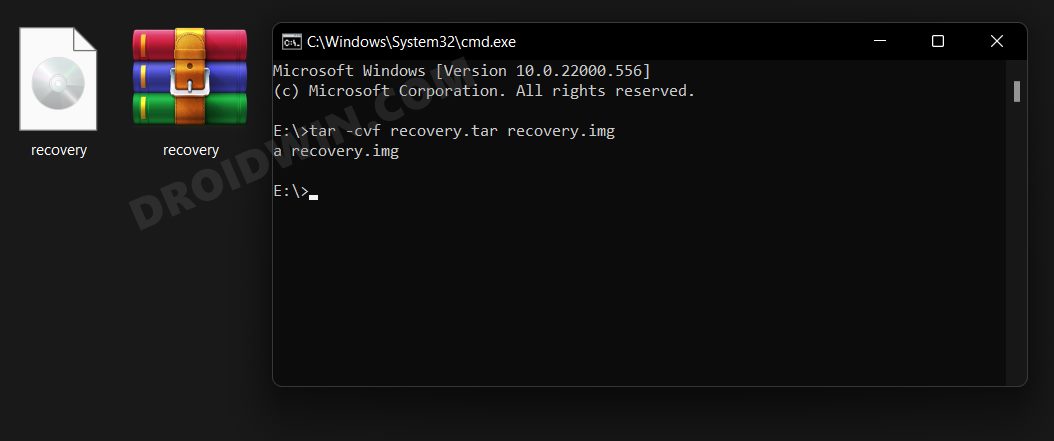
- To begin with, rename the downloaded LineageOS Recovery to recovery.img.
- Then open CMD where the recovery file is present and execute the below command
tar -cvf recovery.tar recovery.img
- This will convert recovery.img to recovery.tar. Once done, boot your device to Download Mode [see STEP 2].
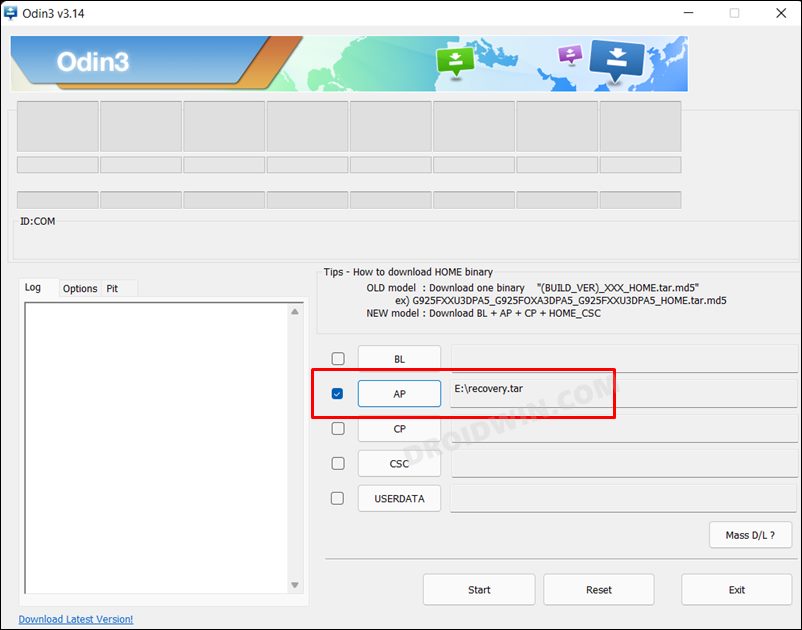
- Now launch Odin, click on AP and load the recovery.tar file.
- Then click Start and wait for the flashing to complete. Once done, you will now have to boot to the recovery.
- For that, power off your device and then press and hold the Power and Volume Up keys for a few seconds.


STEP 2: Install LineageOS 19 on Samsung Galaxy Tab S5e
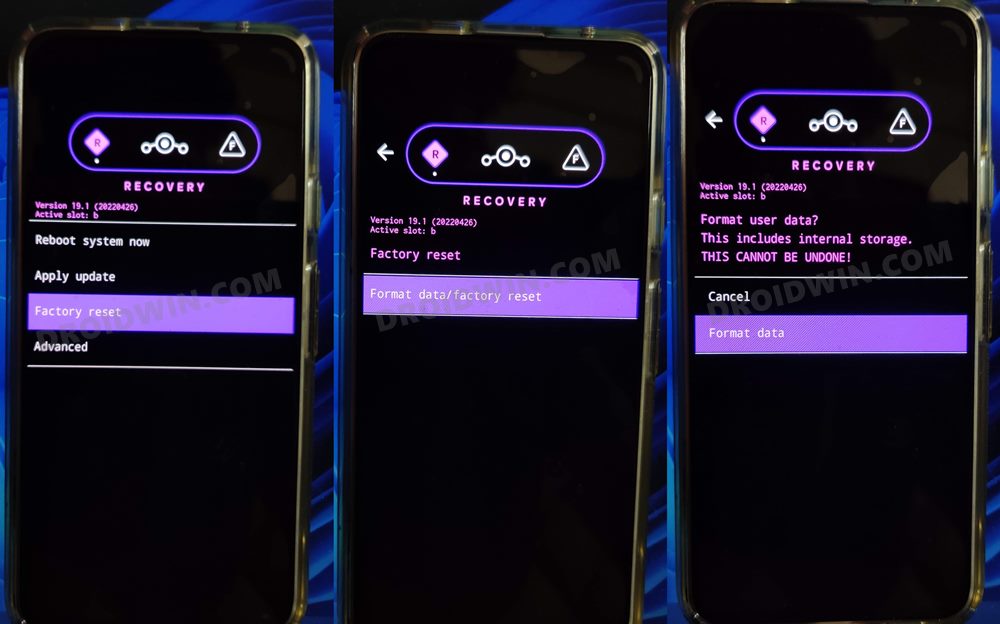
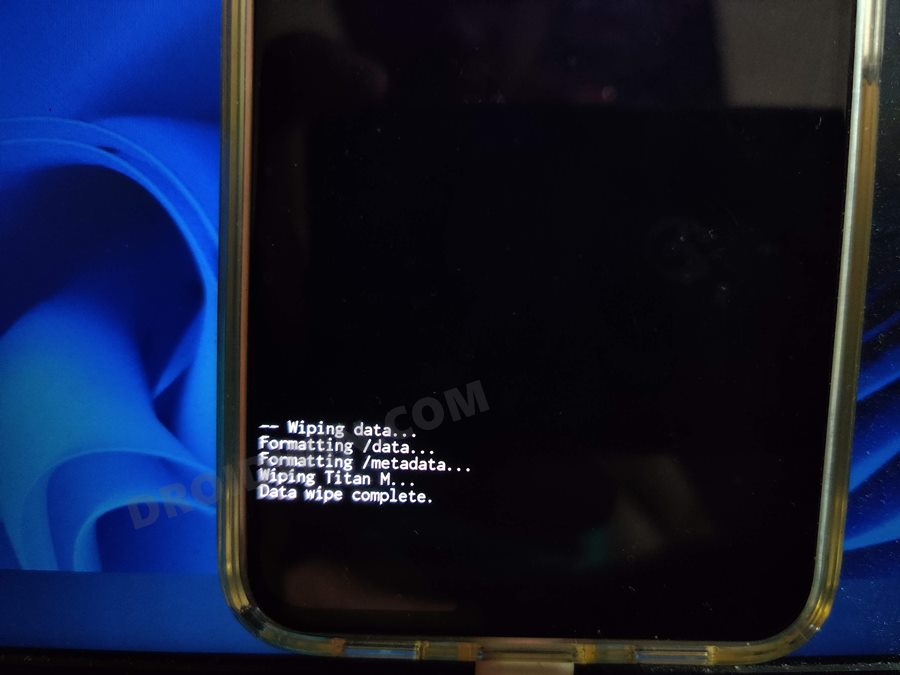
- To begin with, go to Factory Reset > Format Data/Factory Reset > Format Data.
- Your device will now undergo a reset. Once done, you will get the Data Wipe complete message.
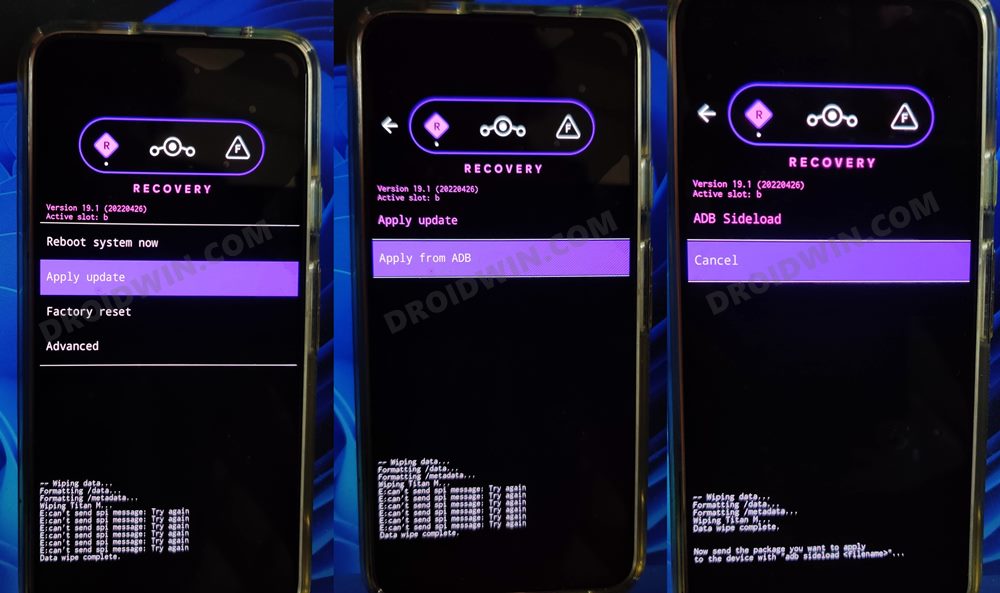
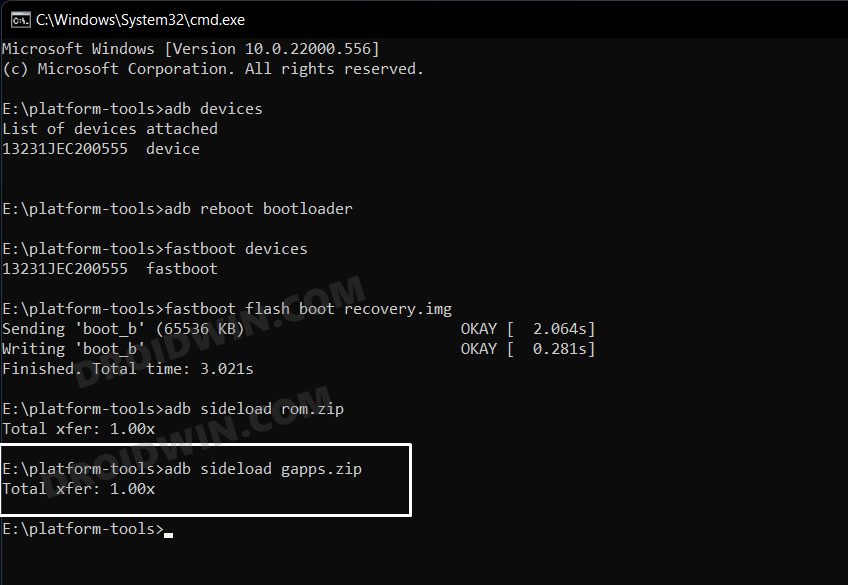
- Now go to the recovery’s home page and select Apply Update > Apply from ADB.
- After that, execute the below command that is opened inside the platform-tools folder.
adb sideload rom.zip
- The ROM will now be flashed. Once done, you will get the Total xfer: 1.00x message.

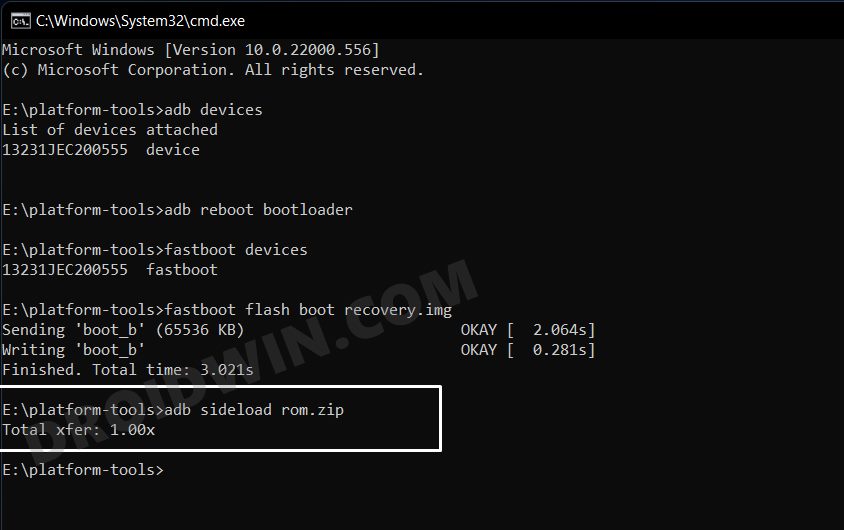
NOTE: In some cases, the process will stop at 47% and report adb: failed to read command: Success. Likewise, it could also report adb: failed to read command: No error or adb: failed to read command: Undefined error: 0. All these messages signify that the flashing has been successfully completed.
STEP 3: Install GApps on Samsung Galaxy Tab S5e
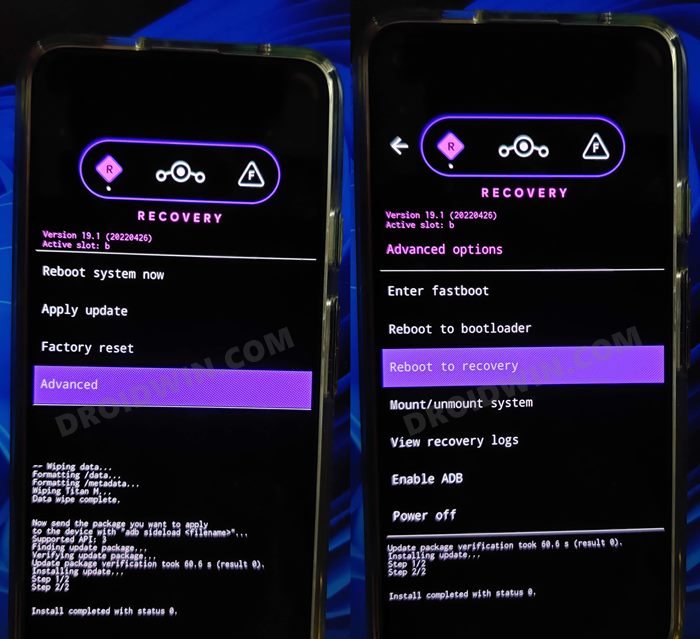
- From the LineageOS recovery, go to Advanced > Reboot to Recovery.
- Once your device reboots to recovery, go to Apply Update > Apply from ADB.
- After that, execute the below command to flash the GApps package
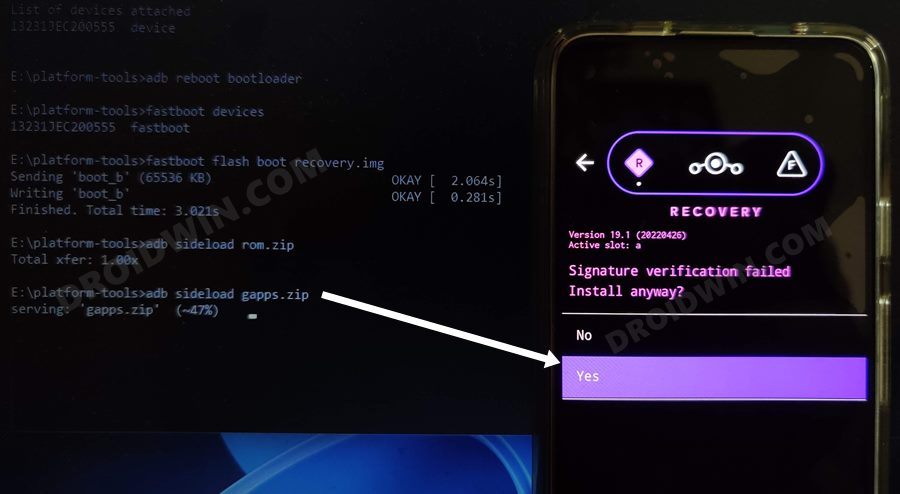
adb sideload gapps.zip
- You might get a signature verification failed message, reply YES [any file that hasn’t been signed by Lineage will throw this error, it is completely normal].
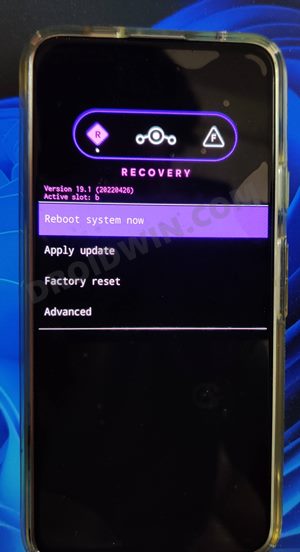
- Once the flashing is complete, go to the recovery home page and select Reboot System Now. Your device will now boot to the newly installed OS.
That’s it. These were the steps to install LineageOS Android 13 ROM on Galaxy S10/S10+/S10 5G/E. If you have any queries concerning the aforementioned steps, do let us know in the comments. We will get back to you with a solution at the earliest.
Install Pixel Extended Android 13 ROM on Galaxy S10/S10+/S10 5G/E
First off, make sure to carry out steps 1 to 4 listed above and only then proceed with the below steps. Moroever, we will be using LineageOS Recovery to install Pixel Extended, so let’s first install this recovery.
STEP 1: Install LineageOS Recovery on Samsung Galaxy Tab S5e
- To begin with, rename the downloaded LineageOS Recovery to recovery.img.
- Then open CMD where the recovery file is present and execute the below command
tar -cvf recovery.tar recovery.img
- This will convert recovery.img to recovery.tar. Once done, boot your device to Download Mode [see STEP 2].
- Now launch Odin, click on AP and load the recovery.tar file.
- Then click Start and wait for the flashing to complete. Once done, you will now have to boot to the recovery.
- For that, power off your device and then press and hold the Power and Volume Up keys for a few seconds.
STEP 2: Install Pixel Extended ROM
- From LineageOS Recovery, go to Factory Reset > Factory Reset & Reset System Partitions.
- Once done, go to Apply update > Choose from SD Card > select the ROM.zip and install it.
- You may reboot the device to the newly installed OS.
That’s it. These were the steps to install Pixel Extended Android 13 ROM on Galaxy S10/S10+/S10 5G/E. If you have any queries concerning the aforementioned steps, do let us know in the comments. We will get back to you with a solution at the earliest.


FlakyJeenyiz
Will this break any future Update functions for Android security, Google apps, Samsung apps, etc?
Daniel
Hi,
To install LineageOS… On your screenshot is a “platform-tools” folder. Where came this from? Odin3 runs without installation, so from where come this “platform-tools” folder to start the adb command?
Regards,
Daniel
Ovidiu
Yess
LUNATIC
Is there a chance of losing my phone ? Or software problems like boot loop ?
FlakyJeenyiz
Good question, dunno why it wasn’t answered… ?
Hugo de Graaf
In your instruction “Install LineageOS Android 13 ROM on Galaxy S10/S10+/S10 5G/E” you mention:
” STEP 1: Install LineageOS Recovery on Samsung Galaxy Tab S5e”
Is this step also valid for Galaxy S10/S10+/S10 5G/E?