In this guide, we will show you the steps to install Android 12 Custom ROM onto your OnePlus Nord device. This Chinese OEM has quite a few devices lined up in its arsenal. Apart from the normal variant, you get the T, Pro, and the T Pro in some instances as well. While these had all the necessary feature sets, yet they didn’t necessarily fit into the budget domain. To address this, OnePlus launched its Nord lineup, and since then there’s been no turning back.
Not only for the general users, but it also has plenty in store for the tech enthusiasts as well, something that’s always embedded in the company’s DNA. Be it for flashing custom ROMs or installing a custom recovery like TWRP, there’s a lot to try out. Along the same line, you could also gain access to the system partition by rooting your device via Magisk. To round it all off, the device has just been blessed with the latest iteration of OS. With that in mind, this guide will show you install Android 12 Custom ROM onto your OnePlus Nord device. Follow along.
Table of Contents
What’s New in Android 12?
Just to recap, the Silicon Valley giants have introduced a plethora of new and interesting features in the twelfth iteration of the OS. These include the massive UI revamp thanks to the Material You design. Likewise, there’s a Wallpaper-based UX Theming that will pick up the major color from the wallpaper and theme it across various device components (such as the Notifications panel and Settings menu). Then there is an addition of the Privacy Dashboard as well.

This will tell you the date and time when an app asked for the location, camera, and microphone permissions. Moreover, there are some new accessibility features as well. These include the likes of Camera Switch that allows you to take full control of your device via your facial gestures. And you could now welcome all these features onto your device. Given here are the detailed instructions to install Android 12 AOSP ROM on the OnePlus Nord.
How to Install Android 12 ROM on OnePlus Nord
Before proceeding with the below steps, make sure to take a backup of all the data on your device. Droidwin and its members wouldn’t be held responsible in case of a thermonuclear war, your alarm doesn’t wake you up, or if anything happens to your device and data by performing the below steps.
STEP 1: Install Android SDK

First and foremost, you will have to install the Android SDK Platform Tools on your PC. This is the official ADB and Fastboot binary provided by Google and is the only recommended one. So download it and then extract it to any convenient location on your PC. Doing so will give you the platform-tools folder, which will be used throughout this guide.
STEP 2: Enable USB Debugging and OEM Unlocking
Next up, you will also have to enable USB Debugging and OEM Unlocking on your device. The former will make your device recognizable by the PC in ADB mode. This will then allow you to boot your device to Fastboot Mode. On the other hand, OEM Unlocking is required to carry out the bootloader unlocking process.
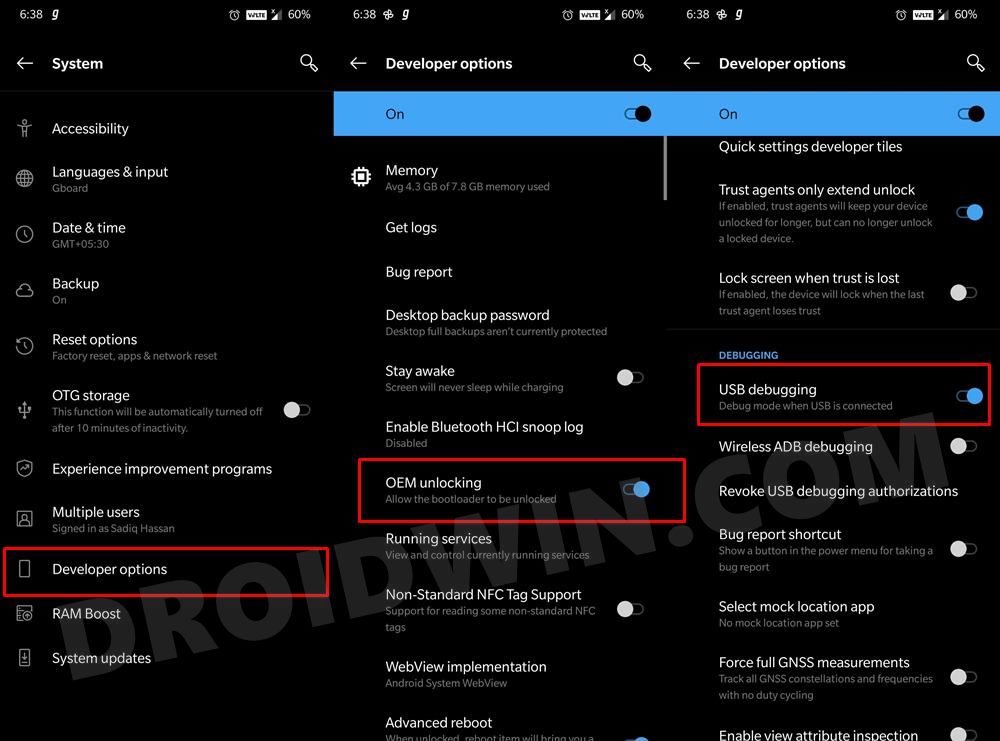
So head over to Settings > About Phone > Tap on Build Number 7 times > Go back to Settings > System > Advanced > Developer Options > Enable USB Debugging and OEM Unlocking.
STEP 3: Unlock Bootloader on OnePlus Nord
Next up, you will also have to unlock the device’s bootloader. Do keep in mind that doing so will wipe off all the data from your device and could nullify its warranty as well. So if that’s all well and good, then please refer to our detailed guide on How to Unlock the Bootloader on OnePlus Nord.
STEP 4: Install TWRP Recovery on OnePlus Nord
In order to flash the Android 12 AOSP Custom ROM onto your OnePlus Nord device, you will have to install the custom recovery. As of now, the TWRP is only in the testing phase. As a result, you will only be able to temporarily boot your device to TWRP but wouldn’t be able to permanently install it. But since this is the only option we have at our disposal, let’s proceed ahead with the steps.
- To begin with, download the TWRP Recovery for OnePlus Nord [Credits: XDA Recognized Developer mauronofrio]: Download Link. [Note: You may also try out the Pixel Experience Recovery if you wish. Download it from here and refer to the below steps (instructions are same)].
- Once downloaded, rename the recovery file to twrp, so that the complete name becomes twrp.img.
- Then transfer this file to the platform-tools folder on your PC.
- Now head over to this folder’s address bar, type in CMD, and hit Enter. It will launch the Command Prompt.

- Connect your device to PC via USB cable and execute the below command in the CMD window to boot your device to Fastboot Mode:
adb reboot bootloader
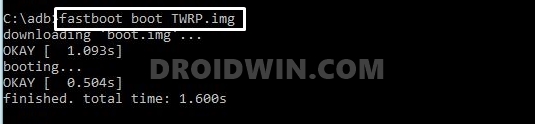
- Now use the below command to flash the TWRP Recovery onto your device:
fastboot boot twrp.img
- Your OnePlus Nord will now boot to TWRP and you may now proceed ahead to install the Android 12 Custom ROM.

STEP 5: Download Android 12 ROM
First off, let’s make you aware of the bugs and the working features of this ROM. Go through them and then make your installation decision accordingly.
What’s working
- Wi-Fi
- RIL
- Mobile data
- GPS
- Camera
- Flashlight
- Camcorder
- Bluetooth
- FM radio
- Fingerprint reader
- NFC
- Lights
- Sound/vibration
Bugs
- SELinux Permissive
Download ROM
You may now grab hold of the latest Android 12 ROM from the below link [Credits: XDA Recognized Developer: kakatkarakshay]
Android 12 Pixel Experience ROM for OnePlus Nord: Download Link
STEP 7: Flash Android 12 ROM on OnePlus Nord
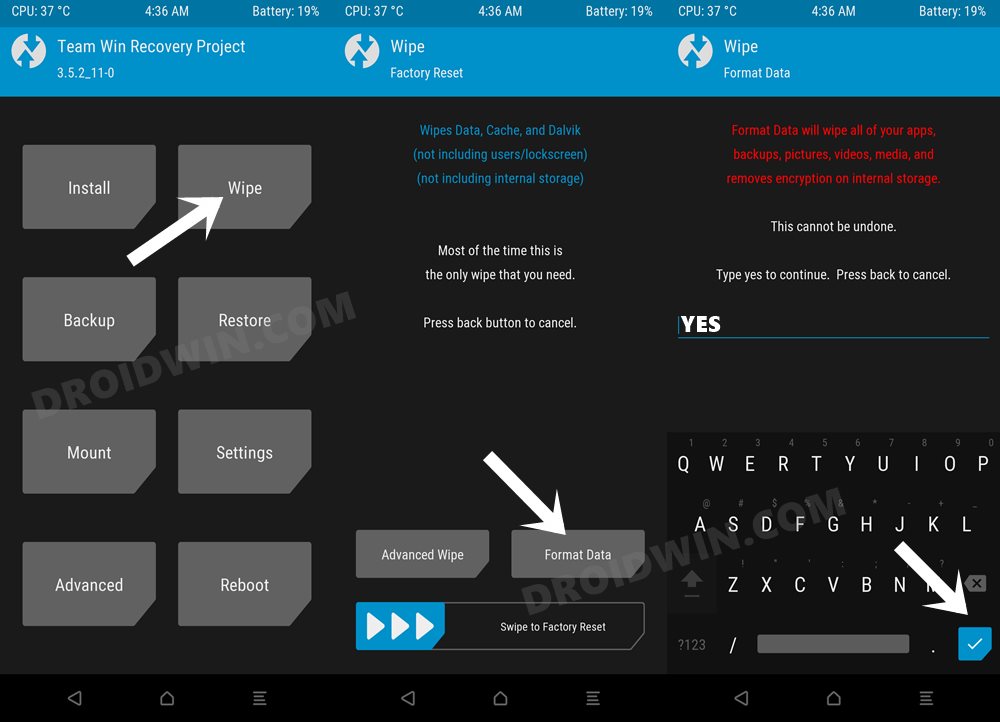
- To begin with, go to the Wipe section of TWRP and tap on the Format Data button.
- Then type in YES in the space provided and tap on the checkmark situated at the bottom right.
- Once that is done, head over to Install and select the Android 12 ROM ZIP file.
- Then perform a right swipe to flash that ROM.
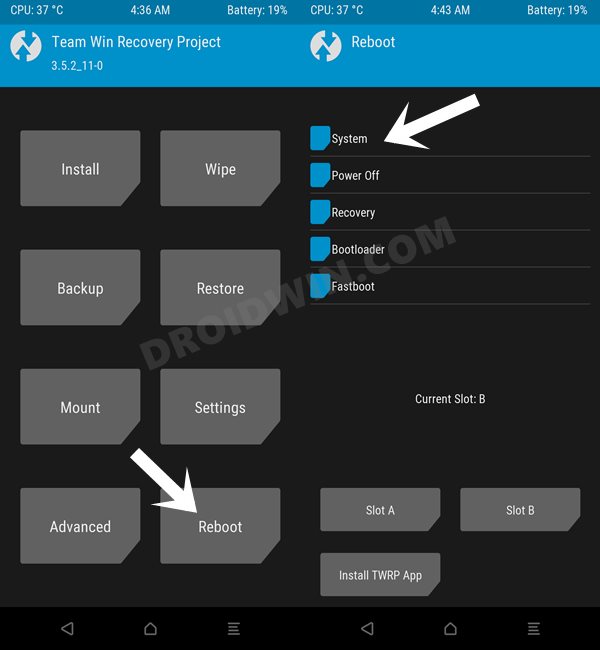
- That’s it. You may now reboot your device to the newly installed OS via Reboot > System.
That’s it. These were the steps to install the Android 12 Custom ROM onto your OnePlus Nord device. If you have any queries concerning the aforementioned steps, do let us know in the comments section. We will get back to you with a solution at the earliest.


