In this guide, we will show you various methods to fix the Hyper-V not working issue on your Windows 11 PC. Developed by Microsoft, Hyper-V is a hardware-based hypervisor that gives you a platform for running multiple instances of different operating systems on your PC. While there already exists quite a few third-party apps in this domain [such as VMWare and Virtual machine], so why was there a need for this one?
Well, since Hyper-V is baked into the system, it gives you a much more optimized and efficient platform to test out the guest OS, which includes the likes of Windows, Ubuntu, and a bunch of other Linux distros. However, in spite of all the goodies that it has to offer, it isn’t free from its fair share of issues either.
Regarding this, most of the issues are being faced by those users who have enabled Hyper-V on their Windows Home edition using the batch file workaround. Anyways, irrespective of the Windows edition, if Hyper-V is not working on your Windows 11 PC as well, then this guide will make you aware of a few nifty workarounds to resolve this issue. Follow along for the fixes.
Table of Contents
Fix Hyper-V not working in Windows 11

It is recommended that you try out each of the below-mentioned workarounds and then see which one spells out success for you. So with that in mind, let’s get started.
FIX 1: Automatic Restart Hyper-V via CMD
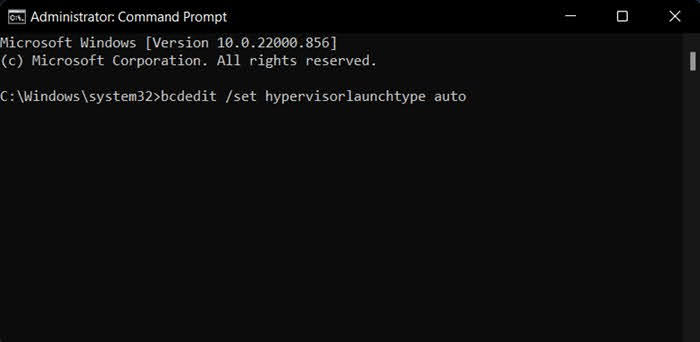
- To begin with, launch Command Prompt as an administrator.
- Then execute the below command to restart Hyper-V
bcdedit /set hypervisorlaunchtype auto
- Check if it fixes Hyper-V not working issue on your Windows 11 PC.
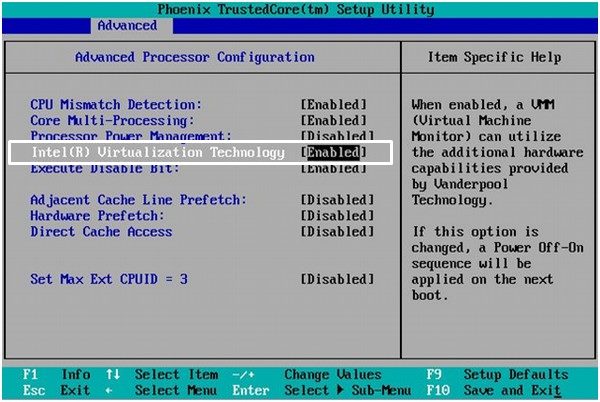
FIX 2: Manually Restart Hyper-V from BIOS
- To begin with, boot your PC to the BIOS.
- Then go to the Advanced/Performance tab and disable Hyper-V
- After that, wait for a few seconds and then re-enable Hyper-V.
- Now save the changes, exit BIOS, and boot your PC to the OS.
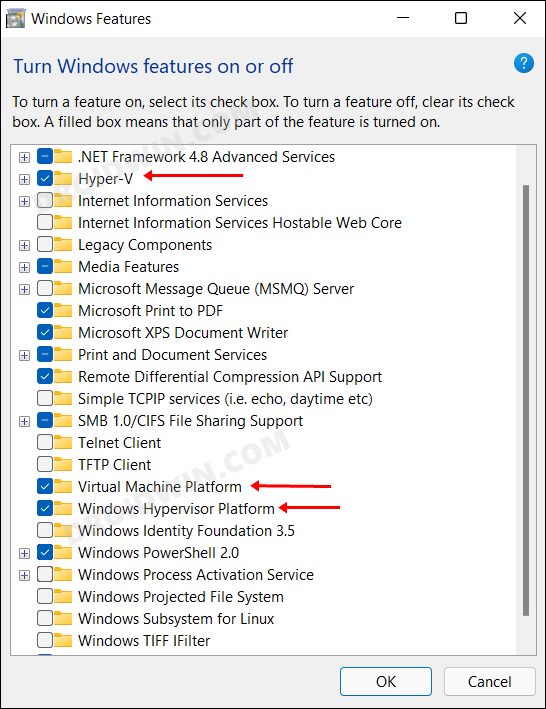
- Then open Run via Windows+R and type in the below command:
optionalfeatures - Now uncheck Hyper-V and hit OK. Then wait for a few seconds, recheck Hyper-V, and click OK.
- Finally, restart your Windows 11 PC and then check if Hyper-V is working now or not.
FIX 3: Restart Hyper-V Service
If Hyper-V background service gets corrupted or isn’t performing along the expected lines, then its direct repercussions will be faced by Hyper-V. Therefore, you should consider restarting its service to resolve this issue. Here’s how it could be done:
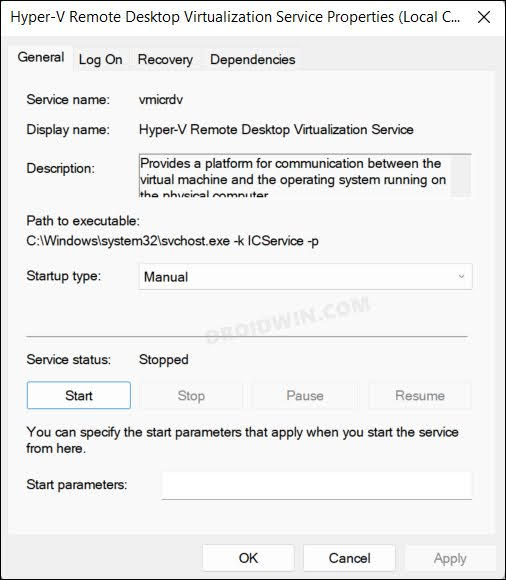
- Bring up Run via Windows+R and type in the below command:
services.msc
- Then open the Hyper-V Virtual Machine Management service.
- Now click on Stop to end this service. Then wait for a few seconds and click on Start.
- Likewise, also restart the Hyper-V Remote Desktop Virtualization service [if present].
- Once done, restart your PC. The underlying issue would now be resolved.

That’s it. These were the three different methods that shall help you fix the Hyper-V not working issue on your Windows 11 PC.


