In this guide, we will show you the steps to update your rooted Android 11 Pixel device to Android 12. The offerings from Google have managed to attract a lot of fanbases in recent years. The clean stock OS experience, coupled with guaranteed three years of OS upgrade and the fact that you would be the earliest adopters of these updates, well, there’s not much left to ask.
Along the same lines, these devices are also quite active in custom development. Right from flashing custom ROMs to installing custom recoveries, there’s a lot to try out. Likewise, you could also gain administrative privileges by rooting your device via Magisk. But what if you have all these tweaks installed and a new OS update is released for your device?
In this regard, there does exist a method through which you could preserve root and upgrade your device. However, that seems to give out a mixed result. Therefore, in this guide, we will be sharing another method with you through which you could easily update your rooted Android 11 Pixel device to Android 12. Follow along for the instructions.
Table of Contents
Update Android 11 with Magisk/TWRP/Custom Kernel to Android 12
This guide has been personally tested on my Pixel 4A that was rooted with Magisk and had a few modules installed. Likewise, the device also had the TWRP Recovery as well as a custom kernel. So you could easily try out this guide on your Pixel device if it
- Is eligible for Android 12 (both the Stable and Beta build), or/and
- Is rooted with Magisk (either by flashing Magisk ZIP via custom recovery or via Magisk patched boot.img), or/and
- Has the TWRP Recovery installed and/or
- Is on a custom kernel.
In short, you could easily try out the below update instructions if you have any one or all the aforementioned tweaks installed on your device. But what if you are on a stock OS with no modifications? Well, then also you could carry out this upgrade process, but it will then require you to unlock the bootloader. This will then format the device and void the warranty.
So a better approach for those users will be to flash the update via ADB Sideload and Stock recovery. As far as the rooted devices are concerned, they would already have their bootloader unlocked, so it wouldn’t be a cause of concern for them. So keeping that in mind, let’s get started with the guide to update your rooted Android 11 Pixel device to Android 12.
How to Update Rooted Android 11 Pixel to Android 12
![]()
Do keep in mind that the process will wipe off all the data from your device. So take a backup beforehand. Along the same lines, you will also lose root and TWRP. While you could easily root your device again after updating it to Android 12, the installation of TWRP solely depends on whether the developer has made the recovery supported on Android 12 or not.
However, during the entire process, the bootloader status will remain unchanged: i.e. it will stay unlocked. Droidwin and its members wouldn’t be held responsible in case of a thermonuclear war, your alarm doesn’t wake you up, or if anything happens to your device and data by performing the below steps.
STEP 1: Install Android SDK

First and foremost, you will have to install the Android SDK Platform Tools on your PC. This is the official ADB and Fastboot binary provided by Google and is the only recommended one. So download it and then extract it to any convenient location on your PC. Doing so will give you the platform-tools folder, which will be used throughout this guide.
STEP 2: Enable USB Debugging
![]()
Next up, you will also have to enable USB Debugging on your device. This will make your device recognizable by the PC in ADB mode, which will then allow you to boot your device to Fastboot Mode. So head over to Settings > About Phone > Tap on Build Number 7 times > Go back to Settings > System > Advanced > Developer Options > Enable USB Debugging.
STEP 3: Download Android 12 Firmware
Next up, download the latest Android 12 firmware for your Pixel device from the below links. Even if you are downloading from any other source, make sure to download the full factory image and not the OTA images.
![]()
- Android 12 Stable Factory Images: Download from Google’s Factory Images Page
- Android 12 Beta 5 Factory Images: Download Beta 5 from below [Source: Google’s Android 12 page]
| Device | Factory Image | |
|---|---|---|
| Google Pixel 3 | Download Link | |
| Google Pixel 3 XL | Download Link | |
| Google Pixel 3a | Download Link | |
| Google Pixel 3a XL | Download Link | |
| Google Pixel 4 | Download Link | |
| Google Pixel 4 XL | Download Link | |
| Google Pixel 4a | Download Link | |
| Google Pixel 4a 5G | Download Link | |
| Google Pixel 5 | Download Link | |
| Google Pixel 5a | Download Link |
STEP 4: Transfer Firmware to ADB Directory
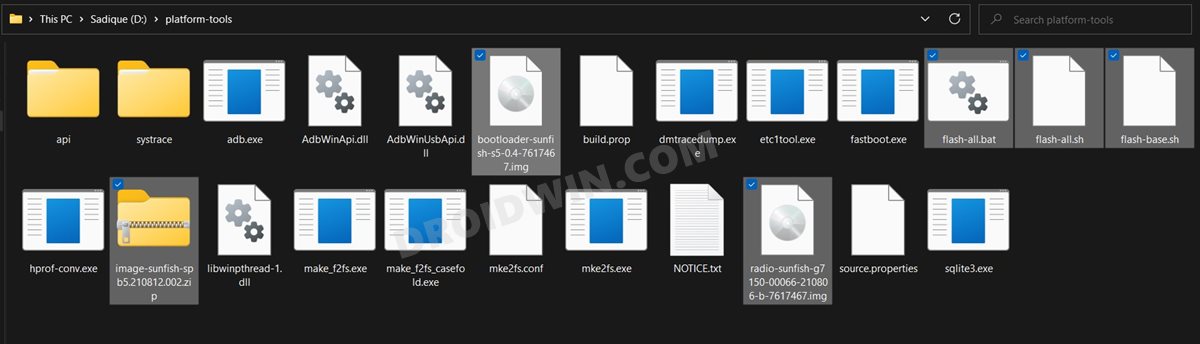
- Once you have downloaded the firmware, extract it to any convenient location on your PC.
- You should now get around 5-6 files, transfer all of them to the platform-tools folder.
- However, do not extract the images.ZIP file, keep it in its compressed state.
STEP 5: Boot to Fastboot Mode
- Now connect your device to the PC via USB cable. Make sure USB Debugging is enabled.
- Then head over to the platform-tools folder, type in CMD in the address bar, and hit Enter. This will launch the Command Prompt.

- Type in the following command in the CMD window to boot your device to Fastboot Mode
adb reboot bootloader
- To verify the Fastboot connection, type in the below command and you should get back the device ID.
fastboot devices

STEP 6: Flash Android 12 Firmware on Rooted Android 11
![]()
Now just double-click on the flash-all.bat file. The flashing process will now begin and could take around 4-5 minutes. During the process, your device will automatically boot to the Fastboot Mode as well as the FastbootD mode. And once the flashing is complete, your device will reboot to the newly installed Android 12.
![]()
STEP 7 [Optional]: Root Android 12 Pixel Device
Once you are done setting up the device, you may now root it via Magisk. For that, please refer to our comprehensive tutorial on How to Root Android 12 via Magisk patched boot.img (without TWRP).
STEP 8 [Optional]: Install TWRP On Android 12 Pixel Device
If you are planning to flash TWRP, then verify from the developers that the said recovery is compatible with Android 12. If it is compatible, then you may refer to our guide on How to Install TWRP Recovery on Android.
That’s it. These were the steps to update your rooted Android 11 device to Android 12. If you have any queries concerning the aforementioned steps, do let us know in the comments. We will get back to you with a solution at the earliest.