In this guide, we will show you the steps to select the server of your choice in Halo Infinite, across both PC and Xbox. The third iteration in the Reclaimer Saga has managed to grab the attention in no time whatsoever. However, all these attentions weren’t for the right reasons. More often than not, a server issue seems to be plaguing this game on a frequent basis. Then the sudden disconnection, frequent lags, and crashes only made the matter worse.
However, nothing comes close to infuriating the users than its weird matchmaking system. Most of the time, you will end up getting a server that is bugged with high pings, sometimes going up to 200+. The fact that the game doesn’t allow you to choose the server of your choice proves to be the final nail in the coffin. Due to this lack of ability to prioritize the matchmaking server region, you’ll have to settle with whatever the game has to offer, which more often than not is pretty laggy.
But thanks to the great work from the gaming community, you now have the option to block all those distant laggy servers and manually select the one of your choice. All that you need to do is just type in the server IPs (in the Host file) of regions that you need to block. The servers that you leave out from the Host Files will be the only servers that would be assigned to your game. Sounds interesting, right? So without any further ado, let’s check out how you could select the server of your choice in Halo Infinite.
Table of Contents
How to Select the Server of your Choice in Halo Infinite on PC

When it comes to PC, there exist two different approaches of carrying out the said task- the automated and the manual method. we have listed both these methods below, along with their perks and drawbacks. Go through them and then try out the one that is in sync with your requirement.
The Automated Method
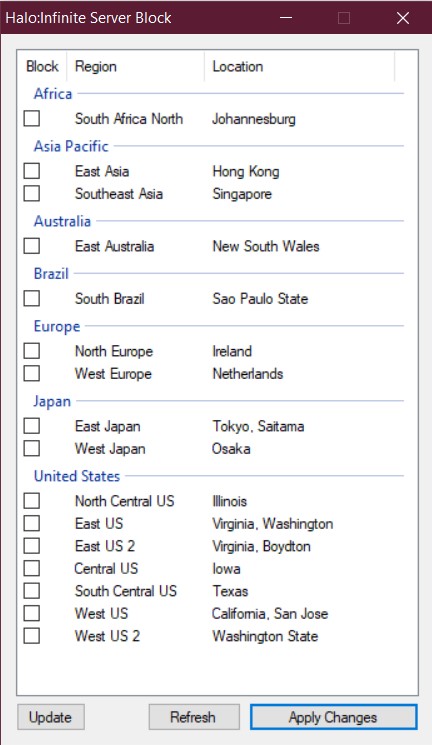
All you need to do is download the Halo Infinite Server Block application from GitHub. Then install it and proceed with the on-screen instructions to use it. The entire process from installing to using it only requires a few clicks, however, there’s an asterisk. Windows Defender might flag this app as a Trojan, though it is more likely a False Positive.
The reason for this false alarm could be the fact that a third-party app is requesting administrator privileges and trying to modify the host file. You could also double-check its entire source code at GitHub and verify that there’s no malicious code. However, if you still have any doubts, then it’s better to try out the manual method listed below.
The Manual Method
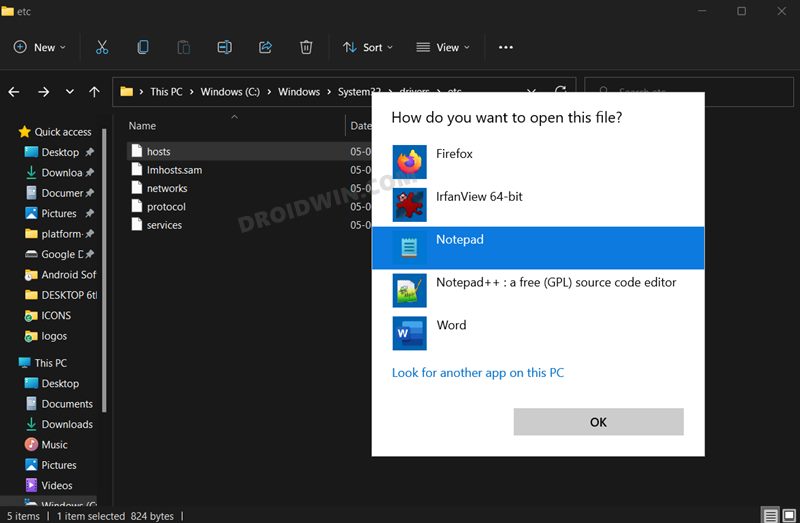
- Bering up the File Explorer via Windows+E shortcut keys. Then head over to the below location:
C:\Windows\System32\drivers\etc
- Now right-click on the Hosts file, select Open With and choose Notepad from the list.

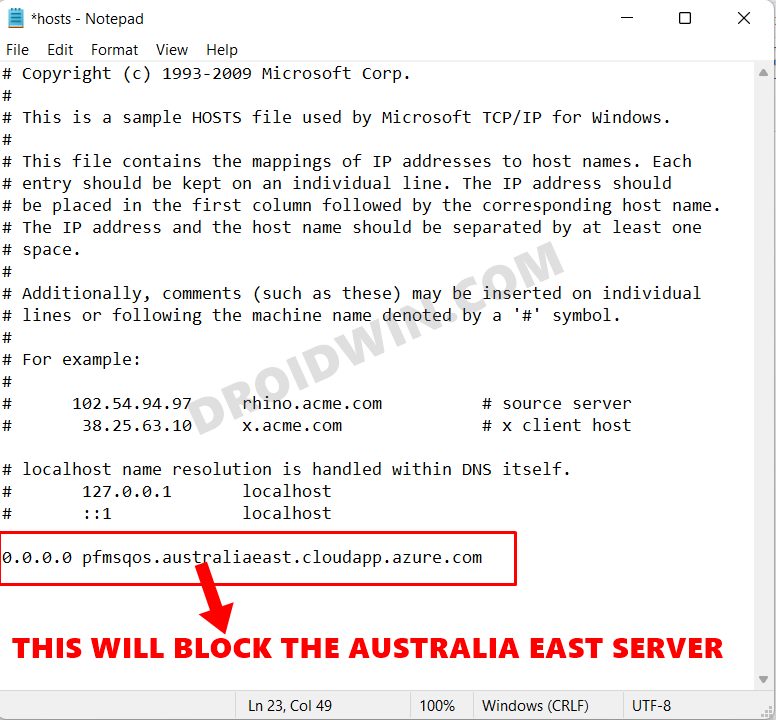
- Now (only) add those server values to the Hosts file from the below list that you need to block.
- The values that you don’t add to the host’s file will be the ones that Halo Infinite will use for online matchmaking.
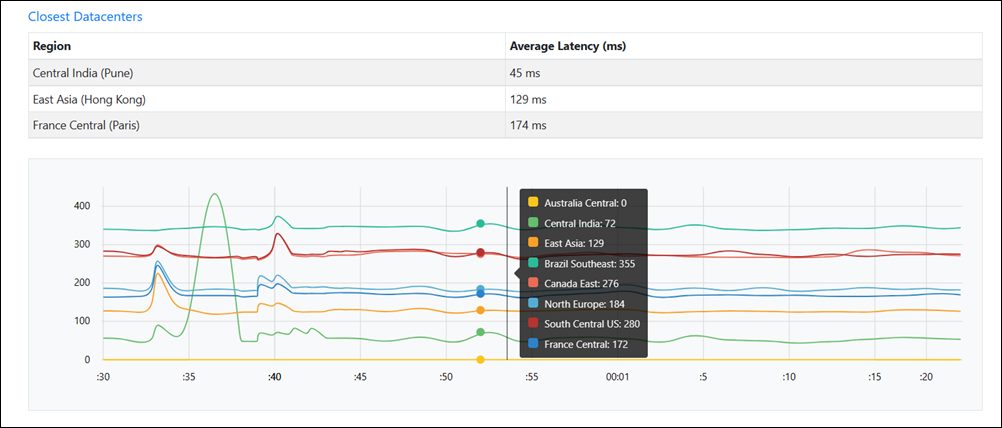
- If you aren’t sure which servers to add to this Host list, then you could also use this website to check out the speed, latency, ping, and other tests for all the available servers. Then you could add the ones that give out poor results to the host file.
0.0.0.0 pfmsqos.australiaeast.cloudapp.azure.com

0.0.0.0 pfmsqos.australiasoutheast.cloudapp.azure.com

0.0.0.0 pfmsqos.southafricanorth.cloudapp.azure.com

0.0.0.0 pfmsqos.westeurope.cloudapp.azure.com

0.0.0.0 pfmsqos.southcentralus.cloudapp.azure.com

0.0.0.0 pfmsqos.japaneast.cloudapp.azure.com

0.0.0.0 pfmsqos.japanwest.cloudapp.azure.com

0.0.0.0 pfmsqos.northeurope.cloudapp.azure.com

0.0.0.0 pfmsqos.westus.cloudapp.azure.com

0.0.0.0 pfmsqos.westus2.cloudapp.azure.com

0.0.0.0 pfmsqos.northcentralus.cloudapp.azure.com

0.0.0.0 pfmsqos.eastus2.cloudapp.azure.com

0.0.0.0 pfmsqos.eastus.cloudapp.azure.com

0.0.0.0 pfmsqos.southeastasia.cloudapp.azure.com

0.0.0.0 pfmsqos.centralus.cloudapp.azure.com

0.0.0.0 pfmsqos.brazilsouth.cloudapp.azure.com

0.0.0.0 pfmsqos.eastasia.cloudapp.azure.com
How to Select the Server of your Choice in Halo Infinite on Xbox
- To begin with, log in to your router’s admin dashboard.
- Then head over to the Static Routing section. Your router might ask for a few values, enter as mentioned below:
Subnet mask: 255.255.255.0 (if that doesn't work, then try 255.255.255.255)
Default Gateway/Gateway IP: Your router's IP address
Destination IP: Select the desired IP address from the below list
Metric: 2
- After that, add the server entries from the below list that you need to block.
- The values that you don’t add will be the ones used by Halo Infinite for online matchmaking purposes.
australiaeast - 20.53.213.241

australiasoutheast - 40.115.72.13

southafricanorth - 102.133.196.95

westeurope - 20.82.62.217

southcentralus - 40.74.160.107

japaneast - 20.89.85.19

japanwest - 104.46.232.223

northeurope - 20.93.96.74

westus - 13.73.33.93

westus2 - 20.99.161.82

northcentralus - 20.98.11.58

eastus2 - 52.184.222.204

eastus - 52.152.253.13

southeastasia - 20.43.154.231

centralus - 20.84.128.18

brazilsouth - 20.201.11.149

eastasia - 13.75.49.198
Complete Halo Infinite Server List
pfmsqos.southafricanorth.cloudapp.azure.com #Johannesburg
pfmsqos.australiaeast.cloudapp.azure.com #New South Wales
pfmsqos.australiasoutheast.cloudapp.azure.com #Victoria
pfmsqos.centralindia.cloudapp.azure.com #Pune
pfmsqos.eastasia.cloudapp.azure.com #Hong Kong
pfmsqos.japaneast.cloudapp.azure.com #Tokyo Saitama
pfmsqos.japanwest.cloudapp.azure.com #Osaka
pfmsqos.koreacentral.cloudapp.azure.com #Seoul
pfmsqos.southeastasia.cloudapp.azure.com #Singapore
pfmsqos.francecentral.cloudapp.azure.com #Paris
pfmsqos.northeurope.cloudapp.azure.com #Ireland
pfmsqos.uksouth.cloudapp.azure.com #London
pfmsqos.westeurope.cloudapp.azure.com #Netherlands
pfmsqos.uaenorth.cloudapp.azure.com #Dubai
pfmsqos.brazilsouth.cloudapp.azure.com #Sao Paulo State
pfmsqos.centralus.cloudapp.azure.com #Iowa
pfmsqos.eastus.cloudapp.azure.com #Virginia
pfmsqos.eastus2.cloudapp.azure.com #Virginia
pfmsqos.northcentralus.cloudapp.azure.com #Illinois
pfmsqos.southcentralus.cloudapp.azure.com #Texas
pfmsqos.westcentralus.cloudapp.azure.com #Wyoming
pfmsqos.westus.cloudapp.azure.com #California
pfmsqos.westus2.cloudapp.azure.com #Washington
With this, we round off the guide on how you could select the server of your choice in Halo Infinite, on both the PC as well as Xbox. All your queries regarding the aforementioned instructions are welcomed in the comments section below.
Credits:
- PC Automated Method: Redditor Haybale100
- PC Manual Method: Redditor Skeetingtons
- Xbox Method: Redditor Skeetingtons
- Complete Server List: Redditor CrimsonBliss-


Felix g
Tried doing this for the Xbox. I had to manually add every single server IP along with all the other info every time. The option to select if it was a WAN or LAN connection came up too.
Anyways, I tried with both 255.255.255.0 and 255.255.255.255 for every server and jumped into a halo ranked game only to still be met with 200+ ping matches.
Any ideas as to why it’s not working??