In this guide, we will show you the steps to root your Pixel device via Magisk patched boot.img running the latest Android 12. There’s a long list of reasons why users are inclined towards the offering from the Silicon Valley giants. For starters, you get a clean and stock OS experience, and probably the best camera quality that any smartphone has to offer. Then the fact that it provides three years of software upgrades really proves to be the icing on the cake. But that’s not it. These sets of devices are quite active in custom development as well.
![]()
Be it for flashing custom ROMs or installing custom recoveries, there’s a lot to try out. Along the same lines, you could also gain access to the system partition by rooting your device via Magisk. This in turn could be done via two different methods- by flashing the Magisk App via TWRP or flashing the Magisk patched boot.img via Fastboot Commands. And in this guide, we will be taking the latter approach. So without further ado, let’s get started with the steps to root your Pixel device via Magisk on Android 12.
Table of Contents
Benefits and Risks of Rooting
Once you have rooted the device via Magisk, you will be in a position to try out a plethora of mods. These include the likes of Magisk Modules, Substratum Themes, Xposed Frameworks, among others. Likewise, you could also flash custom kernels and overclock or underclock the device’s CPU/GPU. However, carrying out these tweaks do bring in a few risks as well.
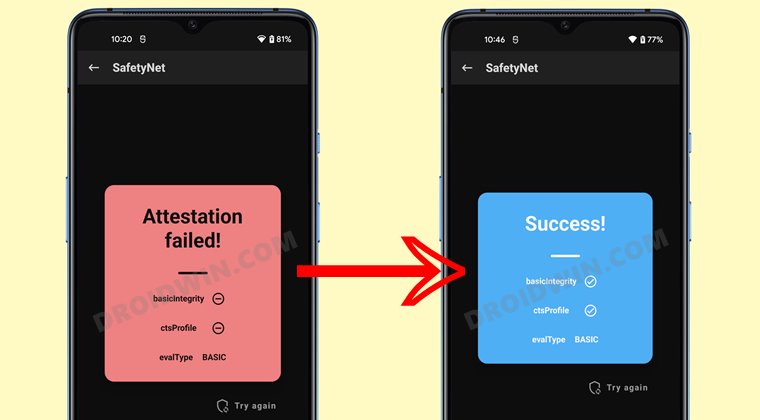
To begin with, you would void your warranty as soon as you unlock the device’s bootloader. And once rooted, the SafetyNet will be triggered. This will result in the inability to try out banking apps and games like Pokemon Go [though this could easily be fixed]. So if that’s well and good, then let’s get started with the steps to root your Pixel device via Magisk on Android 12.
How to Root Pixel Devices via Magisk on Android 12
![]()
The below instructions are listed under separate sections for ease of understanding. Make sure to follow in the exact same sequence as mentioned. Droidwin and its members wouldn’t be held responsible in case of a thermonuclear war, your alarm doesn’t wake you up, or if anything happens to your device and data by performing the below steps.
STEP 1: Install Android SDK

First and foremost, you will have to install the Android SDK Platform Tools on your PC. This is the official ADB and Fastboot binary provided by Google and is the only recommended one. So download it and then extract it to any convenient location on your PC. Doing so will give you the platform-tools folder, which will be used throughout this guide.
STEP 2: Enable USB Debugging and OEM Unlocking
Next up, you will also have to enable USB Debugging and OEM Unlocking on your device. The former will make your device recognizable by the PC in ADB mode. This will then allow you to boot your device to Fastboot Mode. On the other hand, OEM Unlocking is required to carry out the bootloader unlocking process.
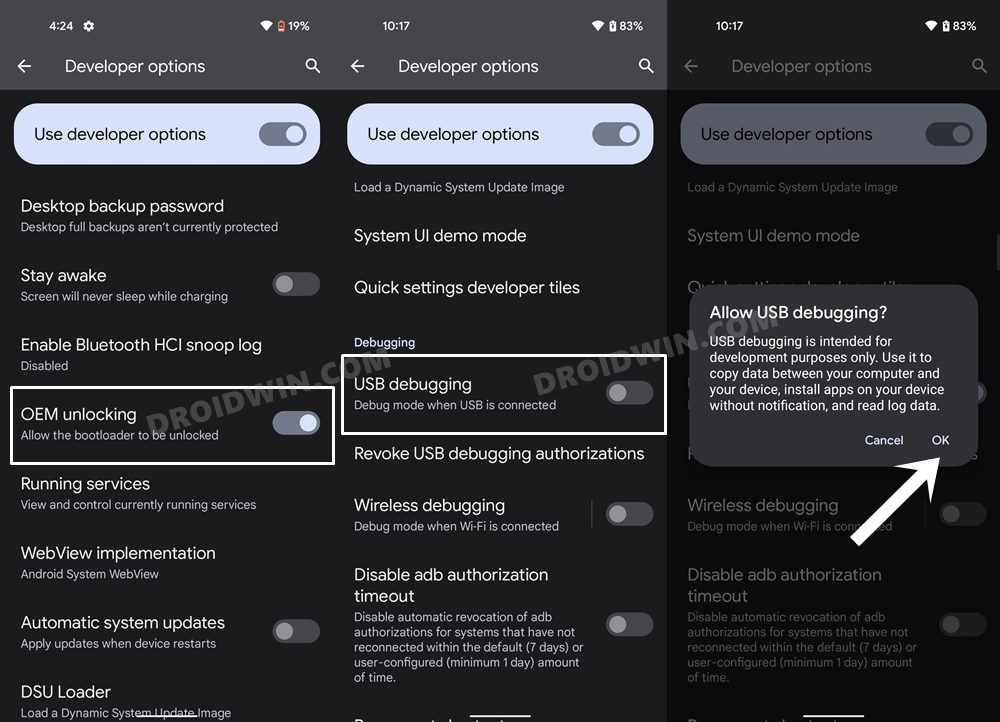
So head over to Settings > About Phone > Tap on Build Number 7 times > Go back to Settings > System > Advanced > Developer Options > Enable USB Debugging and OEM Unlocking.
STEP 3: Unlock Bootloader
Next up, you will also have to unlock the device’s bootloader. Do keep in mind that doing so will wipe off all the data from your device and could nullify its warranty as well. So if that’s all well and good, then please refer to our detailed guide on How to Unlock Bootloader on Google Pixel Devices.
![]()
STEP 4: Get Stock Boot.img
- Next up, get hold of the stock firmware for your Pixel device from the official site: Android 12 Stable | Android 12 Beta
- Make sure to download the same version that is currently installed on your device. To check the same, head over to Settings > About Phone > Build Number.

- Once downloaded, extract it to any convenient location on your PC.
- Then go to the Images folder and you should get the stock boot.img file. Copy it and then transfer it to your device.
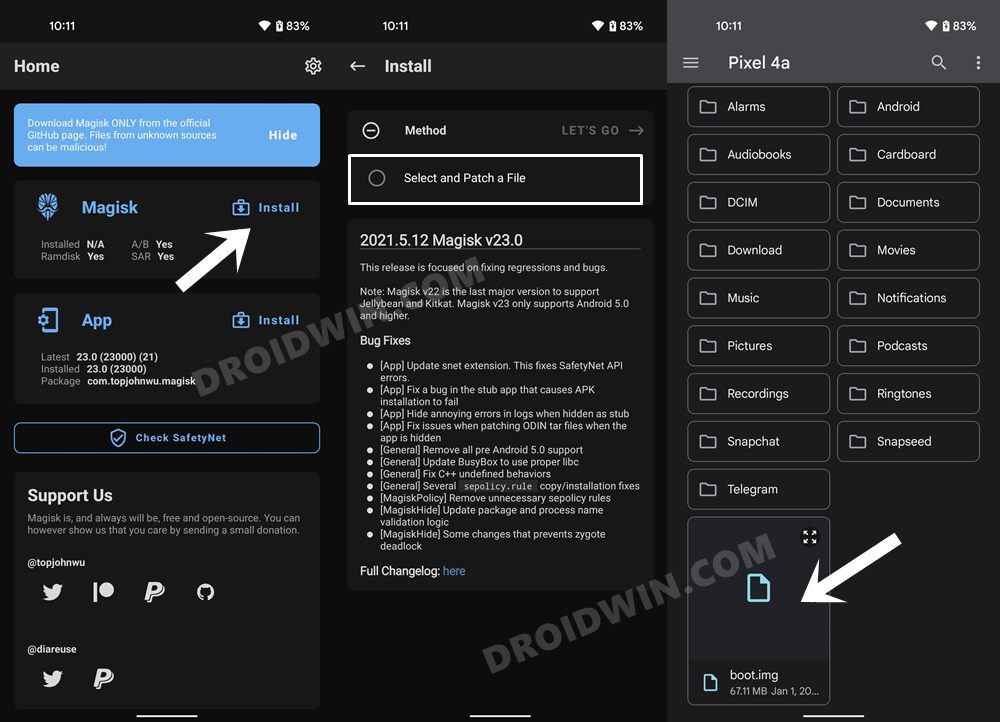
STEP 5: Patch Boot.img via Magisk
- Download and install the Magisk App onto your device.
- Then launch it and tap on the Install button next to Magisk.
- After that, choose ‘Select and Patch a File’, navigate to the stock boot.img file, and select it.
- Then tap on the Let’s Go button situated at the top right.
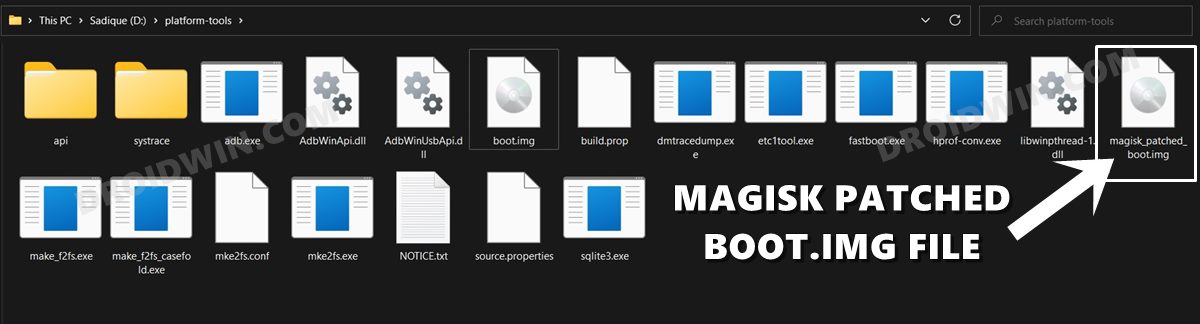
- The boot.img file will now be patched and placed under the Downloads folder on your device. You should transfer this file to the platform-tools folder on your PC.
STEP 6: Boot to Fastboot Mode
- Now connect your device to the PC via USB cable. Make sure USB Debugging is enabled.
- Then head over to the platform-tools folder, type in CMD in the address bar, and hit Enter. This will launch the Command Prompt.
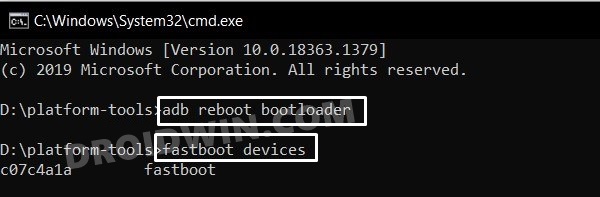
- Type in the following command in the CMD window to boot your device to Fastboot Mode
adb reboot bootloader
- To verify the Fastboot connection, type in the below command and you should get back the device ID.
fastboot devices

STEP 7: Disable AVB and DM Verity
UPDATE 1: Devices till Pixel 4A don’t need to flash the vbmeta file and they may skip over to STEP 8. However, Pixel 4A 5G onwards all the way up to the latest Pixel 6 still requires you to flash the vbmeta.img file by using the below command. If you don’t do so, you will get the “failure to load/verify boot images” error message.
- So head over to the extracted firmware folder and you should find a vbmeta.img file. Transfer it to the platform-tools folder on your PC.
- Now type in the following command in this CMD window that you have opened inside the platform-tools:
fastboot flash --disable-verity --disable-verification vbmeta vbmeta.img
As soon as you execute the above command, AVB and DM Verity would be disabled. You may now proceed ahead with the final step to root your Android 12 device via Magisk patched boot.img.
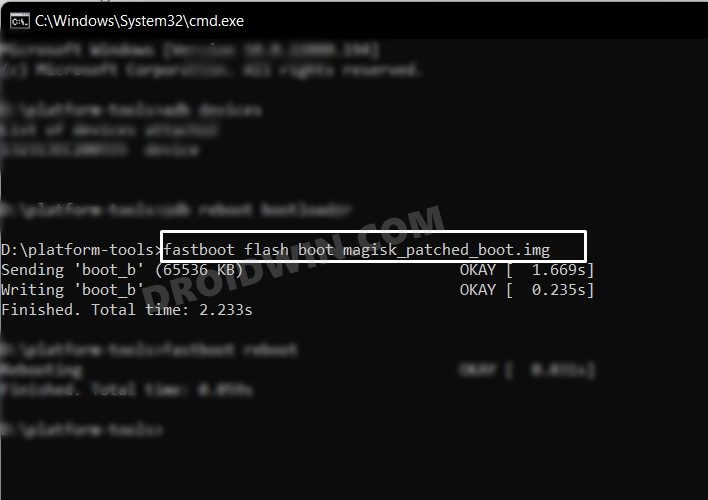
STEP 8A: Flash Magisk Patched Boot.img [For Devices Till Pixel 4A]
These steps are applicable for devices up to Pixel 4A. From Pixel 4a5G all the way up to the latest Pixel 6 series, you should check out STEP 9B.
- To begin with, make sure that you have transferred the magisk_patched.img file to the platform-tools folder.
- Now type in the below command in the CMD window (that is opened inside the platform-tools folder) to flash the Magisk Patched file:
fastboot flash boot magisk_patched.img
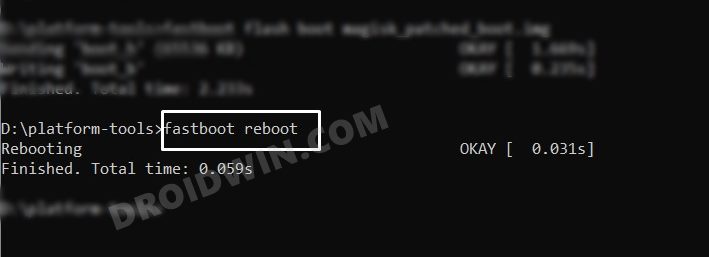
- Once that is done, reboot your device to the OS via the following command:
fastboot reboot
STEP 8B: Boot via Magisk Patched Boot.img [For Pixel 4A 5G, 5, 5A, and 6]
Beginning with Pixel 4a 5g till the latest Pixel 6 series, you cannot directly flash the boot.img file. If you end up doing so, then you will get the “Can’t load Android system. Your data may be corrupted” error message. To avoid this from happening, you will first have to boot your device via the Magisk patched boot.img and then use Magisk’s Direct Install Method.
fastboot boot magisk_patched.img
Your device will now boot to the OS with a temporary root. To make it permanent, launch the Magisk Manager App and tap on Install > Direct Install. Once done, reboot your device and it will be permanently rooted.
![]()
That’s it, the process stands complete. You have now successfully rooted your Pixel device via Magisk running Android 12. Now go ahead and bypass the SafetyNet or dig deep into the ocean of customizations. On that note, we round off this guide. All your queries are welcomed in the comments section below. And here are some other Pixel/Android 12 articles that deserve your attention:
- How to Pass SafetyNet on Rooted Android 12
- Bring Back the WiFi toggle in Quick Settings on Android 12
- How to Update Rooted Android 11 Pixel to Android 12
- Rollback Bricked Pixel 3/4/5 from Android 12 Beta to Android 11 on Locked Bootloader
- How to Downgrade Pixel From Android 12 to Android 11 using Android Flash Tool


huvanile
step 8a talks about step 9b. it’s a typo that should instead say “8b”.
Domcruz
Followed steps for pixel4a5G, right up to the last step, got a note that says missing cmdline or OS version. Wondering how to fix this:
C:\platform-tools>fastboot boot magisk_patched-23000_zv9xi.img
Sending ‘boot.img’ (98304 KB) OKAY [ 2.409s]
Booting (bootloader) boot.img missing cmdline or OS version
V0latyle
Please remove the instructions regarding vbmeta. Magisk Canary 23016 eliminates the need to disable verity/verification, and the 765G/Tensor devices can be rooted as all Pixels before.