In this guide, we will show you the steps to manually change the refresh rate and display resolution on any Xperia device. Many OEMs, including the likes of Samsung, OenPlus, and even Pixel, give granular control to the user so that they could choose the resolution and rate according to their need.
But Sony, on the other hand, doesn’t have such a provision. It tends to automatically set both these settings to what it deems fit according to the current app that you are using or the task that you are executing on your Android device. While it does work well under certain instances but not all.
Moroever, a user should always have their say when implementing these settings. But while that is not the case by default way, you could still manually change the refresh rate and display resolution on your Xperia device with the help of a nifty workaround. And in this guide, we will show you how to do just that. Follow along.
Table of Contents
How to Manually Change the Refresh Rate & Resolution on any Xperia
There exist two different methods to get this job done- root and non-root and have discussed both of them below. You may refer to the one that is in sync with your requirement.
Non-Root Method
- To begin with, download and extract Android SDK Platform Tools on your PC.

- Then enable USB Debugging on your device and connect it to your PC via a USB cable.
- Now type in CMD in the platform-tools folder address bar and hit Enter. This will launch Command Prompt.
- Then type in the below command and hit Enter. You will get a prompt on your device, tap Allow/OK.
adb shell
- Now execute the below command, where x= 0, 1, 2, or 3. Their values are given below as well
service call SurfaceFlinger 1035 i32 x

x= 0 1096x2560x60Hz
x= 1 1644x3840x120Hz
x= 2 1644x3840x60Hz
x= 3 1096x2560x120Hz
- The first two are the resolution whereas the third one is the refresh rate. So in the case of x=2, the resolution will be set to 1644×3840, and the refresh rate at 120Hz.
Root Method
- To begin with, root your device via Magisk if you haven’t done so.
- Then download the Force 4K 120hz mod [Credits: Senior Member pandemic].
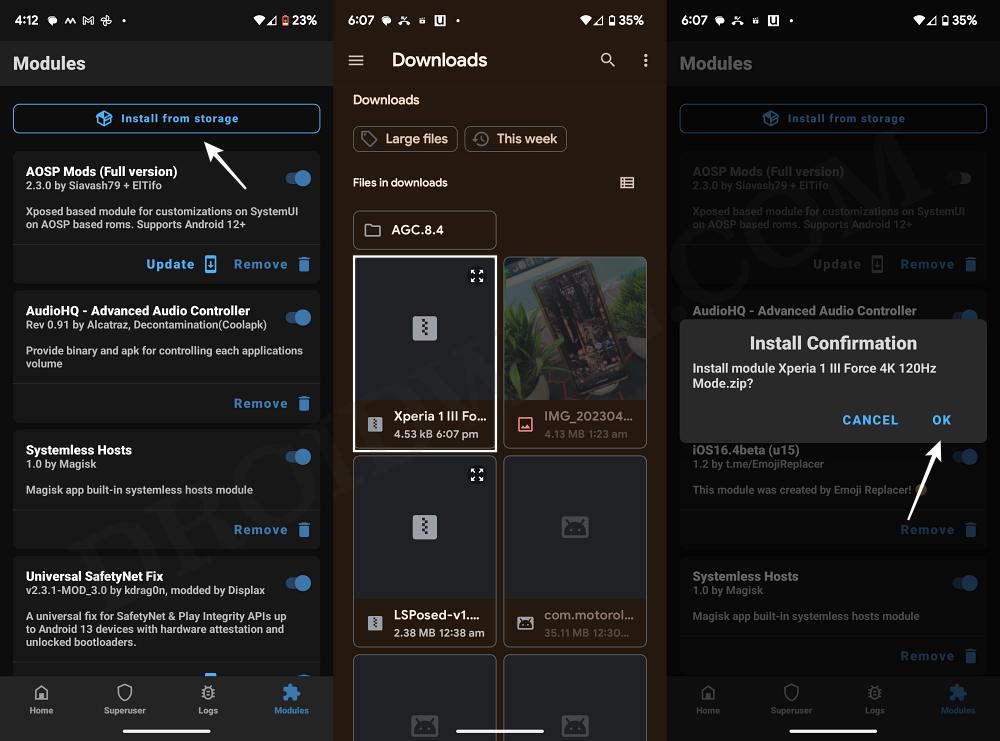
- Now launch Magisk, go to the Modules section, and tap on Install from Storage.
- Now select the mod ZIP file and tap OK in the confirmation prompt to flash it.
- Once done, hit Reboot. Your device will now reboot and the task stands complete.
That’s it. These were the two different methods to manually change the refresh rate and display resolution on your Xperia device. If you have any queries concerning the aforementioned steps, do let us know in the comments. We will get back to you with a solution at the earliest.


