In this guide, we will show you the steps to install OTA updates on your rooted OnePlus 10 Pro. The OEM has been in some turbulence as of late, mostly due to its decision to ditch the ColorOS in favor of its in-house OxygenOS. However, in spite of all those fiasco, there is no denying the fact that its devices are the most developer-friendly out there, thanks in large parts to the underlying Qualcomm chipset [for EDL Mode] and the MSM Tool that allows us to easily unbrick the device by flashing the OFP firmware.
Talking about custom development, it’s the ability to gain administrative privileges that have always been at the top of the priority queue for many users. However, the major issue arises when an update is about to arrive. While you might still get an OTA, you wouldn’t be able to install it the conventional way as it might lead to bootloop or softbrick. So what is the right way out? Well, we will be using your device’s inactive slot to get this job done. So without any further ado, let’s get started with the steps to install OTA updates on your rooted OnePlus 10 Pro.
Table of Contents
How to Install OTA on Rooted OnePlus 10 Pro

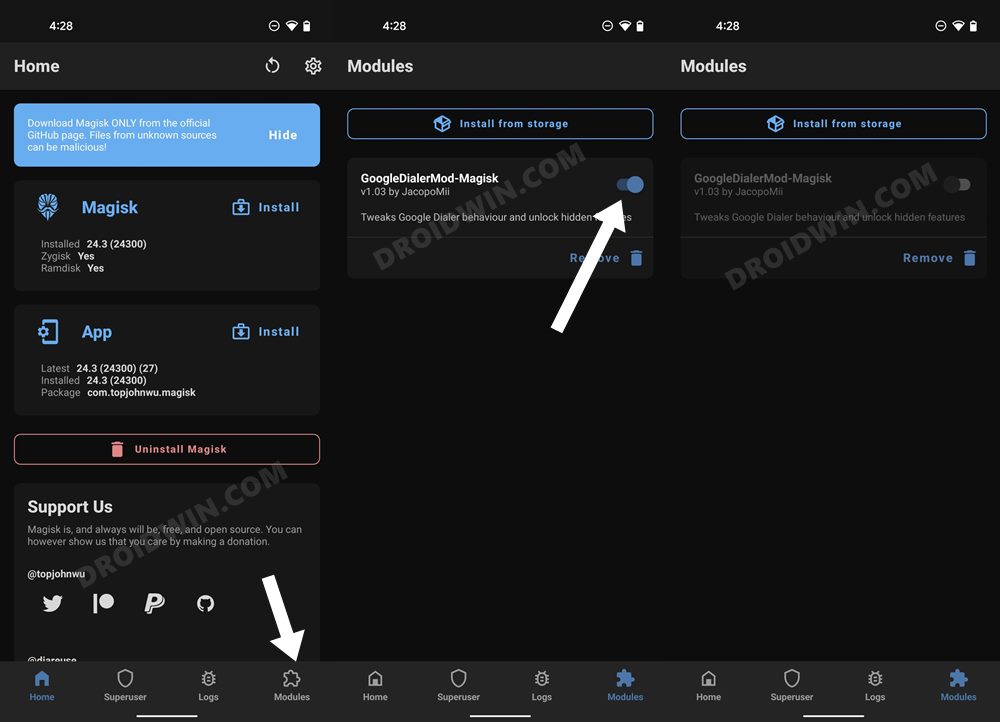
Droidwin and its members wouldn’t be held responsible in case of a thermonuclear war, your alarm doesn’t wake you up, or if anything happens to your device and data by performing the below steps. While the process won’t wipe the data on your device, it is still recommended to take a backup beforehand. Moreover, before starting, make sure to disable all the modules installed on your device. Here’s how it could be done-
- Launch the Magisk app and go to the Modules section.
- Then disable the toggle next to each of the modules.
- Finally, restart the device for the changes to take place.

METHOD 1: With Full OTA Access
- To begin with, go to Settings > System > System Update
- Then download the OTA update that has arrived.
Reference Image - Once downloaded, do not reboot your device.
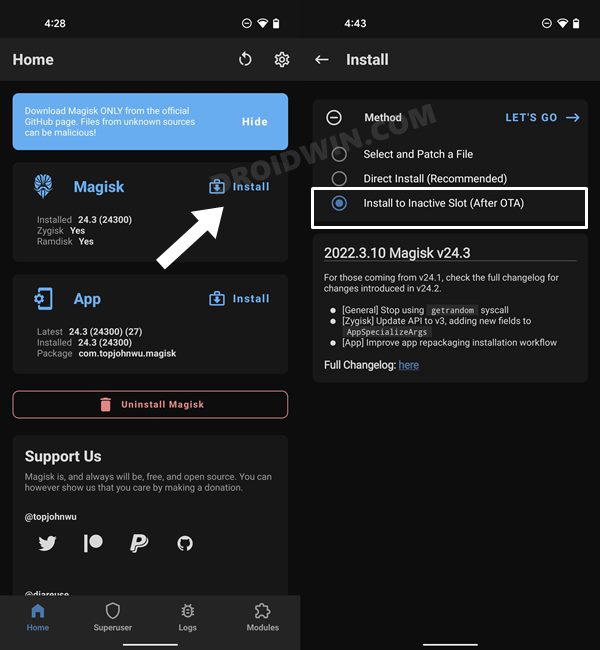
- Now launch the Magisk App and tap on Install next to Magisk.
- After that, select Install to Inactive Slot [After OTA].
- Then tap on the Let’s Go and wait for the process to complete.
- Once done, hit the Reboot Now button. That’s it.
- Your rooted device will now boot to the newly updated OS.

METHOD 2: With Incremental OTA Access
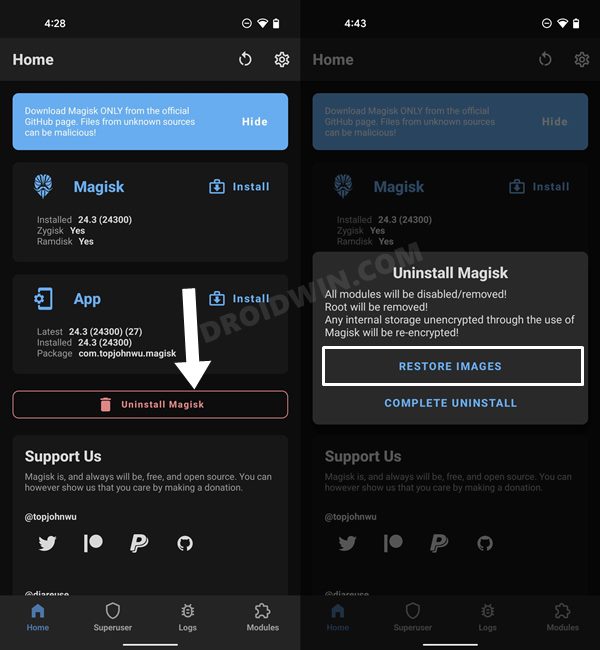
- Launch the Magisk app, tap on Uninstall Magisk and choose Restore Images.
- Magisk will now restore the stock boot.img file that it had backed up during the rooting process.
- Once done, go to Settings > System > System Update and download the OTA update that has arrived.
Reference Image - Once downloaded, do not reboot your device. Rather, launch the Magisk App.
- Then tap on Install next to Magisk. After that, select Install to Inactive Slot [After OTA].
- Finally, tap on Let’s Go and wait for the process to complete. Once done, hit Reboot Now.
- Your device will now boot to the newly updated OS, with the root being persevered.
That’s it. These were the steps to install OTA updates on your rooted OnePlus 10 Pro. If you have any queries concerning the aforementioned steps, do let us know in the comments. We will get back to you with a solution at the earliest.