In this guide, we will show you the steps to flash the Kirisakura custom kernel onto the Google Pixel 6/Pro devices. The sixth iteration of the Pixel devices has bought in a plethora of ‘firsts’. These include the Tensor chipset, an in-display fingerprint sensor, and some exclusive goodies such as the Magic Eraser. Apart from that, it has also carried forward the legacy of older Pixel devices when it comes to custom development. So you are now just a few commands away from rooting your device by patching and flashing the boot.img.
Well, the device has now even been blessed with a custom kernel. As a result, overclocking or underclocking CPU, flashing TWRP that requires LMZ Ramdisk support, or tweaking the CPU Governor profiles are just a few taps away. And as of now, you could welcome all these features onto your device as well. Given here are the detailed instructions to install the Kirisakura custom kernel onto the Google Pixel 6/Pro devices. Follow along.
Table of Contents
Features of Kirisakura Custom Kernel for your Google Pixel 6/Pro
![]()
- Based on the latest kernel sources from Google, Kernel is made for Android 12
- Linux-Stable-Upstream included to 5.10.45
- Use BBR as default TCP congestion algorithm
- Enable support for TTL spoofing
- Include LRNG, see here and here for more info
- Important patches from kernel/common for 5.10
- PowerHint Module: Restrict little cluster to 1,4ghz, mid cluster to 1,49ghz, and big cluster to 1,58ghz during screen off, to reduce battery usage for example during music playback.
Now that’s out of the way, let’s get started with the steps to install the Kirisakura custom kernel onto the Google Pixel 6/Pro devices. Follow along.
How to Flash Custom Kernel on Google Pixel 6/Pro
The below instructions are listed under separate sections for ease of understanding. Make sure to follow in the exact same sequence as mentioned. Droidwin and its members wouldn’t be held responsible in case of a thermonuclear war, your alarm doesn’t wake you up, or if anything happens to your device and data by performing the below steps.
STEP 1: Install Android SDK

First and foremost, you will have to install the Android SDK Platform Tools on your PC. This is the official ADB and Fastboot binary provided by Google and is the only recommended one. So download it and then extract it to any convenient location on your PC. Doing so will give you the platform-tools folder, which will be used throughout this guide.
STEP 2: Enable USB Debugging and OEM Unlocking
Next up, you will also have to enable USB Debugging and OEM Unlocking on your device. The former will make your device recognizable by the PC in ADB mode. This will then allow you to boot your device to Fastboot Mode. On the other hand, OEM Unlocking is required to carry out the bootloader unlocking process.
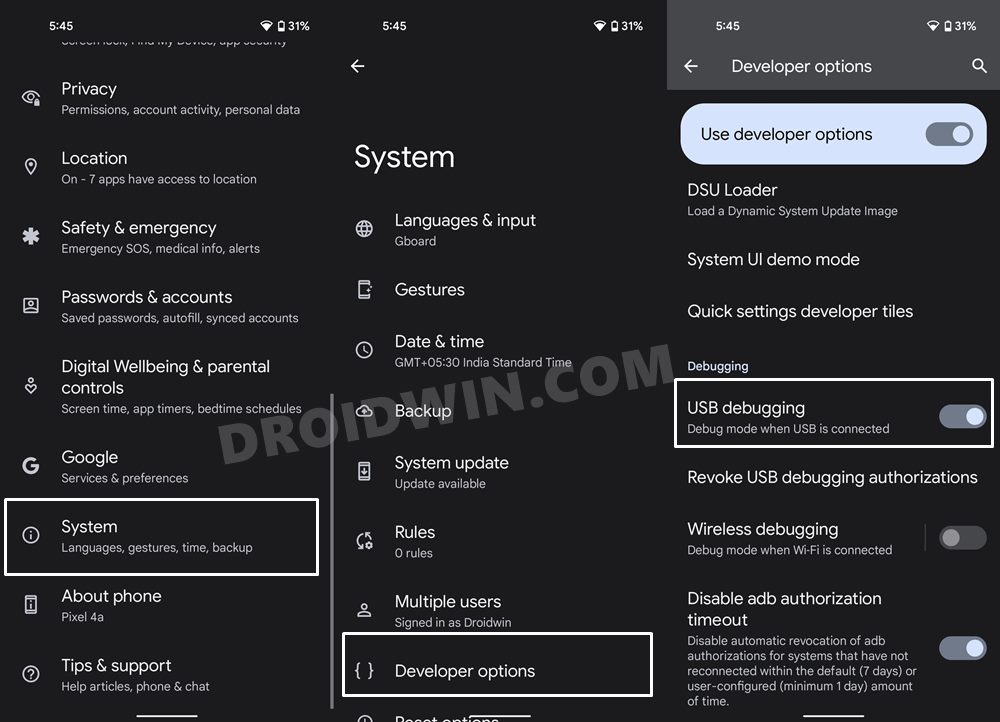
So head over to Settings > About Phone > Tap on Build Number 7 times > Go back to Settings > System > Advanced > Developer Options > Enable USB Debugging and OEM Unlocking.
STEP 3: Unlock Pixel 6/Pro Bootloader
Next up, you will also have to unlock the device’s bootloader. Do keep in mind that doing so will wipe off all the data from your device and could nullify its warranty as well. So if that’s all well and good, then please refer to our detailed guide on How to Unlock Bootloader on Google Pixel 6/6 Pro.
STEP 4: Root Pixel 6/Pro and Disable Verified Boot
You will also have to root your device via the Magisk patched boot.img file. After that, you will have to disable the verity check by flashing the vbmeta file and using the verity flags in the commands. All this has been explained in our in-depth guide, do check it out: How to Root Google Pixel 6 via Magisk Patched Boot.img.
STEP 5: Download Kirisakura Custom Kernel for Pixel 6/Pro
- You may now grab hold of the custom kernel for your device from the below link: (it is a unified build for both these devices)
Custom Kernel: Download Link
- Inside the custom kernel package, there will be three files: boot.img, dtbo.img and vendord_lkm.img. Transfer all these three files to the platform-tools folder on your PC.
- Furthermore, the attached boot.img file in the kernel is the stock one, so upon flashing it, you will lose root. If you wish to retain root on this custom kernel, then first patch it via Magisk, then rename it to boot.img and transfer it to the platform-tools folder on your PC.
- If you want a few additional goodies as well, then also download the PowerHint Module from the below link:
PowerHint Module: Download Link
STEP 6: Flash PowerHint Module
- First off, transfer the PowerHint Module onto your device.
- The launch the Magisk App, go to the Modules section and tap on Install from Storage.

- Now select the PowerHint Module and it will then be subsequently flashed onto your device.
- Once that is done, reboot your device for the kernel module to be active.
STEP 7: Boot to FastbootD Mode
- Connect your device to the PC via USB cable. Make sure USB Debugging is enabled.
- Then head over to the platform-tools folder, type in CMD in the address bar, and hit Enter. This will launch the Command Prompt.
- Type in the following command in the CMD window to boot your device to Fastboot Mode
adb reboot bootloader
- Now that your device is booted to Fastboot, execute the below command to boot it to the FastbootD Mode:
fastboot reboot fastboot

STEP 8: Flash Kirisakura Custom Kernel on Google Pixel 6/Pro
- First off, execute the below command to flash the vendor_dlkm file:
fastboot flash vendor_dlkm vendor_dlkm.img
- Now boot your device to the Fastboot Mode via the below command:
fastboot reboot bootloader
- After that, execute the following command to flash the dtbo file:
fastboot flash dtbo dtbo.img
- Finally, use the below command to flash the boot file:
fastboot flash boot boot.img
- That’s it, you may now reboot the device to the OS via the below command:
fastboot reboot
So with this, we round off the guide on how you could flash the Kirisakura custom kernel onto the Google Pixel 6/Pro devices. If you have any queries concerning the aforementioned steps, do let us know in the comments. We will get back to you with a solution at the earliest.


